Moroccan Chicken Tagine Flavorful and Easy Recipe

Are you ready to dive into the rich flavors of Moroccan cuisine? This Moroccan Chicken Tagine recipe is both simple and delightfully tasty. With tender chicken, warm spices, and colorful ingredients, you’ll impress everyone at the dinner table. I’ll guide you through each step, sharing tips and tricks for perfect results. Let’s bring a little North Africa to your kitchen!
Why I Love This Recipe
- Bold Flavors: This tagine is a stunning blend of spices that brings the warmth of Moroccan cuisine to your table.
- One-Pot Wonder: Cooking everything in one pot means less cleanup and more time to enjoy your meal with family and friends.
- Customizable: You can easily adjust the spices and add your favorite ingredients to make it your own.
- Perfect for Sharing: The vibrant colors and flavors make it a visually appealing dish that’s perfect for gatherings.
Ingredients
Main Ingredients for Moroccan Chicken Tagine
For this dish, you need the following main ingredients:
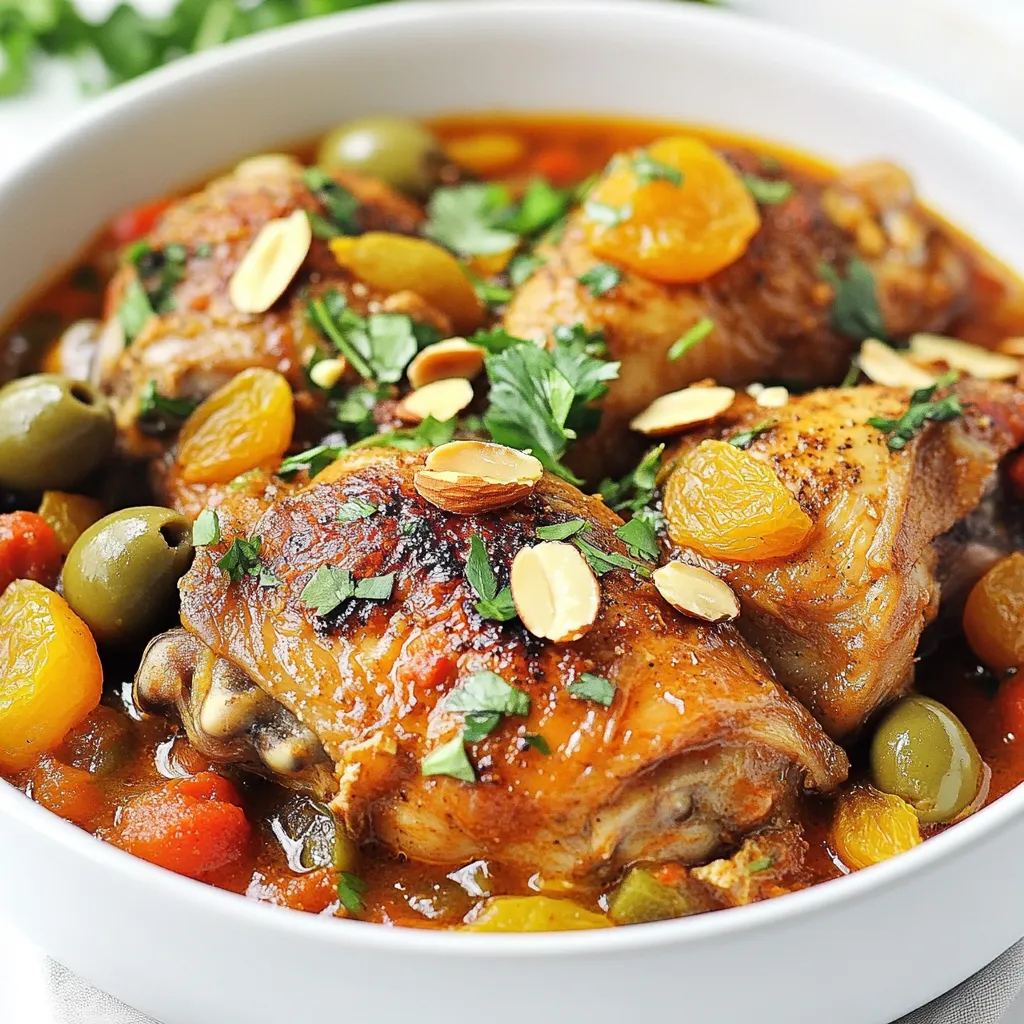
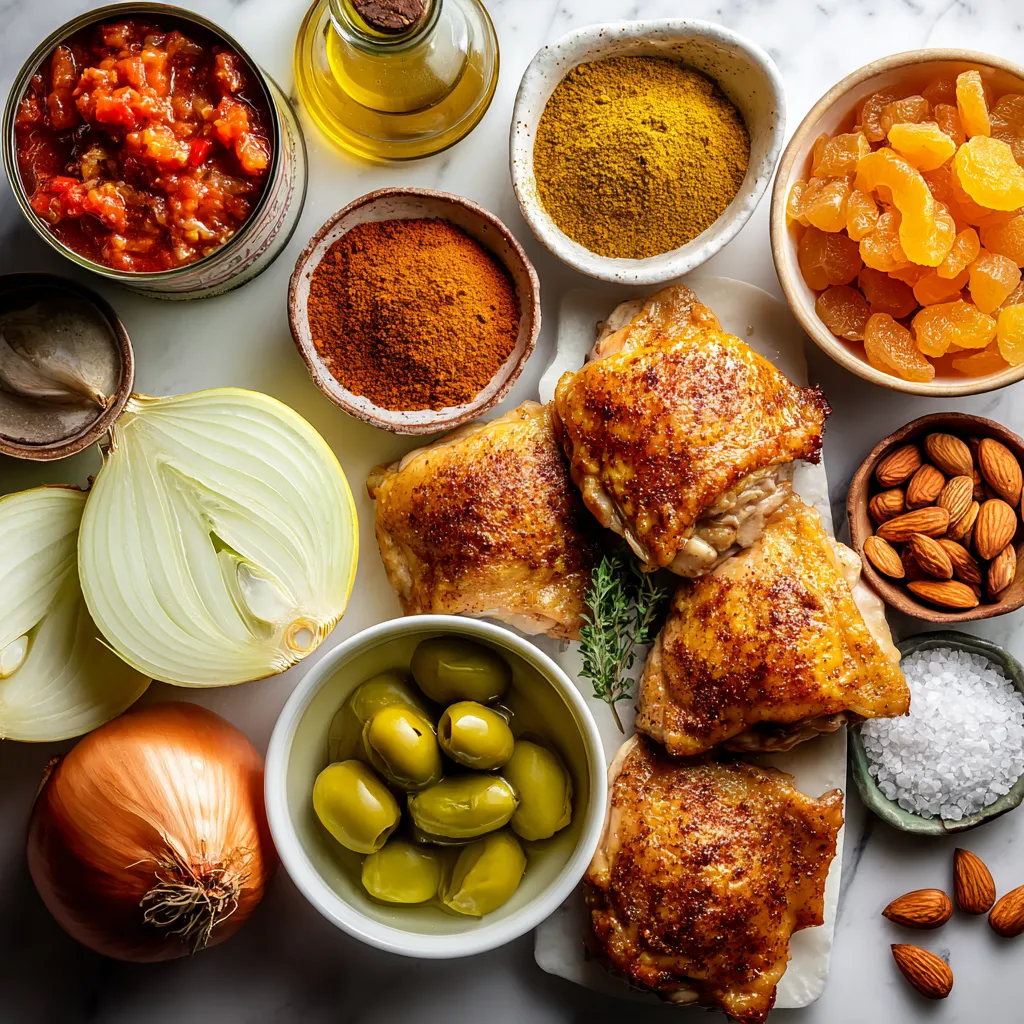
- 4 chicken thighs, bone-in and skin-on
- 2 tablespoons olive oil
- 1 large onion, finely chopped
- 3 cloves garlic, minced
- 1 can (14 oz) diced tomatoes, with juices
- 1 cup chicken broth
- 1 cup dried apricots, chopped into bite-sized pieces
- 1/2 cup almonds, toasted and roughly chopped
- 1 cup green olives, pitted and halved
- Salt and pepper to taste
These ingredients bring rich flavors to the dish. The chicken provides protein and a savory taste. The dried apricots add sweetness. The olives give a salty bite that balances the meal.
Spice Blend Overview
Spices make Moroccan Chicken Tagine special. Here are the spices you need:
- 1 teaspoon ground cumin
- 1 teaspoon ground ginger
- 1 teaspoon ground cinnamon
- 1 teaspoon smoked paprika
- 1/2 teaspoon cayenne pepper (adjust to desired spiciness)
This mix creates warmth and depth. Cumin and ginger give a warm flavor. Cinnamon adds a hint of sweetness. Smoked paprika adds earthiness, and cayenne gives it a kick. You can adjust the cayenne for more or less heat.
Optional Garnishes and Accompaniments
Garnishes enhance the dish’s look and taste. Here are some options:
- Fresh cilantro or parsley, chopped
- Lemon wedges
Cilantro or parsley adds freshness. A squeeze of lemon brightens the flavors and offers a lively contrast to the rich sauce. Serve the tagine with couscous or crusty bread to soak up all that delicious sauce!

Step-by-Step Instructions
Preparation Steps
Start by gathering all your ingredients. You will need:
- 4 chicken thighs, bone-in and skin-on
- 2 tablespoons olive oil
- 1 large onion, finely chopped
- 3 cloves garlic, minced
- 1 teaspoon ground cumin
- 1 teaspoon ground ginger
- 1 teaspoon ground cinnamon
- 1 teaspoon smoked paprika
- 1/2 teaspoon cayenne pepper
- 1 can (14 oz) diced tomatoes, with juices
- 1 cup chicken broth
- 1 cup dried apricots, chopped
- 1/2 cup almonds, toasted and roughly chopped
- 1 cup green olives, pitted and halved
- Salt and pepper to taste
- Fresh cilantro or parsley, chopped
Next, heat the olive oil in a tagine or a heavy pot. Use medium-high heat until the oil shimmers. While the oil heats, season the chicken thighs with salt and pepper. This step adds great flavor to the meat.
Cooking Process
Once the oil is hot, add the chicken thighs. Brown them for about 5 to 7 minutes. The chicken should get a nice color. After browning, set the chicken aside on a plate.
Now, it’s time to add the onion to the pot. Cook the onions for about 5 minutes until they turn translucent. Add the minced garlic and cook for another minute. This will make your kitchen smell amazing!
Next, add the spices: ground cumin, ginger, cinnamon, smoked paprika, and cayenne pepper. Stir well for about 2 minutes. This step wakes up the spices and helps the flavors blend.
Pour in the diced tomatoes with their juices and the chicken broth. Stir everything together and bring the mix to a gentle simmer. Carefully return the browned chicken to the pot and nestle it into the sauce. Add the chopped dried apricots and cover the pot with a lid.
Lower the heat and let the tagine simmer for about 45 minutes. Turn the chicken halfway through cooking for even results. You want the chicken tender and cooked through.
Finishing Touches and Serving Suggestions
In the last 10 minutes of cooking, gently stir in the toasted almonds and halved green olives. This adds texture and depth to your dish. Once the timer goes off, remove the pot from heat.
Garnish with chopped cilantro or parsley for a fresh touch. Serve the tagine hot over a bed of fluffy couscous or with crusty bread. This helps soak up the rich sauce. Enjoy every flavorful bite!
Tips & Tricks
How to Achieve Perfectly Tender Chicken
To get tender chicken, start with bone-in thighs. The bones add flavor and moisture. Brown the chicken in hot oil for about 5-7 minutes. This step seals in the juices. Once browned, let the chicken simmer in the sauce. Simmering slowly helps break down tough fibers. This makes the chicken juicy and soft. Remember to turn the chicken halfway through cooking. This ensures even cooking and flavor.
Adjusting Flavor and Spice Levels
You can make this dish your own by adjusting spices. If you like it spicy, add more cayenne pepper. If you prefer milder flavors, reduce the amount. Taste the sauce before it finishes cooking. You can always add more spices if needed. For a sweet twist, add extra dried apricots or a touch of honey. This balances the spices well. Always season with salt and pepper to enhance the flavors.
Cooking Tools and Alternatives
A tagine pot is great for making this dish. It helps keep moisture in. If you don’t have one, use a heavy-bottomed pot. A Dutch oven works well too. Just make sure it has a tight-fitting lid. For serving, traditional dishes add charm. If you want, use a simple bowl or plate. This dish pairs well with couscous or crusty bread.
Pro Tips
- Marinating the Chicken: For even more flavor, marinate the chicken thighs in the spices, olive oil, and some lemon juice for a few hours or overnight before cooking.
- Adjusting Spice Levels: Taste the sauce before serving and adjust the cayenne pepper to your preferred spice level; you can always add more, but it’s hard to take it out!
- Using Fresh Herbs: Feel free to experiment with fresh herbs such as mint or dill along with cilantro or parsley for added freshness and complexity in flavor.
- Serving Suggestions: This tagine pairs wonderfully with couscous or fluffy rice, but consider serving it with flatbreads to soak up the delicious sauce.

Variations
Substitutions for Ingredients
You can easily swap some ingredients in this Moroccan Chicken Tagine. Here are a few ideas:
- Chicken thighs: Use chicken breasts or drumsticks.
- Olive oil: Swap for avocado oil or coconut oil.
- Dried apricots: Try raisins or prunes for a different sweetness.
- Green olives: Use Kalamata olives for a bolder flavor.
- Spices: Feel free to add turmeric or cardamom for extra depth.
Vegetarian or Vegan Adaptations
To make a veggie version of this dish, follow these steps:
- Replace chicken with firm tofu or chickpeas.
- Use vegetable broth instead of chicken broth.
- Add seasonal veggies like carrots, zucchini, or bell peppers.
- Keep the same spices for that classic Moroccan flavor.
Regional Variations within Moroccan Cuisine
Moroccan cuisine has many regional styles. Here are a few ways to vary your tagine:
- In the north, add preserved lemons for a tangy twist.
- In the south, use more spices like saffron and harissa for heat.
- Some regions include nuts like pistachios or walnuts for added crunch.
- You may even find seafood variations along the coast, using fish or shrimp.
These variations let you customize your Moroccan Chicken Tagine to your taste. Enjoy exploring the flavors!
Storage Info
How to Store Leftover Tagine
To store leftover Moroccan chicken tagine, let it cool first. Place it in an airtight container. Make sure the lid seals tightly to keep the flavors fresh. You can also use a glass jar if you prefer.
Reheating Instructions
When you are ready to eat the leftovers, reheat the tagine on the stove. Pour it into a pot over low heat. Stir it often to avoid burning. You can add a splash of chicken broth if it seems dry. Heat until it is warm all the way through.
Recommended Shelf Life
Leftover Moroccan chicken tagine can last in the fridge for up to four days. If you want to keep it longer, freeze it. In the freezer, it can last for about three months. Just remember to label it with the date before you freeze it.
FAQs
What is the origin of Moroccan Chicken Tagine?
Moroccan Chicken Tagine has roots in North Africa. Tagines are named after the pot used to cook them. This dish blends spices and local ingredients. It reflects the rich culture and traditions of Morocco.
Can I make Moroccan Chicken Tagine in a slow cooker?
Yes, you can use a slow cooker for Moroccan Chicken Tagine. Brown the chicken first for flavor. Then, add all other ingredients to the slow cooker. Set it on low for about 6 hours.
What can I serve with Moroccan Chicken Tagine?
Serve Moroccan Chicken Tagine with fluffy couscous or crusty bread. A side of fresh salad adds crunch. You can also pair it with roasted vegetables for more flavor.
How long does Moroccan Chicken Tagine last in the fridge?
Moroccan Chicken Tagine lasts about 3 to 4 days in the fridge. Store it in an airtight container. Make sure to cool it before you put it away.
Can I use other meats for this tagine recipe?
Yes, you can use lamb, beef, or even fish for this tagine. Adjust the cooking time based on the meat. Each option offers a unique flavor twist to your dish.
Moroccan Chicken Tagine is a tasty dish to make at home. We covered the key ingredients, such as spices and garnishes. The step-by-step guide helps you prepare and cook perfectly. Tips for tender chicken and flavor adjustments ensure great results every time. Variations let you customize the dish to your liking, whether vegetarian or using different meats.
Remember to store leftovers properly for later enjoyment. With this knowledge, you can now create a delicious Moroccan Chicken Tagine anytime! Enjoy your cooking journe

Moroccan Chicken Tagine
Ingredients
- 4 pieces chicken thighs, bone-in and skin-on
- 2 tablespoons olive oil
- 1 large onion, finely chopped
- 3 cloves garlic, minced
- 1 teaspoon ground cumin
- 1 teaspoon ground ginger
- 1 teaspoon ground cinnamon
- 1 teaspoon smoked paprika
- 1/2 teaspoon cayenne pepper
- 1 can (14 oz) diced tomatoes, with juices
- 1 cup chicken broth
- 1 cup dried apricots, chopped
- 1/2 cup almonds, toasted and roughly chopped
- 1 cup green olives, pitted and halved
- to taste salt and pepper
- for garnish fresh cilantro or parsley, chopped
Instructions
- In a tagine or a large heavy-bottomed pot, heat the olive oil over medium-high heat until shimmering.
- Season the chicken thighs generously with salt and pepper. In the hot oil, brown the chicken on all sides, approximately 5-7 minutes. Once browned, remove the chicken from the pot and set it aside on a plate.
- In the same pot, add the finely chopped onion. Sauté for about 5 minutes, or until the onions become translucent. Add the minced garlic and continue to sauté for an additional minute until fragrant.
- Add the ground cumin, ginger, cinnamon, smoked paprika, and cayenne pepper to the onion mixture. Stir well to coat the onions evenly with the spices and cook for another 2 minutes to allow the spices to release their aromas.
- Pour the diced tomatoes, along with their juices, into the pot, followed by the chicken broth. Stir everything together and bring the mixture to a gentle simmer.
- Carefully return the browned chicken to the pot, nestling it into the sauce. Add the chopped dried apricots, then cover the pot with a lid.
- Reduce the heat to low and let the tagine simmer for about 45 minutes. Turn the chicken halfway through the cooking time to ensure even cooking. The chicken should be tender and cooked through.
- In the final 10 minutes of cooking, gently stir in the toasted almonds and halved green olives to combine them with the tagine flavors.
- Once the cooking time has elapsed, remove the tagine from heat. Garnish generously with chopped fresh cilantro or parsley before serving. Serve hot over a fluffy bed of couscous or alongside crusty bread to soak up the rich, fragrant sauce.


![- 1 lb (450g) chicken breast, thinly sliced - 1 cup fresh Thai basil leaves, packed - 3 cloves garlic, minced - 2 red Thai chili peppers, thinly sliced (adjust based on your spice preference) For this dish, I prefer chicken breast. It cooks quickly and stays juicy. Fresh Thai basil gives this meal its unique flavor. Garlic adds a nice aroma, and Thai chili peppers bring heat. You can control the spice by adding more or less chili. - 2 tablespoons soy sauce - 1 tablespoon oyster sauce (or substitute with mushroom sauce for vegetarian) - 1 tablespoon fish sauce (or an extra tablespoon of soy sauce for vegetarian) - 1 teaspoon sugar (to balance flavors) - 1 tablespoon vegetable oil (for frying) These sauces are key to great taste. Soy sauce offers saltiness, while oyster and fish sauces add depth. Sugar balances the salty flavors, making everything taste better. - 1 bell pepper, sliced (your choice of color for visual appeal) - 1 small onion, sliced into thin wedges - Optional: other vegetables for added nutrition I like using bell pepper and onion for color and crunch. You can add other veggies like carrots or snap peas. They bring more nutrition and flavor, making the dish more vibrant. For the full recipe, refer to the [Full Recipe]. To start, you need to combine the chicken with the sauces. In a medium bowl, add the sliced chicken breast, soy sauce, oyster sauce, fish sauce, and sugar. Mix these ingredients well so the chicken gets all the flavor. Let it marinate for 15 minutes. This short time helps the chicken absorb the tasty sauces. Next, heat the vegetable oil in a large skillet or wok over medium-high heat. You want the oil to shimmer before adding anything. Then, add the minced garlic and sliced Thai chili peppers. Stir-fry them for about 30 seconds until they smell amazing. Be careful not to burn the garlic. Now, add the marinated chicken to the pan. Spread it out evenly for even cooking. Stir-fry for about 5 to 7 minutes. Cook until the chicken is no longer pink and has a nice brown color. After that, toss in the sliced bell pepper and onion. Stir-fry for another 3 to 4 minutes. This will make the vegetables tender but still crisp. Once the chicken and veggies are done, take the skillet off the heat. Gently fold in the fresh Thai basil leaves. They will wilt quickly from the heat and add a lovely aroma. Serve the dish hot, over a bed of fluffy jasmine rice. This rice complements the stir-fry well. Enjoy your Thai Basil Chicken Stir-Fry! For the full recipe, check out the details above. Using fresh ingredients makes a big difference. Fresh Thai basil gives a sweet and fragrant flavor to the dish. Always choose bright green basil leaves. They should smell strong and sweet. The chicken should be fresh, too. This keeps your stir-fry tasty and safe to eat. For the best flavor, cook on high heat. A hot pan helps to sear the chicken. This adds a nice caramel color and enhances the taste. When you add garlic and chili, cook them quickly. This brings out their strong flavors without burning them. You can change the heat level easily. If you want it milder, remove the seeds from the chili peppers. You can also use fewer peppers or substitute with sweet bell peppers. If you like a kick but want it less spicy, try adding sugar. It balances the heat. You can also use a bit of honey for sweetness without heat. Pair your Thai basil chicken stir-fry with jasmine rice. The rice absorbs the sauce well. You can also add a side of steamed veggies for extra nutrition. For garnishes, consider adding lime wedges or crushed peanuts. They add color and crunch. Fresh cilantro or extra basil leaves also make it pop. Enjoy your meal with these simple touches! For the full recipe, check out the details above. {{image_4}} For a vegetarian or vegan version, you can swap chicken for tofu or tempeh. These options give a nice texture. Use mushroom sauce instead of oyster sauce. It brings depth and umami flavor. For the fish sauce, simply add an extra tablespoon of soy sauce. This keeps the taste bold. To maintain flavor, marinate the tofu or tempeh just like chicken. Allow it to soak up the sauces. When cooking, make sure to press out excess moisture. This helps achieve that nice, crispy texture we all love. If you want to try something new, switch the chicken for shrimp or beef. Shrimp cooks quickly, so cut down the cooking time to about 3-4 minutes. Beef takes longer. Slice it thin and cook it for about 6-8 minutes. Remember, cooking times change based on what protein you use. Always make sure your protein is fully cooked before adding in the veggies. Want to shake things up? Add sauces like teriyaki or sriracha for an exciting twist. Teriyaki gives a sweet flavor, while sriracha adds heat. You can even mix both for a sweet and spicy kick. Feel free to experiment with herbs and spices too. Adding cilantro or mint can brighten the dish. Try a sprinkle of lime juice for an extra zest. These tiny changes can create a whole new taste experience. For the full recipe, check the section above. Enjoy cooking! To keep your Thai basil chicken stir-fry fresh, store it in an airtight container. Refrigerate the leftovers within two hours of cooking. If you want to save it longer, freeze the stir-fry. Make sure to cool it completely before freezing. This method helps retain flavor and texture. When you reheat your stir-fry, use a skillet for the best results. Heat it over medium warmth and stir often. This keeps the chicken juicy and prevents it from drying out. For rice, add a splash of water and cover it. This helps the rice steam and become fluffy again. In the fridge, your Thai basil chicken stir-fry lasts up to four days. If frozen, it can last for about three months. Always check for off smells or changes in color. If you see these, it's best to discard it for safety. Thai Basil Chicken Stir-Fry has roots in Thai street food. This dish reflects the vibrant flavors of Thai cuisine. It showcases fresh herbs, bold spices, and simple cooking techniques. Thai basil, known for its unique flavor, is key to this dish. It adds a sweet and slightly spicy note that enhances the chicken. This meal represents the balance of sweet, salty, and spicy tastes typical in Thai dishes. Each bite transports you to bustling markets in Thailand. Yes, you can prepare Thai basil chicken stir-fry in advance. Cook and store it in the fridge for up to three days. To keep it fresh, store it in an airtight container. When you are ready to eat, simply reheat it on the stove. This dish tastes even better the next day as flavors meld. Serve it over freshly cooked jasmine rice for a quick meal. If you cannot find Thai basil, you have options. Sweet basil or holy basil works well as a substitute. Sweet basil offers a milder flavor, while holy basil is spicier. You can also mix in a bit of mint for a fresh twist. While these substitutes change the taste slightly, they still create a tasty dish. Just remember, the flavor will differ from the original recipe. The spice level of Thai Basil Chicken Stir-Fry can vary. It depends on the number of Thai chili peppers you use. Typically, this dish has a mild to medium heat. If you prefer a milder dish, use fewer chilis or remove the seeds. For those who love heat, add extra chilis or a dash of hot sauce. Adjusting spice levels allows everyone to enjoy this flavorful meal. Thai Basil Chicken Stir-Fry is a simple yet flavorful dish. You learned about the key ingredients, like fresh basil and chicken. The step-by-step instructions make cooking easy, even for beginners. We explored tips to enhance flavor and adjust spice levels to suit your taste. You can even try fun variations with different proteins or herbs. Enjoy making it your own, and savor the fresh flavors. Every bite will bring joy to your table.](https://dishtreats.com/wp-content/uploads/2025/06/20a2f9de-1755-4b6a-ade1-393123d10e24-768x768.webp)

![- 8 oz spaghetti or fettuccine pasta - 2 boneless, skinless chicken breasts - 1 cup basil pesto (homemade or store-bought) - 1/2 cup heavy cream - 1/4 cup cherry tomatoes, halved - 1/4 cup freshly grated Parmesan cheese - Fresh basil leaves for garnish - Salt and freshly ground black pepper, to taste - 2 tablespoons extra virgin olive oil Gather these ingredients before you start cooking. The pasta and chicken form the base of your dish. The creamy pesto sauce adds rich flavor. The cherry tomatoes bring a burst of freshness. The Parmesan cheese tops it off with a salty kick. Fresh basil leaves make it look gorgeous. Using fresh ingredients makes a big difference. If you have the time, try making your own pesto. It’s simple and tastes amazing. You can adjust the flavors to your liking. You can also swap the pasta type if you want. Just keep in mind that different shapes may change how the sauce clings to the pasta. For the chicken, you want it juicy and tender. The seasoning is key here. Use good quality olive oil, salt, and pepper. This will help keep the flavor bright and fresh. Once you have everything, you’ll be ready to make a delicious meal. If you want the full recipe, check out the complete guide for step-by-step instructions. Start by boiling a large pot of water. Add a good amount of salt to the water. This will help flavor the pasta. Once the water is boiling, add your spaghetti or fettuccine. Cook it until it is al dente, which means it should be firm to the bite. This usually takes around 8-10 minutes. When done, drain the pasta. Make sure to save about 1/2 cup of the pasta water for later. While the pasta cooks, get ready to season the chicken. Sprinkle salt and pepper on both sides of the chicken breasts. Heat 2 tablespoons of olive oil in a large skillet over medium heat. When the oil is hot, add the chicken. Cook each side for about 6-7 minutes. You want the chicken to turn a nice golden brown. Check that the juices run clear when you cut into it. Once cooked, take the chicken out of the skillet and let it rest for a few minutes. Then, slice it into thin strips. In the same skillet, lower the heat to medium-low. Add your basil pesto to the pan and stir it. You want to warm it through but not burn it. After about a minute, slowly pour in 1/2 cup of heavy cream. Stir it all together until it is well mixed and heated, which should take about 2-3 minutes. Now, add the cooked pasta to the skillet with your creamy pesto sauce. Toss the pasta gently to make sure it gets coated evenly. If the sauce looks too thick, add a little of the reserved pasta water. This will help you reach your desired creamy consistency. To finish, fold in the halved cherry tomatoes and the sliced chicken. Stir everything together for another 2 minutes. This will warm the chicken and tomatoes through. Finally, sprinkle freshly grated Parmesan cheese on top. Toss it lightly to mix. For a bright touch, garnish with fresh basil leaves before serving. For a full recipe, check out the details above! You can use homemade or store-bought pesto for this dish. Homemade pesto gives you full control over flavors, but store-bought saves time. If you want a stronger basil taste, simply add more fresh basil leaves to your mix. For a milder flavor, blend in more nuts or cheese. This helps balance the taste to your liking. To keep your chicken juicy, avoid overcooking it. Cook chicken breasts in a hot skillet for 6-7 minutes on each side. The internal temperature should reach 165°F. Rest the chicken for a few minutes before slicing. This helps the juices stay inside. You can make your sauce thicker or lighter based on your taste. For a richer sauce, use more heavy cream. If you want a lighter option, try half-and-half or low-fat milk. Adding a splash of pasta water helps adjust the sauce's thickness too. This way, you can achieve the perfect creamy texture for your chicken pesto pasta. For the Full Recipe, check out the detailed instructions to create this delightful dish! {{image_4}} Adding vegetables to your Chicken Pesto Pasta makes it even better. It boosts flavor and nutrition. Seasonal veggies like spinach or bell peppers work great. Spinach adds a nice green color. Bell peppers give a sweet crunch. You can toss them in during the last few minutes of cooking. This way, they stay bright and fresh. If you need gluten-free pasta, you have choices! You can use rice pasta or chickpea pasta. These options taste great and cook well. Just follow the package instructions. Cooking times may differ, so keep an eye on them. You want your pasta to be tender but not mushy. Not in the mood for chicken? Try shrimp or tofu instead! Shrimp cooks fast and adds a nice twist. Just sauté them until they turn pink. Tofu is a fantastic plant-based option. Make sure to press it first to remove extra water. Adjust cooking times based on what you choose. This keeps your dish delicious and exciting. For the full recipe, check out the [Full Recipe]. Store any leftovers in the fridge. Use a tight-sealing container to keep your chicken pesto pasta fresh. Glass containers work well, as do plastic ones. Make sure to let it cool down before putting it away. It stays good in the fridge for up to three days. To freeze your chicken pesto pasta, pack it in an airtight container or freezer bag. Remove as much air as possible. This helps prevent freezer burn. You can freeze it for up to three months. Just label the bag with the date so you remember when you froze it. When reheating, use the microwave or stovetop. If using the microwave, heat in short bursts. Stir between each burst to ensure even warming. On the stovetop, add a splash of water or cream to keep it moist. This helps keep the creaminess intact. Enjoy your meal again as if it were fresh! To make chicken pesto pasta from scratch, follow these basic steps: 1. Cook the pasta. Boil water in a large pot, add salt, and cook your choice of spaghetti or fettuccine until al dente. 2. Prepare the chicken. Season boneless chicken breasts with salt and pepper. Sear them in olive oil until golden brown. 3. Make the sauce. In the same skillet, mix basil pesto with heavy cream until warm and creamy. 4. Combine. Toss the cooked pasta with the sauce and sliced chicken. Adjust the sauce with reserved pasta water if needed. 5. Serve. Garnish with cherry tomatoes, Parmesan cheese, and fresh basil. You can find the full recipe above for a detailed guide. Yes, you can make chicken pesto pasta ahead of time. Here are some tips: - Cooked pasta and sauce. Prepare the chicken and sauce, then store them separately from the pasta. This keeps them fresh. - Refrigerate. Store in airtight containers in the fridge for up to three days. - Freeze. For longer storage, freeze the chicken and sauce. Use within two months for best flavor. - Reheat. When ready, reheat the chicken and sauce. Cook the pasta fresh to keep it al dente. Chicken pesto pasta pairs well with various side dishes. Consider these suggestions: - Garlic bread. A warm, crispy slice complements the creamy pasta. - Salad. A light green salad with a tangy vinaigrette balances the richness of the dish. - Roasted vegetables. Seasonal veggies add color and nutrients to the meal. Chicken pesto pasta can be a healthy option. Here’s why: - Protein. Chicken provides lean protein, which is vital for muscle health. - Basil and olive oil. These ingredients are rich in antioxidants and healthy fats. - Pasta. Whole-grain pasta offers fiber, which aids digestion. - Portion control. Adjust the serving size to fit your dietary needs. Absolutely! You can use various pasta types. Here are some alternatives: - Whole wheat pasta. Adds extra fiber and nutrients. - Gluten-free pasta. Great for those with gluten sensitivities. - Zoodles. Spiralized zucchini for a low-carb option. - Penne or rigatoni. These shapes hold the sauce well, providing a satisfying bite. In this post, I covered how to make a delicious chicken pesto pasta. We discussed the main ingredients and their roles, along with simple steps for cooking. I also shared tips for perfecting your dish and exciting variations to try. In closing, this recipe is easy and flexible, letting you customize flavors. Whether you choose to add veggies or change proteins, your meal will impress. Enjoy this tasty dish and make it your own!](https://dishtreats.com/wp-content/uploads/2025/06/ae0d281d-adb6-406a-8a42-58bd8911a0b3-768x768.webp)


![- 1 block firm tofu, thoroughly drained and pressed - 1 cup jasmine rice - 2 tablespoons Sriracha sauce The firm tofu acts as the main protein. It absorbs flavors well and provides a hearty bite. Jasmine rice, with its fluffy texture, makes a great base. Sriracha sauce adds the spicy kick, balancing heat and taste. - 1 cup broccoli florets, fresh or frozen - 1 red bell pepper, thinly sliced - ½ cup carrots, julienned or matchstick-cut Broccoli florets add crunch and color. The red bell pepper brings sweetness and a pop of color. Carrots add a nice crunch and a bit of earthiness. Together, they create a vibrant mix that enhances the dish. - 1 tablespoon soy sauce (preferably low-sodium) - 1 tablespoon sesame oil - Fresh cilantro, for garnish Soy sauce brings umami depth. Sesame oil adds a nutty flavor that complements the spice. Fresh cilantro brightens the dish, giving it a fresh finish. This combo of flavors makes each bite exciting. For the full recipe, check out the complete guide. To start, cut the pressed tofu into 1-inch cubes. This size helps the tofu cook evenly. Next, toss the cubes in a bowl with cornstarch. Make sure every piece is coated. This coating is key for a crispy finish when you cook it. Pressing the tofu is vital. It removes excess water, allowing better flavor absorption and texture. Bring vegetable broth to a boil in a medium saucepan. Add the jasmine rice and stir it once. Cover the pan, reduce the heat, and let it simmer for about 15 minutes. This method infuses flavor into the rice. Once the liquid absorbs, fluff the rice with a fork. This step keeps the rice light and airy, which balances the dish. Heat vegetable oil in a large skillet over medium-high heat. Carefully add the cornstarch-coated tofu cubes in a single layer. Fry them for about 8-10 minutes, turning occasionally. You want all sides to turn golden brown and crispy. Once done, transfer the tofu to a plate lined with paper towels. This helps absorb any excess oil. In the same skillet, add the broccoli, red bell pepper, and carrots. Stir-fry the veggies for 4-5 minutes. You want them tender but still bright and colorful. This keeps their nutrients intact. Add the sliced green onions for the last minute. Their fresh taste adds a nice crunch to the mix. In a small bowl, whisk together the Sriracha sauce, soy sauce, sesame oil, and honey (or maple syrup). Mix until well blended. This sauce brings all the flavors together. If you like it spicier, add more Sriracha. For a milder version, reduce the amount. Now, it’s time to put it all together! Divide the fluffy jasmine rice into bowls. Top it with the spicy tofu and vegetable mix. For a polished finish, sprinkle sesame seeds and fresh cilantro on top. This adds flavor and a pop of color to your bowl. For the full recipe, refer back to the main section. Enjoy your Spicy Sriracha Tofu Bowl! To make crispy tofu, you need to press it well. Start by wrapping the block of firm tofu in a clean kitchen towel. Place a heavy object, like a cast iron pan, on top for about 20-30 minutes. This helps remove excess moisture. Next, coat the tofu cubes with cornstarch. Use about 2 tablespoons, ensuring each piece is covered. This coating creates a crunchy texture when cooked. Not everyone enjoys the same heat. If you want less spice, use only 1 tablespoon of Sriracha. You can also mix Sriracha with a bit of honey or ketchup to mellow the heat. For a different flavor, try other sauces. Chili garlic sauce or sweet chili sauce can work well too. Experiment with these options to find what you like best. To save time, prep your ingredients ahead of time. You can chop the vegetables and store them in the fridge for up to three days. Cook the rice and tofu in advance, too. Store them separately in airtight containers. This way, you can quickly assemble your Spicy Sriracha Tofu Bowl when you’re ready to eat. Enjoy the convenience of quick meals without sacrificing taste! For the full recipe, check out the Spicy Sriracha Tofu Bowl. {{image_4}} You can switch the tofu for other protein sources. Tempeh is a great choice. It has a nutty flavor and holds up well in stir-fries. Seitan is another tasty option. It mimics the texture of meat nicely. If you prefer meat, chicken or shrimp work well too. Chicken adds a mild taste, while shrimp brings a sweet, briny flavor. Both cook quickly, making your meal even faster. Feel free to change the vegetables based on the season. In spring, try snap peas or asparagus. In summer, zucchini and bell peppers shine. Winter vegetables like Brussels sprouts and kale add heartiness. You can also use frozen veggies. They save time and are often just as nutritious as fresh ones. Just make sure to thaw and drain excess water before cooking. If you need a gluten-free option, swap soy sauce for tamari. Tamari has a similar flavor but is gluten-free. For the rice, try quinoa or cauliflower rice. Both options are nutritious and add a unique texture to your bowl. Quinoa is protein-rich, while cauliflower rice is low in carbs and calories. These swaps ensure everyone can enjoy this spicy dish! For the complete recipe, check the [Full Recipe]. To keep your spicy Sriracha tofu bowl fresh, store leftovers in an airtight container. Place the bowl in the fridge within two hours of cooking. This helps keep the food safe. Your leftovers can last for up to four days in the fridge. To reheat the tofu without losing its crispness, use an oven or a skillet. If using an oven, preheat it to 350°F (175°C). Place the tofu on a baking sheet for about 10-15 minutes. If using a skillet, heat over medium heat for about 5-7 minutes, turning the tofu occasionally. This keeps it crispy and delicious. You can freeze cooked bowls if you want to save some for later. Place the cooled bowl in a freezer-safe container. It can stay frozen for up to three months. To thaw, move the bowl to the fridge overnight. Reheat it in the oven or a skillet as mentioned above. This way, you can enjoy your spicy Sriracha tofu bowl anytime! For the full recipe, check the earlier sections. To make the Spicy Sriracha Tofu Bowl vegan, swap honey for maple syrup. This simple change keeps the dish sweet and plant-based. Also, check that all products you use are vegan-friendly. For example, ensure your soy sauce is made without animal products. Yes, you can use brown rice. However, remember that brown rice takes longer to cook. It usually needs about 40-50 minutes, while jasmine rice only takes around 15 minutes. Brown rice has a nuttier taste and chewier texture. So, it can change the feel of your bowl. If you don’t have Sriracha, several substitutes work well. You can use chili garlic sauce or sambal oelek for a similar heat. You can also make a homemade version by mixing hot sauce, garlic, and a bit of sugar. This gives you control over the flavor. The spice level of this dish depends on the amount of Sriracha you use. One tablespoon adds mild heat, while two tablespoons ramp up the spice. To adjust heat to your taste, start with less and add more if you like it spicier. Always taste as you go. You can serve this bowl with a side of edamame or a fresh salad. They add nice contrast and extra crunch. For more flavor, drizzle extra Sriracha or sesame oil on top. You can also add lime juice for a zesty touch. Enjoy your meal! For the full recipe, check out the Spicy Sriracha Tofu Bowl details above. You learned how to make a tasty Spicy Sriracha Tofu Bowl. We covered each ingredient and how to prepare them. From cooking the rice to achieving crispy tofu, each step matters. Remember to adjust spices to suit your taste. Feel free to swap in different proteins or veggies to keep it fresh. Store leftovers well to enjoy later. This bowl is not just good; it’s fun to make and share. Enjoy your cooking adventure!](https://dishtreats.com/wp-content/uploads/2025/07/ee3e23f0-fb80-42df-ace0-60219f206871-768x768.webp)