Mexican Street Corn Salad Flavorful and Easy Recipe

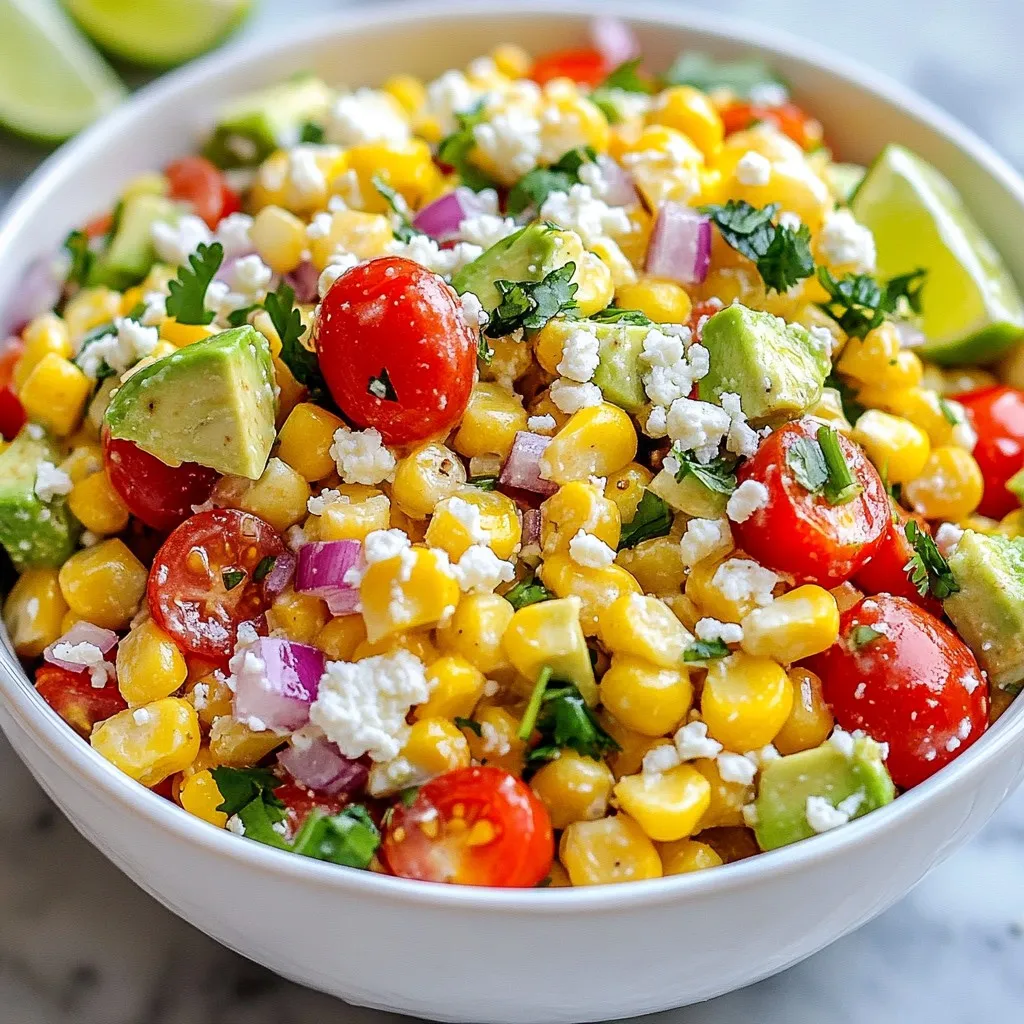
Are you ready to spice up your meal with a fresh and tasty twist? Mexican Street Corn Salad is a colorful dish that brings bold flavors to your table. This easy recipe uses simple ingredients, and I’ll guide you through each step. Whether you enjoy it as a side or main, it’s perfect for gatherings or a weeknight dinner. Let’s dive into making this delicious salad together!
Why I Love This Recipe
- Fresh and Flavorful: This salad combines the sweetness of corn with the vibrant flavors of fresh vegetables, making each bite a delightful taste experience.
- Easy to Prepare:
- Versatile and Customizable: You can easily adapt this salad by adding your favorite ingredients, such as black beans or jalapeños, to suit your taste.
- Perfect for Any Occasion: This Mexican Street Corn Salad is a hit at barbecues, potlucks, or as a refreshing side dish for any meal.
Ingredients
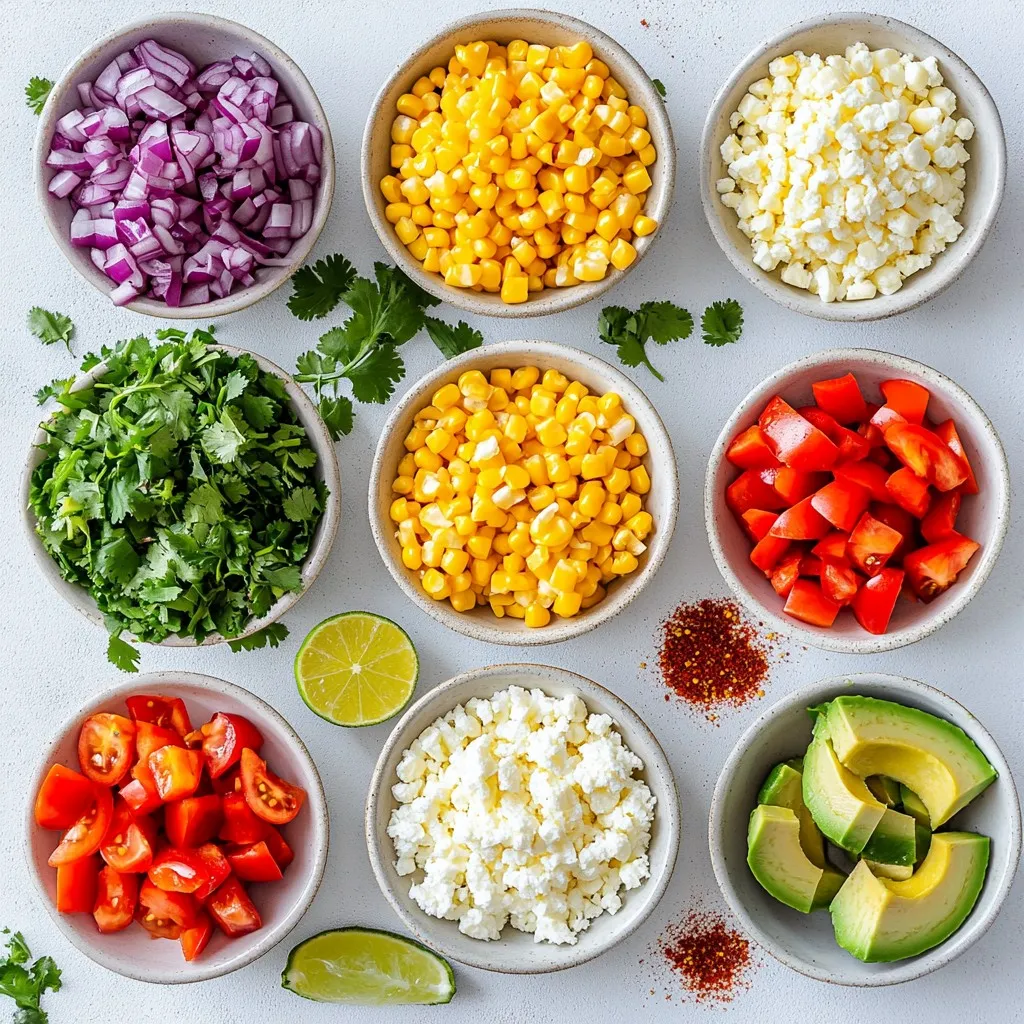
Fresh Corn or Frozen Corn
You can use either fresh corn or frozen corn. Fresh corn gives the best flavor. For fresh corn, take 4 ears. Grill them for about 10 minutes, turning often. This makes the kernels sweet and smoky. Once done, let the corn cool. Then slice off the kernels. If you choose frozen corn, use 4 cups. Thaw it in hot water, then drain it well. Frozen corn is quick and easy.
Vegetables and Herbs
The salad needs some crunch and color from fresh veggies. Use 1 medium red bell pepper, diced small. It adds sweetness. You also need 1 small red onion, finely chopped, for a mild bite. Add 1 cup of halved cherry tomatoes for a burst of juice. Fresh cilantro is key; add 1/4 cup, roughly chopped. For extra creaminess, you can include a ripe avocado, diced. This makes the salad rich and satisfying.
Dairy and Dressing Components
Dairy adds creaminess and flavor. Use 1/2 cup of crumbled cotija cheese, or feta cheese will work too. For the dressing, combine 2 tablespoons of mayonnaise, preferably Mexican-style, with 1 tablespoon of fresh lime juice. This gives a zesty kick. Add 1 teaspoon of chili powder for some heat. Don’t forget salt and pepper to taste. The dressing ties everything together and makes each bite delicious.

Step-by-Step Instructions
Preparing the Corn
To start, you need the corn. If using fresh corn, grill the ears over medium heat. Grill for about 10 minutes, turning often. You want the kernels to be lightly charred and tender. After grilling, let the corn cool a bit. Then, slice off the kernels. If you choose frozen corn, thaw it in hot water. Drain it well before use.
Combining the Vegetables
Next, grab a large mixing bowl. Add the charred corn kernels into the bowl. Now, it’s time to add the other veggies. Dice up the red bell pepper and finely chop the red onion. Halve the cherry tomatoes. Toss all these colorful pieces into the bowl. Mix gently to combine everything.
Making the Dressing
Now, let’s make the dressing. In a small bowl, add mayonnaise, fresh lime juice, and chili powder. Don’t forget a pinch of salt and pepper. Whisk it all together until it’s smooth and creamy. This dressing will bring the salad together.
Tossing and Serving the Salad
Drizzle the dressing over the corn mixture. Carefully toss everything together. Make sure all the ingredients are coated well in the dressing. Taste your salad. Adjust the seasoning with more salt, pepper, or lime juice if needed. You can serve the salad right away for a fresh crunch. If you want the flavors to blend, refrigerate it for up to an hour.
Tips & Tricks
Achieving the Perfect Grill Marks on Corn
Grilling corn gives it a smoky flavor. To get nice grill marks, start with fresh corn. Heat your grill to medium. Grill the corn for about 10 minutes. Turn the ears every couple of minutes. Look for light char marks. This adds flavor and looks great in your salad.
How to Choose Ripe Avocado
Choosing a ripe avocado is easy. First, look for avocados that are dark green. They should yield slightly to pressure when you squeeze them. If they are hard, they are not ripe. If they are too soft, they may be overripe. A ripe avocado will add a creamy texture to your salad.
Adjusting Spiciness and Flavor
Spice level can change based on your taste. Start with 1 teaspoon of chili powder. Taste the salad after mixing. If you want more heat, add more chili powder. Lime juice adds brightness. If you want it tangier, add a bit more lime juice. Adjust the salt and pepper to fit your flavor.
Pro Tips
- Fresh Corn is Best: If you can get your hands on fresh corn, use it for the best flavor and texture. Grilling enhances the natural sweetness and adds a delicious smoky char.
- Customize the Heat: Adjust the chili powder to suit your taste. For a spicier kick, consider adding diced jalapeños or a dash of hot sauce to the dressing.
- Make it Ahead: This salad can be prepared a few hours in advance. Just keep it refrigerated until serving to allow the flavors to meld beautifully without becoming soggy.
- Add More Veggies: Feel free to incorporate other vegetables like diced cucumbers or black beans for additional flavor and nutrition, making this dish even more colorful and hearty.

Variations
Adding Proteins like Grilled Chicken or Shrimp
You can make this salad heartier by adding protein. Grilled chicken or shrimp work great. Both have a nice smoky flavor that blends well. Just grill them until they are well-cooked. Cut the chicken into bite-sized pieces or toss the shrimp in with the salad. This adds a filling and tasty twist.
Vegetarian and Vegan Alternatives
If you want a vegetarian or vegan option, you have choices. For the cheese, you can skip cotija and use a plant-based cheese. For a creamy texture, try using vegan mayo. You can also add beans like black beans or chickpeas. This boosts protein and makes the salad more satisfying.
Seasonal Variations and Additions
You can change the salad with seasonal ingredients. In the summer, add diced mango for sweetness. In the fall, try roasted butternut squash. You can also add other veggies like zucchini or radishes. These additions keep the salad fresh and fun throughout the year.
Storage Info
Best Practices for Storing Leftovers
After enjoying your Mexican Street Corn Salad, store leftovers in an airtight container. Keep it in the fridge for up to three days. Make sure to cover it well. This keeps the salad fresh and tasty. If you add avocado, it may brown quickly. To prevent this, store the avocado separately. You can mix it in just before serving.
Reheating Tips
This salad is best served cold. If you really want to warm it, do so gently. Use a microwave and heat it for short bursts. Stir in between to avoid hot spots. Remember, heating may change the texture and flavors. So, enjoy it fresh from the fridge when you can.
Long-term Freezing Considerations
You can freeze this salad, but be aware of some changes. The corn will hold up well, but tomatoes and avocado won’t. They can get mushy when thawed. If you plan to freeze it, leave out the tomatoes and avocado. Store the salad in a freezer-safe container. It should be good for about three months. When you’re ready, thaw it in the fridge overnight before eating.
FAQs
Can I make Mexican Street Corn Salad ahead of time?
Yes, you can make this salad ahead of time. It tastes even better after sitting for a while. Make it up to one hour in advance. Just store it in the fridge. This lets the flavors mix well. Be sure to keep the dressing separate if you want a fresher crunch.
What can I substitute for cotija cheese?
If you cannot find cotija cheese, feta cheese works well as a substitute. Feta adds a similar saltiness and creaminess. You can also use queso fresco for a milder taste. Each of these options gives you great flavor without changing the salad too much.
How do I make Mexican Street Corn Salad less spicy?
To make the salad less spicy, use less chili powder. You can also skip it entirely if you prefer. Adding more creamy ingredients like mayonnaise can help tone it down. Mixing in more diced vegetables will also balance the heat. The key is to adjust based on your taste.
This blog post covered all you need for a great Mexican Street Corn Salad. We explored choosing fresh or frozen corn, using the right herbs, and making a tasty dressing. I shared tips on grilling corn, selecting ripe avocados, and adjusting flavors. You can also add proteins, try vegan options, and experiment with seasonal ingredients. Proper storage and reheating practices help maintain freshness. Enjoy this salad in any way you like! Dive in, share your creations, and make every bite coun

Mexican Street Corn Salad Delight
Ingredients
- 4 ears fresh corn, kernels removed (or 4 cups of frozen corn, thawed)
- 1 medium red bell pepper, diced into small pieces
- 1 small red onion, finely chopped
- 1 cup cherry tomatoes, halved
- 0.25 cup fresh cilantro, roughly chopped
- 0.5 cup cotija cheese, crumbled (or feta cheese as a substitute)
- 2 tablespoons mayonnaise, preferably Mexican-style
- 1 tablespoon fresh lime juice
- 1 teaspoon chili powder
- to taste salt and pepper
- 1 ripe avocado, diced (optional but recommended)
Instructions
- Prepare the Corn: If using fresh corn, grill the ears over medium heat for about 10 minutes, turning occasionally, until the kernels are lightly charred and tender. Once grilled, let the corn cool slightly before slicing off the kernels. If using frozen corn, thaw it in hot water for a few minutes, then drain thoroughly.
- Combine the Vegetables: In a large mixing bowl, add the charred corn kernels. Then, incorporate the diced red bell pepper, finely chopped red onion, and halved cherry tomatoes. Mix gently to combine.
- Add Fresh Ingredients: Stir in the chopped fresh cilantro, crumbled cotija cheese, and the diced avocado, if you’ve chosen to include it.
- Create the Dressing: In a separate small bowl, whisk together the mayonnaise, lime juice, chili powder, and a pinch of salt and pepper until smooth and creamy.
- Toss Together: Drizzle the dressing over the corn mixture and carefully toss everything together until all the ingredients are well coated in the dressing.
- Taste and Adjust: Sample the salad and adjust the seasoning with more salt, pepper, or lime juice to achieve your preferred flavor balance.
- Serve: This salad can be served immediately for a refreshing crunch, or you can refrigerate it for up to 1 hour to allow the flavors to meld beautifully.


![To make delicious grilled veggie kabobs, gather these fresh ingredients: - 1 bell pepper (any color), cut into 1-inch pieces - 1 zucchini, sliced into rounds - 1 yellow squash, sliced into rounds - 1 red onion, cut into wedges - 8 cherry tomatoes - 1 cup mushrooms, cleaned and stems removed - 3 tablespoons olive oil - 2 cloves garlic, finely minced - 1 teaspoon smoked paprika - 1 teaspoon dried oregano - Salt and freshly ground black pepper to taste - 8 skewers (wooden or metal) Fresh vegetables make a big difference in flavor. You can swap in seasonal veggies, like asparagus or eggplant, based on what you find at the market. This keeps your kabobs fresh and exciting. If you have frozen vegetables, use those too! Just remember to thaw and drain them well. Fresh veggies often taste better but frozen can be a great backup. Using fresh ingredients ensures better taste and texture. Fresh veggies hold their shape and crunch better on the grill. When you bite into a grilled kabob, you want that satisfying crunch. Plus, fresh produce packs more nutrients and flavor. So, always try to choose fresh when you can! For the full recipe, check the section above. Cutting vegetables evenly ensures they cook at the same rate. Aim for 1-inch pieces for bell peppers and wedges for onions. Slice zucchini and yellow squash into rounds. If using wooden skewers, soak them in water for at least 30 minutes. This step prevents burning and keeps them strong. Marinating vegetables adds rich flavor. Combine olive oil, minced garlic, smoked paprika, and oregano. Toss in salt and pepper, then mix well. Add your veggies and coat them with the marinade. Let them sit for 15 minutes to soak up the flavors. Preheat your grill to medium-high heat. A hot grill helps create nice grill marks and a good sear. Place the kabobs on the grill grates. Arrange them evenly for better cooking. Cook for about 10-15 minutes. Turn them occasionally to ensure even cooking. Look for tender veggies with nice grill marks. To serve kabobs, use a rustic platter for a warm touch. Garnish with fresh herbs for added color. Serve with tzatziki or yogurt dip for a creamy contrast. Pair with a light salad or grilled protein for a complete meal. Enjoy your delicious creation! For the full recipe, check out the Grilled Veggie Kabobs details above. To boost the taste of your grilled veggie kabobs, try different marinades. Balsamic vinegar adds a sweet tang. Citrus juices like lemon or lime give a bright kick. You can also add spices or herbs. Consider rosemary, thyme, or cayenne pepper for extra flavor. Smoking the veggies adds depth too. If you have a grill with a smoker box, use it. Wood chips like hickory or mesquite can make a big difference. When you assemble your kabobs, think about color and texture. Alternate your veggies for a pretty look. Start with a bell pepper, then add a mushroom, followed by a cherry tomato. This keeps the kabob interesting. To prevent veggies from falling apart, push them snugly together on the skewer. Avoid overloading them; a little space helps. You can also add proteins like chicken or shrimp, or even cheese cubes for variety. This makes your kabobs more filling and tasty. For a twist, try marinating the protein in the same mix as the veggies. If you want to dive deeper into the recipe, check out the Full Recipe for more details! {{image_4}} You can easily customize grilled veggie kabobs by using seasonal vegetables. Here are some ideas: - Summer: Try corn on the cob, eggplant, and asparagus. - Fall: Use butternut squash, Brussels sprouts, and sweet potatoes. - Winter: Consider root veggies like carrots, turnips, and beets. You can also grill fruits alongside your veggies. Fruits add sweetness and a nice contrast. Pineapple, peaches, and bell peppers work well. Skewer them together for fun color and taste. For a great look and texture, combine different colors and shapes. Mix round cherry tomatoes with long zucchini slices. Use bright peppers with earthy mushrooms. This creates visual interest on your plate. You can make grilled veggie kabobs vegan by omitting any animal products. The recipe is already plant-based, so it’s a perfect choice. If you want a gluten-free version, ensure your marinade is gluten-free. Most spices and oils are safe, but check labels. You can enhance nutrition by adding grains or legumes. Try adding cooked quinoa or chickpeas to your kabobs. This gives extra protein and fiber. If you follow a low-carb diet, focus on non-starchy vegetables. Zucchini, bell peppers, and mushrooms are great picks. You can skip the starchy veggies like corn or potatoes. Check out the Full Recipe for more ideas on how to adapt these kabobs! To keep your leftover kabobs fresh, store them in the fridge. Place them in an airtight container. They can last up to three days. For longer storage, freeze them. Wrap each kabob in plastic wrap, then place them in a freezer bag. They can stay frozen for up to three months. When reheating kabobs, use the oven or grill. Preheat the oven to 350°F. Place the kabobs on a baking sheet. Heat them for about 10 minutes. This method keeps the veggies tender. You can also grill them for 5 minutes on medium heat. Avoid microwaving, as it makes them soggy. The freshness of your ingredients matters. Bell peppers and zucchini last well in the fridge for about a week. Tomatoes and mushrooms are best if used within three days. Always check for signs of spoilage before using leftovers. You can prep veggies ahead of time for easy grilling. Cut your bell pepper, zucchini, and onion in advance. Store them in the fridge in sealed bags. This saves time when you're ready to grill. Kabobs are great for meal plans. You can mix and match different veggies throughout the week. Pair them with grains or salads for a full meal. They also work well for lunch boxes. Just make sure to keep them cool until you eat. If you have a gathering, kabobs are a hit! You can set up a kabob station. Guests can choose their favorite veggies. This adds fun and personalization to your meal. Kabobs not only taste great but also look colorful and inviting on the table. For the complete recipe, check out the [Full Recipe]. Can I make these kabobs in the oven? Yes, you can! Set your oven to 400°F. Place the kabobs on a baking sheet. Bake for about 20 minutes, turning halfway through. This gives you a tasty option when grilling isn't possible. What are the best vegetables for grilling? The best vegetables for grilling include: - Bell peppers - Zucchini - Yellow squash - Red onion - Cherry tomatoes - Mushrooms These veggies hold up well on the grill and taste great! How to know when the vegetables are done cooking? Look for nice grill marks and tenderness. You can pierce them with a fork. If they are soft but still firm, they are ready to eat. How to make grilled veggie kabobs more flavorful? Use a good marinade with olive oil, garlic, and spices. Let the veggies soak in the marinade for at least 15 minutes. This step really boosts their taste. Why should you marinate vegetables? Marinating adds flavor and helps keep them juicy. The oil and spices soak into the veggies, making each bite delicious. What type of skewers work best for grilling? Both wooden and metal skewers work well. If using wooden skewers, soak them first. This prevents burning. Metal skewers can be reused and do not need soaking. Can I use tofu or tempeh in veggie kabobs? Yes, tofu or tempeh can add protein. Cut them into cubes and marinate like the veggies. They grill nicely and taste great with the other flavors. How do I prevent vegetables from burning on the grill? Start with a clean grill and preheat it. Keep an eye on the kabobs while grilling. Turn them often to ensure even cooking and avoid burning. What can I serve alongside grilled veggie kabobs? Serve kabobs with dips like tzatziki or hummus. They also pair well with rice, quinoa, or a fresh salad. Adding some bread can complete the meal nicely. You now have all the tools to create delicious grilled veggie kabobs. We covered essential ingredients, preparation methods, grilling tips, and serving ideas. Remember, fresh ingredients make a big difference. You can also customize with various vegetables and flavors. Don’t forget to store leftovers properly for future meals. Enjoy your grilling adventure, and get creative with your kabob variations. With practice, you'll master this fun cooking method that delights everyone!](https://dishtreats.com/wp-content/uploads/2025/06/56cc5cbd-3bee-4e7d-a92f-dff27107e6fe-768x768.webp)