Mexican Street Corn Pasta Salad Fresh and Flavorful Dish

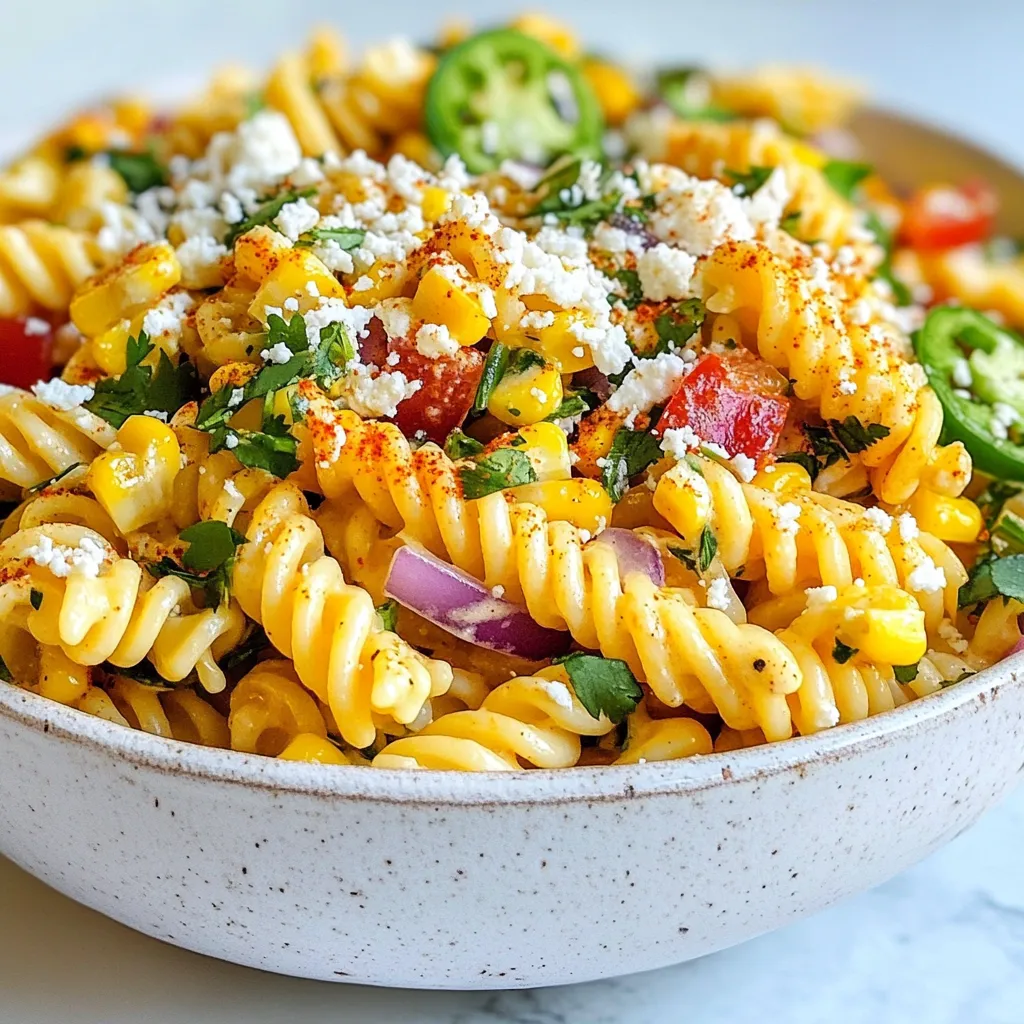
Looking for a fresh twist on pasta salad? This Mexican Street Corn Pasta Salad is bursting with flavor! With sweet corn, zesty lime, and a creamy dressing, it’s a dish that brightens up any meal. Whether you’re hosting a barbecue or need a quick weeknight dinner, this recipe is perfect. I’m excited to share the simple steps and tips to make this crowd-pleaser! Let’s dive in!
Why I Love This Recipe
- Bold Flavor Combination: This pasta salad perfectly captures the essence of Mexican street corn with its vibrant flavors and textures.
- Easy to Prepare: With simple ingredients and straightforward steps, this recipe is quick to whip up, making it perfect for weeknight dinners or picnics.
- Customizable: This dish allows for personal touches—add more veggies, spices, or proteins to suit your taste preferences!
- Great for Meal Prep: This salad tastes even better after chilling in the fridge, making it an ideal option for meal prep and leftovers.
Ingredients
Complete List of Ingredients
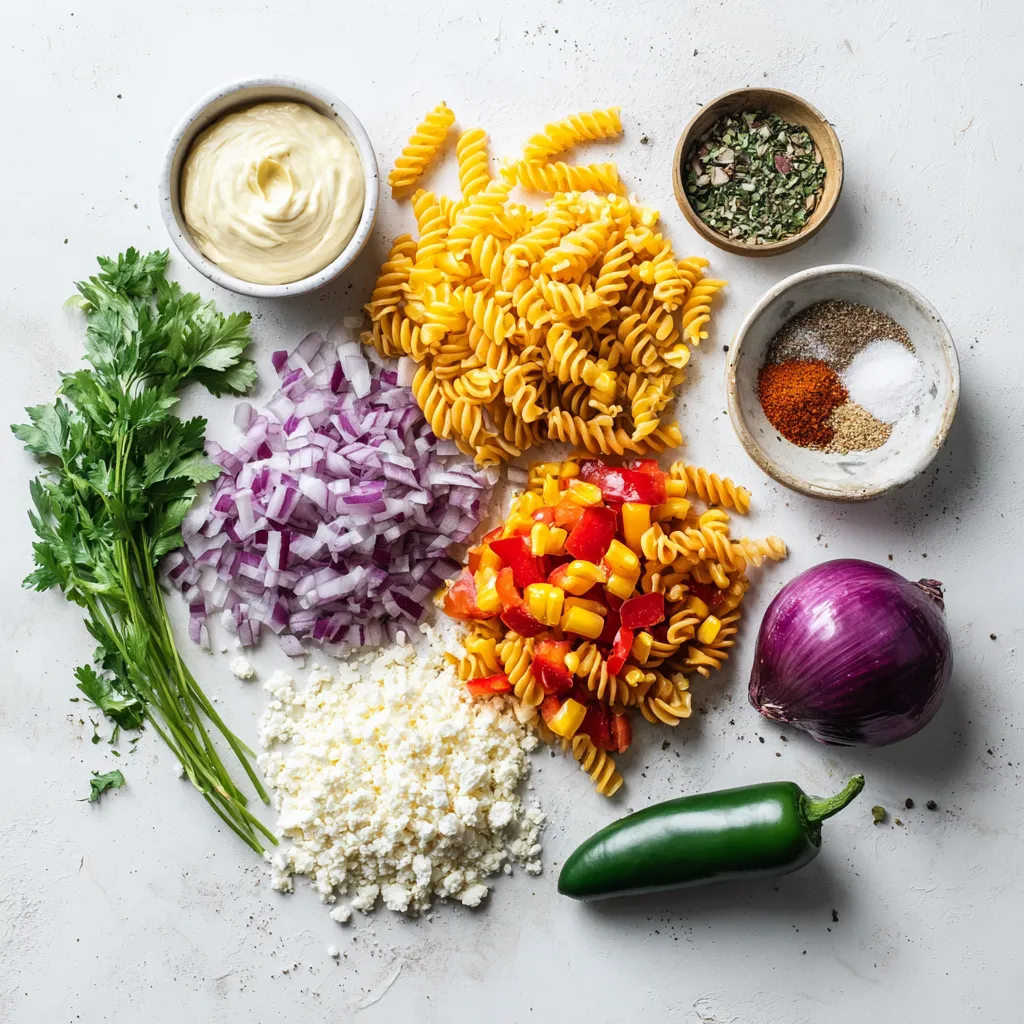
For this tasty Mexican street corn pasta salad, gather these items:
- 8 oz fusilli pasta
- 2 cups corn kernels (fresh or frozen)
- 1 red bell pepper, diced
- 1/2 red onion, finely chopped
- 1 jalapeño, deseeded and minced
- 1/2 cup crumbled cotija cheese
- 1/4 cup fresh cilantro, chopped
- 3 tablespoons mayonnaise
- 2 tablespoons lime juice
- 1 teaspoon chili powder
- Salt and pepper to taste
Ingredient Substitutions
You can easily swap some ingredients if needed:
- Use any pasta shape, like penne or rotini, instead of fusilli.
- If you don’t have cotija cheese, feta works well as a substitute.
- For a creamy vegan option, use dairy-free mayo.
- If lime juice is unavailable, lemon juice is a great alternative.
Fresh vs. Frozen Corn
Fresh corn tastes sweet and bright. It’s a great choice when in season. You can grill or sauté it to enhance the flavor.
Frozen corn is convenient and still tasty. It’s often picked at peak ripeness, so don’t worry if it’s your only option. Just thaw it before adding to the salad.

Step-by-Step Instructions
Cooking the Pasta
Start by boiling a large pot of salted water. Once it boils, add 8 oz of fusilli pasta. Cook according to the package instructions until it’s al dente. This usually takes about 8-10 minutes. Drain the pasta and rinse it under cold water. This stops the cooking process and cools it down. Set the pasta aside to dry completely.
Preparing the Corn
In a large skillet, add 2 cups of corn kernels. You can use fresh or frozen corn. Set the skillet over medium heat. Sauté the corn for 5-7 minutes. Stir occasionally until the corn gets a nice char. This adds flavor. Once done, remove the skillet from the heat and let the corn cool.
Combining the Ingredients
In a large mixing bowl, combine the cooled pasta with the sautéed corn. Next, add 1 diced red bell pepper, 1/2 finely chopped red onion, and 1 minced jalapeño. Stir gently to mix everything evenly. It’s important to blend the flavors well in this step.
Making the Dressing
In a small bowl, whisk together 3 tablespoons of mayonnaise, 2 tablespoons of lime juice, and 1 teaspoon of chili powder. Add salt and pepper to taste. This dressing brings all the flavors together. Make sure it’s smooth before you pour it over the pasta salad.
Final Assembly
Now, pour the dressing over the pasta salad mixture. Toss gently until all the ingredients are coated. Carefully fold in 1/2 cup of crumbled cotija cheese and 1/4 cup of chopped cilantro. This adds a burst of flavor and freshness. Taste the salad. Adjust seasoning if needed. For the best flavor, cover the salad and chill it in the fridge for at least 30 minutes. This allows the flavors to meld beautifully.
Tips & Tricks
Ensuring Perfectly Cooked Pasta
To get the best pasta, start with plenty of water. Use a big pot and add salt. It should taste like the ocean. When the water boils, add the fusilli pasta. Cook it until it’s al dente, which means firm to the bite. This usually takes about 8-10 minutes. After cooking, drain it well. Rinse it under cold water to stop the cooking. This keeps the pasta from getting mushy.
Flavor Boosters and Adjustments
If you want more flavor, try adding extra lime juice or chili powder. A squeeze of fresh lime can brighten the dish. You can also add more jalapeño for heat. Don’t be afraid to adjust the salt and pepper too. Taste your salad before serving. If it lacks flavor, you can easily fix it.
Presentation Tips for Serving
Serve your pasta salad in a large, colorful bowl. This makes it look inviting. For a nice touch, add extra cilantro on top. A sprinkle of chili powder adds color too. Using pretty plates or bowls can enhance the look. Remember, we eat with our eyes first!
Pro Tips
- Fresh Corn is Best: For the most authentic flavor, use freshly grilled corn. The char adds a wonderful smokiness that elevates the salad.
- Customize the Heat: Adjust the amount of jalapeño based on your spice preference. You can also add some diced red chili for extra heat.
- Make Ahead: This salad can be made a day in advance. Just keep it covered in the fridge to enhance the flavors and serve chilled.
- Adding Other Veggies: Feel free to mix in other vegetables like diced cucumbers or cherry tomatoes for added texture and flavor.

Variations
Adding Protein (Chicken, Shrimp, etc.)
You can make this dish heartier by adding protein. Grilled chicken or shrimp works well. Cook the protein first, then chop it into bite-sized pieces. Mix it in with the pasta and veggies. This adds flavor and makes the salad more filling.
Vegetarian and Vegan Options
If you want a vegetarian version, skip the meat. You can add black beans or chickpeas for protein. For a vegan option, replace mayonnaise with a plant-based mayo. Also, use a vegan cheese or skip cheese altogether. This keeps the dish light and fresh.
Spicy and Mild Variations
Adjust the heat to your taste. For spicy, add more jalapeño or use a spicier pepper, like serrano. You can also sprinkle in some cayenne pepper for extra kick. If you prefer mild, leave out the jalapeño. Your salad will still taste great without the heat.
Storage Info
How to Store Leftovers
To keep your Mexican Street Corn Pasta Salad fresh, store it in an airtight container. Place it in the fridge. It will stay good for up to three days. If you notice any extra moisture, drain it before serving.
Reheating Instructions
Reheating this salad is simple. Use the microwave for a quick warm-up. Heat it in short bursts, stirring in between. You can also enjoy it cold, as the flavors still shine through chilled.
Best Practices for Meal Prep
For meal prep, make the salad ahead of time. This allows the flavors to blend beautifully. Store it in individual containers for easy lunches. Prep the ingredients separately if you plan to eat it later in the week. This keeps everything fresh and tasty.
FAQs
Can I use other types of pasta?
Yes, you can use other pasta shapes. Bowtie, penne, or rotini work well. Just make sure to cook them until they are al dente. This keeps the pasta firm and gives a nice bite.
How can I make this salad ahead of time?
You can prepare the salad a day before serving. Just mix all the ingredients but add the dressing later. Keep the salad in the fridge. Add the dressing just before you serve it. This keeps the pasta and veggies fresh.
What to serve with Mexican Street Corn Pasta Salad?
This salad pairs well with grilled meats and tacos. You can serve it as a side or a main dish. It goes great with chicken, steak, or shrimp. Try it with a refreshing drink like agua fresca or iced tea.
Is this recipe gluten-free?
No, this recipe is not gluten-free due to the pasta. However, you can use gluten-free pasta. Look for brands made from rice or chickpeas. This way, you can enjoy the salad without gluten.
Can I freeze Mexican Street Corn Pasta Salad?
It is not ideal to freeze this salad. Freezing may change the texture of the pasta and veggies. If you have leftovers, store them in the fridge and eat them within a few days.
This blog post covers how to make a delicious Mexican Street Corn Pasta Salad. We explored ingredients, cooking steps, and tips for the best results. You can use fresh or frozen corn and substitute ingredients as needed. I shared ways to add protein and make vegetarian options. Plus, I included storage tips to keep your salad tasty.
Enjoy making this easy and flavorful dish. You can impress others with your cooking skills! Happy cooking and eatin

Mexican Street Corn Pasta Salad
Ingredients
- 8 oz fusilli pasta
- 2 cups corn kernels (fresh or frozen)
- 1 red bell pepper, diced
- 0.5 red onion, finely chopped
- 1 jalapeño, deseeded and minced
- 0.5 cup crumbled cotija cheese
- 0.25 cup fresh cilantro, chopped
- 3 tablespoons mayonnaise
- 2 tablespoons lime juice
- 1 teaspoon chili powder
- Salt and pepper to taste
Instructions
- Begin by boiling a large pot of salted water. Once boiling, add the fusilli pasta and cook according to the package instructions until al dente. Drain the pasta and rinse it under cold water to stop the cooking process and cool it down. Set aside.
- In a large skillet set over medium heat, add the corn kernels. Sauté them for about 5-7 minutes, stirring occasionally, until they become slightly charred and tender. Remove the skillet from the heat and let the corn cool.
- In a large mixing bowl, combine the cooled fusilli pasta, the sautéed corn, diced red bell pepper, finely chopped red onion, and minced jalapeño pepper. Stir gently to mix the ingredients evenly.
- In a separate small bowl, whisk together the mayonnaise, lime juice, chili powder, salt, and pepper until smooth. Pour this flavorful dressing over the pasta salad mixture and toss gently until everything is thoroughly combined.
- Carefully fold in the crumbled cotija cheese and chopped cilantro, ensuring they are evenly distributed throughout the salad.
- Taste the salad and adjust the seasoning if necessary by adding more salt and pepper. For best results, cover and chill the salad in the refrigerator for at least 30 minutes before serving, allowing the flavors to meld beautifully.


![- 2 grilled chicken breasts, shredded - 1 cup BBQ sauce (choice of homemade or your favorite store-bought) - 4 cups mixed greens (combination of spinach, arugula, and romaine) - 1 cup cherry tomatoes, halved - 1 cup corn (freshly cooked, canned, or frozen) - 1 ripe avocado, diced - ½ cup red onion, finely sliced - ½ cup shredded cheddar cheese - ¼ cup fresh cilantro, chopped (optional for garnish) - Salt and freshly ground black pepper, to taste - Tortilla chips, for serving on the side Gather these ingredients before you start cooking. Grilled chicken gives a great flavor. You can use any BBQ sauce you like. If you want homemade sauce, that works too! The salad greens add crunch and freshness. Cherry tomatoes and corn give sweetness. Avocado adds creaminess. Red onion gives a nice bite. Shredded cheese makes everything richer. The cilantro is optional, but it adds a nice touch. Finally, don’t forget the tortilla chips for a fun crunch on the side. This combination makes for a bright, colorful, and tasty BBQ chicken salad bowl. For the complete recipe, follow the steps provided in the article. First, shred your grilled chicken breasts. Place the chicken in a medium bowl. Next, pour in your BBQ sauce. You can use homemade sauce or your favorite store-bought kind. Mix it well. Make sure every piece of chicken gets coated with the sauce. This step is key to getting great flavor. After mixing, set the chicken aside. Let it sit for a few minutes. This allows the flavors to meld together. Grab a large salad bowl for this part. Start by adding your mixed greens, which can include spinach, arugula, and romaine. Next, toss in the halved cherry tomatoes, corn, and sliced red onion. Use salad tongs or your hands to mix the greens and veggies. You want everything to be evenly distributed. Now, gently add the diced avocado. Take care to fold it in without mashing it. This keeps the avocado pieces intact and adds a creamy texture. Now it’s time for the fun part! Divide your colorful salad mixture into individual serving bowls. This makes for a beautiful display. On top of each bowl, add a generous scoop of the BBQ chicken. Finish each bowl with a sprinkle of shredded cheddar cheese. This adds richness and flavor. If you like, you can also garnish with fresh cilantro. This step gives a nice touch. Serve your bowls with tortilla chips on the side. They add a satisfying crunch to the meal. For the full recipe, check out the earlier section. Grilling chicken gives it a smoky flavor. This method adds a nice char. Baking chicken is easier and keeps it juicy. Choose what fits your time and setup. For great BBQ flavor, marinate the chicken overnight. This helps the sauce soak in well. Boost your BBQ sauce with spices. Try adding garlic powder, onion powder, or smoked paprika. Fresh herbs like oregano or thyme can also work wonders. If you want cheese alternatives, try feta or goat cheese. Both add a tangy kick to your salad. Layer your salad ingredients for a beautiful look. Start with greens, then add the chicken. Place colorful toppings like tomatoes and corn on top. Use bright bowls to make the meal pop. Vibrant tortilla chips add a fun touch and great crunch. For the full recipe, check back to the beginning! {{image_4}} You can make BBQ chicken salad bowls even more fun by swapping ingredients. Instead of grilled chicken, try using pulled pork or even tofu for a vegetarian option. These proteins still soak up that yummy BBQ flavor. For salad greens, don't feel stuck with just one type. You can mix in kale, romaine, or even baby spinach. Each green adds a new taste and texture. You might also consider adding different vegetables like bell peppers or cucumbers. They can add a nice crunch and freshness to your bowls. While BBQ sauce is a star, you can explore other dressings too. Ranch dressing gives a creamy twist. A tangy vinaigrette can make the salad lighter. Try mixing BBQ sauce with ranch for a unique blend. Don't hesitate to play with BBQ sauce flavors. You could use a spicy version for a kick or a honey BBQ for sweetness. Each type creates a new experience every time you make this dish. When serving your BBQ chicken salad bowls, think about sides that go well. Cornbread or sweet potato fries are great options. They can balance the salad's freshness with some warmth. Get creative with your bowls. Use large lettuce leaves as edible bowls or even hollowed-out bell peppers. This makes your meal fun and different. Plus, it adds color and excitement to your table. For more ideas, check out the Full Recipe to get inspired on how to mix things up! To keep your BBQ chicken salad fresh, store it in the fridge. Use airtight containers. This helps keep the flavors and textures intact. You can also separate the chicken from the salad if you prefer. For reheating BBQ chicken, place it in a microwave-safe dish. Heat it for short intervals, about 30 seconds at a time. Stir it in between to ensure even heating. You want it warm, not hot, to keep the chicken juicy. You can safely eat your prepared salad for up to three days. After that, the greens may wilt and lose their crunch. If you want to keep it longer, consider freezing some components. You can freeze the BBQ chicken for up to three months. Just make sure to package it well in freezer bags. The salad greens and toppings should stay in the fridge, as freezing changes their texture. For a full recipe on how to make this delicious dish, check the [Full Recipe]. It takes about 15 minutes to prep and 15 minutes to cook. So, in total, you’ll need around 30 minutes. This quick time makes it perfect for busy days. Yes, you can prepare this salad ahead of time! Just keep the salad and chicken separate until you’re ready to eat. This way, the greens stay fresh and crisp. You can store the chicken in the fridge for up to three days. When you are ready, mix them together for a tasty meal. If you want to swap out BBQ sauce, you can try teriyaki sauce for a sweet twist. Ranch dressing also works well if you prefer something creamy. Each option gives a different flavor, making your salad fun and unique. To make this recipe gluten-free, choose a gluten-free BBQ sauce. Many brands offer tasty options. Also, ensure your tortilla chips are gluten-free. This way, you can enjoy this dish without worry! This blog post detailed how to create tasty BBQ chicken salad bowls. You learned about key ingredients, from grilled chicken to colorful salad greens. We discussed step-by-step instructions for preparing and assembling the salad, along with cool tips for flavor and presentation. You also discovered variations for ingredients, sauces, and serving suggestions. Now, you can enjoy these bowls at home. Try new flavors and enjoy your meals. With simple swaps, your salad will always be fresh and fun.](https://dishtreats.com/wp-content/uploads/2025/06/ab007e5c-1328-4456-8678-35604ca2185e-768x768.webp)


![- 1 block firm tofu, thoroughly drained and pressed - 1 cup jasmine rice - 2 tablespoons Sriracha sauce The firm tofu acts as the main protein. It absorbs flavors well and provides a hearty bite. Jasmine rice, with its fluffy texture, makes a great base. Sriracha sauce adds the spicy kick, balancing heat and taste. - 1 cup broccoli florets, fresh or frozen - 1 red bell pepper, thinly sliced - ½ cup carrots, julienned or matchstick-cut Broccoli florets add crunch and color. The red bell pepper brings sweetness and a pop of color. Carrots add a nice crunch and a bit of earthiness. Together, they create a vibrant mix that enhances the dish. - 1 tablespoon soy sauce (preferably low-sodium) - 1 tablespoon sesame oil - Fresh cilantro, for garnish Soy sauce brings umami depth. Sesame oil adds a nutty flavor that complements the spice. Fresh cilantro brightens the dish, giving it a fresh finish. This combo of flavors makes each bite exciting. For the full recipe, check out the complete guide. To start, cut the pressed tofu into 1-inch cubes. This size helps the tofu cook evenly. Next, toss the cubes in a bowl with cornstarch. Make sure every piece is coated. This coating is key for a crispy finish when you cook it. Pressing the tofu is vital. It removes excess water, allowing better flavor absorption and texture. Bring vegetable broth to a boil in a medium saucepan. Add the jasmine rice and stir it once. Cover the pan, reduce the heat, and let it simmer for about 15 minutes. This method infuses flavor into the rice. Once the liquid absorbs, fluff the rice with a fork. This step keeps the rice light and airy, which balances the dish. Heat vegetable oil in a large skillet over medium-high heat. Carefully add the cornstarch-coated tofu cubes in a single layer. Fry them for about 8-10 minutes, turning occasionally. You want all sides to turn golden brown and crispy. Once done, transfer the tofu to a plate lined with paper towels. This helps absorb any excess oil. In the same skillet, add the broccoli, red bell pepper, and carrots. Stir-fry the veggies for 4-5 minutes. You want them tender but still bright and colorful. This keeps their nutrients intact. Add the sliced green onions for the last minute. Their fresh taste adds a nice crunch to the mix. In a small bowl, whisk together the Sriracha sauce, soy sauce, sesame oil, and honey (or maple syrup). Mix until well blended. This sauce brings all the flavors together. If you like it spicier, add more Sriracha. For a milder version, reduce the amount. Now, it’s time to put it all together! Divide the fluffy jasmine rice into bowls. Top it with the spicy tofu and vegetable mix. For a polished finish, sprinkle sesame seeds and fresh cilantro on top. This adds flavor and a pop of color to your bowl. For the full recipe, refer back to the main section. Enjoy your Spicy Sriracha Tofu Bowl! To make crispy tofu, you need to press it well. Start by wrapping the block of firm tofu in a clean kitchen towel. Place a heavy object, like a cast iron pan, on top for about 20-30 minutes. This helps remove excess moisture. Next, coat the tofu cubes with cornstarch. Use about 2 tablespoons, ensuring each piece is covered. This coating creates a crunchy texture when cooked. Not everyone enjoys the same heat. If you want less spice, use only 1 tablespoon of Sriracha. You can also mix Sriracha with a bit of honey or ketchup to mellow the heat. For a different flavor, try other sauces. Chili garlic sauce or sweet chili sauce can work well too. Experiment with these options to find what you like best. To save time, prep your ingredients ahead of time. You can chop the vegetables and store them in the fridge for up to three days. Cook the rice and tofu in advance, too. Store them separately in airtight containers. This way, you can quickly assemble your Spicy Sriracha Tofu Bowl when you’re ready to eat. Enjoy the convenience of quick meals without sacrificing taste! For the full recipe, check out the Spicy Sriracha Tofu Bowl. {{image_4}} You can switch the tofu for other protein sources. Tempeh is a great choice. It has a nutty flavor and holds up well in stir-fries. Seitan is another tasty option. It mimics the texture of meat nicely. If you prefer meat, chicken or shrimp work well too. Chicken adds a mild taste, while shrimp brings a sweet, briny flavor. Both cook quickly, making your meal even faster. Feel free to change the vegetables based on the season. In spring, try snap peas or asparagus. In summer, zucchini and bell peppers shine. Winter vegetables like Brussels sprouts and kale add heartiness. You can also use frozen veggies. They save time and are often just as nutritious as fresh ones. Just make sure to thaw and drain excess water before cooking. If you need a gluten-free option, swap soy sauce for tamari. Tamari has a similar flavor but is gluten-free. For the rice, try quinoa or cauliflower rice. Both options are nutritious and add a unique texture to your bowl. Quinoa is protein-rich, while cauliflower rice is low in carbs and calories. These swaps ensure everyone can enjoy this spicy dish! For the complete recipe, check the [Full Recipe]. To keep your spicy Sriracha tofu bowl fresh, store leftovers in an airtight container. Place the bowl in the fridge within two hours of cooking. This helps keep the food safe. Your leftovers can last for up to four days in the fridge. To reheat the tofu without losing its crispness, use an oven or a skillet. If using an oven, preheat it to 350°F (175°C). Place the tofu on a baking sheet for about 10-15 minutes. If using a skillet, heat over medium heat for about 5-7 minutes, turning the tofu occasionally. This keeps it crispy and delicious. You can freeze cooked bowls if you want to save some for later. Place the cooled bowl in a freezer-safe container. It can stay frozen for up to three months. To thaw, move the bowl to the fridge overnight. Reheat it in the oven or a skillet as mentioned above. This way, you can enjoy your spicy Sriracha tofu bowl anytime! For the full recipe, check the earlier sections. To make the Spicy Sriracha Tofu Bowl vegan, swap honey for maple syrup. This simple change keeps the dish sweet and plant-based. Also, check that all products you use are vegan-friendly. For example, ensure your soy sauce is made without animal products. Yes, you can use brown rice. However, remember that brown rice takes longer to cook. It usually needs about 40-50 minutes, while jasmine rice only takes around 15 minutes. Brown rice has a nuttier taste and chewier texture. So, it can change the feel of your bowl. If you don’t have Sriracha, several substitutes work well. You can use chili garlic sauce or sambal oelek for a similar heat. You can also make a homemade version by mixing hot sauce, garlic, and a bit of sugar. This gives you control over the flavor. The spice level of this dish depends on the amount of Sriracha you use. One tablespoon adds mild heat, while two tablespoons ramp up the spice. To adjust heat to your taste, start with less and add more if you like it spicier. Always taste as you go. You can serve this bowl with a side of edamame or a fresh salad. They add nice contrast and extra crunch. For more flavor, drizzle extra Sriracha or sesame oil on top. You can also add lime juice for a zesty touch. Enjoy your meal! For the full recipe, check out the Spicy Sriracha Tofu Bowl details above. You learned how to make a tasty Spicy Sriracha Tofu Bowl. We covered each ingredient and how to prepare them. From cooking the rice to achieving crispy tofu, each step matters. Remember to adjust spices to suit your taste. Feel free to swap in different proteins or veggies to keep it fresh. Store leftovers well to enjoy later. This bowl is not just good; it’s fun to make and share. Enjoy your cooking adventure!](https://dishtreats.com/wp-content/uploads/2025/07/ee3e23f0-fb80-42df-ace0-60219f206871-768x768.webp)