Mediterranean Stuffed Zucchini Boats Flavorful Feast

Are you ready to dive into a vibrant dish that bursts with flavor? Mediterranean Stuffed Zucchini Boats combine fresh veggies and hearty grains to please your taste buds. This recipe is simple, healthy, and customizable, making it perfect for any meal. Join me as I guide you through each step. Let’s create a delightful feast that celebrates the best of Mediterranean cooking!
Why I Love This Recipe
- Healthy and Nutritious: This dish is packed with wholesome ingredients like zucchini, quinoa, and fresh vegetables, making it a great choice for a light yet filling meal.
- Easy to Make: With straightforward steps and minimal prep time, this recipe is perfect for weeknight dinners or meal prep.
- Customizable: You can easily modify the filling ingredients based on your preferences or what you have on hand, making it versatile for any occasion.
- Flavorful and Satisfying: The combination of Mediterranean flavors from olives, feta, and herbs creates a deliciously satisfying dish that everyone will love.
Ingredients
List of Required Ingredients
To make Mediterranean Stuffed Zucchini Boats, gather these key ingredients:
- 4 medium zucchinis
- 1 cup cooked quinoa
- 1 cup cherry tomatoes, halved
- 1/2 cup black olives, pitted and finely chopped
- 1/2 cup feta cheese, crumbled
- 1/4 cup red onion, finely diced
- 2 cloves garlic, minced
- 1 teaspoon dried oregano
- 1 teaspoon dried basil
- 2 tablespoons olive oil
- Salt and pepper, to taste
- Fresh parsley, chopped, for garnish
Optional Ingredients for Customization
You can also add some optional ingredients to make this dish even more exciting:
- Cooked spinach for added greens
- Bell peppers for a sweet crunch
- Pine nuts for a nutty flavor
- Lemon zest for extra brightness
Nutritional Benefits of Ingredients
Mediterranean Stuffed Zucchini Boats are not just tasty; they offer great nutrition too:
- Zucchini is low in calories and high in fiber.
- Quinoa provides complete protein and essential amino acids.
- Olives are a good source of healthy fats and antioxidants.
- Feta cheese adds calcium and protein.
- Tomatoes are rich in vitamins C and K and are great for heart health.
- Garlic may help boost the immune system.
These ingredients create a balanced meal that is both delicious and good for you. Enjoy the flavors of the Mediterranean while nourishing your body!

Step-by-Step Instructions
Prepping the Oven and Zucchini
Start by preheating your oven to 375°F (190°C). This temperature helps cook the zucchini evenly. While the oven warms up, grab your zucchinis. Cut each zucchini in half lengthwise. Be careful with the knife! Use a spoon to scoop out the seeds and some flesh. You want to create hollow boats. Save the scooped-out flesh for later; it will add more flavor to your filling.
Sautéing Aromatics and Combining Filling
Next, heat 2 tablespoons of olive oil in a medium skillet over medium heat. Add 1/4 cup of finely diced red onion and 2 minced garlic cloves. Sauté for about 3-4 minutes until the onion turns soft and clear. This step makes the kitchen smell amazing! Now, chop the reserved zucchini flesh and add it to the skillet. Cook for another 2-3 minutes. This softens the mixture and allows the flavors to blend well.
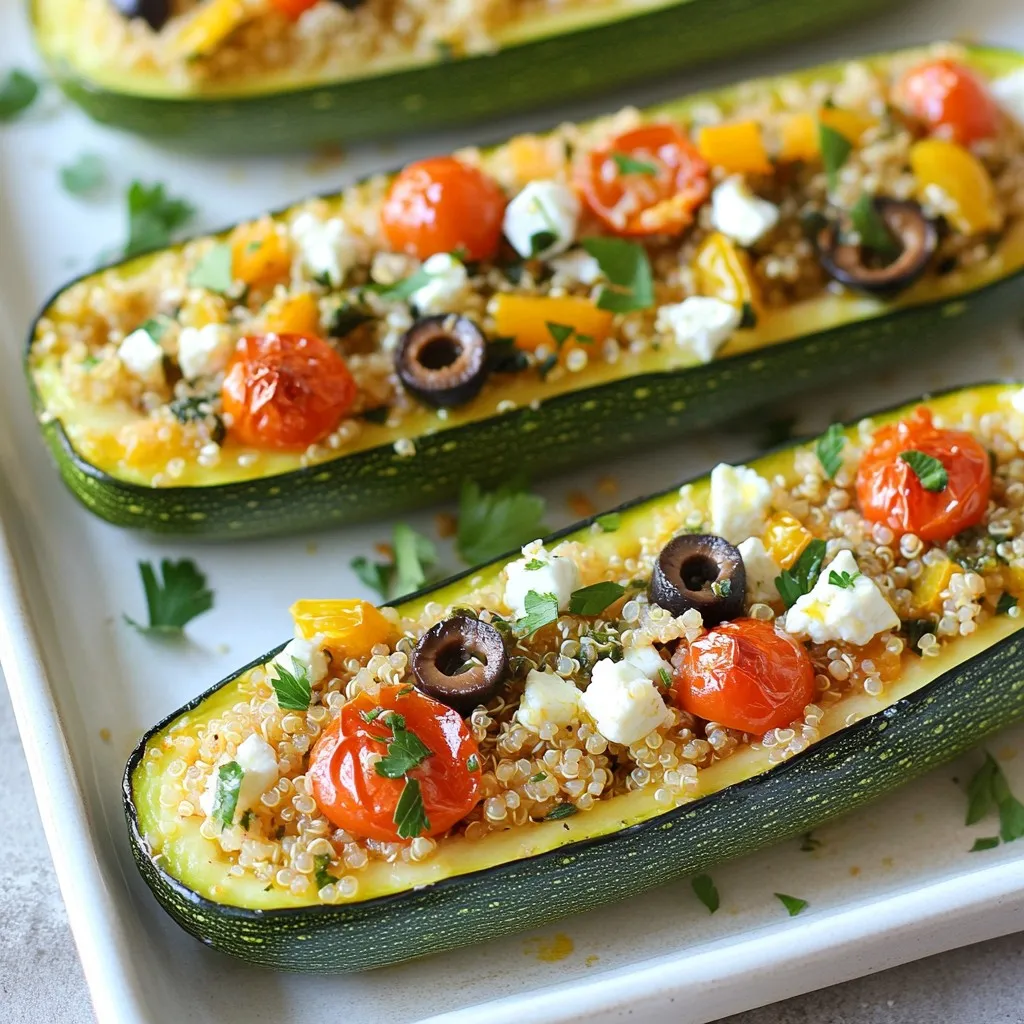
In a large bowl, mix 1 cup of cooked quinoa with the sautéed mixture. Toss in 1 cup of halved cherry tomatoes, 1/2 cup of chopped black olives, and 1/2 cup of crumbled feta cheese. Add 1 teaspoon each of dried oregano and dried basil. Season with salt and pepper to your taste. Stir everything until it’s well combined.
Stuffing and Baking the Zucchini Boats
Now comes the fun part: stuffing the zucchini! Spoon the filling into each hollowed-out zucchini boat. Press down a little to pack the filling tightly. Arrange the stuffed boats in a lined baking dish. For extra flavor, drizzle a bit of olive oil on top of each boat.
Cover the dish with aluminum foil and place it in the oven. Bake for 25 minutes. After that, remove the foil and bake for another 10-15 minutes. You want the zucchini to be soft and the tops to turn golden. Once done, take the zucchini boats out of the oven. Let them cool for a few minutes. Sprinkle freshly chopped parsley on top for a fresh touch before serving. Enjoy your flavorful Mediterranean feast!
Tips & Tricks
Best Practices for Cooking Quinoa
To cook quinoa well, start with a good rinse. Rinsing helps to wash away a bitter coating. Use a 2:1 ratio of water to quinoa. Bring the water to a boil, then add quinoa. Reduce the heat to low, cover, and simmer for about 15 minutes.
Once cooked, let it sit for 5 minutes. Fluff the quinoa with a fork to separate the grains. This makes the quinoa light and airy. You can also season the water with salt for extra flavor.
How to Perfectly Cook Zucchini
For perfect zucchini, choose firm ones. Look for bright green skin without soft spots. Cut the zucchinis in half lengthwise. Use a spoon to scoop out the center, making a boat shape.
Don’t overcook zucchini in the oven. Bake until tender but still firm. This keeps them from becoming mushy. It’s all about that perfect bite.
Serving Suggestions for Mediterranean Flavors
To serve these stuffed zucchini boats, use a large platter. Drizzle some extra virgin olive oil on top. Sprinkle fresh herbs like parsley for a pop of color.
Pair with a light salad or crusty bread. These simple sides enhance the meal. You can also serve a yogurt dip for a cool contrast. Enjoy the fresh Mediterranean flavors!
Pro Tips
- Use Fresh Herbs: Fresh herbs like basil and parsley not only enhance the flavor but also add a vibrant touch to the presentation of your zucchini boats.
- Customize Your Filling: Feel free to add other Mediterranean ingredients like artichoke hearts or sun-dried tomatoes to the filling for a unique twist.
- Check for Doneness: Zucchini can vary in size; check for doneness by inserting a fork into the flesh. It should be tender but not mushy.
- Make Ahead: You can prepare the zucchini boats in advance and store them in the refrigerator. Just bake them when you’re ready to serve!

Variations
Vegetarian Alternatives
You can make this dish fully vegetarian by changing a few ingredients. Instead of feta cheese, use vegan cheese or cashew cream. You can also add more veggies to the filling. Try bell peppers, spinach, or even artichokes. They add flavor and color to your meal. If you like a kick, add some crushed red pepper flakes. This will give your zucchini boats a nice spicy touch.
Protein Additions for Extra Heartiness
If you want more protein, add cooked lentils or chickpeas to the filling. These options are hearty and keep the dish healthy. You can also include cooked ground turkey or chicken. Just sauté the meat before mixing it with the other ingredients. This adds a savory depth and makes the meal more filling.
Gluten-Free Options
This recipe is naturally gluten-free. Quinoa is a great base since it does not contain gluten. If you want to make it even heartier, consider adding gluten-free grains like millet or rice. You can also swap the feta for a gluten-free cheese alternative. Just check the labels to ensure they are safe. This way, everyone can enjoy the deliciousness of stuffed zucchini boats without worry.
Storage Info
Short-Term Storage Tips
To keep your stuffed zucchini boats fresh, let them cool completely first. Place them in an airtight container. Store them in the fridge for up to three days. This way, they stay tasty and safe to eat.
Freezing and Reheating Instructions
If you want to freeze them, wrap each zucchini boat in plastic wrap. Then, place them in a freezer-safe bag. They can last up to three months in the freezer. When you’re ready to eat, thaw them in the fridge overnight. To reheat, place them in a preheated oven at 350°F (175°C). Bake for about 20 minutes until they’re warm all the way through.
Shelf Life of Stuffed Zucchini Boats
Stuffed zucchini boats can last in the fridge for three days. If frozen, they can last for three months. Always check for signs of spoilage, like off smells or changes in texture. Proper storage helps keep your delicious meal safe and enjoyable!
FAQs
How do I know when the zucchini boats are done?
You can tell when the zucchini boats are done by checking their texture. They should be tender but not mushy. The tops should look lightly golden. You can also poke them with a fork. If the fork goes in easily, they are ready. This usually takes about 35 to 40 minutes total in the oven. The smell will be a good hint too. A nice, savory aroma means they are close to done.
Can I use other grains instead of quinoa?
Yes, you can use other grains in this recipe. Brown rice, couscous, or farro all work well. Each grain will change the texture a bit. If you want a gluten-free option, try using rice. Just make sure to cook the grain first before mixing it with the filling. This will help it blend nicely with the other ingredients. You can also mix grains for fun flavor and texture!
What dips or sauces pair well with this dish?
Mediterranean stuffed zucchini boats taste great with various dips and sauces. A classic choice is tzatziki, which adds coolness. Hummus is another tasty option, rich in flavor. You could also try a drizzle of balsamic glaze for a sweet touch. A simple olive oil and lemon juice mix brightens the dish. Feel free to explore and find what you love!
Stuffed zucchini boats offer versatility and nutrition in a tasty package. We covered key ingredients, helpful steps, and useful tips to make the perfect dish. You can customize it with different flavors and dietary options to suit your taste. Proper storage keeps leftovers fresh for later. Remember, this dish can fit any meal and please any palate. Enjoy the process of making these healthy, baked delights in your kitchen. Your creativity shines with every unique boat you creat

Mediterranean Stuffed Zucchini Boats
Ingredients
- 4 medium zucchinis
- 1 cup cooked quinoa
- 1 cup cherry tomatoes, halved
- 1/2 cup black olives, pitted and finely chopped
- 1/2 cup feta cheese, crumbled
- 1/4 cup red onion, finely diced
- 2 cloves garlic, minced
- 1 teaspoon dried oregano
- 1 teaspoon dried basil
- 2 tablespoons olive oil
- to taste salt and pepper
- for garnish fresh parsley, chopped
Instructions
- Preheat your oven to 375°F (190°C). Line a baking dish with parchment paper to prepare for the stuffed zucchini boats.
- Cut the zucchinis in half lengthwise. Using a spoon, carefully scoop out the seeds and some of the flesh to create hollowed-out boats. Reserve the scooped-out flesh for later use.
- In a medium skillet, heat the olive oil over medium heat. Add the finely diced red onion and minced garlic. Sauté for about 3-4 minutes, or until the onion becomes translucent and fragrant.
- Chop the reserved zucchini flesh and add it to the skillet. Cook for an additional 2-3 minutes, allowing the mixture to soften and combine flavors.
- In a large mixing bowl, combine the cooked quinoa, the sautéed onion and zucchini mixture, halved cherry tomatoes, chopped black olives, crumbled feta cheese, dried oregano, dried basil, and season with salt and pepper. Stir until all ingredients are well mixed and evenly distributed.
- Generously spoon the filling into each zucchini boat, pressing down lightly to ensure the boats are well-packed.
- Arrange the stuffed zucchini boats in the prepared baking dish. Drizzle a small amount of olive oil over the top of each boat for added flavor.
- Cover the baking dish with aluminum foil and place it in the preheated oven. Bake for 25 minutes. After 25 minutes, remove the foil and continue baking for an additional 10-15 minutes, or until the zucchini is tender and the tops are lightly golden.
- Once cooked, carefully remove the zucchini boats from the oven. Allow them to cool for a few minutes before serving. Garnish with freshly chopped parsley for a burst of color and added freshness.


![To make tasty roasted veggie grain bowls, gather these items: - 1 cup quinoa, thoroughly rinsed - 2 cups vegetable broth - 1 zucchini, diced into bite-sized pieces - 1 red bell pepper, diced - 1 cup cherry tomatoes, halved - 1 cup broccoli florets, cut into small pieces - 2 tablespoons olive oil - 1 teaspoon garlic powder - 1 teaspoon smoked paprika - Salt and freshly cracked black pepper, to taste - 1 avocado, halved and sliced - ¼ cup tahini - 2 tablespoons freshly squeezed lemon juice - Fresh herbs (such as parsley or cilantro) for garnish Fresh ingredients make a big difference. Choose bright, firm veggies for the best flavor. Here are some tips to ensure freshness: - Look for vibrant colors: Fresh veggies should be bright and appealing. - Check for firmness: Avoid soft or wrinkled produce. - Buy local when possible: Seasonal veggies taste better and last longer. You can swap some ingredients based on your taste or what you have. Here are easy swaps: - Quinoa: Use farro, rice, or barley instead. - Veggies: Try carrots, asparagus, or sweet potatoes. - Tahini: Substitute with yogurt or nut butter for a different sauce. - Herbs: Use basil, dill, or chives for fresh flavor. Explore these options to make your roasted veggie grain bowls unique! For the complete recipe, check the Full Recipe. Start by preheating your oven to 425°F (220°C). This heat is perfect for roasting. While the oven warms, prepare the quinoa. In a medium saucepan, bring 2 cups of vegetable broth to a boil. Once boiling, add 1 cup of rinsed quinoa. Lower the heat, cover, and let it simmer for about 15 minutes. The quinoa will soak up the broth and become fluffy. After cooking, let it rest for 5 minutes. Fluff it with a fork before serving. While the quinoa cooks, prepare your veggies. Grab a large baking sheet and add the diced zucchini, red bell pepper, halved cherry tomatoes, and broccoli florets. Drizzle 2 tablespoons of olive oil over these veggies. Then, sprinkle 1 teaspoon of garlic powder, 1 teaspoon of smoked paprika, salt, and freshly cracked black pepper. Mix everything well to coat the veggies. Place the baking sheet in the oven and roast for 20-25 minutes. Halfway through, stir the veggies to ensure even cooking. They are done when tender and slightly caramelized. For the tahini sauce, combine ¼ cup of tahini and 2 tablespoons of freshly squeezed lemon juice in a small bowl. Whisk them together until smooth. Add a pinch of salt for flavor. If the sauce seems too thick, thin it out with a little water. Adjust it until you reach your desired consistency. You can check the [Full Recipe] for more details. When making roasted veggie grain bowls, avoid overcooking your vegetables. They should be tender but not mushy. Also, don't skip the seasoning. A little salt and pepper make a big difference. Lastly, ensure the quinoa is fluffed well after cooking. This helps the grains mix nicely with the veggies. To boost flavor, try marinating the veggies in olive oil and spices before roasting. You can add herbs like thyme or rosemary for a fresh taste. For texture, consider adding nuts or seeds. Toasted sunflower seeds or crunchy almonds add a nice bite. Roasted veggie grain bowls are great for a filling meal. Pair them with a side salad for more greens. You can also add a protein like grilled chicken or chickpeas for extra nutrition. For a wow factor, drizzle more tahini sauce on top or sprinkle with feta cheese. Check out the Full Recipe for more ideas! {{image_4}} You can switch up the grains in your bowl. Try brown rice, farro, or barley. Each grain brings a different taste and texture. Quinoa is great, but experimenting keeps it fun. You can also use millet for a unique twist. These grains offer more fiber and nutrients. Explore different cooking times for each grain to get them just right. Seasonal veggies make your grain bowl fresh and vibrant. In spring, use asparagus and peas. Summer calls for corn and eggplant. Fall brings sweet potatoes and kale. In winter, think about Brussels sprouts and root vegetables. Each season gives you new flavors and colors. Using fresh, local produce can boost taste and nutrition. Toppings can elevate your bowl. Consider adding nuts or seeds for crunch. Roasted chickpeas add protein and flavor. You might also try feta cheese for a salty kick. Fresh herbs like basil or cilantro can brighten the dish. A squeeze of lime or lemon juice adds freshness. For a spicy touch, drizzle hot sauce or sprinkle red pepper flakes. Each addition brings a new layer of flavor to your meal. Check out the Full Recipe for more ideas! To keep your roasted veggie grain bowls fresh, store them in airtight containers. Make sure to let the bowls cool down before sealing them. This helps prevent moisture buildup, which can make your veggies soggy. You can keep them in the fridge for up to four days. When you’re ready to enjoy your leftovers, reheat them gently. Use the microwave for quick heating. Heat in short bursts, stirring in between, to avoid hot spots. You can also warm them in a pan over low heat. Add a splash of water or broth to keep them moist. Meal prepping is a great way to save time. You can make extra quinoa and roast a variety of veggies. Store them separately in the fridge for easy access. This way, you can mix and match different flavors throughout the week. Just assemble the bowls when you're ready to eat. For a detailed recipe, check the Full Recipe for all the steps! Roasted veggie grain bowls are healthy meals filled with grains and vegetables. They combine cooked grains, like quinoa, with roasted veggies. This mix creates a tasty and colorful dish. You get fiber, vitamins, and minerals in every bite. The flavors blend well, making each bowl satisfying and fun to eat. To make roasted veggie grain bowls, follow these steps: 1. Preheat your oven to 425°F (220°C). 2. Cook 1 cup of quinoa in 2 cups of vegetable broth. Let it simmer until fluffy. 3. Prepare your veggies: dice zucchini, red bell pepper, and halve cherry tomatoes. Add broccoli florets. 4. Toss the veggies with olive oil, garlic powder, smoked paprika, salt, and pepper. 5. Roast the veggies for 20-25 minutes until tender and slightly caramelized. 6. Mix tahini with lemon juice, adding water if needed for the right texture. 7. Assemble the bowls with quinoa, roasted veggies, and avocado slices on top. 8. Drizzle with tahini sauce and add fresh herbs for garnish. You can find the full recipe above for more detailed steps. Yes, you can customize this recipe. Use different grains like brown rice or farro. Change the veggies based on what you like or what is in season. You can also add proteins like chickpeas or grilled chicken. Experiment with different sauces or toppings to make the dish your own. This flexibility makes roasted veggie grain bowls perfect for everyone. This blog covered how to make delicious roasted veggie grain bowls. We discussed key ingredients, focusing on freshness and substitutions. I shared step-by-step instructions for prepping, roasting, and creating a tasty tahini sauce. You learned helpful tips to avoid mistakes and enhance flavor. Variations allowed you to experiment with grains and veggies. Lastly, I provided storage tips to keep leftovers fresh. Roasted veggie grain bowls are flexible and fun. You can mix and match to fit your taste. Enjoy experimenting!](https://dishtreats.com/wp-content/uploads/2025/07/945baa8c-ba42-4ceb-8d11-39d9a326283a-768x768.webp)
![To make spicy chickpea tacos, you need some key items. Here is what you will need: - 1 can (15 oz) chickpeas, thoroughly drained and rinsed - 2 tablespoons extra virgin olive oil - 1 teaspoon ground chili powder - 1 teaspoon ground cumin - 1/2 teaspoon smoked paprika - 1/4 teaspoon cayenne pepper - Sea salt and freshly cracked black pepper to taste - 8 small corn or flour tortillas - 1 ripe avocado, sliced into thin pieces - 1 cup finely shredded purple cabbage - Fresh cilantro leaves for garnish - Lime wedges for serving These ingredients create a tasty and spicy base for your tacos. The spices bring warmth and depth, while the chickpeas offer a great source of protein and fiber. You can add some unique touches to your tacos. Here are some ideas: - Diced tomatoes for freshness - Sliced jalapeños for extra heat - A dollop of sour cream or yogurt for creaminess - Shredded cheese for richness - Corn or black beans for more texture Feel free to mix and match these extras. They can elevate your tacos to a whole new level. Chickpeas are not just tasty; they are also very healthy. Here are some benefits: - High in protein, which helps build muscle - Rich in fiber, aiding in digestion - Contain vitamins and minerals like iron and magnesium - Low in fat, making them a great choice for heart health Including chickpeas in your diet can support your overall health. They are a smart ingredient in any meal. For the full recipe, check the [Full Recipe]. Start by opening a can of chickpeas. Drain and rinse them well. In a bowl, use a fork or potato masher to gently mash the chickpeas. Leave some chunks for texture. You want them slightly broken but not a paste. This will help them stay firm while cooking. Heat 2 tablespoons of extra virgin olive oil in a skillet over medium heat. Once the oil shimmers, add the mashed chickpeas. Sprinkle in the spices: 1 teaspoon of chili powder, 1 teaspoon of cumin, 1/2 teaspoon of smoked paprika, and 1/4 teaspoon of cayenne pepper. Add sea salt and black pepper to taste. Stir well to coat all the chickpeas. Cook for about 5 to 7 minutes. This will make the spices fragrant and the chickpeas slightly crispy. While the chickpeas cook, warm the tortillas in another skillet for about 30 seconds on each side. You can also heat them in the oven. Once the chickpeas are ready, spoon a generous amount onto each tortilla. Top with sliced avocado, shredded purple cabbage, and fresh cilantro. Serve with lime wedges on the side. This adds a zesty touch just before eating. For the full recipe, check out the complete guide! To make your spicy chickpea tacos pop, use a mix of spices. I love pairing chili powder with cumin for a warm base. Adding smoked paprika brings a nice depth. If you want more heat, cayenne pepper is the way to go. You can also try adding garlic powder or onion powder for extra flavor. Experiment until you find your favorite blend. Warming your tortillas is key to a great taco. You can heat them in a skillet, about 30 seconds on each side. This keeps them soft and pliable. Alternatively, stack them, wrap in foil, and warm in the oven. If you prefer a crispy texture, try frying them lightly in oil. Just be careful not to overcook them! Serving matters! Place your tacos on a large platter. Add lime wedges and fresh cilantro for color. You can even include cherry tomatoes or sliced radishes for a vibrant touch. This not only looks great but also invites your guests to dig in. For a fun twist, serve with a side of salsa or guacamole to enhance the flavor. Enjoy the Full Recipe for more tips! {{image_4}} You can turn your spicy chickpea tacos into a taco bowl. Start with a base of rice or quinoa. Then, add your chickpea mixture on top. Pile on shredded cabbage, avocado, and cilantro. This bowl offers a fun twist on the classic taco. You could also add salsa or hot sauce for extra flavor. Feel free to mix in different proteins or veggies. You can add cooked chicken, beef, or shrimp if you want. For a veggie boost, try bell peppers, corn, or zucchini. These options add variety and nutrition to your meal. You can also swap chickpeas for black beans or lentils for a new taste. Making this dish gluten-free is easy. Just use corn tortillas instead of flour ones. They are tasty and safe for those with gluten issues. This recipe is already vegan, so you can enjoy it as is. To enhance flavors, add avocado or a vegan sour cream. These small changes can make a big difference in taste and texture. For the full recipe, check out the earlier sections. To store leftover chickpeas, place them in a clean, airtight container. Make sure the lid seals tightly. You can keep them in the fridge for up to three days. If you want to store them for longer, freeze the chickpeas. They will last for about three months in the freezer. Just remember to label your container with the date. This helps you keep track of freshness. Reheating your tacos is easy! You can microwave them for about 30 seconds. Make sure to cover them with a damp paper towel. This keeps the tortillas soft. If you prefer a crispier taco, reheat them in a skillet. Heat the skillet on medium and warm each taco for about one minute on each side. This way, you keep that delicious crunch! For storing your ingredients, glass containers are best. They are safe, durable, and help keep food fresh. You can also use plastic containers, but make sure they are BPA-free. Small jars work well for spices and herbs. Label each container so you can find what you need quickly. Keep everything in a cool, dry place for the best results. For a full recipe, check the Spicy Chickpea Tacos section. You can make chickpea tacos spicier by adding more cayenne pepper. Start with 1/2 teaspoon and adjust to your heat level. You can also use hot sauce for an extra kick. Another idea is to add chopped jalapeños or serrano peppers. These fresh peppers bring heat and flavor. If you love smoky flavors, try adding chipotle powder. This will give your tacos a nice depth. Yes, you can prepare chickpea tacos in advance. I suggest cooking the chickpeas and storing them in an airtight container. Keep the tortillas and toppings separate until ready to serve. This way, everything stays fresh. You can store the chickpea mixture in the fridge for up to three days. Just reheat it before serving. Fresh toppings like avocado and cilantro should be added last. Spicy chickpea tacos pair well with many sides. You could serve them with rice or quinoa for a filling meal. A fresh salad adds brightness and crunch. Try a simple cabbage slaw or a corn salad. You might also enjoy salsa or guacamole on the side. For drinks, consider a refreshing limeade or a cold beer. This will balance the spice and add flavor. For the full recipe, check out the detailed instructions above. In this post, we covered how to make spicy chickpea tacos. We explored essential ingredients and their health benefits. You learned step-by-step instructions for preparing and cooking chickpeas, assembling tacos, and customizing them. We shared tips for seasoning, tortilla methods, and serving ideas. Variations included taco bowls and gluten-free options. Finally, we discussed how to store leftovers effectively. These tacos are fun, tasty, and good for you. Ready to enjoy your homemade spicy chickpea tacos?](https://dishtreats.com/wp-content/uploads/2025/06/78aca89b-dca0-4457-a4a9-555278ab1264-768x768.webp)