Mediterranean Orzo Salad Fresh and Flavorful Dish

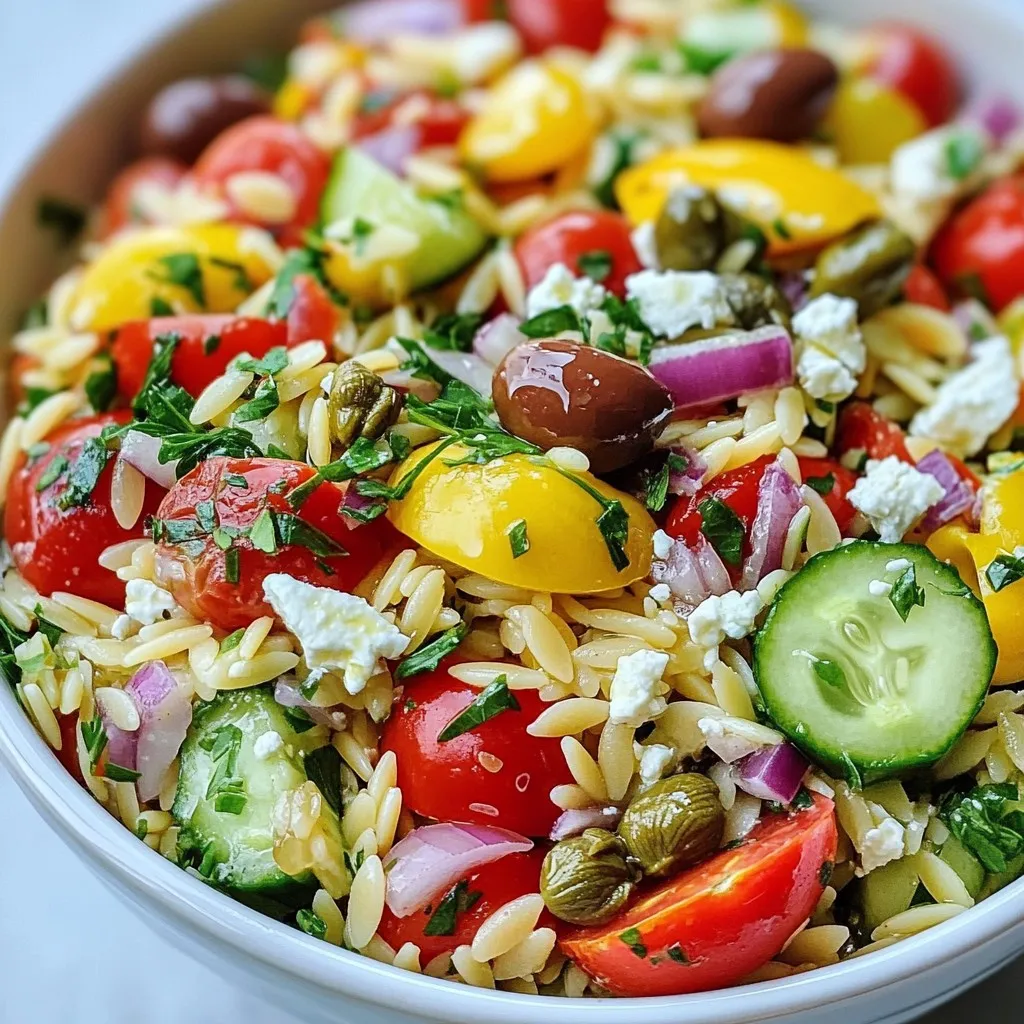
Looking for a dish that bursts with flavor and is easy to make? I’m excited to share my Mediterranean Orzo Salad recipe! This salad is fresh, vibrant, and packed with healthy ingredients. Whether you want a light lunch or a side for dinner, this salad fits the bill. Stick around to learn how to whip it up in no time, and I’ll give you tips to make it your own!
Why I Love This Recipe
- Fresh and Vibrant Ingredients: This salad bursts with the flavors of fresh vegetables and herbs, making every bite a delightful experience.
- Quick and Easy Preparation: With minimal cooking time and straightforward instructions, this recipe is perfect for busy weeknights or last-minute gatherings.
- Versatile and Customizable: You can easily modify this salad by adding or substituting your favorite ingredients, such as grilled chicken or different cheeses.
- Perfect for Meal Prep: This dish keeps well in the fridge, making it an ideal option for meal prepping and enjoying throughout the week.
Ingredients
List of Ingredients
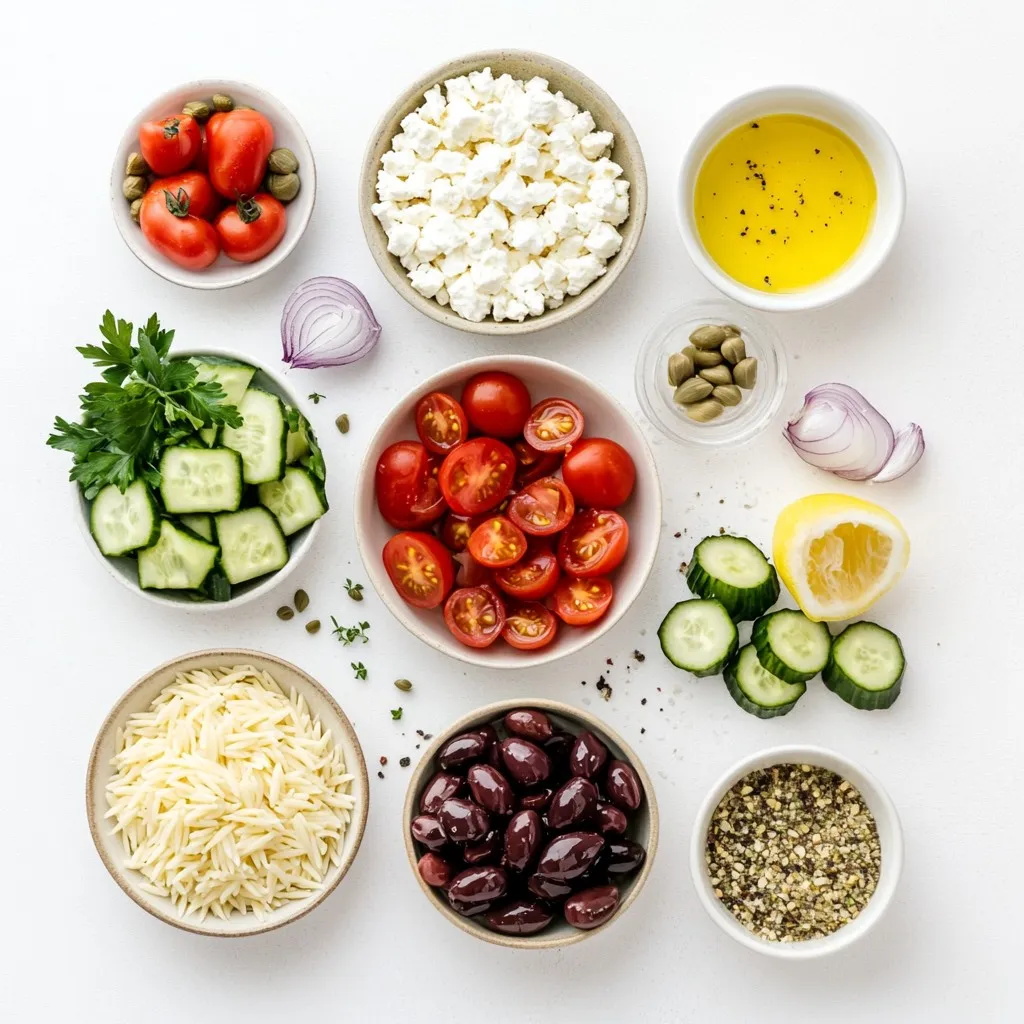
To make a tasty Mediterranean Orzo Salad, gather these ingredients:
- 1 cup orzo pasta
- 1 ½ cups cherry tomatoes, halved
- 1 cup cucumber, diced
- ½ cup red onion, finely chopped
- 1 cup Kalamata olives, pitted and sliced
- 1 cup feta cheese, crumbled
- ½ cup fresh parsley, chopped
- 2 tablespoons capers, rinsed and drained
- ¼ cup extra virgin olive oil
- 2 tablespoons freshly squeezed lemon juice
- 1 teaspoon dried oregano
- Salt and black pepper, to taste
Ingredient Substitutions
You can swap some ingredients to fit your taste. Here are a few ideas:
- Use quinoa instead of orzo for a gluten-free option.
- Swap cherry tomatoes for diced bell peppers for a crunch.
- Try black olives if you cannot find Kalamata olives.
- Use goat cheese instead of feta for a different cheese flavor.
- Fresh basil can replace parsley for a twist.
Nutritional Information
This salad is not just tasty; it’s also healthy. Here’s a quick look:
- Calories: About 250 per serving
- Protein: Approximately 8g
- Carbohydrates: Around 30g
- Fat: About 12g
- Fiber: Roughly 3g
This dish provides great energy and nutrients, making it a smart choice for meals. Enjoy your fresh and flavorful Mediterranean Orzo Salad!

Step-by-Step Instructions
Cooking the Orzo
Start by boiling salted water in a large pot. Once it bubbles, add 1 cup of orzo pasta. Cook it for about 8 to 10 minutes. You want it to be al dente, firm but not hard. When done, drain the orzo in a colander. Rinse it under cold water to stop the cooking.
Mixing the Vegetables
In a big mixing bowl, toss together the fun ingredients. Add 1 ½ cups of halved cherry tomatoes, 1 cup of diced cucumber, and ½ cup of finely chopped red onion. Next, include 1 cup of sliced Kalamata olives and 1 cup of crumbled feta cheese. Don’t forget ½ cup of chopped fresh parsley and 2 tablespoons of rinsed capers. Gently mix everything to blend the colors and flavors.
Preparing the Dressing
Grab a small bowl to make the dressing. Whisk together ¼ cup of extra virgin olive oil and 2 tablespoons of freshly squeezed lemon juice. Then, sprinkle in 1 teaspoon of dried oregano. Add salt and black pepper to taste. Taste it to make sure it has a good flavor.
Combining the Ingredients
Now, it’s time to bring it all together. Add the cooled orzo to the bowl with the mixed veggies and feta. Drizzle the dressing over the top. Toss everything gently until the salad looks colorful and well mixed.
Chilling the Salad
Cover the salad and place it in the fridge. Let it chill for at least 30 minutes. This waiting time helps the flavors blend together perfectly.
Serving Suggestions
Serve the Mediterranean Orzo Salad in a large bowl. For a pop of color, sprinkle extra chopped parsley and some feta on top. If you want a fun way to serve it, try putting the salad in mason jars. Layer the ingredients for a lovely look!
Tips & Tricks
How to Perfectly Cook Orzo
To cook orzo well, start with a large pot. Bring salted water to a boil. Add the orzo and stir gently. Cook it for 8 to 10 minutes. You want it al dente, so taste as you go. Once done, drain the orzo in a colander. Rinse it under cold water to stop the cooking. This keeps it firm and perfect for your salad.
Flavor Enhancements
To boost the flavor of your Mediterranean Orzo Salad, consider these tips. Use fresh herbs like basil or mint for extra taste. A splash of balsamic vinegar can add depth. You can also mix in some diced bell peppers for crunch. If you like a bit of heat, add some red pepper flakes. Don’t forget to taste as you go, adjusting salt and pepper for balance.
Make Ahead and Storage Tips
You can make this salad ahead of time. Prepare it a day in advance for the best flavor. Store it in an airtight container in the fridge. The flavors blend well when chilled. If you have leftovers, keep them in the fridge for up to three days. Just give it a good stir before serving again. If it seems dry, add a splash of olive oil and lemon juice.
Pro Tips
- Cooking Orzo Perfectly: To achieve the perfect al dente texture, ensure you follow the package instructions precisely and taste-test a minute before the suggested time is up.
- Flavorful Dressing: For an extra layer of flavor, consider adding a teaspoon of Dijon mustard or a pinch of red pepper flakes to the dressing.
- Ingredient Variations: Feel free to customize your salad by adding other ingredients like bell peppers, artichokes, or even grilled chicken for added protein.
- Make-Ahead Magic: This salad tastes even better the next day, so feel free to prepare it a day in advance for optimal flavor blending.

Variations
Adding Protein (Chicken, Tuna, etc.)
You can easily boost this salad with protein. Grilled chicken adds great flavor. Simply chop it into bite-sized pieces and mix it in. Canned tuna is another fantastic option. Just drain it well and flake it into the salad. If you want a seafood twist, try adding shrimp. Cook the shrimp in olive oil until pink, then toss them in. Each of these proteins makes the salad filling and tasty.
Vegetarian/Vegan Alternatives
To make this salad vegetarian, simply leave out the feta cheese. You can replace it with tofu or a creamy vegan cheese. For a vegan option, use chickpeas for protein. They add a nice texture and flavor. You can also add more veggies, like bell peppers or zucchini, to keep it vibrant and fresh. This way, you still get a nutritious meal without animal products.
Seasonal Ingredient Swaps
Seasonal swaps keep this salad exciting. In spring, add fresh peas or asparagus for a pop of green. In summer, try ripe peaches or strawberries for sweetness. Autumn brings the chance to add roasted pumpkin or butternut squash. In winter, think about using kale or Brussels sprouts. These changes help you enjoy the best ingredients all year round. Plus, it makes the dish more colorful and tasty!
Storage Info
Best Practices for Storing Leftovers
To keep your Mediterranean Orzo Salad fresh, store it in an airtight container. This helps keep the flavors intact. Make sure to refrigerate the salad right after serving. The salad can last up to three days in the fridge. If you notice any excess liquid, drain it before serving again. This keeps the salad from getting soggy.
Freezing Instructions
I do not recommend freezing Mediterranean Orzo Salad. The texture of the orzo and fresh veggies changes when frozen. If you freeze it, the salad may become mushy when thawed. If you want to save a portion, store it in the fridge instead.
Shelf Life of Ingredients
- Orzo pasta: Uncooked, it lasts for about two years in a cool, dry place.
- Cherry tomatoes: Fresh tomatoes can stay good for up to a week in the fridge.
- Cucumber: It lasts about one week in the fridge.
- Red onion: Whole, it can last for one to two months in a cool, dark area.
- Kalamata olives: Stored in their brine, they can last up to a year.
- Feta cheese: It stays good for about five days after opening, if kept in the fridge.
- Fresh parsley: It stays fresh for about one week in the fridge.
- Capers: They can last up to a year when stored properly in the fridge.
- Olive oil: It stays fresh for about six months after opening, if stored in a cool, dark place.
- Lemon juice: Fresh juice lasts for about three to four days in the fridge.
By following these storage tips, you can enjoy your Mediterranean Orzo Salad longer!
FAQs
What is Orzo Pasta?
Orzo is a small, rice-shaped pasta. It cooks quickly and has a soft bite. You can find it in many dishes, especially in salads. Its unique shape makes it fun to eat and easy to mix with other ingredients.
Can I make Mediterranean Orzo Salad in advance?
Yes, you can prepare this salad ahead of time. Making it a few hours early allows the flavors to blend well. Just keep it in the fridge until you’re ready to serve. If you make it the night before, the taste will be even better.
What can I serve with Mediterranean Orzo Salad?
This salad pairs well with grilled chicken or fish. You can also serve it with pita bread and hummus. A light soup can make a great starter too. It’s a perfect side for summer picnics or barbecues.
Is this salad suitable for meal prep?
Absolutely! Mediterranean Orzo Salad is great for meal prep. It stores well in containers and stays fresh for several days. Just remember to keep the dressing separate if you want it crisp. You can easily grab it for lunch or dinner throughout the week.
This blog post showed you how to make Mediterranean Orzo Salad. We covered the ingredients, how to cook orzo, and mix in vegetables. You learned how to prepare a tasty dressing and tips for perfecting the dish. We explored variations to fit your taste and shared storage tips to keep leftovers fresh.
In short, this salad is simple to make and full of flavor. Enjoy your cookin

Mediterranean Orzo Salad Delight
Ingredients
- 1 cup orzo pasta
- 1.5 cups cherry tomatoes, halved
- 1 cup cucumber, diced
- 0.5 cup red onion, finely chopped
- 1 cup Kalamata olives, pitted and sliced
- 1 cup feta cheese, crumbled
- 0.5 cup fresh parsley, chopped
- 2 tablespoons capers, rinsed and drained
- 0.25 cup extra virgin olive oil
- 2 tablespoons freshly squeezed lemon juice
- 1 teaspoon dried oregano
- to taste Salt and black pepper
Instructions
- In a large pot, bring salted water to a rolling boil. Add the orzo pasta and cook according to the package directions, typically around 8-10 minutes, until al dente. Once cooked, drain the orzo in a colander and rinse under cold water to halt the cooking process and cool it down.
- In a spacious mixing bowl, combine the halved cherry tomatoes, diced cucumber, finely chopped red onion, sliced Kalamata olives, crumbled feta cheese, chopped parsley, and rinsed capers. Gently fold the ingredients together to ensure an even mix.
- In a separate small bowl, whisk together the rich olive oil, fresh lemon juice, dried oregano, and season with salt and black pepper. Adjust the seasoning to your taste, ensuring a well-balanced flavor.
- Add the cooled orzo to the bowl of mixed vegetables and feta. Drizzle the prepared dressing all over the salad and carefully toss until everything is beautifully combined and uniformly coated.
- Sample the salad and adjust the seasoning as needed. You can add a pinch more salt, a dash of pepper, or a splash of lemon juice depending on your flavor preference.
- To allow the flavors to meld seamlessly, cover the salad and refrigerate for at least 30 minutes before serving. This chilling time will enhance the taste of the dish.


![To make the best creamy buffalo chicken dip, you need the following key ingredients: - 2 cups shredded cooked chicken - 1/2 cup cream cheese, softened to room temperature - 1/2 cup sour cream - 1/2 cup plain Greek yogurt - 1/2 cup buffalo sauce (adjust based on desired heat level) - 1 cup shredded sharp cheddar cheese These ingredients create a rich and creamy base that is sure to please any crowd. The chicken adds protein and heartiness, while the cream cheese, sour cream, and Greek yogurt provide a smooth texture. Buffalo sauce gives it that spicy kick, and the sharp cheddar cheese adds a wonderful flavor. You can also enhance your dip with these optional ingredients for extra flavor: - 1/2 teaspoon garlic powder - 1/2 teaspoon onion powder - 1 tablespoon fresh chives, finely chopped (plus additional for garnishing) Garlic powder and onion powder add depth to the dip's flavor profile. Fresh chives bring a pop of color and a mild onion taste. Feel free to add your favorite seasonings to make it truly yours. For the full recipe, check out [Full Recipe]. To start, we need to mix the creamy base. In a large mixing bowl, combine the softened cream cheese, sour cream, and Greek yogurt. Use a hand mixer or spatula to blend until smooth. Make sure there are no lumps. This creamy base will give the dip its rich texture. Next, we add the chicken and buffalo sauce. Fold in the shredded cooked chicken and buffalo sauce gently. Add garlic powder, onion powder, salt, and pepper. Mix until everything is well combined. The buffalo sauce gives this dip its signature kick. Adjust the sauce to suit your taste. Now, we prepare to bake the dip. Spoon the creamy chicken mixture into a medium-sized baking dish. Spread it out evenly. For a cheesy finish, sprinkle some reserved cheddar cheese on top. Preheat your oven to 350°F (175°C). Place the baking dish in the oven and bake for about 20 minutes. The dip should be bubbling and the top lightly golden. After baking, let the dip cool for about 5 minutes. This helps prevent burns when serving. Garnish with fresh chopped chives for a pop of color. For dipping, I recommend using tortilla chips, crunchy celery sticks, or sweet carrot sticks. These dippers complement the creamy dip perfectly. Enjoy this dish at your next gathering or game day! For the complete recipe, check out the [Full Recipe]. To get the perfect creaminess, blend the cream cheese, sour cream, and Greek yogurt well. Use a hand mixer for a smooth texture. This step ensures your dip is rich and velvety. If it feels too thick, add a splash of buffalo sauce to loosen it up. When it comes to heat, buffalo sauce is your friend. Start with half a cup, then taste. If you want more heat, add a little more sauce. Remember, you can always add, but you can't take away! For mixing, I recommend a sturdy mixing bowl and a hand mixer. This combination makes it easy to achieve a smooth mix. If you prefer, a spatula works just as well. For baking, use a medium-sized baking dish. A glass or ceramic dish helps the dip bake evenly. You might also want a cookie sheet underneath for easy handling. Pair your dip with tortilla chips for crunch. Fresh celery and carrot sticks add a great veggie option. You can even set up a fun dip station with various dippers. Try serving the dip in individual ramekins for a party. It makes each serving special and easy to grab. A wooden cutting board adds a rustic touch, making it look even more inviting! {{image_4}} You can easily make this dip fit your needs. For a gluten-free option, use gluten-free buffalo sauce. Check labels to ensure all ingredients are safe. You can also swap regular sour cream with a gluten-free version. If you're watching carbs, try using cream cheese and Greek yogurt as they are lower in carbs. You can reduce the amount of buffalo sauce or serve with veggies instead of chips. Celery sticks and carrot sticks are great low-carb dippers! Want to shake things up? Add a twist with different cheeses. Blue cheese adds a bold flavor that many love. You can also use mozzarella or pepper jack for a creamy texture and a kick. Incorporate extra spices, like smoked paprika or cayenne, to enhance the flavor. Adding diced bell peppers or jalapeños gives it a crunchy texture. These simple changes make your dip unique and fun! No oven? No problem! You can make this dip in a slow cooker. Just mix all ingredients and cook on low for 2-3 hours. Stir occasionally for a creamy result. If you have an air fryer, you can use it too! Place the dip in a heat-safe dish and cook at 350°F for about 15-20 minutes. This method gives it a crispy top while keeping the inside gooey. For the full recipe, check out the link. To keep your creamy buffalo chicken dip fresh, store it in an airtight container. Make sure to let it cool completely before sealing. This helps lock in flavors. Place the container in the fridge. Your dip can last up to 3 days this way. If you have more leftovers, you can freeze it. Use freezer-safe bags or containers. Just be sure to remove as much air as possible. When properly stored, it can last up to 3 months in the freezer. When it comes time to enjoy your dip again, reheating it is key. The best method is to use the oven. Preheat the oven to 350°F (175°C). Place the dip in an oven-safe dish and cover it with foil. Heat for about 15-20 minutes. This keeps the dip creamy and prevents it from drying out. You can use the microwave if you're short on time. Place a portion in a microwave-safe bowl. Heat in 30-second bursts, stirring in between. This method may change the texture a bit, but it still tastes great. In the fridge, your dip stays fresh for about 3 days. After that, the flavor and texture may change. Signs that your dip has gone bad include an off smell, discoloration, or separation. If you see any of these signs, it's best to throw it away. Always trust your senses! For the full recipe, check out the Buffalo Bliss Chicken Dip section above. Can I make this dip ahead of time? Yes, you can prepare this dip ahead of time. Mix all the ingredients and store it in the fridge. Bake it just before serving. This makes it easy for parties. Is it possible to use canned chicken instead of shredded? Yes, you can use canned chicken. It saves time and is easy to mix in. Just drain and shred the chicken before adding it to the dip. The dip has about 300 calories per serving. Each serving is roughly 1/2 cup. If you want to lower calories, use low-fat cream cheese or Greek yogurt. This gives you a tasty dip without adding too many calories. Creamy Buffalo Chicken Dip is great for game day, parties, or family gatherings. It’s a crowd-pleaser! Pair it with cold drinks like beer or soda. You can also serve it with fresh veggies and chips for extra crunch. This article covered how to make creamy buffalo chicken dip, from ingredients to storage. We explored main and optional ingredients, easy step-by-step instructions, tips for a perfect dip, and variations. In the end, making this dip is all about fun and flavor. Enjoy experimenting with ingredients and serving ideas. Whether for game day or a gathering, this dip will impress your guests!](https://dishtreats.com/wp-content/uploads/2025/07/05957703-937f-462f-adea-92812be79973-768x768.webp)

. How to select ripe avocados To choose ripe avocados, look for dark green skin. Gently squeeze without applying too much pressure. A ripe avocado gives slightly. Avoid any that feel too soft or have dark spots. Storing leftover salad To keep leftovers fresh, store them in an airtight container. Place a piece of plastic wrap directly on the salad before sealing. This helps keep the avocados from browning. Additional spices or herbs You can add spices like smoked paprika or cayenne for extra flavor. Fresh herbs like parsley or basil can also brighten the salad. Experiment with what you like to create your perfect mix. Adjusting the heat level If you want more heat, add more jalapeño or a splash of hot sauce. For a milder version, skip the jalapeño or remove the seeds. Adjust to your taste! Presentation ideas For a fun presentation, layer the salad in a clear bowl. This shows off all the bright colors. You can also serve it in individual bowls or mason jars for a neat look. Pairing with other dishes This salad pairs well with grilled chicken, fish, or tacos. You can also serve it as a light lunch or side dish at a barbecue. It adds a fresh touch to any meal. {{image_4}} You can easily change this salad to fit your taste. Adding protein is one great option. Grilled chicken or shrimp works well here. It adds heartiness and flavor. You can also mix in seasonal vegetables. Try diced cucumbers in summer or roasted butternut squash in fall. These add color and texture. You can make this salad vegan by skipping the feta cheese. The other ingredients are already plant-based. It still tastes great without it. If you need a gluten-free version, you’re in luck! This salad is naturally gluten-free. All the ingredients fit a gluten-free diet, so enjoy without worry. For a twist on the dressing, use a yogurt-based option. This adds creaminess without extra fat. It’s a fun change from the classic vinaigrette. You can also try different vinaigrettes. A balsamic or honey mustard vinaigrette can change the flavor. Experiment to find your favorite! For the full recipe, check out the delicious avocado and black bean salad. To keep your avocado and black bean salad fresh, store it in an airtight container. This helps prevent oxidation and keeps flavors intact. Make sure the container is clean and dry before adding the salad. You can also squeeze a little extra lime juice on top. This adds a nice flavor and helps slow browning. I do not recommend freezing this salad. The texture of avocados changes when frozen. You may end up with mushy avocados and watery beans. If you want to save some for later, consider storing the ingredients separately. You can freeze black beans or corn, but mix them fresh with avocado when serving. This salad is best served cold or at room temperature. If you must reheat it, do it gently. Place it in a microwave-safe bowl and heat in short bursts. Stir it often to avoid cooking the avocado. However, reheating is not necessary, as the flavors shine best when fresh. For more details, check the Full Recipe. To keep avocados fresh, use lemon or lime juice. The acid slows browning. Also, store cut avocados in an airtight container. You can cover them with plastic wrap, pressing it against the flesh to limit air exposure. If you leave the pit in the avocado, it helps too. Yes, you can prepare the salad ahead. However, add the avocados and dressing just before serving. This way, they stay fresh. You can chop all the other ingredients earlier. Store them in the fridge to keep them cool. If you want to switch the black beans, try chickpeas or kidney beans. They both add protein and flavor. You could also use grilled chicken or shrimp for a meaty option. If you prefer a vegan choice, lentils are great too. Yes, this salad is gluten-free. All the ingredients are safe for those with gluten issues. If you choose to add any extras, like croutons, check their labels to ensure they are gluten-free. This blog post covered a vibrant salad packed with healthy ingredients. You learned how to prepare fresh avocados, black beans, and various veggies. I shared tips for making the perfect dressing and assembling the salad without mushing the avocados. Remember, customizing the salad allows for everyone’s taste. Keep it fresh, explore new flavors, and enjoy! Healthy eating can be fun and delicious. Take these ideas and make your salad unique.](https://dishtreats.com/wp-content/uploads/2025/06/59c4ae36-0ebd-4eac-932b-d71541cf887d-768x768.webp)


