Margherita Flatbread Pizza Flavorful and Easy Recipe

Are you ready for a simple yet delicious treat? My Margherita Flatbread Pizza recipe packs fresh flavors and easy steps that anyone can follow. With just a few ingredients like rich marinara, fresh mozzarella, and basil, you can create a dish that’s perfect for any meal. Whether you’re cooking for family or friends, this pizza will impress. Let’s dive in and make your next pizza night a breeze!
Ingredients
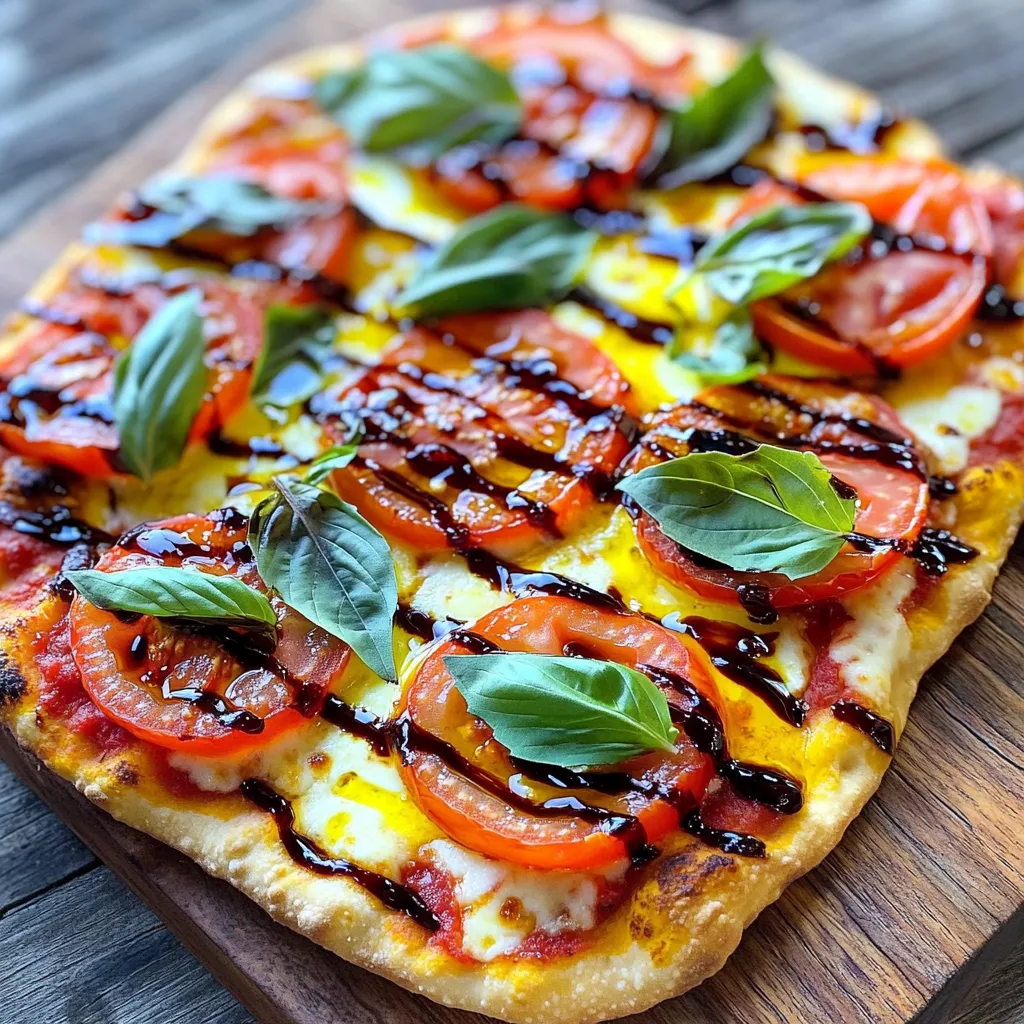
Required Ingredients
- 4 flatbreads or naan breads
- 1 cup rich marinara sauce
- 8 ounces fresh mozzarella cheese, sliced into rounds
- 2 large ripe tomatoes, thinly sliced into rounds
- Handful of fresh basil leaves
- 2 tablespoons high-quality olive oil
- 1 teaspoon aromatic dried oregano
- Sea salt and freshly cracked black pepper, to taste
- Balsamic glaze for drizzling (optional)
When I make Margherita flatbread pizza, I choose fresh, high-quality ingredients. The flatbreads give a nice base. You can use naan bread if you want a slightly thicker crust.
The marinara sauce should be rich and flavorful. I prefer homemade, but store-bought works too. For cheese, fresh mozzarella is key. It melts beautifully and tastes great.
Ripe tomatoes add sweetness and juiciness. I slice them thin to layer nicely. Fresh basil gives that classic Margherita flavor. Olive oil adds richness. I drizzle it on top before baking.
Oregano adds warmth and depth. A pinch of sea salt and cracked black pepper enhances the taste. If you want a gourmet touch, drizzle balsamic glaze after baking.
Ingredient Substitutions
- Flatbreads vs. Traditional Pizza Dough: Flatbreads cook faster and are easier to handle. They are great for quick meals. Traditional dough takes longer but can be used if you prefer.
- Alternative Cheese Options: If you want a different flavor, try burrata or goat cheese. Both add unique tastes that complement the tomatoes well.
- Organic vs. Store-bought Marinara Sauce: Organic sauce often has better flavor and fewer additives. If you’re short on time, a good store-bought option is still tasty.
Step-by-Step Instructions
Preparation Steps
1. Preheating the Oven
Preheat your oven to 450°F (230°C). This heat helps create a crispy crust.
2. Arranging Flatbreads on Baking Sheet
Place the flatbreads on a baking sheet lined with parchment paper. This keeps them from sticking.
Layering and Baking
3. Spreading Marinara Sauce
Spoon a generous amount of marinara sauce onto each flatbread. Leave a small edge for the crust.
4. Adding Mozzarella and Tomatoes
Layer the mozzarella slices on top of the sauce. Ensure even coverage. Then, add the tomato slices, slightly overlapping them for a nice look.
5. Baking Time and Temperature
Put the baking sheet in the oven. Bake for 10-12 minutes until the cheese is melted and bubbly.
Final Touches
6. Adding Basil and Balsamic Glaze
As soon as you take the flatbreads out, sprinkle fresh basil leaves on top. For extra flavor, drizzle balsamic glaze if you like.
7. Slicing and Serving Tips
Use a sharp knife to slice the flatbreads into wedges. Serve hot for the best taste. Enjoy!
Tips & Tricks
Achieving the Perfect Crust
To get a crunchy crust, start with high heat. Preheat your oven to 450°F (230°C). This heat helps the flatbread become crispy. Use a baking sheet lined with parchment paper. This keeps the flatbread from sticking. Place the flatbreads directly on the sheet for the best results. Bake them for 10 to 12 minutes until the cheese is bubbly and golden.
Flavor Enhancements
You can spice up your Margherita flatbread pizza with extra seasonings. Try adding a pinch of red pepper flakes for heat. You can also mix in garlic powder for more depth. When it comes to herbs, fresh basil shines. But dried oregano works well too. Fresh herbs give a vibrant taste, while dried herbs add a concentrated flavor.
Presentation Tips
Serve your pizza on a rustic wooden board for a charming touch. Slice the flatbreads into wedges for easy sharing. Garnish with extra fresh basil leaves to make it pop. If you want to impress, drizzle balsamic glaze over the top. This adds a sweet and tangy finish, making each bite special.

Variations
Different Flatbread Options
You can use many types of flatbreads for this recipe. Whole wheat flatbreads give a nutty flavor and are healthier. They add fiber to your meal. Gluten-free flatbreads work well for those with dietary needs. Check your local store for these options.
You can also change the shape of your flatbread. Try using small rounds for personal pizzas. Cut large flatbreads into squares for a fun presentation. The shape can make your meal more exciting.
Topping Variations
Toppings are where you can get creative! Adding veggies can enhance your pizza’s taste. Bell peppers add a sweet crunch, while olives give a salty kick. You can mix and match as you like.
For protein, consider chicken, pepperoni, or prosciutto. Chicken is a lean option, while pepperoni packs flavor. Prosciutto adds a gourmet touch. Choose what suits your taste best.
Sauce Alternatives
While marinara is classic, try using pesto as a base. Pesto has a bright and fresh flavor. It pairs well with the cheese and tomatoes.
You can also use white sauce for a creamy twist. This adds richness to your flatbread. It can balance the flavors of the toppings nicely.
Explore these ideas to make your Margherita flatbread pizza unique!
Storage Info
Storing Leftovers
After enjoying your Margherita flatbread pizza, store any leftovers properly. Let the pizza cool down first. Wrap each piece in plastic wrap or foil. This keeps the pizza fresh and tasty. Place the wrapped pizza in an airtight container. You can store it in the fridge for up to three days.
If you want to save it for longer, freezing is a good option. Place the wrapped pizza in a freezer-safe bag. Squeeze out any air to avoid freezer burn. It can last up to three months in the freezer.
Reheating Techniques
When it’s time to eat your leftovers, you want them warm and crispy. The best way to reheat them is in the oven. Preheat your oven to 375°F (190°C). Place the pizza on a baking sheet. Bake it for about 10 minutes. This method keeps the crust crunchy.
Avoid using a microwave. Microwaving makes the flatbread soggy. If you must use a microwave, heat it for just 30 seconds. Then, let it sit for a minute before eating. This can help reduce sogginess but may not be as good as the oven.
For those who love a crispy crust, consider using a skillet. Heat the skillet on medium heat. Add the pizza and cover it with a lid. This reheats the pizza while keeping the crust nice. Enjoy every bite!
FAQs
What does Margherita pizza traditionally include?
Margherita pizza has three main toppings: fresh mozzarella, ripe tomatoes, and basil. These elements stand for the colors of the Italian flag. The sauce is usually a simple marinara made with tomatoes, olive oil, and salt. Fresh basil adds a fragrant touch. The ingredients come together to create a dish that is both simple and delicious.
Can I make Margherita flatbread pizza in advance?
Yes, you can prepare the flatbread pizza ahead of time. You can assemble the flatbreads and store them in the fridge. Cover them with plastic wrap to keep them fresh. When you’re ready to eat, just pop them in the oven. Bake until the cheese melts and the flatbread is warm.
How can I make the pizza healthier?
To make your Margherita flatbread pizza healthier, try these tips:
- Use whole wheat flatbreads instead of regular ones.
- Add more vegetables like spinach or bell peppers for extra nutrients.
- Cut back on cheese or use part-skim mozzarella.
- Use less olive oil or choose a low-fat version.
What is the difference between flatbread pizza and regular pizza?
Flatbread pizza uses a thinner crust than traditional pizza. It cooks faster and has a crispier texture. The toppings often sit on top of the flatbread without being buried in dough. This allows the flavors to stand out more. It’s a lighter option, making it a good choice for a quick meal.
Is there a vegan option for Margherita flatbread pizza?
Yes! To make a vegan version, swap out the mozzarella for vegan cheese. You can also use a nut-based cheese or simply skip the cheese altogether. The flavors from the marinara sauce and fresh basil will still shine through. Enjoy this plant-based twist without losing the classic taste.
In this post, we explored how to make delicious Margherita flatbread pizza. We covered required ingredients, step-by-step instructions, and helpful tips. You can easily customize your pizza with various toppings and sauces. Don’t forget to store leftovers properly and reheat them for the best taste. With these simple guidelines, you can enjoy a tasty meal anytime. Get creative and make it your own! Happy cooking!


![- 1 lb boneless, skinless chicken breast, thinly sliced - 1 large bell pepper (red or yellow), sliced into strips - 1 cup broccoli florets, cut into bite-sized pieces - 1 cup snap peas, trimmed - 1 medium carrot, julienned - 1/4 cup low-sodium soy sauce - 1 tablespoon honey - 1 tablespoon rice vinegar - 2 tablespoons sesame oil, divided - 3 cloves garlic, finely minced - 1 tablespoon fresh ginger, finely minced - Sesame seeds for garnish - 3 green onions, chopped (white and green parts kept separate) Using these ingredients, you can create a dish that bursts with flavor. Each element adds its own unique taste. The chicken breast serves as a great protein base. Bell peppers and broccoli contribute crunch and color. Snap peas and carrots add sweetness and texture. When you use sesame oil, garlic, and ginger, you create a rich aroma. These cooking essentials infuse the dish with depth. Finally, the sesame seeds and green onions provide a delightful finish. They enhance the dish's look and add a touch of brightness. For the full recipe, check the detailed instructions. Heat a large skillet or wok over medium-high heat. Add 1 tablespoon of sesame oil. When the oil shimmers, add the thinly sliced chicken. Season it with salt and pepper. Cook the chicken for 5-7 minutes. Stir it often until golden brown and fully cooked. Once done, remove the chicken from the skillet and set it aside. In the same skillet, add the second tablespoon of sesame oil. Let it heat up. Then, add the minced ginger and garlic. Sauté these for about 30 seconds. This step helps unlock their amazing flavors. Now, add the sliced bell pepper, broccoli florets, snap peas, and julienned carrot to the skillet. Stir-fry the vegetables for 4-5 minutes. You want them tender but still crisp. This keeps the dish colorful and crunchy. Return the cooked chicken to the skillet with the vegetables. In a separate small bowl, mix the soy sauce, honey, and rice vinegar. Whisk these until they blend well. Pour this sauce evenly over the chicken and veggies in the skillet. Stir everything together gently. Bring the mixture to a simmer over medium heat. This helps combine all the flavors and makes the dish more delicious. Next, slowly add the cornstarch slurry to the stir-fry. Stir constantly as you add it. Cook for 1-2 more minutes until the sauce thickens to your liking. This gives the dish a nice glossy finish. Remove the skillet from the heat. Add the chopped green tops of the green onions. Toss everything gently to combine. Serve the stir-fry on plates. Sprinkle sesame seeds on top for extra crunch. Enjoy this delightful meal! For the full recipe, you can refer to the earlier sections. For the best chicken stir-fry, use boneless, skinless chicken breast. Thinly slice it for quick cooking. This cut stays tender and soaks up flavors well. Heat your skillet over medium-high heat. This helps sear the chicken quickly, locking in moisture. Want to spice things up? Try adding a dash of red pepper flakes for heat. You can also mix in a splash of hoisin sauce for extra sweetness. Serve this stir-fry with jasmine rice or noodles. Both options soak up the sauce nicely. To plate your dish, start with a mound of rice in the center. Arrange the chicken and veggies around it. This creates a beautiful, colorful display. For garnish, sprinkle sesame seeds and chopped green onions on top. This adds a nice crunch and fresh flavor. For the full recipe, click here: [Full Recipe]. {{image_4}} You can easily change the protein in this dish. If you don’t like chicken, try these options: - Pork: Thinly sliced pork loin works well. - Beef: Flank steak adds great flavor. - Tofu: Firm tofu is perfect for a vegetarian option. - Shrimp: Quick-cooking shrimp gives a seafood twist. For vegetarian or vegan options, stick with tofu or tempeh. These protein sources soak up flavors well and add a nice texture. If you use tofu, press it to remove excess water for better frying. You can swap vegetables based on what’s in season or what you like best. Here are some great choices: - Zucchini: Adds a nice crunch and color. - Mushrooms: They bring an earthy flavor. - Asparagus: Great for spring dishes. - Cauliflower: A fun way to add some fiber. Mixing different veggies can also create a more colorful dish. Try to use at least three different kinds for variety. Adjust the sauce to match your taste. If you like it sweeter, add more honey. For a spicier kick, toss in some red pepper flakes. You can also switch vinegars. Here are some options: - Apple cider vinegar: It gives a fruity flavor. - Balsamic vinegar: Adds depth and sweetness. - White vinegar: For a sharper taste. Experimenting with these changes makes the dish your own. Don’t be afraid to try new flavors! For the full recipe, check the original instructions. To store leftovers, let the stir-fry cool down first. Place it in an airtight container. This keeps it fresh for up to three days in the fridge. When you're ready to eat, just take out the portion you want. If you want to freeze the stir-fry, use a freezer-safe bag or container. Remove as much air as possible to prevent freezer burn. You can freeze it for up to three months. Remember, some veggies may lose crunch when thawed, so choose your mix carefully. To reheat, the best method is on the stovetop. Add a splash of water or broth to keep it moist. Heat it over medium until hot. If you prefer the microwave, use a microwave-safe dish. Cover it with a damp paper towel to keep steam in. This helps maintain the texture and flavor. You can make this dish your own by adding personal touches. Try using different vegetables like zucchini or bok choy. You can also swap chicken for shrimp or tofu. Add your favorite nuts for a crunchy texture. Experiment with spicy sauces to kick up the heat. Each change can give you a new dish! Yes, frozen vegetables work well in this stir-fry. They save time and are easy to use. However, keep in mind that they may cook faster than fresh ones. You might need to adjust your cooking time. Aim for 3-4 minutes instead of 4-5 minutes for the veggies to stay crisp. Stir-fry goes great with several side dishes. Serve it with steamed jasmine rice for a classic touch. You can also pair it with brown rice for a healthier option. Noodles, like soba or rice noodles, also work well. Add a simple side salad for freshness and extra crunch. Absolutely! This sesame ginger chicken stir-fry is perfect for meal prep. Cook a big batch and divide it into containers. It stores well in the fridge for up to three days. To reheat, use a microwave or skillet. Just be sure to add a splash of water to keep it moist. To make this dish healthier, try a few simple swaps. Use less oil, or replace it with cooking spray. Choose low-sodium soy sauce to cut down on salt. Add more vegetables to increase fiber and nutrients. You can also cut back on honey for fewer calories. This blog post covered how to make a tasty Sesame Ginger Chicken Stir-Fry. We discussed key ingredients like chicken, fresh veggies, and flavorful sauces. I shared step-by-step cooking instructions, along with tips to enhance flavor and presentation. We also explored variations for dietary needs and the best ways to store leftovers. In summary, stir-fry is easy, fun, and flexible. You can customize it to suit your tastes. Enjoy making this dish your own, and share it with friends and family!](https://dishtreats.com/wp-content/uploads/2025/06/887f9040-7330-4bb7-a0e7-766c5efe9124-768x768.webp)
![- 1 cup quinoa - 2 cups water or vegetable broth - 1 large cucumber, diced - 1 red bell pepper, diced - 1 cup cherry tomatoes, halved - 1/4 red onion, finely chopped - 1 cup fresh parsley, roughly chopped - 1/4 cup tahini - 2 tablespoons fresh lemon juice - 1 tablespoon extra virgin olive oil - 1 clove garlic, minced - Salt and freshly cracked pepper - 1/4 cup sunflower seeds - Chopped nuts (walnuts or almonds) The ingredients for your Lemon Tahini Quinoa Salad are fresh and colorful. Each one adds flavor and nutrition. Start with quinoa, which is the base of this dish. It is high in protein and gluten-free. For the salad, you need diced cucumber, red bell pepper, cherry tomatoes, red onion, and parsley. The cucumber gives crunch. The red bell pepper adds sweetness. Cherry tomatoes bring juiciness. The red onion gives a mild bite, while parsley adds a fresh taste. Next, let’s talk about the dressing. Tahini is a creamy paste made from sesame seeds. It gives richness to the salad. Lemon juice adds zing and brightness. Olive oil makes it smooth. Garlic adds depth of flavor. A pinch of salt and cracked pepper finishes it off. If you want more texture, try adding sunflower seeds or chopped nuts. They add crunch and healthy fats. This Lemon Tahini Quinoa Salad is easy to make and packed with good ingredients. You can find the Full Recipe to guide you through the steps. First, you need to cook the quinoa. Combine one cup of rinsed quinoa and two cups of water or vegetable broth in a medium saucepan. Bring the mixture to a rapid boil over medium-high heat. Once it boils, lower the heat and cover the pot. Let it simmer for about 15 minutes. The quinoa will soak up all the liquid and become fluffy. After cooking, remove it from heat and let it cool for a bit. While the quinoa cooks, you can prepare the dressing. In a small bowl, whisk together a quarter cup of tahini, two tablespoons of fresh lemon juice, one tablespoon of olive oil, and one clove of minced garlic. Mix until it becomes smooth and creamy. You can add salt and pepper to taste. Now it's time to make the salad. In a large mixing bowl, add one large diced cucumber, one diced red bell pepper, one cup of halved cherry tomatoes, one-fourth of a finely chopped red onion, and one cup of roughly chopped fresh parsley. Stir these ingredients together until they are well mixed. Next, add the cooled quinoa to the bowl with the veggies. Toss everything together gently so the ingredients blend well. Drizzle the tahini dressing over the salad and mix again. For a nice crunch, you can sprinkle a quarter cup of sunflower seeds or chopped nuts on top before serving. For the full recipe, refer to the earlier sections. Enjoy your fresh and flavorful Lemon Tahini Quinoa Salad! To make the best quinoa, start with rinsing it well. This removes any bitter coating. Use cold water and a fine mesh strainer. After rinsing, cook the quinoa in water or broth. Cooking this way adds a nice flavor. Once cooked, let it cool a bit. This helps it mix better with other ingredients. For a creamy dressing, whisk all ingredients together. Use a bowl that allows for easy mixing. If you find clumps, keep whisking until smooth. Adjust the lemon juice and tahini to match your taste. You may like it tangy or mild. Experiment to find your favorite balance. Presentation is key! Serve the salad in colorful bowls. This makes it more inviting and fun. Add lemon slices and fresh parsley on top for a pop of color. These garnishes not only look great but also add extra flavor. For a unique touch, use clear glasses to showcase the vibrant layers of the salad. Check the Full Recipe for more tips on serving! {{image_4}} You can easily boost the protein in your Lemon Tahini Quinoa Salad. Incorporate chickpeas for a hearty touch. These legumes add fiber and flavor. Diced grilled chicken also works well if you want meat. For those following a vegan diet, try tempeh or tofu. Both options soak up flavors and make the salad filling. Feel free to mix in various vegetables. Substitute or add bell peppers, carrots, or creamy avocado. These veggies add crunch and color. You can also use seasonal vegetables for extra freshness. Think of bright summer tomatoes or hearty winter squash. The key is to choose what you enjoy most. Spice up your salad with fun flavors. Add spices like cumin or paprika for a tasty twist. These spices bring warmth and depth to the dish. Fresh herbs like mint or cilantro can brighten things up, too. They add a burst of freshness that takes your salad to the next level. Store your Lemon Tahini Quinoa Salad in an airtight container in the fridge. This keeps it fresh and tasty. It’s best to eat it within 3-5 days. After this time, the flavors may fade, and veggies can lose their crunch. You can freeze quinoa salad if needed. Dress it before serving after you thaw it. Be aware that freezing may change the texture of some vegetables. It’s a good idea to use firmer veggies like bell peppers, as softer ones may not hold up well. I don’t recommend reheating salads. They taste best when served chilled. However, if you want to reheat, you can warm individual components like quinoa or cooked veggies. Just make sure to let them cool before mixing back into the salad. Enjoy the fresh, vibrant flavors! Yes, it's great for meal prep; just dress before serving. This salad stays fresh for days. You can cook the quinoa and chop the veggies in advance. When you are ready to eat, mix in the dressing. This way, the salad will taste fresh. Yes, quinoa is naturally gluten-free. It makes this salad a perfect choice for gluten-free diets. Always check that your other ingredients, like broth, are gluten-free too. This salad is friendly for many diets. You can add different vegetables, proteins, or dressings to suit your taste. Try adding chickpeas for protein or avocados for creaminess. You can also change the herbs or use a different dressing. The choices are endless! It can be a side dish or a main dish, served chilled or at room temperature. For a picnic, serve it cold. If you want a warm meal, let it sit for a bit. Dress it just before serving for the best flavor. Yes, other grains like farro or bulgur can be used as substitutes. Each grain brings a different taste and texture. You can experiment to find your favorite. Just cook them according to package directions. Check the [Full Recipe] for more details! This blog post covered how to make a tasty Lemon Tahini Quinoa Salad. You learned the main ingredients, cooking steps, and tips for perfecting the dish. Remember, feel free to add your favorite proteins or veggies. You can also make it ahead of time for meal prep. Enjoy this salad fresh and chilled for the best flavor. Experiment with it, and you'll find your perfect mix!](https://dishtreats.com/wp-content/uploads/2025/07/0131a3b2-a937-48f9-ad75-9f78e7be101a-768x768.webp)


