Maple Soy Glazed Chicken Thighs Flavorful Dinner Idea

Looking for a delightful dinner idea that will impress your family? Maple Soy Glazed Chicken Thighs are the answer! This dish combines sweet and savory flavors, making it a favorite for any table. In this article, I’ll guide you through the steps to create this mouthwatering meal, share handy tips to perfect your glaze, and even offer variations to suit any taste. Let’s get cooking!
Why I Love This Recipe
- Bold Flavors: The combination of maple syrup and soy sauce creates a perfect balance of sweet and savory that tantalizes the taste buds.
- Easy Preparation: With a simple marinade and straightforward baking process, this dish is perfect for both novice and experienced cooks.
- Versatile Serving Options: This chicken pairs beautifully with a variety of sides, from rice to salads, making it easy to customize your meal.
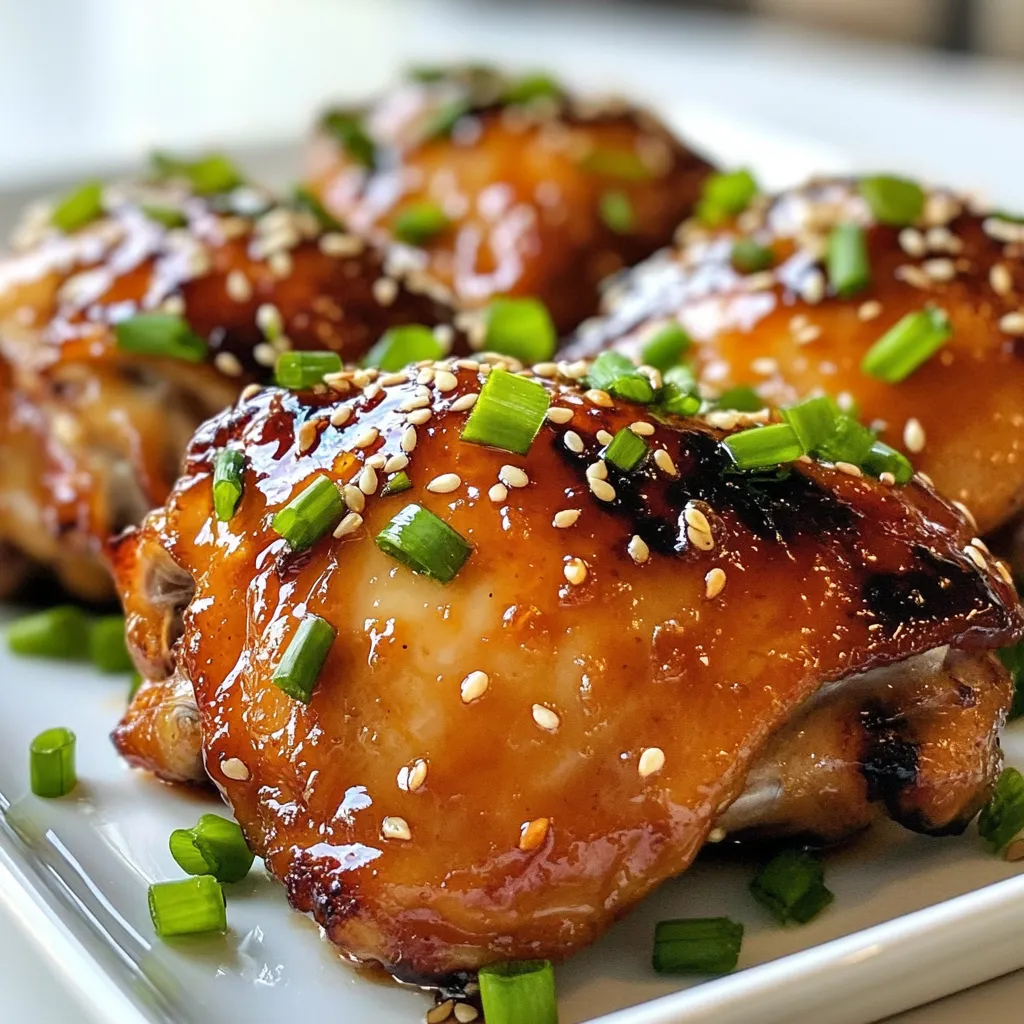
- Impressive Presentation: The golden, crispy skin and colorful garnishes make this dish visually stunning, ideal for entertaining guests.
Ingredients
List of Ingredients with Measurements
- 4 bone-in, skin-on chicken thighs
- 1/4 cup soy sauce
- 1/4 cup pure maple syrup
- 2 tablespoons rice vinegar
- 2 cloves garlic, finely minced
- 1 teaspoon fresh ginger, finely grated
- 1 tablespoon sesame oil
- 1/2 teaspoon freshly ground black pepper
- 1/4 teaspoon red pepper flakes (optional)
- 1 tablespoon sesame seeds (for garnish)
- 2 green onions, thinly sliced (for garnish)
Optional Ingredients for Added Flavor
- You can add a splash of orange juice for a bright twist.
- Try adding a teaspoon of hoisin sauce for more depth.
- Fresh herbs, like cilantro, can enhance the dish’s freshness.
Tips for Ingredient Substitutions
- If you don’t have soy sauce, use tamari for a gluten-free option.
- Maple syrup can be replaced with honey, but the taste will change.
- Rice vinegar can swap with apple cider vinegar if needed.
- For a spicier kick, use chili oil instead of sesame oil.
Using these ingredients wisely makes your Maple Soy Glazed Chicken Thighs shine. Feel free to mix and match based on what you have at home, but keep in mind the core flavors. These tips help you create a tasty meal every time!

Step-by-Step Instructions
Marinating the Chicken
Start by mixing the marinade. In a large bowl, combine:
- 1/4 cup soy sauce
- 1/4 cup pure maple syrup
- 2 tablespoons rice vinegar
- 2 cloves garlic, finely minced
- 1 teaspoon fresh ginger, finely grated
- 1 tablespoon sesame oil
- 1/2 teaspoon black pepper
- 1/4 teaspoon red pepper flakes (optional)
Stir the mixture well. Take your chicken thighs and add them to the bowl. Make sure each thigh is coated in the marinade. Cover the bowl with plastic wrap and refrigerate for at least 1 hour. For better flavor, let it marinate overnight.
Preheating the Oven
When you’re ready to cook, preheat your oven to 400°F (200°C). This high heat helps the chicken get crispy and cook evenly.
Preparing the Baking Dish
Grab a baking dish and line the bottom with parchment paper. This helps prevent sticking. If you do not have parchment, lightly grease the dish with cooking spray or oil.
Arranging and Baking the Chicken
After marinating, take the chicken out of the marinade. Let any extra marinade drip off. Place the thighs in your baking dish, skin-side up. Save the leftover marinade for later. Bake the chicken for 25-30 minutes. Use a meat thermometer to check for 165°F (75°C) inside. The skin should be golden and crispy. Halfway through, baste the chicken with the reserved marinade for added flavor.
Glazing the Chicken
In the last 5 minutes of baking, turn on your broiler. This step gives the skin an amazing glaze. Watch it closely to prevent burning.
Resting and Serving the Dish
When the chicken is done, remove it from the oven. Let it rest for about 5 minutes. This helps the juices settle. Just before serving, sprinkle with sesame seeds and sliced green onions. This adds color and flavor. Serve the chicken on a warm platter with a drizzle of glaze for an inviting look. Pair it with rice or a fresh salad for a complete meal.
Tips & Tricks
Perfecting the Marinade
To make the best marinade, balance the sweet and salty. Use pure maple syrup for rich flavor. Mix soy sauce with rice vinegar for a tangy kick. Fresh garlic and ginger add depth. Let the chicken soak in the marinade for at least one hour. Overnight marinating is even better. This time allows the flavors to seep deep into the meat. Always coat the chicken well to ensure every bite is tasty.
Achieving Crispy Skin
Crispy skin is key for a great chicken dish. Start by preheating your oven to 400°F (200°C). This high heat helps the skin crisp up nicely. After marinating, let excess marinade drip off. Place the chicken skin-side up in the baking dish. Avoid overcrowding the pan. If the pieces are too close, they will steam instead of crisp. In the last five minutes, turn on the broiler. Watch closely to prevent burning. This final touch creates a beautiful glaze.
Common Mistakes to Avoid
One common mistake is not marinating long enough. Quick marinades miss out on flavor. Another error is skipping the broiler step. This step is vital for that sought-after glaze. Also, check the internal temperature. Chicken should reach 165°F (75°C) to be safe. Lastly, don’t rush the resting time. Letting the chicken rest helps keep it juicy.
Pro Tips
- Use Fresh Ingredients: Always opt for fresh garlic and ginger for the marinade; it enhances the overall flavor of the dish significantly.
- Let it Rest: After baking, allow the chicken to rest for a few minutes before serving. This helps the juices redistribute, resulting in juicier meat.
- Monitor the Broiling: When using the broiler for glazing, keep a close eye on the chicken to prevent burning, as it can happen quickly.
- Experiment with Marinade: Don’t hesitate to experiment by adding other flavors to the marinade, such as orange juice or sriracha, for a unique twist.

Variations
Alternative Cooking Methods (Grilling or Air Frying)
You can cook the Maple Soy Glazed Chicken Thighs in different ways. Grilling gives a nice smoky flavor. To grill, preheat your grill to medium heat. Cook the marinated chicken thighs skin-side down for about 6-8 minutes. Then flip and cook for another 6-8 minutes until they reach 165°F. Air frying is another great option. Set your air fryer to 380°F. Cook the chicken for about 25-30 minutes, turning halfway. Both methods yield juicy chicken with a tasty glaze.
Healthier Ingredient Swaps
You can swap some ingredients to make the dish healthier. Use low-sodium soy sauce to cut down on salt. Try using agave syrup instead of maple syrup for fewer calories. You can also replace sesame oil with olive oil for a lighter touch. Fresh herbs like cilantro or parsley are great to add in place of green onions. These swaps keep the flavor while making the dish better for you.
Flavor Enhancements (Additional Spices or Herbs)
Adding spices can take this dish to the next level. Try adding a teaspoon of smoked paprika for a warm flavor. You might also enjoy a hint of lime juice for brightness. Fresh herbs like thyme or basil add freshness. For a bit more heat, toss in some cayenne pepper. Each addition gives your chicken a new flair while keeping the original taste.
Storage Info
How to Store Leftovers
Store your leftover Maple Soy Glazed Chicken Thighs in an airtight container. Let the chicken cool to room temperature first. This helps keep it fresh. Place the container in the fridge. You can enjoy your leftovers for up to three days.
Reheating Tips
To reheat, take the chicken out of the fridge. Preheat your oven to 350°F (175°C). Place the chicken on a baking sheet. Cover it with foil to keep moisture in. Heat for about 15-20 minutes, or until it reaches 165°F (75°C). You can also reheat it in a microwave. Just make sure to cover it to avoid drying out.
Freezing Instructions
If you want to freeze the chicken, wrap it tightly in plastic wrap. Then, place it in a freezer bag. Remove as much air as possible. You can freeze the chicken for up to three months. To thaw, move it to the fridge overnight before reheating. Enjoy your meal even later!
FAQs
Can I use chicken breasts instead of thighs?
Yes, you can use chicken breasts. They will cook faster and may dry out. Thighs have more fat, which keeps them juicy. If you choose breasts, check them often while cooking.
What should the internal temperature be for chicken?
The safe internal temperature for chicken is 165°F (75°C). Use a meat thermometer to check the thickest part. This ensures it’s cooked through and safe to eat.
How long can I marinate the chicken?
You can marinate the chicken for 1 hour up to 24 hours. Longer marinating adds more flavor. Just remember to keep it in the fridge.
What can I serve with Maple Soy Glazed Chicken Thighs?
You can serve the chicken with steamed rice or a fresh salad. Roasted veggies also pair well and add color to your plate. For a twist, try quinoa or couscous.
Can I make this recipe ahead of time?
Yes, you can make this dish ahead. Marinate the chicken the night before for best flavor. You can bake it and store leftovers in the fridge. Heat it up when you are ready to serve.
This blog post covered the essential steps to make Maple Soy Glazed Chicken Thighs. We explored the key ingredients and their options, alongside the cooking methods and tips for success. I shared ways to enhance flavors, store leftovers, and answer common questions.
Enjoy your cooking journey! With these steps, you can create a tasty dish. Happy cookin

Maple Soy Glazed Chicken Thighs
Ingredients
- 4 pieces bone-in, skin-on chicken thighs
- 0.25 cup soy sauce
- 0.25 cup pure maple syrup
- 2 tablespoons rice vinegar
- 2 cloves garlic, finely minced
- 1 teaspoon fresh ginger, finely grated
- 1 tablespoon sesame oil
- 0.5 teaspoon freshly ground black pepper
- 0.25 teaspoon red pepper flakes (optional, for heat)
- 1 tablespoon sesame seeds (for garnish)
- 2 pieces green onions, thinly sliced (for garnish)
Instructions
- In a spacious mixing bowl, combine the soy sauce, maple syrup, rice vinegar, minced garlic, grated ginger, sesame oil, black pepper, and red pepper flakes (if you're craving some spice). Stir well to create a smooth marinade. Add the chicken thighs to the bowl, ensuring they are thoroughly coated with the marinade. Cover the bowl with plastic wrap and place it in the refrigerator for a minimum of 1 hour, or preferably overnight, to infuse maximum flavor.
- Set your oven to preheat at 400°F (200°C). This ensures your chicken will cook evenly and develop a perfect crispy skin.
- Place a piece of parchment paper in the bottom of a baking dish, or lightly grease the dish with cooking spray or oil, which will help prevent the chicken from sticking.
- After marinating, take the chicken thighs out of the marinade, allowing the excess to drip off. Arrange them in the prepared baking dish, skin-side up. Reserve the remaining marinade for later use.
- Place the chicken in the preheated oven and bake for 25-30 minutes. The chicken is done when it reaches an internal temperature of 165°F (75°C) and the skin is golden and crispy. For a flavor boost, baste the chicken with the reserved marinade halfway through the baking time.
- In the last 5 minutes of baking, turn on the broiler. This step will create an incredible glaze on the skin. Monitor the chicken closely to avoid burning.
- Once the chicken is cooked, take it out of the oven and allow it to rest for about 5 minutes to let the juices redistribute. Before serving, sprinkle generously with sesame seeds and sliced green onions for a burst of flavor and a beautiful presentation.


![- 12 ounces of spaghetti or linguine - 4 cups of vegetable broth - 1 tablespoon of olive oil - 6 cloves of garlic, finely minced - 1 teaspoon of red pepper flakes - Zest of 1 lemon - Juice of 2 fresh lemons - 1 cup of cherry tomatoes, halved - 1 cup of fresh spinach leaves - 1/2 cup of grated Parmesan cheese - Salt and freshly ground black pepper to taste - Fresh parsley, chopped for garnish Gathering the right ingredients is key for One-Pot Lemon Garlic Pasta. Each item plays a role in creating a bright and tasty dish. The spaghetti or linguine serves as the base. The vegetable broth gives it depth and flavor. Olive oil adds richness, while garlic brings a punch. Red pepper flakes add just a hint of heat. Next, the lemon zest and juice bring brightness. Cherry tomatoes offer sweetness and color. Fresh spinach adds a pop of green and nutrition. Parmesan cheese gives a creamy finish. Finally, don’t forget salt and pepper to enhance all the flavors. - Use nutritional yeast instead of Parmesan cheese for a vegan option. - Try gluten-free pasta like brown rice or quinoa pasta. If you want to make this dish vegan, swap out the cheese for nutritional yeast. It adds a similar nutty flavor without dairy. For those who need gluten-free options, plenty of pasta choices exist. You can use brown rice or quinoa pasta for a tasty alternative. This recipe stays flexible while keeping its delicious essence. Enjoy exploring these options as you cook! First, heat one tablespoon of olive oil in a large pot over medium heat. Once the oil is hot, add six cloves of finely minced garlic and one teaspoon of red pepper flakes. Sauté this mix for about one to two minutes. Stir it often to avoid burning the garlic. Burnt garlic can ruin the flavor of your dish. Next, pour in four cups of vegetable broth. Then, add the zest of one lemon and the juice of two fresh lemons. Stir gently to mix everything well. The lemon adds a bright flavor that makes this dish special. Now, bring the mixture to a rolling boil. Carefully add twelve ounces of spaghetti or linguine. Make sure the pasta is fully submerged in the broth. This helps it cook evenly. Reduce the heat to a gentle simmer. Cook the pasta while stirring occasionally for about ten to twelve minutes. You want it to be al dente, which means it should be firm to the bite. Most of the liquid should be absorbed by now. After the pasta is cooked, add one cup of halved cherry tomatoes and one cup of fresh spinach. Cook for an additional two to three minutes. Stir until the spinach wilts and the tomatoes soften slightly. Remove the pot from the heat. Stir in half a cup of grated Parmesan cheese. This will give your pasta a creamy texture. Taste it and season with salt and freshly ground black pepper as needed. Allow the pasta to rest for a couple of minutes in the pot. This helps it thicken slightly before serving. For the full recipe, check out the details provided above. Enjoy your flavorful one-pot lemon garlic pasta! To cook pasta al dente, follow these steps: - Use plenty of water for boiling. - Check the pasta package for cooking times. - Taste a piece a minute before the time is up. To avoid burnt garlic, do this: - Keep the heat at medium. - Stir the garlic often. - As soon as it smells good, move to the next step. If you want a zesty kick, add more lemon juice. - Start with an extra half lemon. - Taste and add more if needed. To balance spices, try adding fresh herbs. - Basil or thyme work well. - Chop them finely and mix in before serving. For best pairings, serve with a crisp salad. - A simple green salad brightens the meal. - Garlic bread makes a great side, too. For a nice presentation, use shallow bowls. - Garnish with parsley and extra cheese. - A sprinkle of red pepper flakes adds color. Check the Full Recipe for more details and tips on making this dish shine! {{image_4}} You can make One-Pot Lemon Garlic Pasta even more filling by adding protein. Grilled chicken is a great choice. Just slice it thin and mix it in before serving. Shrimp is another tasty option. Simply cook the shrimp in the pot for a few minutes until they turn pink. If you want a plant-based option, try chickpeas. They are easy to add and packed with protein. Use a can of chickpeas, rinse them, and stir them in with the pasta. They will soak up the lemon flavor and add a nice texture. Using seasonal vegetables can brighten your dish. Fresh veggies add color and nutrition. In spring, consider asparagus or peas. In summer, zucchini or bell peppers work well. You can also substitute spinach with kale or arugula. These greens offer a different taste and texture. Just chop them and add them in the last few minutes of cooking. You can change the sauce to suit your taste. For a creamy lemon sauce, add a splash of cream after cooking. This gives the pasta a rich flavor. If you prefer a dairy-free option, use coconut milk instead. Another way to deepen the flavor is by adding a splash of white wine. Pour it in before the broth. This adds a nice depth that complements the lemon. Just let it cook down for a minute before adding the rest of the ingredients. These variations will keep your One-Pot Lemon Garlic Pasta exciting and new each time you make it. For the complete recipe, check out [Full Recipe]. You can store One-Pot Lemon Garlic Pasta in the fridge for about three days. To keep it fresh, place it in an airtight container. When reheating, add a splash of water or broth to prevent it from drying out. Heat it gently on the stove or in the microwave, stirring often. This keeps the pasta creamy and tasty. If you want to freeze One-Pot Lemon Garlic Pasta, let it cool completely first. Transfer it to a freezer-safe container. It can last for up to three months in the freezer. When you are ready to eat, move it to the fridge to thaw overnight. Reheat it on the stove with a little broth or water. This helps regain its original texture and flavor. Enjoy your meal without fuss! I recommend using spaghetti or linguine for this dish. These shapes cook well and absorb the lemon-garlic flavors nicely. You can also try fettuccine or thin spaghetti if you like. Choose your favorite type based on what you have at home. Yes! You can use gluten-free pasta like brown rice or chickpea pasta. These options hold up well in the dish and taste great. Be sure to check the cooking time, as gluten-free pasta may vary. If you want less heat, simply reduce the red pepper flakes. You can start with half a teaspoon and add more if you want. You can also replace them with a pinch of black pepper for flavor without the heat. This pasta pairs well with a fresh salad or garlic bread. A simple green salad with lemon vinaigrette adds a nice touch. You can also serve it with grilled vegetables or a light protein like chicken or shrimp. Enjoy your meal! This blog post shared a simple recipe for One-Pot Lemon Garlic Pasta. You learned about the key ingredients, including pasta, broth, and fresh veggies. I offered tips on cooking techniques, flavor enhancements, and ways to add protein. You also found storage tips and answers to common questions. This dish is easy to make and great for any meal. Enjoy experimenting with your favorite ingredients and variations!](https://dishtreats.com/wp-content/uploads/2025/07/777f1442-06da-446c-8bc8-b5c2e5ded698-768x768.webp)


