Are you ready to transform your dinner with a simple yet delicious dish? Maple glazed Brussels sprouts combine sweet and savory flavors that will excite your taste buds. This dish is easy to make, perfect for any meal, and packed with nutrients. I’ll guide you step-by-step, from choosing the freshest sprouts to achieving that perfect caramelization. Let’s get started on this delightful journey to a healthier table!
Ingredients
List of Ingredients for Maple Glazed Brussels Sprouts
To make this tasty dish, gather these simple ingredients:
– 1 pound Brussels sprouts, trimmed and halved
– 3 tablespoons extra virgin olive oil
– 1/4 cup pure maple syrup
– 2 tablespoons balsamic vinegar
– 1 teaspoon Dijon mustard
– 1/2 teaspoon fine sea salt
– 1/4 teaspoon freshly ground black pepper
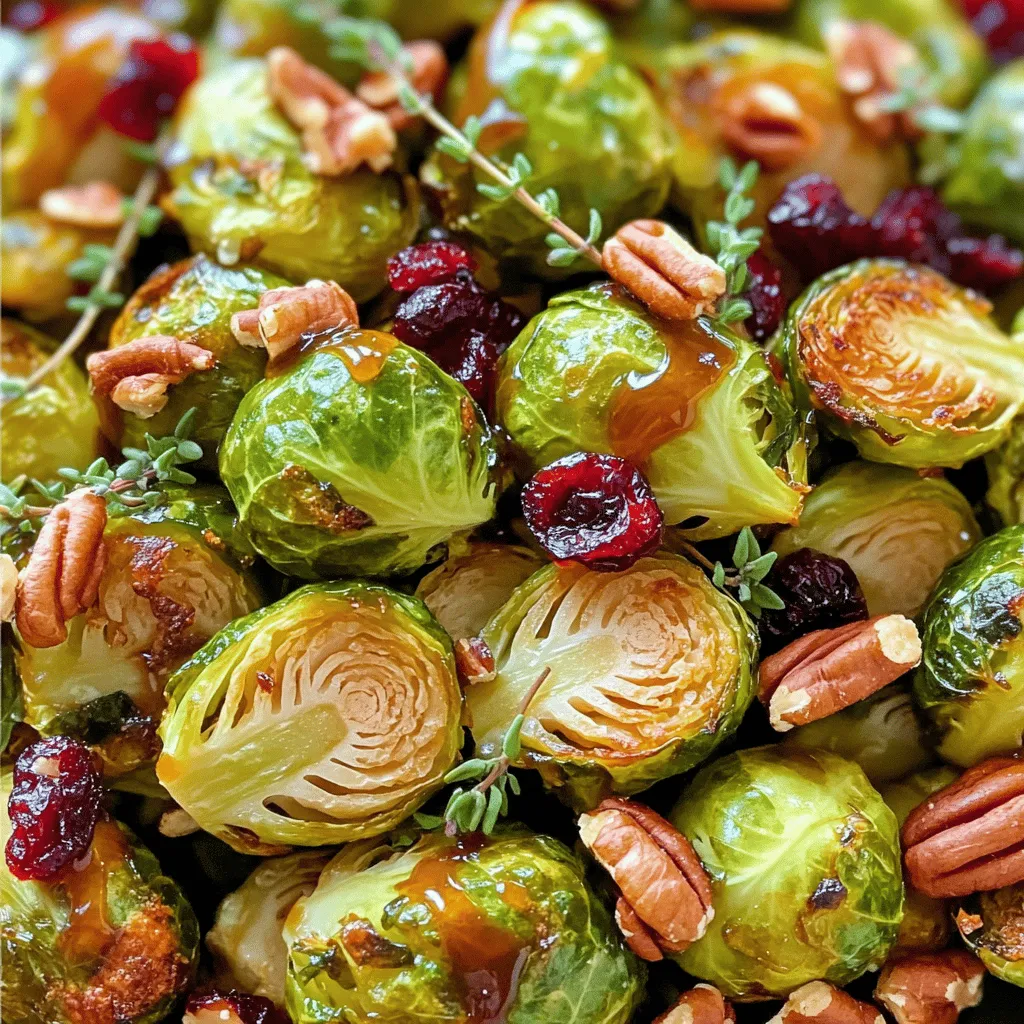
– 1/4 cup pecans, roughly chopped for added crunch
– 1/4 cup dried cranberries for a touch of sweetness
– Fresh thyme leaves for an aromatic garnish (optional)
Measurement Conversions for Seasonal Adjustments
You can easily adjust ingredient amounts based on what you need. Here are some quick conversions:
– If you want to make more, use 2 pounds of sprouts and double the glaze.
– For less, cut the amounts in half. This still keeps the taste great.
– In a pinch, you can swap the pecans for walnuts or almonds.
Nutritional Information Breakdown
This dish not only tastes good but is also good for you. Here’s a quick look at what’s inside:
– Calories: About 200 per serving
– Fat: 12 grams (mostly healthy fats from olive oil and nuts)
– Carbohydrates: 24 grams (includes natural sugars from maple syrup)
– Fiber: 5 grams (great for digestion from Brussels sprouts)
– Protein: 3 grams (from nuts and sprouts)
This breakdown helps you see the benefits of each ingredient. Enjoy making this dish with fresh, seasonal produce for the best flavor and health benefits.
Step-by-Step Instructions
Preheat the Oven and Prepare Your Workspace
Start by preheating your oven to 400°F (200°C). This step is key for getting perfect crispness. While the oven warms up, clear your kitchen counter. Gather all your tools and ingredients. Having everything ready makes cooking much easier.
Detailed Process for Preparing Brussels Sprouts
Take 1 pound of Brussels sprouts. Trim off the ends and cut them in half. Place the halved sprouts in a large mixing bowl. Add 3 tablespoons of extra virgin olive oil and 1/2 teaspoon of fine sea salt. Sprinkle in 1/4 teaspoon of freshly ground black pepper. Toss the sprouts until they are well coated. This ensures each sprout gets flavor.
Roasting and Glazing Techniques
Spread the seasoned Brussels sprouts on a baking sheet. Make sure the cut sides face down. This helps them brown nicely. Place the baking sheet in your preheated oven. Roast for 20-25 minutes. They should be crispy and golden.
While they roast, make the maple glaze. In a small saucepan, mix 1/4 cup of pure maple syrup, 2 tablespoons of balsamic vinegar, and 1 teaspoon of Dijon mustard. Heat over medium heat but do not let it boil. Once the sprouts are ready, drizzle the glaze over them. Toss gently to coat.
Return the glazed sprouts to the oven for 5 more minutes. This step caramelizes the glaze, making it rich and tasty. After that, take them out and add 1/4 cup of roughly chopped pecans and 1/4 cup of dried cranberries. These add crunch and sweetness. If you want, garnish with fresh thyme leaves for even more flavor.
Tips & Tricks
Pro Tips for Choosing Fresh Brussels Sprouts
When you pick Brussels sprouts, look for bright green ones. They should feel firm and heavy in your hand. Avoid any that have yellow leaves or feel soft. The size matters too; smaller sprouts are sweeter and more tender. If you can, buy them on the stalk. They stay fresh longer that way.
How to Achieve Perfect Caramelization
Caramelization makes Brussels sprouts sweet and tasty. To get it right, roast them cut-side down. This lets them get nice and brown. Make sure they have space on the baking sheet. If they are too close together, they will steam instead of roast. Use high heat, about 400°F, for best results. Check them halfway through and give them a stir for even cooking.
Common Mistakes to Avoid
One big mistake is overcooking the sprouts. They should be tender but still have a bit of crunch. Avoid using too much glaze; it can make them soggy. Always glaze right after roasting, then caramelize them for just a few minutes. This step adds flavor without losing the sprout’s crispness. Lastly, don’t skip the nuts and cranberries; they add great texture and taste.

Variations
Adding Different Nuts or Seeds
You can change the taste of maple glazed Brussels sprouts by adding different nuts or seeds. Try walnuts for a rich flavor or sunflower seeds for a crunch. Almonds also work well; they add a nice texture and nutty taste. Each option gives a new twist to your dish. Just sprinkle them on top after roasting for the best crunch and flavor.
Substituting Ingredients for Dietary Preferences
If you need to adjust for dietary needs, it’s easy. Use agave syrup instead of maple syrup for a vegan option. For a nut-free dish, skip the pecans and use pumpkin seeds. You can also swap balsamic vinegar with apple cider vinegar for a light zing. These swaps keep the dish tasty while meeting your needs.
Seasonal Variations for Every Meal
Brussels sprouts shine in fall and winter, but you can adapt them year-round. In spring, add fresh herbs like basil or parsley for brightness. In summer, pair with grilled corn for a sweet twist. You can also mix in seasonal veggies like carrots or sweet potatoes for color and taste. This way, your dish stays fresh and exciting no matter the season.
Storage Info
Best Practices for Storing Leftovers
After enjoying your maple glazed Brussels sprouts, store leftovers right. Place them in an airtight container. They will stay fresh for about three days in the fridge. Keep them away from strong-smelling foods. This helps maintain their flavor.
Reheating Techniques to Retain Flavor
When you reheat, aim to keep the sprouts crispy. Use your oven for the best results. Preheat it to 350°F (175°C). Spread the sprouts on a baking sheet. Heat them for about 10-15 minutes. This method helps keep them crunchy and flavorful. You can also microwave them for quick reheating, but they may not stay as crispy.
Freezing Options for Future Meals
If you want to enjoy these sprouts later, freezing works too. First, let them cool completely. Spread them on a baking sheet in a single layer. Freeze until solid, then transfer to a zip-top bag. They can last up to three months in the freezer. When ready to eat, thaw them overnight in the fridge. Reheat using the oven for the best taste. Enjoy your tasty treat again!
FAQs
Can I make Maple Glazed Brussels Sprouts ahead of time?
Yes, you can prepare these Brussels sprouts ahead of time. After roasting them, let them cool. Store them in an airtight container in the fridge. They stay fresh for up to three days. When you’re ready to serve, just reheat them in the oven. This keeps them crispy and tasty.
What should I serve with Maple Glazed Brussels Sprouts?
These Brussels sprouts pair well with many dishes. Serve them alongside roasted chicken or grilled salmon for a complete meal. They also shine as a side dish for holiday dinners. You can even enjoy them with a grain salad or pasta for a light lunch. The sweet glaze adds a nice touch to any plate.
How can I adjust the sweetness of the glaze?
You can easily change the sweetness of the glaze. If you want it sweeter, add more maple syrup. Start with an extra tablespoon and taste as you go. For a less sweet glaze, reduce the maple syrup. You can add more balsamic vinegar to balance the flavor. Adjust it to match your taste!
We explored how to make Maple Glazed Brussels Sprouts from start to finish. You learned about ingredients, cooking steps, and storage tips. I shared helpful tricks to avoid mistakes and ensure a tasty outcome. You can now customize your dish with variations and serve it with confidence. Remember, fresh ingredients and careful roasting lead to the best flavors. Enjoy making this dish and impress your family and friends. With practice, your skills will grow. Happy cooking!


