Maple Dijon Roasted Carrots Flavorful Side Dish

Looking for a delicious side dish that’s easy to make? Maple Dijon Roasted Carrots pack a sweet and tangy punch you can’t resist. I’ll guide you through simple steps to roast carrots to perfection. With tips for fresh ingredients and storage, you’ll create a dish that impresses at any meal. Let’s dive into this tasty recipe and make your table shine!
Why I Love This Recipe
- Delicious Flavor Combination: The sweet maple syrup perfectly balances the tangy Dijon mustard, creating a delightful flavor profile that elevates the humble carrot.
- Easy Preparation: With just a few simple ingredients and minimal prep time, this recipe is perfect for busy weeknight dinners or last-minute gatherings.
- Healthy and Nutritious: Carrots are packed with vitamins and minerals, making this dish not only tasty but also a nutritious addition to your meal.
- Beautiful Presentation: The vibrant color of the roasted carrots adds a lovely visual appeal to any plate, making your meal look as good as it tastes.
Ingredients
List of Ingredients
To make Maple Dijon Roasted Carrots, you need:
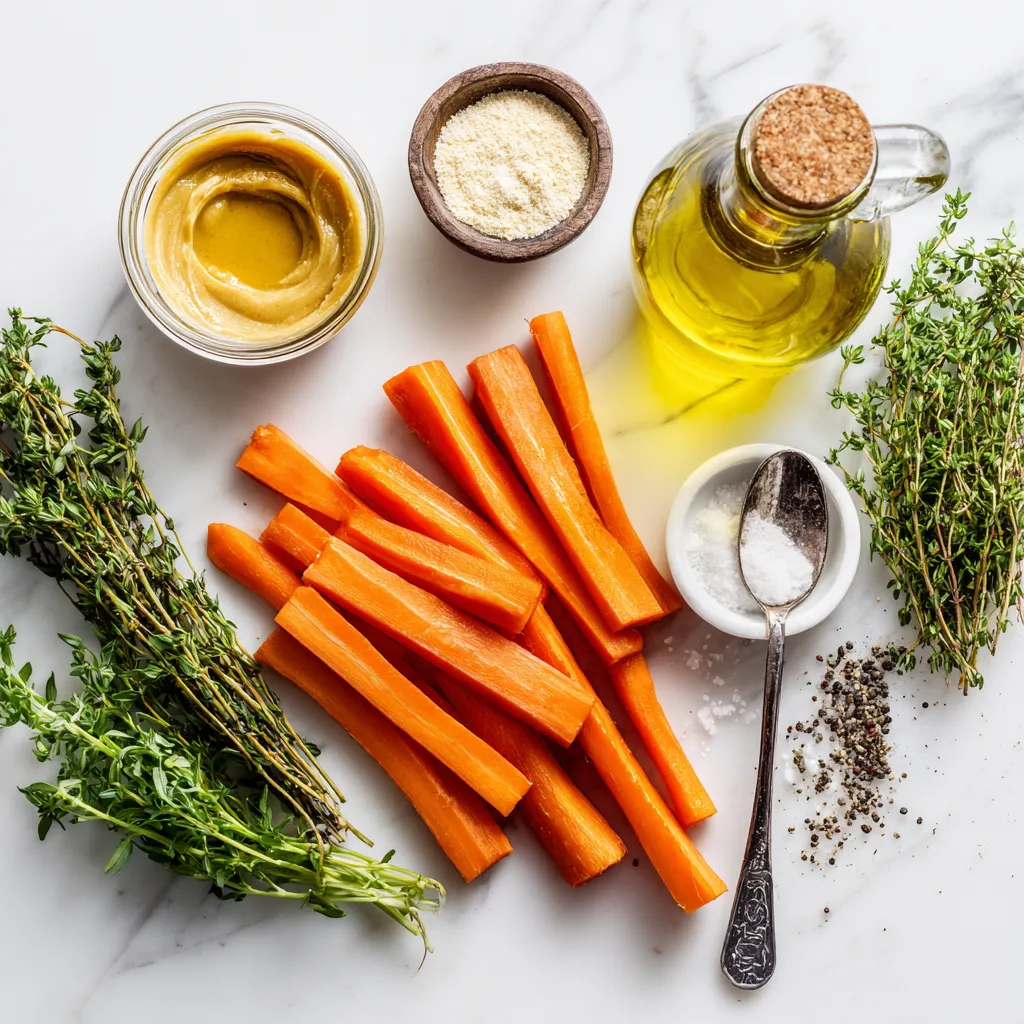
- 1 pound of medium-sized carrots, peeled and cut into uniform sticks
- 3 tablespoons pure maple syrup
- 2 tablespoons Dijon mustard
- 2 tablespoons extra-virgin olive oil
- 1 teaspoon garlic powder
- 1/2 teaspoon sea salt
- 1/4 teaspoon freshly ground black pepper
- Fresh thyme or flat-leaf parsley for garnish (optional)
Ingredient Substitutions
You can swap some ingredients if needed. Use honey instead of maple syrup. For a milder taste, use yellow mustard instead of Dijon. You can also use avocado oil instead of olive oil. If you don’t have garlic powder, fresh garlic works well too. Just chop one clove finely. For garnish, try using chives or dill if you want other flavors.
Tips for Choosing Fresh Carrots
When picking carrots, look for firm ones. They should be bright orange and smooth. Avoid carrots that are soft or have dark spots. The greens on top should look fresh and not wilted. If you can, buy organic carrots for better taste and fewer chemicals. Always store them in the fridge to keep them crisp.

Step-by-Step Instructions
Preparation Steps
Start by preheating your oven to 425°F (220°C). This heat makes the carrots sweet and tender. Next, grab a large mixing bowl. In this bowl, combine 3 tablespoons of pure maple syrup, 2 tablespoons of Dijon mustard, and 2 tablespoons of extra-virgin olive oil. Add 1 teaspoon of garlic powder, 1/2 teaspoon of sea salt, and 1/4 teaspoon of freshly ground black pepper. Whisk these ingredients together until they blend smoothly.
Now, peel and cut 1 pound of medium-sized carrots into uniform sticks. Add these carrot sticks to your bowl and gently toss them in the maple-Dijon mixture. Make sure each stick is coated well. This step ensures every bite is packed with flavor.
Roasting Process
Line a baking sheet with parchment paper. This helps with easy cleanup and prevents sticking. Spread the coated carrots in a single layer on the baking sheet. Avoid overcrowding; this lets them roast evenly. Place the baking sheet in your preheated oven. Roast the carrots for 25-30 minutes. Halfway through, stir the carrots gently. This promotes even cooking and caramelization. The carrots are done when they are fork-tender and have a nice caramel color on the edges.
Garnishing and Serving Suggestions
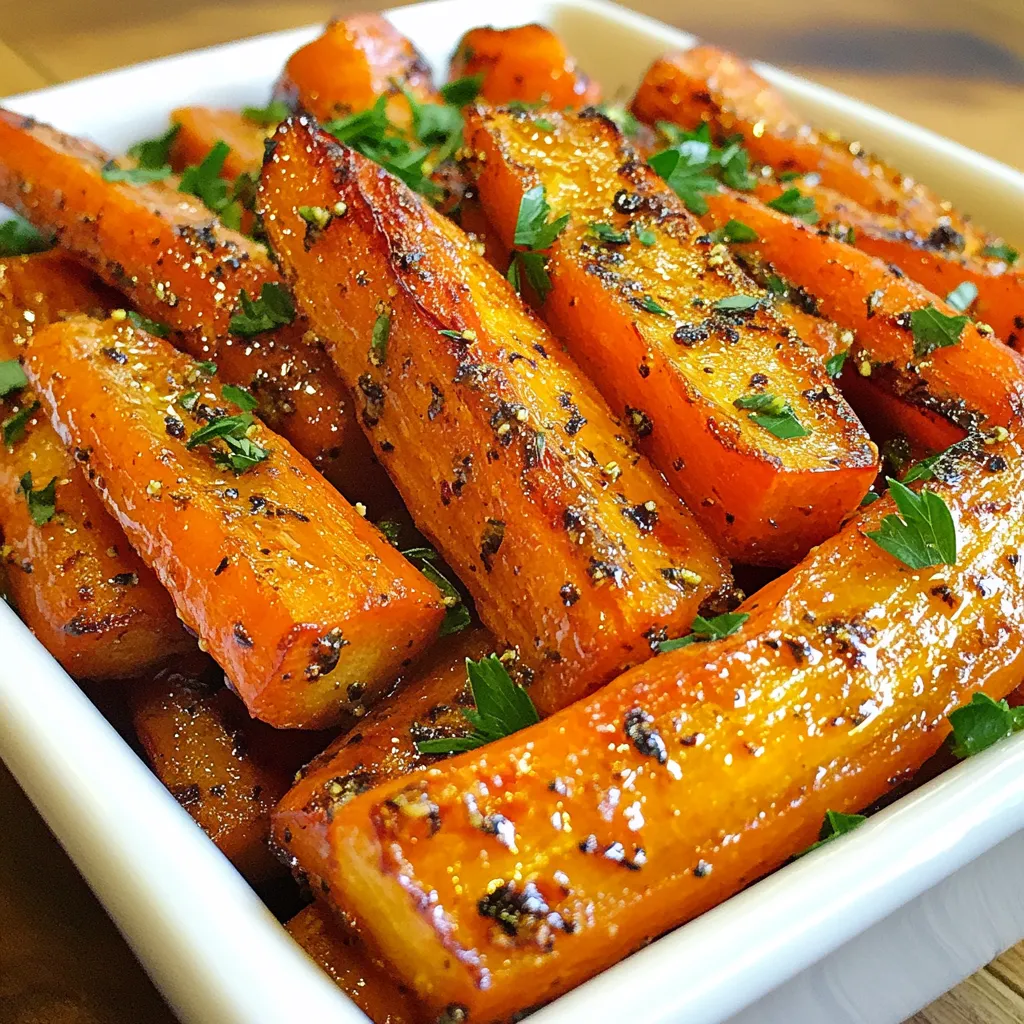
After roasting, take the carrots out and let them cool for a few minutes. Transfer the roasted carrots to a serving dish. For a fresh touch, sprinkle some fresh thyme or chopped parsley on top. If you want, drizzle any leftover maple-Dijon sauce over the carrots for extra flavor. Serve them warm as a vibrant side dish that brightens up any meal.
Tips & Tricks
Achieving Perfectly Roasted Carrots
To get the best roasted carrots, cut them into even sticks. This helps them cook the same. Roast at 425°F for that perfect crisp. Use parchment paper on your baking sheet. It keeps carrots from sticking and makes cleanup easy. Stir them halfway through cooking to ensure even browning. Look for a nice caramel color when they are done.
Enhancing Flavor Profiles
Maple syrup and Dijon mustard create a sweet and tangy mix. You can change the flavor by adding spices. Try adding a pinch of cayenne for some heat. Fresh herbs like thyme or parsley elevate the taste and look. A splash of lemon juice adds brightness and freshness to the dish.
Common Mistakes to Avoid
One common mistake is overcrowding the baking sheet. This leads to steaming instead of roasting. Do not skip preheating your oven, as this is key for crispness. Avoid using old carrots; they can be woody and less sweet. Make sure to coat the carrots well with the maple-Dijon sauce for full flavor.
Pro Tips
- Choose the Right Carrots: Opt for medium-sized carrots for even cooking and better texture. If possible, select organic carrots for enhanced flavor and freshness.
- Adjust Sweetness: Feel free to modify the amount of maple syrup based on your sweetness preference. You can also substitute honey or agave syrup for a different flavor profile.
- Enhance with Spices: Experiment with adding spices like cumin or smoked paprika to the maple-Dijon mixture for an extra layer of flavor.
- Perfect Roasting: Make sure the carrots are in a single layer with space between them on the baking sheet. This ensures they roast evenly and develop a lovely caramelization.

Variations
Adding Different Vegetables
You can switch up the carrots if you want. Try using parsnips, sweet potatoes, or even Brussels sprouts. These veggies roast well with the maple-Dijon mix. Cut them into sticks or wedges for even cooking. Just keep the roasting time in mind so they cook through. Each veggie brings a unique taste and texture.
Maple Dijon Roasted Carrots with Nuts
Adding nuts gives a nice crunch. I love using walnuts or pecans. Chop them coarsely and mix them in before roasting. The nuts will toast nicely and add a rich flavor. Sprinkle the nuts on top after baking for a fresh finish. This twist makes the dish more filling and adds healthy fats.
Spicy Twist on the Recipe
Want some heat? Add red pepper flakes or cayenne pepper to the sauce. Start with a small amount and taste as you go. The spice pairs well with the sweet maple and tangy Dijon. This variation is perfect for those who like a kick in their side dishes. It adds excitement to the meal and keeps things interesting.
Storage Info
How to Store Leftovers
After enjoying your Maple Dijon roasted carrots, store any leftovers in an airtight container. Make sure the carrots cool down first. Place the container in the fridge. They will stay fresh for up to 3 days. If you want to keep them longer, consider freezing.
Reheating Instructions
To reheat the carrots, preheat your oven to 350°F (175°C). Spread the carrots on a baking sheet. Heat them for about 10-15 minutes. This will help them regain their warmth and crispness. You can also use a microwave. Just heat them for 30 seconds at a time, stirring in between.
Freezing Maple Dijon Roasted Carrots
You can freeze these roasted carrots for future meals. First, let the carrots cool completely. Place them in a freezer-safe bag or container. Remove as much air as possible. They can last in the freezer for up to 2 months. When ready to eat, thaw them overnight in the fridge and reheat as mentioned above.
FAQs
Can I make this recipe ahead of time?
Yes, you can prepare the carrots ahead of time. Toss them in the maple-Dijon mixture and store them in the fridge. Keep them in an airtight container for up to 24 hours. This saves time on cooking day. Just remember to roast them right before serving for the best flavor and texture.
What dishes pair well with Maple Dijon Roasted Carrots?
Maple Dijon Roasted Carrots go well with many dishes. They pair nicely with grilled chicken or fish. You can also serve them alongside roasted pork or a hearty grain salad. Their sweet and tangy flavor adds a great touch to any meal.
How can I make this recipe vegan?
To make Maple Dijon Roasted Carrots vegan, simply check the mustard. Most Dijon mustards are already vegan. Use pure maple syrup, olive oil, garlic powder, sea salt, and black pepper. You can enjoy this dish without any animal products and still keep all the great flavors.
Roasting carrots is easy and fun. We covered key ingredients, substitutions, and tips for fresh carrots. Then, I shared simple steps for preparation, roasting, and serving. I also gave tricks for perfect flavor and common mistakes to avoid. We explored variations with other veggies and two tasty twists. Finally, I outlined storage tips for leftovers and answered common questions.
Make the most of your carrot dish. Enjoy experimenting and make it your wa

Maple Dijon Roasted Carrots
Ingredients
- 1 pound medium-sized carrots, peeled and cut into uniform sticks
- 3 tablespoons pure maple syrup
- 2 tablespoons Dijon mustard
- 2 tablespoons extra-virgin olive oil
- 1 teaspoon garlic powder
- 1/2 teaspoon sea salt
- 1/4 teaspoon freshly ground black pepper
- to taste fresh thyme or flat-leaf parsley for garnish (optional)
Instructions
- Begin by preheating your oven to 425°F (220°C), allowing it to reach the perfect roasting temperature.
- In a large mixing bowl, combine the maple syrup, Dijon mustard, olive oil, garlic powder, sea salt, and black pepper. Using a whisk, mix the ingredients thoroughly until you achieve a smooth and well-emulsified dressing.
- Next, add the prepared carrot sticks to the bowl. Gently toss the carrots with the maple-Dijon mixture, ensuring that each stick is fully coated and infused with all those delicious flavors.
- Line a baking sheet with parchment paper. Spread the carrots out in a single layer on the baking sheet, making sure they are not overcrowded. This will help them roast evenly and prevent sticking.
- Place the baking sheet in the preheated oven and roast the carrots for 25-30 minutes. Halfway through the cooking time, give the carrots a gentle stir to promote even caramelization and tenderness. They are ready when they are fork-tender and beautifully caramelized on the edges.
- Once the carrots are done, remove them from the oven and allow them to cool for a few minutes on the baking sheet.
- Transfer the roasted carrots to a serving dish. For an extra touch of freshness and color, garnish with fresh thyme or chopped parsley if desired.


![- 2 boneless, skinless chicken breasts, sliced into thin strips - 2 tablespoons honey - 4 cloves garlic, minced - 2 tablespoons low-sodium soy sauce - 1 tablespoon sesame oil - 1 red bell pepper, thinly sliced - 1 cup broccoli florets - 1 cup snap peas - 1 carrot, julienned - 2 tablespoons vegetable oil - Salt and pepper to taste I love using fresh chicken for this dish. It cooks well and tastes great. Honey adds a sweet touch, while garlic gives it a nice punch. You can pick any colorful veggies you like. I usually choose bell peppers, broccoli, and snap peas for their crunch. - Sesame seeds - Sliced green onions Garnishes make your meal pop! Sesame seeds add a nutty flavor. Green onions give a fresh, sharp taste. They make the dish look fancy, too. - Skillet or wok - Mixing bowl - Whisk A large skillet or wok is best for stir-frying. It helps cook everything quickly and evenly. You’ll also need a mixing bowl for the sauce. A whisk is handy to mix your sauce smoothly. For the full recipe and cooking instructions, check the [Full Recipe]. - How to prepare the sauce To make the sauce, grab a small mixing bowl. Add 2 tablespoons of honey and 4 minced garlic cloves. Pour in 2 tablespoons of low-sodium soy sauce and 1 tablespoon of sesame oil. Whisk these ingredients well until they blend smoothly. This sauce will be full of flavor! - How to season the chicken Take 2 sliced chicken breasts and place them in a bowl. Lightly sprinkle salt and pepper over the chicken. Toss it gently to coat every piece evenly. This step is key to making sure your chicken tastes great. - Cooking the chicken Heat a large skillet or wok over medium-high heat. Add 1 tablespoon of vegetable oil. Once the oil shimmers, add the seasoned chicken strips. Cook them for about 5-7 minutes. Look for a golden color and make sure they are cooked all the way through. Remove the chicken and set it aside on a plate. - Stir-frying the vegetables In the same skillet, add another tablespoon of vegetable oil. Throw in the sliced red bell pepper, 1 cup of broccoli florets, 1 cup of snap peas, and 1 julienned carrot. Stir-fry these vegetables for 3-4 minutes. You want them to stay vibrant and crisp-tender. - Combining and flavoring the dish Now, return the cooked chicken to the skillet. Pour the honey garlic sauce over everything. Stir it well to coat all the chicken and vegetables. Cook for an extra 2-3 minutes. This allows the sauce to thicken and stick to your meal. - How to garnish and serve Once done, take the skillet off the heat. Sprinkle sesame seeds and sliced green onions over the stir fry. This adds a nice crunch and fresh flavor. For an appealing look, serve it in shallow bowls on a bed of rice or noodles. Enjoy your tasty Honey Garlic Chicken Stir Fry! Check the Full Recipe for more details! For the best stir-fry, set your heat to medium-high. This helps to cook the chicken fast and keep it juicy. When cooking, work in batches if your pan is small. This way, the chicken won’t steam. To get crisp veggies, don’t overcrowd the pan. Just like the chicken, cook the veggies fast. Stir them often, about three to four minutes will do. Add some red pepper flakes for a spicy kick. You can also try fresh ginger for a nice zing. Balancing sweet and savory is key. If it’s too sweet, add a dash more soy sauce. Taste as you go to find the perfect mix. Serve your stir fry in shallow bowls. Place it on a bed of rice or noodles for a great look. Top with extra sesame seeds and sliced green onions. A lime wedge on the side adds color and flavor! {{image_4}} You can switch the chicken for other proteins. Tofu works great for a vegetarian dish. Just press and cube the tofu, then cook it like the chicken. Shrimp is another tasty option. It cooks fast and adds a nice flavor. Feel free to mix up the veggies. Bell peppers, zucchini, and green beans all taste amazing. Seasonal flavors add fun too! Use fresh corn in summer or squash in fall. These choices bring color and taste to your meal. You can change the sauce to fit your taste. If you want less sweetness, use less honey. To make it salty, add more soy sauce. Want some heat? Toss in red chili flakes or chopped peppers. This will spice up your stir fry and make it unique. To store your honey garlic chicken stir fry, cool it down first. Place the leftovers in an airtight container. This helps keep out air and moisture. I recommend using glass or BPA-free plastic containers. They are safe and durable. Make sure to refrigerate within two hours of cooking. This keeps the dish fresh and safe to eat. Yes, you can freeze honey garlic chicken stir fry! It freezes well and saves time for future meals. To freeze, use a freezer-safe container or a zip-top bag. Remove as much air as possible before sealing. For best results, eat it within three months. When you're ready to eat, thaw it in the fridge overnight. Reheat it in a skillet over medium heat until hot. This keeps the chicken and veggies tender. Leftovers will last about three to four days in the fridge. Always check for signs of spoilage before eating. If it smells off or has a strange color, it’s best to toss it. You'll want to avoid any food safety risks. Remember, good storage means enjoying your tasty meal later! To cut the sweetness, reduce the honey. Use one tablespoon instead of two. You can also add more soy sauce to balance the flavor. Adding a splash of rice vinegar or lime juice helps too. These add tang without making it too sweet. You can also use low-sugar honey or a sugar-free sweetener. Yes, you can prepare the chicken and veggies ahead of time. Slice the chicken and chop the vegetables. Store them in the fridge until you're ready to cook. You can also mix the sauce in advance. Just keep it in a sealed container. When you are ready to eat, cook it all together for a quick meal. Some good side dishes include: - Steamed rice - Fried rice - Noodles - Quinoa - A fresh green salad These sides add more texture and flavor to your meal. They also help soak up the tasty sauce. - Full Recipe: Detailed cooking instructions for easy reference. In this blog post, we explored the key ingredients and cooking steps for honey garlic chicken stir fry. We covered how to prepare the sauce, cook the chicken, and stir-fry the veggies. I shared useful tips on enhancing flavors and balancing taste. Plus, we discussed variations and storage methods for your leftovers. Cooking can be fun and rewarding. With these skills, you can create tasty meals. Enjoy trying new ingredients and discovering your favorites. Happy cooking!](https://dishtreats.com/wp-content/uploads/2025/07/ad7e2fa8-e610-4152-a96e-e496d4740468-768x768.webp)
![To make crispy sweet and sour chicken, you need some key ingredients. Here’s what to gather: - 1 lb (450g) chicken breast, cut into bite-sized pieces - 1 cup cornstarch - 2 large eggs, beaten - Oil for frying - Salt and black pepper to taste These ingredients form the base of your dish. The chicken gives protein, while cornstarch creates that crispy texture. Eggs help the cornstarch stick to the chicken. Adding vibrant colors and fresh flavors is easy with the right vegetables and fruits. Here’s what you’ll need: - 1 cup bell peppers, chopped (mix of colors for visual appeal) - 1 cup pineapple chunks (fresh or canned) - 1 cup onion, chopped - 3 cloves garlic, minced The bell peppers and onions add crunch and sweetness. Pineapple brings a juicy burst of flavor. Garlic adds depth to the dish. The sweet and sour sauce makes this dish memorable. Gather these components: - 1/2 cup ketchup - 1/4 cup apple cider vinegar - 1/4 cup brown sugar - 2 tablespoons soy sauce - 1 tablespoon cornstarch mixed with 2 tablespoons water (for slurry) This sauce balances sweetness and tang. Ketchup gives a rich base, while apple cider vinegar adds a zesty kick. Brown sugar enhances the sweetness, and soy sauce adds umami. The cornstarch slurry thickens the sauce perfectly. For the full recipe, check out the complete list of steps to follow. Happy cooking! Start by seasoning the chicken pieces with salt and pepper. This simple step adds great flavor. Next, dredge each piece in cornstarch. Make sure to shake off any extra cornstarch. This helps create a nice, crispy crust. After that, dip the chicken pieces into the beaten eggs. This coating will help the cornstarch stick well. In a large skillet, heat oil over medium-high heat. You want the oil to shimmer before adding the chicken. Fry the chicken in batches. Avoid crowding the pan to keep the chicken crispy. Cook each piece for about 4-5 minutes per side. When golden brown, use a slotted spoon to remove the chicken. Place it on paper towels to drain any excess oil. Lower the heat to medium. In the same pan, add chopped onions and bell peppers. Sauté them for about 3-4 minutes or until soft. This brings out their sweetness. Then, add minced garlic and cook for another minute. The aroma will fill your kitchen and make your mouth water. In a bowl, whisk together the sauce ingredients: ketchup, apple cider vinegar, brown sugar, and soy sauce. Combine these until smooth. Pour this sweet and tangy sauce over the sautéed vegetables. Stir gently to mix everything together. The colors and smells will be inviting. Raise the heat slightly and bring the sauce to a gentle simmer. This helps blend the flavors. Once it simmers, add pineapple chunks for sweetness. Then, mix the cornstarch slurry and pour it in. Stir continuously until the sauce thickens, which takes about 2-3 minutes. You want it to coat the chicken well. Add the crispy chicken back into the pan. Carefully fold it into the thickening sauce. Toss everything gently to coat each piece of chicken. Once warmed through, the dish is ready to serve. For a great presentation, plate it over fluffy rice or steamed quinoa. You can also garnish it with sesame seeds and green onions for extra flair. To get that perfect crispy texture, start with your oil. Heat it well, around 350°F (175°C) is ideal. If the oil isn't hot enough, your chicken will soak up oil and get soggy. Fry the chicken in batches to avoid crowding. This keeps the oil temperature steady. Once fried, place the chicken on paper towels. This helps drain off any extra oil. For a twist on the classic sauce, try adding a splash of orange juice. It brightens the flavor. You can also swap brown sugar with honey for a different sweetness. Using fresh ginger in your sauce will give an extra kick. Remember to taste as you mix. Adjust salt and pepper to suit your taste buds. Presentation makes your dish look more appealing. Serve your crispy sweet and sour chicken over fluffy white rice or quinoa. Sprinkle sesame seeds on top for crunch. Finely chopped green onions add a pop of color. You can even add a few slices of fresh pineapple on the side for a tropical touch. This will make your meal look vibrant and inviting. {{image_4}} You can switch up the protein in this dish. Shrimp works great and cooks fast. Just sauté it until it turns pink. Tofu is another good option. Use firm tofu for the best texture. Cut it into cubes and fry until golden. Pork also fits well. Use pork tenderloin or chops, cut into bite-sized pieces. Each protein adds its own flavor, keeping things exciting. You can mix in different veggies for added nutrition. Broccoli is a great choice. It adds a nice crunch and color. Carrots give a sweet flavor and vibrant look. Snap peas are another fun option. They stay crisp and add a pop of freshness. Feel free to combine any of these for a colorful plate. It makes your meal more appealing and nutritious. You can easily tweak the sauce to match your taste. If you like heat, add some red pepper flakes or sriracha. This will spice up the dish nicely. For sweetener options, you can swap brown sugar for honey or maple syrup. This change adds a different flavor twist. Adjust the acidity by adding more vinegar or a squeeze of lime juice. Each change can create a new experience with this classic dish. For the full recipe, check out the detailed instructions earlier. After enjoying your crispy sweet and sour chicken, store any leftovers in an airtight container. This keeps the dish fresh for up to three days. Before storing, let the chicken cool down to room temperature. This prevents condensation, which can make the chicken soggy. If you have sauce left over, store it separately to keep the chicken crispy. To freeze your crispy sweet and sour chicken, place it in a freezer-safe container or bag. Make sure to remove as much air as possible. This helps avoid freezer burn. It can stay good for about one month. When you're ready to eat, thaw it overnight in the fridge. For the best taste and texture, reheat your chicken in an oven. Preheat the oven to 350°F (175°C). Spread the chicken on a baking sheet and cover with foil. Heat for about 15-20 minutes or until warm. This method helps keep the chicken crispy. You can also reheat it in a skillet over medium heat. Just add a splash of water to the pan to create steam, which helps warm it without drying out. Enjoy your leftovers just as much as the first time! To make crispy sweet and sour chicken, start with these steps: 1. Prep Chicken: Cut chicken breast into bite-sized pieces. Season with salt and pepper. Dredge in cornstarch, then coat in beaten eggs. 2. Fry Chicken: Heat oil in a skillet over medium-high heat. Fry chicken pieces until golden brown, about 4-5 minutes per side. Drain on paper towels. 3. Sauté Vegetables: Lower heat and add chopped onion and bell peppers to the same pan. Cook for 3-4 minutes. Add minced garlic and cook for another minute. 4. Prepare Sauce: Mix ketchup, apple cider vinegar, brown sugar, and soy sauce in a bowl. Pour this mixture over the vegetables in the pan. 5. Thicken Sauce: Bring the sauce to a gentle simmer. Add pineapple chunks and cornstarch slurry. Stir until the sauce thickens, about 2-3 minutes. 6. Combine Chicken and Sauce: Add the fried chicken back into the pan. Toss gently to coat the chicken in the sauce. 7. Serve: Let the dish rest for a minute. Serve it over rice or quinoa for a complete meal. Yes, you can prepare some parts in advance. Cook the chicken and the sauce ahead of time. Store them separately in airtight containers in the fridge. You can keep the chicken for up to three days. The sauce will last about a week. When ready to serve, reheat the chicken and sauce together in a pan. This keeps the chicken crispy and the sauce fresh. Yes, you can make a vegetarian version! Use tofu instead of chicken. Press the tofu to remove excess moisture, then cut it into cubes. Coat and fry the tofu pieces just like you would with chicken. You can also use seitan or tempeh for a similar texture. The sauce remains the same, giving you that sweet and sour flavor. I love serving crispy sweet and sour chicken with steamed rice or quinoa. You can also pair it with: - Fried rice - Noodles - Steamed broccoli - A fresh cucumber salad These sides complement the dish well and add color to your plate. Enjoy your meal! For the complete recipe, check the [Full Recipe]. Crispy sweet and sour chicken is a delightful dish. We explored key ingredients, cooking methods, and tips for perfecting it. You learned how to achieve that crispy texture and enhance flavors. Remember, try different proteins and veggies for variety. Proper storage keeps leftovers fresh. This dish is not only tasty but also versatile. Enjoy making and sharing it with friends and family. Let your kitchen creativity shine with this classic recipe!](https://dishtreats.com/wp-content/uploads/2025/05/ffc138cc-1bdb-4282-b515-13f85bd5dbd6-768x768.webp)


