Mango Coconut Chia Parfait Fresh and Flavorful Delight

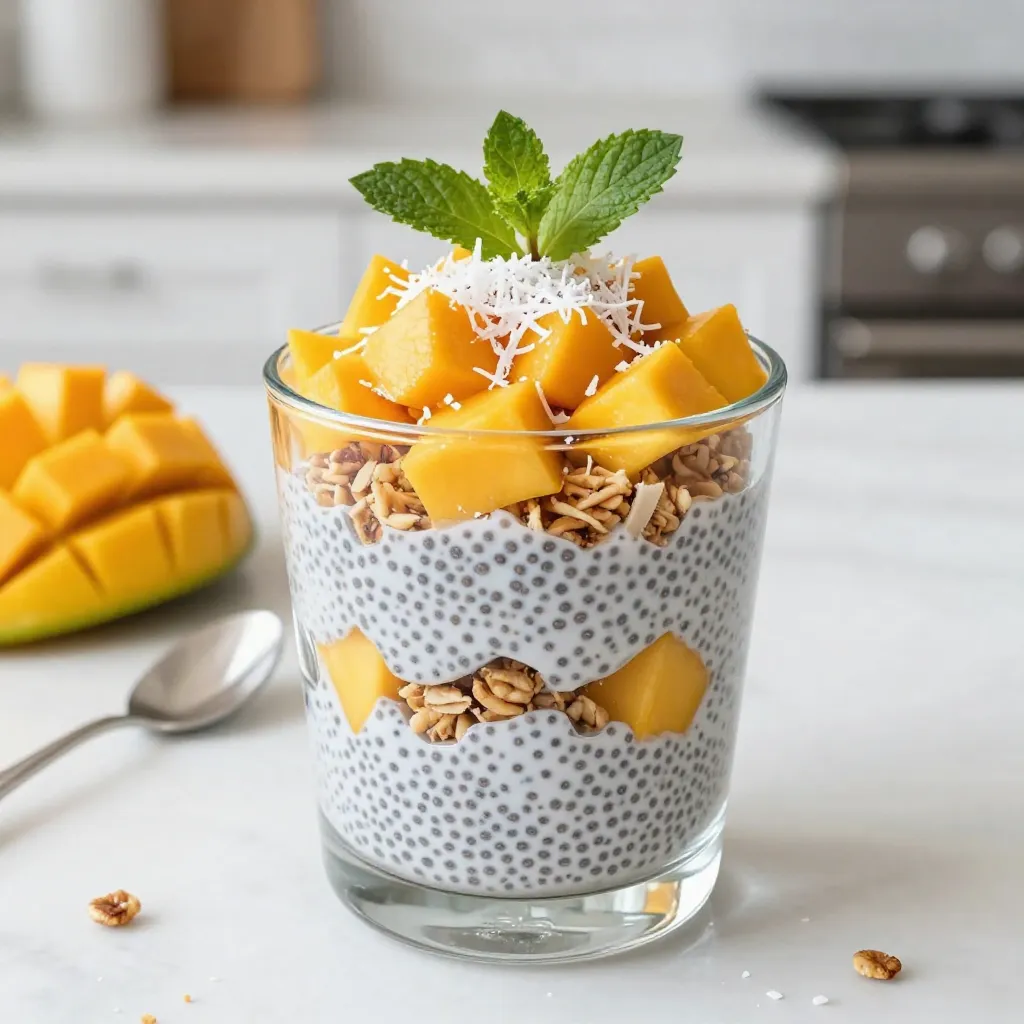
Looking for a tasty, healthy treat? You’ll love this Mango Coconut Chia Parfait! This vibrant dish is easy to make and perfect for breakfast or a snack. With layers of creamy coconut, fresh mango, and nutrient-packed chia seeds, it offers a delightful burst of flavor. Ready to impress your taste buds? Let’s dive into the ingredients and steps for this fresh and flavorful delight!
Why I Love This Recipe
- Healthy Indulgence: This parfait is a guilt-free treat packed with nutrients, thanks to the chia seeds, mango, and coconut milk.
- Easy to Make: With just a few simple ingredients and minimal prep time, this recipe is perfect for busy mornings or easy desserts.
- Versatile Layers: You can customize the layers with your favorite fruits or toppings, making it a delightful option for anyone’s taste.
- Stunning Presentation: The beautiful layers of mango, chia pudding, and coconut create an eye-catching and appetizing dish.
Ingredients
Detailed Ingredients List
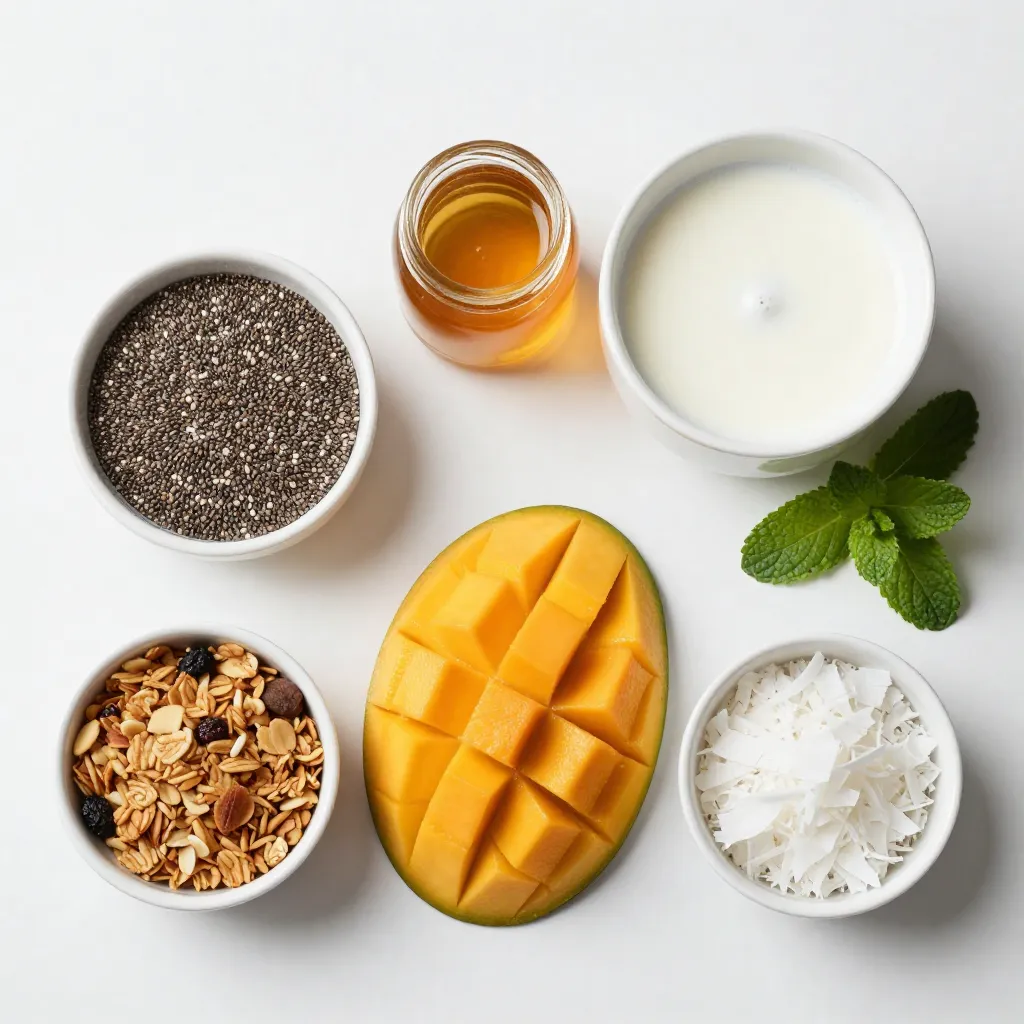
To make your Mango Coconut Chia Parfait, gather these ingredients:
- 1 cup coconut milk (canned or carton)
- 1/4 cup chia seeds
- 2 tablespoons maple syrup (or honey)
- 1 ripe mango, diced into small cubes
- 1/2 cup granola (coconut-flavored is best)
- 1/4 cup shredded coconut (sweetened or unsweetened)
- Fresh mint leaves for garnish
Substitutions and Alternatives
You can easily swap some ingredients if needed. Use almond milk or oat milk instead of coconut milk. If you want a different sweetener, try agave syrup. You can use any fruit for the layers, like berries or bananas. For granola, pick your favorite flavor or a nut mix. Don’t have mint? Use basil or leave it out altogether.
Key Ingredients Explained
Coconut milk gives a rich, creamy texture. It pairs well with chia seeds, which thicken the pudding. Chia seeds are full of fiber and protein. They help keep you full. Maple syrup adds a natural sweetness. You can use honey if you prefer. The ripe mango adds a fresh, juicy flavor. Granola adds crunch, and shredded coconut adds more tropical flair. Mint leaves finish it off, adding freshness and color.

Step-by-Step Instructions
Preparation of Chia Mixture
To start, grab a medium bowl. Add 1 cup of coconut milk, 1/4 cup of chia seeds, and 2 tablespoons of maple syrup. You can use honey instead if you like. Whisk or stir the mix well. Make sure the chia seeds are evenly spread in the coconut milk. This step is key to avoid clumps. Cover the bowl with plastic wrap or a lid. Place it in the fridge for at least 2 hours. For the best texture, let it sit overnight. This allows the chia seeds to soak up the milk and thicken.
Assembling the Parfait Layers
Once your chia mixture is thick, it’s time to layer. Get your parfait glasses or bowls ready. Start by spooning a good layer of chia pudding into each glass. Make sure it covers the bottom. Next, add a layer of diced mango on top of the chia. Spread the mango evenly for a nice look. Then, sprinkle a layer of granola over the mango. This adds a nice crunch. Follow this with another spoonful of chia pudding. Repeat the layers until you reach the top. Aim for a bright finish with a final layer of mango. Top each parfait with shredded coconut.
Tips for Perfect Layering
For best results, use clear glasses or bowls. This shows off your colorful layers beautifully. Make sure each layer is even to enhance the look. You can add a slice of fresh mango on the rim of the glass for flair. Use fresh mint leaves as a garnish. This adds a touch of color and a fresh taste. Enjoy the process and have fun with your presentation!
Tips & Tricks
Best Practices for Chia Seeds
Chia seeds are tiny but mighty. They soak up liquid and expand. For the best results, mix them well in coconut milk. Let them sit for a few hours or overnight. This helps them thicken nicely. You want a pudding-like texture. If you skip this step, your parfait may be runny.
Enhancing Flavor and Texture
To make your parfait burst with flavor, choose ripe mangoes. Ripe mangoes are sweet and juicy. They pair well with the creamy coconut. Adding maple syrup or honey brings a touch of sweetness. Consider using coconut-flavored granola for extra taste. Shredded coconut adds a nice crunch too. If you like it sweet, go for sweetened coconut. If you prefer less sugar, choose unsweetened.
Presentation Ideas for Serving
Make your parfaits look amazing! Use clear cups or glasses to show off the layers. Start with chia pudding at the bottom, then mango, and granola. Repeat the layers until you reach the top. Finish with a final layer of mango. Sprinkle some shredded coconut on top. A sprig of fresh mint makes a beautiful garnish. It adds a pop of color and a fresh taste.
Pro Tips
- Chill Time Matters: Allow the chia pudding to chill overnight for the best texture and flavor absorption.
- Perfect Mango Selection: Choose a ripe mango for the sweetest taste; it should yield slightly to pressure when squeezed.
- Granola Variations: Experiment with different flavors of granola to customize the taste profile of your parfait.
- Garnish for Appeal: Fresh mint not only adds flavor but also elevates the visual presentation of your parfait.
Variations
Fruit Variations
You can switch up the fruit in your parfait. Mango is sweet and tasty, but other fruits work great too. You might try berries like strawberries, blueberries, or raspberries. They add a nice tartness. Bananas bring a creamy texture and mild flavor. You could also use pineapple for a tropical twist. Just remember, any fruit you pick should be ripe and juicy for the best taste.
Alternative Milk Options
Don’t feel stuck with coconut milk. You can use almond milk for a nutty flavor. Oat milk is another great choice. It makes the parfait creamy without strong taste. If you want a richer flavor, try cashew milk. Each milk option will change the final taste a bit, so feel free to explore.
Protein Boosting Ideas
Want to add more protein? You can mix in yogurt. Greek yogurt is a great choice because it is thick and creamy. It also adds a nice tang. You could use protein powder too. Just stir a scoop into your chia mixture for a boost. Nuts and seeds are another option. Sprinkle some on top for a crunchy finish and more protein.
Storage Info
Refrigeration Tips
You should store your Mango Coconut Chia Parfait in the fridge. Use an airtight container to keep it fresh. The parfait will stay good for up to three days. Make sure to cover it well to avoid drying out. If you used fresh mango, check for any signs of spoilage before serving again.
Freezing Guidelines
I do not recommend freezing the parfait. The texture of the chia pudding and fresh fruit will change once frozen. If you want to prep ahead, make the chia mixture and mango separately. You can freeze the chia mixture for up to one month. Thaw it in the fridge before you layer it.
Shelf Life of Ingredients
Each ingredient has its own shelf life:
- Coconut milk: Store in the fridge after opening, use within 5-7 days.
- Chia seeds: Keep in a cool, dry place; they last for years if stored properly.
- Maple syrup: It can last for months in the pantry, but refrigerate after opening.
- Mango: Fresh mango lasts for about 3-5 days when ripe; check for softness.
- Granola: Store in a sealed bag or container; it stays fresh for 2-3 months.
- Shredded coconut: Keep it in an airtight container; it lasts for 6-12 months.
FAQs
How long can I store Mango Coconut Chia Parfait?
You can store the parfait in the fridge for up to three days. Make sure to cover it well. If you notice the chia pudding thickens too much, you can add a splash of coconut milk to loosen it. This keeps it fresh and tasty.
Can I prepare this parfait in advance?
Yes, you can make this parfait ahead of time. I recommend preparing it the night before. This allows the chia seeds to soak and thicken properly. Just store it in the fridge and layer it before serving. Your guests will love the fresh taste.
What are the health benefits of chia seeds?
Chia seeds are tiny powerhouses of nutrition. They are high in fiber, which helps with digestion. They also contain omega-3 fatty acids, which are great for heart health. Plus, chia seeds are packed with protein, vitamins, and minerals. Adding them to your diet can boost your overall health.
In this blog post, we covered the ingredients for a Mango Coconut Chia Parfait. I shared substitutions and explained key ingredients. You learned how to prepare the chia mixture and assemble the layers. We explored tips for perfect layering and how to enhance flavor. We also discussed fruit and milk variations and important storage guidelines.
Chia seeds are not just tasty; they are good for you, too. With creativity, you can make a parfait that suits your tast

Mango Coconut Chia Parfait
Ingredients
- 1 cup coconut milk
- 0.25 cup chia seeds
- 2 tablespoons maple syrup
- 1 whole ripe mango
- 0.5 cup granola
- 0.25 cup shredded coconut
- to taste leaves fresh mint leaves
Instructions
- In a medium-sized mixing bowl, combine the coconut milk, chia seeds, and maple syrup (or honey). Use a whisk or spoon to mix thoroughly, ensuring that the chia seeds are evenly distributed throughout the coconut milk.
- Cover the bowl with plastic wrap or a lid, then place it in the refrigerator. Allow it to chill for at least 2 hours, or for best results, overnight.
- Once the chia mixture has thickened to your liking, gather your parfait glasses or bowls for assembly. Start by spooning a generous layer of the chia pudding into the bottom of each glass.
- On top of the chia pudding layer, add a layer of the freshly diced mango, spreading it evenly.
- Next, sprinkle a layer of granola over the mango. Then, follow this with another generous spoonful of chia pudding to create the next layer.
- Continue layering by repeating the diced mango and chia pudding steps until you reach the top of the glass. Aim for a visually appealing presentation by ending with a final layer of diced mango.
- Finish by generously sprinkling shredded coconut atop each parfait for added texture and flavor.
- For the final touch, garnish with fresh mint leaves.


. First, preheat your oven to 225°F (110°C). This low heat helps the apples dry out slowly. Next, line two baking sheets with parchment paper. This step keeps the chips from sticking. Now it’s time to wash and core the apples. Rinse them well under cold water. Use a sharp knife or a corer to remove the seeds and the core. The best apples for this recipe are Fuji or Honeycrisp. They have a perfect balance of sweet and tart. Slice the apples into thin rounds. Aim for about 1/8 inch thick. A mandoline slicer makes this easy, but a sharp knife works too. Consistent thickness ensures even baking and crispiness. To keep your apple slices from browning, you will need lemon juice. Toss the apple slices in a bowl with one teaspoon of lemon juice. This step adds flavor and helps maintain their color. In a separate bowl, combine one tablespoon of ground cinnamon, one tablespoon of sugar (if you want it sweeter), and a pinch of salt. Mix this well. Now, sprinkle this cinnamon-sugar mixture evenly over the coated apple slices. Toss gently, ensuring each slice is coated without breaking them. Arrange the apple slices in a single layer on your prepared baking sheets. Make sure the slices do not overlap. This spacing allows them to bake evenly and become crispy. Place the baking sheets in the preheated oven. Bake the apple slices for about 1.5 to 2 hours. Halfway through baking, turn the slices. This will help them cook evenly. Keep an eye on them towards the end. You want them to be golden and crisp, not burnt. Once done, remove the sheets from the oven. Let the apple chips cool completely on the sheets. They will get even crispier as they cool. For the full recipe, check out the earlier sections. Enjoy making these tasty baked cinnamon apple chips! To get that perfect crunch in your baked cinnamon apple chips, thickness matters. Slice your apples about 1/8 inch thick. If they're too thick, they won’t crisp well. If they’re too thin, they might burn. Use a sharp knife or a mandoline for even slices. When it comes to baking, spacing is key. Place the apple slices on your baking sheets in a single layer. Make sure they don’t touch or overlap. This allows hot air to circulate and helps them bake evenly. To keep your baked apple chips fresh, store them in an airtight container. A glass jar or a resealable bag works great. Keep them in a cool, dry place. Storing them this way can help them last up to two weeks. Look for signs of freshness. If your chips are still crisp and fragrant, they’re good to snack on. If they start to feel soft or lose their crunch, it's time to toss them. Baked cinnamon apple chips make a great snack on their own. You can also serve them with dips like peanut butter or yogurt. They add a nice crunch to salads or granola bowls too. For a fun twist, try pairing them with cheese. The sweet and savory mix is delightful. You can also serve them alongside other snacks like popcorn or nuts for a tasty snack platter. Whether you enjoy them solo or with friends, these chips never fail to please! {{image_4}} You can have fun with flavors! Try different spices like vanilla or ginger. They add a unique twist to your apple chips. You can also adjust the sweetness. If you want a sweeter chip, add more sugar. For less sweetness, skip the sugar. You can even use honey or maple syrup instead. This way, you create a snack that fits your taste perfectly. Different apples give varied tastes and textures. Fuji and Honeycrisp work great, but don’t stop there! You can try Granny Smith for a tart flavor. Gala apples are sweeter and softer. Each type changes the final result. Experimenting with apple varieties keeps it exciting and tasty. Want a different texture? Dehydrating apples is a great choice. You can use a food dehydrator for an even, dry result. It takes longer, but the crunch is worth it. If you don’t have a dehydrator, your oven works too! Just lower the temperature and keep an eye on them. By adjusting the method, you can find your favorite way to enjoy these apple chips. For the full recipe, check the section above. Apples are a great snack. They are full of vitamins and fiber. One medium apple has about 95 calories and 4 grams of fiber. This helps keep your heart healthy. When you bake apple chips, you keep many of these benefits. Baked apple chips are better than store-bought snacks. Many snacks are full of added sugars and fats. Baked apple chips have no preservatives and you control the ingredients. This makes them a healthier choice for your family. A serving of baked apple chips has about 50-60 calories. This is much lower than many processed snacks. In fact, chips and cookies can have more than double that amount. You can enjoy a tasty snack without feeling guilty. Making your own snacks at home is better. You avoid unhealthy ingredients. You also save money. Homemade baked apple chips cost less than store-bought options. Plus, they taste fresher and crispier. Baked cinnamon apple chips are gluten-free and vegan. This makes them a great choice for many diets. You can enjoy them without worry. If you need to cut sugar, you can skip the optional sugar. You can also use natural sweeteners like honey or agave syrup if you want a sweet touch. Adjusting the recipe is easy to fit your needs. Enjoy these healthy chips any time! To make your apple chips crispy, focus on a few key factors. First, slice the apples very thin, about 1/8 inch thick. This helps them bake evenly. Second, arrange the slices in a single layer on your baking sheet. Avoid overlapping them to allow hot air to circulate. Lastly, bake at a low temperature of 225°F (110°C). This slow baking helps remove moisture, resulting in a perfect crispy texture. Yes, you can use other fruits to make chips. Pears and peaches work well and have great flavors. Bananas can also make tasty chips but will need a bit more care. Slice them thin and watch closely while they bake. You can even mix fruits for a fun variety! Baked apple chips can last up to a week when stored properly. Keep them in an airtight container at room temperature. If you notice any signs of softness, they may not be fresh anymore. For the best crunch, enjoy them sooner rather than later. Using sugar is not necessary for this recipe. If you prefer, you can leave it out. The cinnamon and apple flavors are sweet enough on their own. You might also try alternatives like honey or maple syrup for a different taste. Just remember, these can change the texture a bit. Yes, you can freeze baked apple chips! Place them in a freezer-safe bag or container. When you're ready to eat them, let them thaw at room temperature. You can also re-crisp them in the oven for a few minutes. Enjoy these tasty snacks later without losing their flavor! For the full recipe, check out the previous sections. Baked cinnamon apple chips are easy to make and taste great. You need just a few ingredients, like apples and spices. The step-by-step guide ensures perfect results every time. Don’t forget the tips for storage and serving. You can even try different flavors and apple types. These homemade snacks are healthier than store-bought options. Enjoy them anytime as a delicious treat. Get ready to impress yourself and others with your apple chips! Happy baking!](https://dishtreats.com/wp-content/uploads/2025/07/23051670-7243-464d-be8c-81eac2c3effc-768x768.webp)


. Can I use dark chocolate instead of semi-sweet? Yes, you can use dark chocolate. It adds a richer flavor. Dark chocolate makes the bars less sweet. This change gives you a nice balance in taste. If you love dark chocolate, go for it! What can I substitute for eggs in this recipe? You can use applesauce or mashed bananas. Use 1/4 cup for each egg. This keeps the bars moist. It also adds a bit of natural sweetness. Another option is flaxseed meal mixed with water. Mix 1 tablespoon of flaxseed meal with 2.5 tablespoons of water. Let it sit for five minutes before using. How do I know when the cookie bars are done baking? Check the edges for a golden brown color. The center should look set but may be soft. Insert a toothpick in the center. If it comes out clean or with a few crumbs, they are done. Let them cool before cutting for the best results. You now know how to make delicious chocolate chip cookie bars from scratch. We covered essential ingredients, step-by-step instructions, and expert tips. You learned about gluten-free and vegan options, plus how to store them well. Remember, measuring accurately and not overmixing are key for the best results. Enjoy your baking journey. Share these tips with friends so everyone can enjoy these tasty treats!](https://dishtreats.com/wp-content/uploads/2025/05/88326a6b-fa01-43d4-bb00-6171d5f3f1c3-768x768.webp)