
If you crave a dish that warms the soul, then Loaded Baked Potato Soup is perfect for you. This creamy and comforting recipe uses simple ingredients like russet potatoes, cheese, and a dash of seasoning. You can easily customize it, adding toppings or switching to dairy-free options. Join me as we whip up this cozy bowl of goodness that’s sure to be a favorite at your table!
Why I Love This Recipe
- Comforting Flavor: This creamy loaded baked potato soup is the epitome of comfort food, offering a warm and hearty bowl that satisfies any craving.
- Customizable Ingredients: With options to add broccoli or switch to dairy-free alternatives, this recipe can easily be tailored to suit various dietary preferences.
- Quick Preparation: In just 45 minutes, you can whip up a delicious soup that serves six, making it perfect for family dinners or meal prep.
- Garnish for Extra Flair: The addition of green onions and extra cheese as garnishes not only enhances the presentation but also adds layers of flavor and texture.
Ingredients
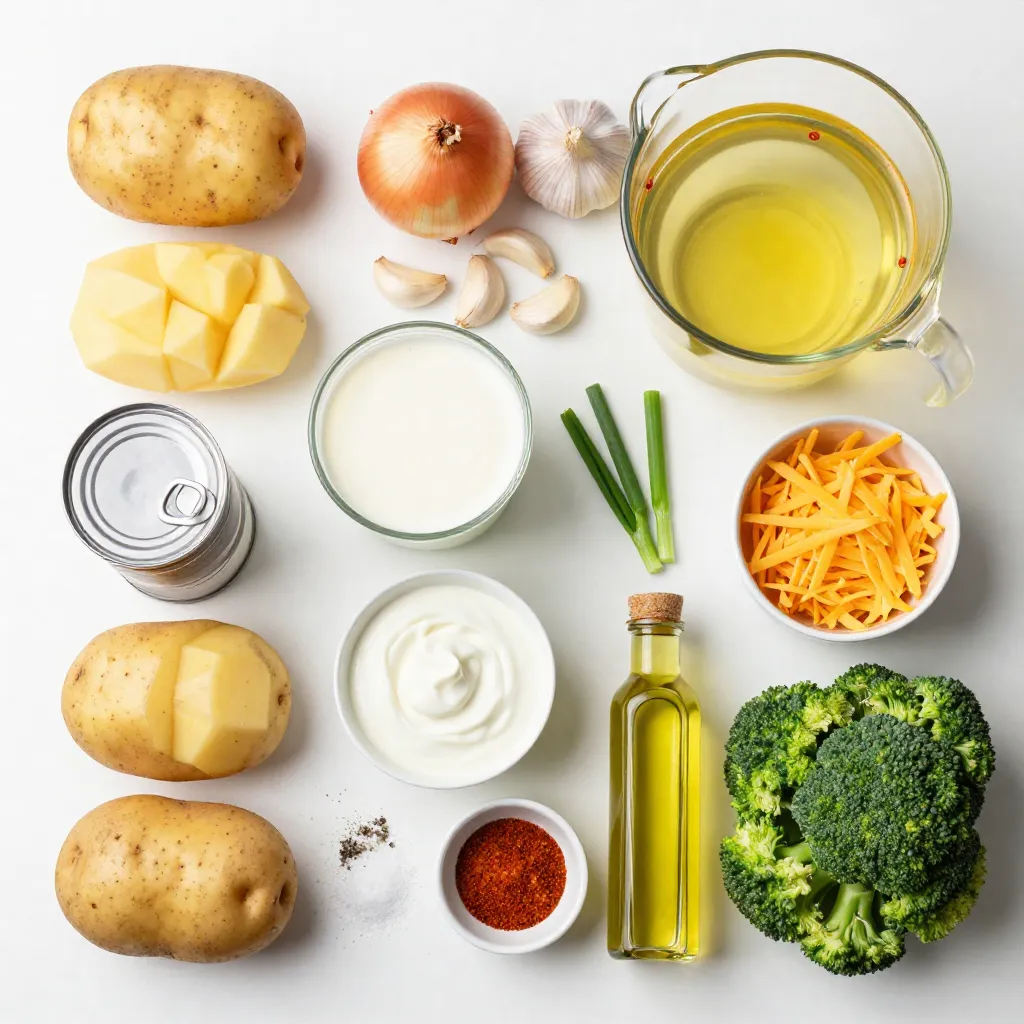
List of Essential Ingredients
To make a delicious loaded baked potato soup, gather these items:
– 4 large russet potatoes, peeled and diced into 1-inch cubes
– 1 medium onion, finely chopped
– 3 cloves garlic, minced
– 4 cups vegetable broth
– 1 cup heavy cream (or substitute with coconut milk for a dairy-free option)
– 1 cup shredded cheddar cheese (plus extra for garnishing)
– 1/2 cup sour cream (or Greek yogurt for a tangy twist)
– 3 green onions, thinly sliced (for garnish)
– 1 teaspoon smoked paprika
– Salt and black pepper to taste
– 2 tablespoons extra-virgin olive oil
These ingredients give the soup its rich and creamy texture. The russet potatoes are key. They break down well, making the soup thick and hearty. Adding onion and garlic boosts the flavor base, creating a warm aroma that fills your kitchen.
Optional Ingredients for Customization
You can make this soup even better with some optional items:
– 1 cup broccoli florets (for added nutrition and color)
– Greek yogurt as a sour cream alternative
– Alternative dairy choices for a vegan version
Broccoli adds both color and nutrients. If you want a lighter soup, try Greek yogurt instead of sour cream. You can also swap heavy cream with coconut milk for a dairy-free option. These choices let you customize the soup to your taste and dietary needs.
Step-by-Step Instructions
Preparation Steps
First, heat 2 tablespoons of extra-virgin olive oil in a large pot over medium heat. Next, add 1 medium onion, finely chopped. Sauté for about 5 minutes. The onion should turn translucent and fragrant.
Then, stir in 3 cloves of minced garlic. Cook for just 1 minute. You want it aromatic but not browned.
Now, add 4 large russet potatoes, peeled and diced into 1-inch cubes, along with 4 cups of vegetable broth. Increase the heat to bring the mixture to a gentle boil.
Cooking Method
Once the soup reaches a boil, reduce the heat to low. Cover the pot and let it simmer for 15-20 minutes. You want the potatoes to be fork-tender and fall apart easily.
If you like, now is the time to add 1 cup of broccoli florets. Stir them in after the potatoes are tender. Cook for an extra 5 minutes. This adds color and nutrition.
Next, use an immersion blender to blend the soup until smooth. For a chunkier soup, blend only half. This keeps some texture and body.
Final Touches
Return the pot to low heat. Stir in 1 cup of heavy cream or coconut milk, 1 cup of shredded cheddar cheese, and 1/2 cup of sour cream. Add 1 teaspoon of smoked paprika for flavor. Season with salt and black pepper to taste.
Heat the mixture through for about 5 minutes until warm. Taste the soup and adjust the seasoning as needed.
Finally, ladle the hot soup into deep bowls. Garnish with extra cheddar cheese and sliced green onions. Enjoy this creamy and comforting dish!
Tips & Tricks
Best Practices for Perfect Soup
– Choose large russet potatoes. They have a creamy texture that works great.
– Look for firm potatoes with smooth skin. Avoid any with dents or sprouts.
– For seasoning, use smoked paprika. It adds a nice depth to the flavor.
– Taste as you go. Adjust salt and pepper to match your liking.
Cooking Techniques
– You can use a slow cooker. Cook on low for 6-8 hours for deep flavor.
– An Instant Pot saves time. Cook on high pressure for only 10 minutes.
– For blending, use an immersion blender. It’s easy and keeps your pot clean.
– If you want texture, blend half the soup. Leave some chunks for a heartier bite.
Dietary Modifications
– To make it dairy-free, swap heavy cream for coconut milk. It gives a nice flavor.
– For gluten-free, check your broth. Ensure it’s labeled gluten-free to be safe.
– Use Greek yogurt instead of sour cream. It adds a tangy twist without dairy.
Pro Tips
- Choose the Right Potatoes: For the best texture, use russet potatoes as they become fluffy and creamy when cooked, perfect for a smooth soup.
- Adjust Thickness: If you prefer a thicker soup, blend less of the mixture or add more potatoes. For a thinner consistency, simply add more broth or cream.
- Flavor Boost: Enhance the flavor by adding a splash of Worcestershire sauce or a dash of hot sauce for a little kick.
- Garnish Creatively: Elevate the presentation by adding crispy bacon bits or fresh herbs like parsley or chives for an extra pop of color and flavor.
Variations
Flavorful Enhancements
You can make loaded baked potato soup even better. Adding herbs and spices brings new life. Try fresh chives or thyme for a fragrant twist. A pinch of cayenne pepper adds warmth. Smoked paprika gives a nice depth. You can also add crispy bacon or ham for a savory crunch. The salty bite of bacon pairs well with creamy soup.
Different Cooking Methods
You can cook this soup in different ways. A slow cooker option is great for busy days. Just add all the ingredients and let it run for six hours on low. This method infuses flavors well. For a quick meal, use an Instant Pot. Cook it on high pressure for about 10 minutes. This cuts the cooking time down and gives you a tasty soup fast.
Additional Vegetable Options
Adding more veggies is a fun way to boost nutrition. Corn adds sweetness, while carrots give a nice texture. Spinach can sneak in some greens without changing the flavor much. Don’t forget customizable toppings! You can add more cheese, crispy onions, or chopped herbs. These toppings make the soup look pretty and add flavor.
Storage Info
Proper Storage Techniques
To keep your loaded baked potato soup fresh, you can use two main methods: refrigerating and freezing.
– Refrigerating leftovers: Let the soup cool down first. Then, store it in an airtight container. It will stay fresh for up to 4 days in the fridge. Always label the container with the date.
– Freezing for long-term storage: If you plan to save it longer, freeze the soup. Use a freezer-safe container or a resealable bag. Be sure to leave some space for expansion. It can last for up to three months in the freezer.
Reheating Instructions
When it’s time to enjoy your soup again, reheating it properly is key.
– Best methods to reheat soup without losing flavor: The stovetop is the best choice. Pour the soup into a pot and heat it over medium-low heat. Stir often to prevent sticking. You can also use a microwave, but choose a microwave-safe bowl. Heat it in short bursts, stirring in between.
– Tips for restoring creaminess after freezing: If the soup loses creaminess after freezing, just add a splash of heavy cream or coconut milk while reheating. Stir well to bring back its smooth texture.
Shelf Life
Knowing how long your soup lasts helps avoid waste.
– Duration for refrigerated vs. frozen soup: In the fridge, your loaded baked potato soup lasts about 4 days. In the freezer, it stays good for 3 months. If you want to enjoy it longer, freezing is your best bet. Just make sure to label it with the date.
FAQs
Common Questions About Loaded Baked Potato Soup
Can I make this soup ahead of time?
Yes, you can make this soup ahead. Store it in the fridge for up to three days. Just reheat it gently on the stove. This allows the flavors to meld and deepen.
What can I substitute for heavy cream?
You can use coconut milk as a great dairy-free option. It adds creaminess and a hint of sweetness. Other choices include cashew cream or almond milk for lighter versions. Just pick one that fits your taste.
Troubleshooting
What to do if the soup is too thick or thin?
If the soup is too thick, add more vegetable broth or water. Stir well and heat to blend. If it’s too thin, simmer it longer to reduce and thicken the soup. You can also mash some potatoes directly in the pot for added texture.
How to improve bland flavors?
To boost flavor, add more salt and pepper. You can also stir in fresh herbs like chives or parsley. A squeeze of lemon juice or a dash of hot sauce can add brightness. Taste as you go to find the right balance.
Ingredient Substitutions
Alternatives for vegetable broth
Chicken broth or beef broth works well if you’re not vegetarian. For a lighter option, use water with added herbs and spices. You can also make a quick broth using leftover vegetable scraps.
Non-dairy cheese options for toppings
Look for cashew-based or almond-based cheeses. Nutritional yeast is a great option, too. It adds a cheesy flavor without dairy. Just sprinkle it on top for a tasty finish.
You can create a delicious Loaded Baked Potato Soup using simple, essential ingredients. Start with large russet potatoes, onion, garlic, and creamy options like broth and cheese. Follow the step-by-step guidelines for perfect cooking, seasoning, and blending. Customize your soup with tasty toppings or dietary swaps to suit your needs. Store leftovers properly to enjoy later. This soup stands out for its warmth and comfort, making it a great meal anytime. With these tips and tricks, you are ready to impress friends and family with your cooking skills. Enjoy your soup journe


