Lemon Garlic Shrimp Skewers Flavorful and Easy Dish

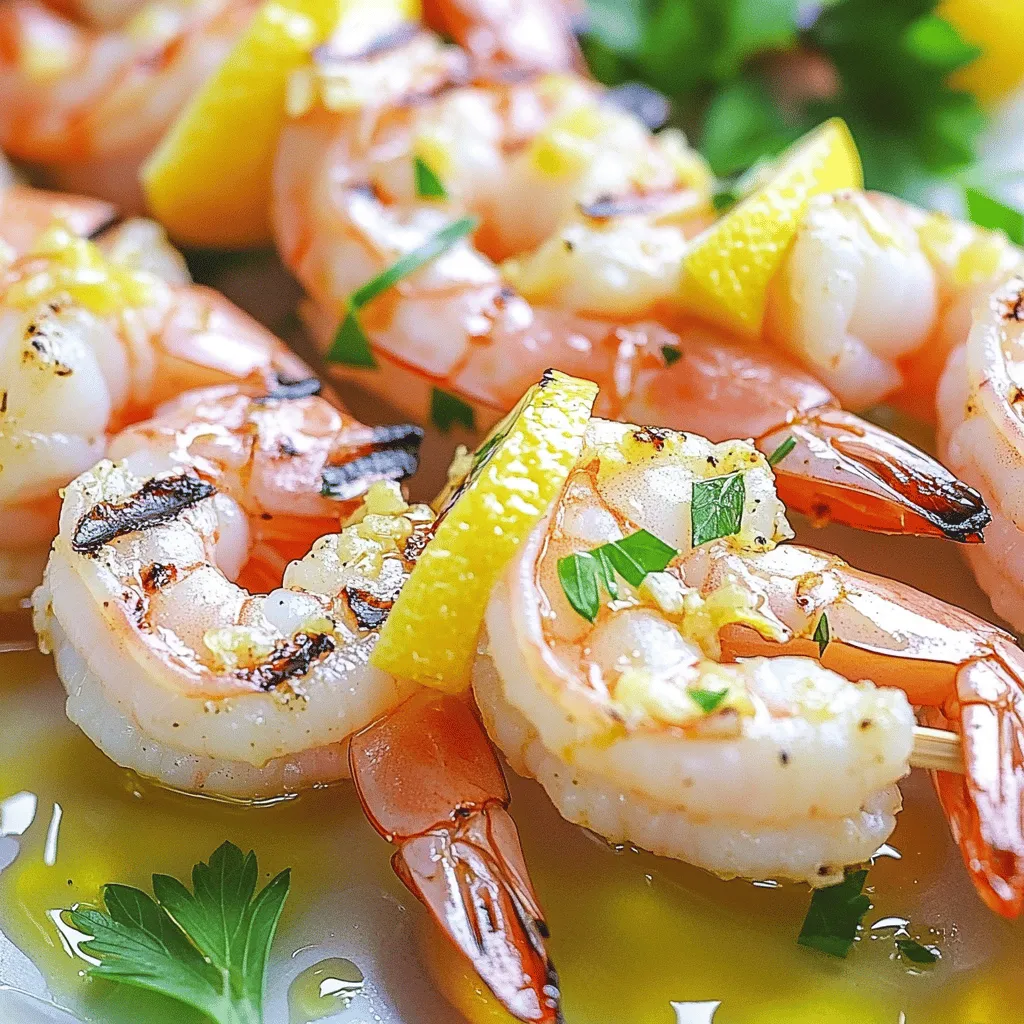
Looking for a quick and tasty meal? My Lemon Garlic Shrimp Skewers are your answer! This easy dish packs a punch of flavor with just a few fresh ingredients. You’ll love the mix of juicy shrimp, zesty lemon, and aromatic garlic. Follow my simple steps to create this delightful meal on the grill. Perfect for a weeknight dinner or a summer cookout! Let’s dive into the recipe together.
Ingredients
Main Ingredients
- Large shrimp (1 lb, peeled and deveined)
- Garlic (4 cloves, finely minced)
- Extra virgin olive oil (1/4 cup)
- Juice and zest of 2 fresh lemons
Seasonings and Marinade
- Smoked paprika (1 teaspoon)
- Dried oregano (1 teaspoon)
- Salt and freshly cracked pepper to taste
Additional Items
- Skewers (wooden or metal)
- Fresh parsley (for garnish)
Using fresh ingredients makes a big difference. I always choose large shrimp because they hold up well on the grill. Make sure they are peeled and deveined for easy eating. Garlic brings flavor, while extra virgin olive oil adds rich taste and helps the spices stick. The juice and zest of fresh lemons brighten the dish.
For the seasonings, smoked paprika gives a warm kick. Oregano adds an earthy note. Salt and pepper balance everything. If you want to make this dish your own, you can play with the spices.
Don’t forget the skewers! If you use wooden ones, soak them for 30 minutes to avoid burning. I like to add fresh parsley as a garnish. It looks pretty and adds a fresh taste.
Step-by-Step Instructions
Preparing the Marinade
To start, you will need to make the marinade. In a medium bowl, whisk together 4 cloves of minced garlic, 1/4 cup of olive oil, the juice and zest of 2 lemons, 1 teaspoon of smoked paprika, 1 teaspoon of dried oregano, and a pinch of salt and pepper. This mix gives the shrimp a bright and zesty flavor. Be sure to mix well so every ingredient blends nicely.
Marinating the Shrimp
Next, add 1 pound of peeled and deveined large shrimp to the marinade. Stir gently to coat each shrimp fully. Cover the bowl with plastic wrap and place it in the fridge. Let the shrimp marinate for 30 minutes to 1 hour. This step is crucial. It allows the shrimp to soak up all the wonderful flavors from the marinade.
Grilling the Shrimp Skewers
While the shrimp marinates, preheat your grill to medium-high heat. Once hot, thread the marinated shrimp onto skewers, with about 4-5 shrimp per skewer. Make sure to leave a small gap between each shrimp for even cooking. Place the skewers on the grill and cook for 2-3 minutes on each side. You want the shrimp to turn pink and opaque. Be careful not to overcook them, as they can become rubbery.
Once done, take the skewers off the grill and let them rest for about a minute. This helps the juices settle. You can garnish with fresh parsley and a bit more lemon juice if you like.Enjoy your delicious lemon garlic shrimp skewers!
Tips & Tricks
Cooking Perfection
To make perfect lemon garlic shrimp skewers, avoid overcooking the shrimp. Overcooked shrimp can become tough and rubbery. Cook them just until they turn pink and opaque. This usually takes about 2-3 minutes on each side.
Another key tip is to ensure even heat on the grill. If some parts are hotter than others, some shrimp will cook faster. This can lead to uneven texture. To fix this, preheat your grill properly and spread the shrimp out for even cooking.
Presentation Ideas
Presentation is key to a great dish. Serve your skewers on a colorful platter. Add fresh lemon wedges for a pop of color. The bright yellow will contrast nicely with the shrimp.
For an extra touch, drizzle more lemon juice over the skewers. This adds a fresh zing. You can also garnish with finely chopped parsley. This not only looks good but adds a fresh flavor.
Recommended Sides
Pair your shrimp skewers with a fresh salad. A simple green salad works well. You can also serve grilled vegetables. This adds color and nutrition to your meal.
For a heartier option, consider rice or quinoa. These grains can soak up the delicious lemon garlic flavor. They make your meal more filling and satisfying.

Variations
Flavor Twists
You can easily change the taste of your lemon garlic shrimp skewers. One fun way is to add chili flakes for some heat. This small change makes a big flavor difference. You can also mix in fresh herbs like basil or cilantro. These herbs bring a fresh taste that brightens the dish. Experiment with your favorite spices to find your perfect flavor.
Different Proteins
If you want to mix things up, try using chicken or tofu instead of shrimp. Chicken pieces work well when marinated in the same lemon garlic sauce. Just ensure they cook fully to a safe temperature. Tofu absorbs flavors beautifully, making it a great vegan option. Simply press the tofu to remove excess water, then cut it into cubes for skewering.
Cooking Methods
You don’t have to use a grill to make these skewers. You can oven-bake or broil them instead. For baking, preheat your oven to 400°F. Place the skewers on a baking sheet lined with parchment paper. Bake for about 8-10 minutes, turning halfway through. Broiling works fast too. Just place the skewers in the broiler for 2-3 minutes per side. This method gives you a nice char without needing a grill.
Storage Info
Refrigeration Guidelines
After enjoying your lemon garlic shrimp skewers, store any leftovers in an airtight container. This keeps them fresh for up to 2 days. Make sure the container seals well to prevent any odors from the fridge from seeping in.
Freezing Instructions
If you want to save some skewers for later, you can freeze them. Place the cooked skewers in a freezer-safe bag or container. They will stay good for up to 2 months. Be sure to label the bag with the date, so you know when you made them.
Reheating Methods
When you’re ready to eat your frozen skewers, reheat them well. The oven works best for even heating. Preheat your oven to 350°F (175°C) and place the skewers on a baking sheet. You can also reheat them on the grill for a few minutes. This keeps the flavor fresh and helps maintain their tasty texture.
FAQs
What type of shrimp is best for skewers?
For skewers, I recommend using large shrimp. You can choose fresh or frozen shrimp. Large shrimp hold up well on the grill and cook evenly. They also absorb the marinade flavors nicely. Look for shrimp that are firm and have a mild scent. This helps ensure you get the best taste and texture in your dish.
Can I use wooden skewers without soaking?
It’s best to soak wooden skewers in water for 30 minutes. This step helps prevent burning on the grill. If you skip this, the skewers may catch fire. Soaking also keeps them from splintering. I always recommend this simple step for perfect results.
How can I tell when shrimp is cooked?
You can tell shrimp is cooked when it turns pink and opaque. This usually takes about 2 to 3 minutes per side on the grill. Overcooking shrimp can make them tough, so keep an eye on them. When they curl into a C shape, they’re done. I love using this simple method to check for doneness.
You learned how to make delicious shrimp skewers in this post. We covered the key ingredients, step-by-step cooking instructions, and helpful tips. Remember, marinating shrimp enhances their flavor, making each bite better. Always avoid overcooking for the best texture. You can also switch up the flavors with spices or different proteins. These skewers are easy to store and reheat, perfect for meal prep. Try this recipe for a tasty treat that everyone will love!


. How to select ripe avocados To choose ripe avocados, look for dark green skin. Gently squeeze without applying too much pressure. A ripe avocado gives slightly. Avoid any that feel too soft or have dark spots. Storing leftover salad To keep leftovers fresh, store them in an airtight container. Place a piece of plastic wrap directly on the salad before sealing. This helps keep the avocados from browning. Additional spices or herbs You can add spices like smoked paprika or cayenne for extra flavor. Fresh herbs like parsley or basil can also brighten the salad. Experiment with what you like to create your perfect mix. Adjusting the heat level If you want more heat, add more jalapeño or a splash of hot sauce. For a milder version, skip the jalapeño or remove the seeds. Adjust to your taste! Presentation ideas For a fun presentation, layer the salad in a clear bowl. This shows off all the bright colors. You can also serve it in individual bowls or mason jars for a neat look. Pairing with other dishes This salad pairs well with grilled chicken, fish, or tacos. You can also serve it as a light lunch or side dish at a barbecue. It adds a fresh touch to any meal. {{image_4}} You can easily change this salad to fit your taste. Adding protein is one great option. Grilled chicken or shrimp works well here. It adds heartiness and flavor. You can also mix in seasonal vegetables. Try diced cucumbers in summer or roasted butternut squash in fall. These add color and texture. You can make this salad vegan by skipping the feta cheese. The other ingredients are already plant-based. It still tastes great without it. If you need a gluten-free version, you’re in luck! This salad is naturally gluten-free. All the ingredients fit a gluten-free diet, so enjoy without worry. For a twist on the dressing, use a yogurt-based option. This adds creaminess without extra fat. It’s a fun change from the classic vinaigrette. You can also try different vinaigrettes. A balsamic or honey mustard vinaigrette can change the flavor. Experiment to find your favorite! For the full recipe, check out the delicious avocado and black bean salad. To keep your avocado and black bean salad fresh, store it in an airtight container. This helps prevent oxidation and keeps flavors intact. Make sure the container is clean and dry before adding the salad. You can also squeeze a little extra lime juice on top. This adds a nice flavor and helps slow browning. I do not recommend freezing this salad. The texture of avocados changes when frozen. You may end up with mushy avocados and watery beans. If you want to save some for later, consider storing the ingredients separately. You can freeze black beans or corn, but mix them fresh with avocado when serving. This salad is best served cold or at room temperature. If you must reheat it, do it gently. Place it in a microwave-safe bowl and heat in short bursts. Stir it often to avoid cooking the avocado. However, reheating is not necessary, as the flavors shine best when fresh. For more details, check the Full Recipe. To keep avocados fresh, use lemon or lime juice. The acid slows browning. Also, store cut avocados in an airtight container. You can cover them with plastic wrap, pressing it against the flesh to limit air exposure. If you leave the pit in the avocado, it helps too. Yes, you can prepare the salad ahead. However, add the avocados and dressing just before serving. This way, they stay fresh. You can chop all the other ingredients earlier. Store them in the fridge to keep them cool. If you want to switch the black beans, try chickpeas or kidney beans. They both add protein and flavor. You could also use grilled chicken or shrimp for a meaty option. If you prefer a vegan choice, lentils are great too. Yes, this salad is gluten-free. All the ingredients are safe for those with gluten issues. If you choose to add any extras, like croutons, check their labels to ensure they are gluten-free. This blog post covered a vibrant salad packed with healthy ingredients. You learned how to prepare fresh avocados, black beans, and various veggies. I shared tips for making the perfect dressing and assembling the salad without mushing the avocados. Remember, customizing the salad allows for everyone’s taste. Keep it fresh, explore new flavors, and enjoy! Healthy eating can be fun and delicious. Take these ideas and make your salad unique.](https://dishtreats.com/wp-content/uploads/2025/06/59c4ae36-0ebd-4eac-932b-d71541cf887d-768x768.webp)
![To make this dish, you will need: - 1 lb Brussels sprouts, trimmed and halved - 3 tablespoons extra virgin olive oil - 1/4 cup pure maple syrup - 1 tablespoon balsamic vinegar - 1 teaspoon garlic powder - Salt and freshly ground black pepper to taste These ingredients come together to create a sweet and savory glaze. The maple syrup adds sweetness, while the balsamic vinegar gives tanginess. The olive oil helps with roasting, making the sprouts tender and tasty. You can add these optional ingredients for extra flavor and texture: - 1/4 cup chopped walnuts - Fresh thyme leaves for garnish Walnuts add a nice crunch, while thyme gives a fresh aroma. Both options enhance the dish without overpowering it. This dish is not just tasty; it’s also good for you. Here’s a quick look at the nutrition per serving: - Calories: About 180 - Protein: 3g - Carbohydrates: 25g - Fat: 8g - Fiber: 4g Brussels sprouts are rich in vitamins C and K. The maple syrup provides natural sugars, making this dish a healthy choice. You get great flavors and health benefits in one meal. For the complete recipe, check the Full Recipe section above! First, we need to preheat the oven to 400°F (200°C). This heat is perfect for roasting. A hot oven ensures crispy edges and tender centers for your Brussels sprouts. Next, gather your ingredients. You will need: - 1 lb Brussels sprouts, trimmed and halved - 3 tablespoons extra virgin olive oil - 1/4 cup pure maple syrup - 1 tablespoon balsamic vinegar - 1 teaspoon garlic powder - Salt and freshly ground black pepper to taste - 1/4 cup chopped walnuts (optional for crunch) - Fresh thyme leaves for garnish (optional for aroma and color) In a large bowl, mix the halved Brussels sprouts with olive oil, maple syrup, balsamic vinegar, garlic powder, salt, and pepper. Toss everything well. Make sure every sprout gets coated in the sweet and savory sauce. This step is key for flavor. Prepare your baking sheet by lining it with parchment paper. This makes cleaning easy and helps prevent sticking. Spread the Brussels sprouts in a single layer on the sheet. Give them space to roast well. Now, place the baking sheet in the hot oven. Roast the sprouts for 25 minutes. Halfway through, stir them to promote even cooking. You want them to get tender and brown. If you add walnuts, toss them on the sheet during the last 5 minutes. This will give them a nice toast and extra crunch. Once done, take the Brussels sprouts out and let them cool for a minute. Transfer them to a serving dish. For a finishing touch, sprinkle fresh thyme leaves on top. This adds a nice pop of color and aroma to your dish. Enjoy this full recipe for a delicious treat! To get that perfect glaze, start with good maple syrup. Use pure maple syrup for the best flavor. Mix it well with olive oil and balsamic vinegar; this combo really shines. Make sure to coat the Brussels sprouts evenly. This helps each piece get that sweet, sticky glaze. Toss them well in the bowl before roasting. Roasting Brussels sprouts needs some care. First, preheat your oven to 400°F (200°C). This hot oven helps them caramelize. Spread the sprouts on a baking sheet in a single layer. If they are crowded, they won't brown well. Stir them halfway through cooking to ensure even roasting. You want them golden brown and tender, about 25 minutes in the oven. When ready to serve, think about how to make them look nice. Place the roasted sprouts on a large platter. You can arrange them in a circle for a pretty look. If you added walnuts, sprinkle them on top for crunch. Fresh thyme leaves also add color and smell great. This makes the dish not just tasty but beautiful too. For the full recipe, check out the details above. {{image_4}} You can switch up the sweetener for a twist. Try honey or agave syrup. These will add their own unique flavors. You can also use coconut sugar for a richer taste. If you like a kick, add some chili flakes for heat. A dash of orange juice can also brighten up the sweetness. This recipe is already vegetarian. To make it vegan, ensure the maple syrup is pure. You can also use almond oil instead of olive oil for a different flavor. For creaminess, add a dollop of vegan sour cream on top before serving. This adds a lovely tang that pairs well with the sweetness. Seasonal swaps can make this dish even better. In spring, add fresh peas for color and sweetness. During fall, toss in some diced apples for a sweet crunch. In winter, try adding roasted chestnuts for a nutty flavor. These changes keep the dish fresh and exciting every time you make it. For the full recipe, you can refer back to the detailed instructions provided. After enjoying your maple glazed Brussels sprouts, store any leftovers in an airtight container. This keeps them fresh and prevents odors. Let them cool first before sealing. Place the container in the fridge. They stay good for about 3 to 5 days. If you want to keep them longer, consider freezing. Reheating your Brussels sprouts can be quick and easy. You can use the oven or stovetop. If you use the oven, preheat it to 350°F (175°C). Spread the sprouts on a baking sheet and heat for about 10-15 minutes. Stir halfway through to ensure even warming. If you prefer the stovetop, heat a pan over medium heat. Add a bit of olive oil and toss the sprouts until warmed through. Freezing Brussels sprouts is a smart way to save them for later. First, blanch them in boiling water for 3 minutes. Then, cool them in ice water. This keeps their bright color and flavor. Drain and dry the sprouts, then place them in a freezer bag. Remove as much air as you can before sealing. They can last up to 6 months in the freezer. When you're ready to use them, just thaw and reheat! Enjoy your deliciously roasted maple glazed Brussels sprouts from [Full Recipe] and savor every bite! Yes, you can prep Brussels sprouts in advance. Trim and halve them a day before. Store them in an airtight container in the fridge. When you're ready, mix them with the other ingredients from the Full Recipe. This helps save time and makes cooking easier. Maple glazed Brussels sprouts pair well with many dishes. Here are some great options: - Roast chicken for a savory touch. - Grilled salmon for a healthy protein. - Quinoa salad for a hearty side. - Mashed potatoes for comfort food lovers. These options balance the sweet and savory flavors of the sprouts. To make this dish vegan, swap out the maple syrup for agave nectar. This keeps the sweetness intact. You can also use vegetable oil instead of olive oil if you prefer. Follow the Full Recipe as is, making those simple swaps. Enjoy the same great taste with a vegan twist! In this blog post, we covered how to make maple glazed Brussels sprouts. We discussed the key ingredients and provided step-by-step instructions. Tips helped you achieve the perfect glaze and roasting method. You also learned about variations, storage, and common questions. Now, you have all the tools to enjoy this dish. Experiment with flavors and enjoy your cooking!](https://dishtreats.com/wp-content/uploads/2025/06/8ccc11bb-56ad-4722-8e0d-cbebb28a9ca5-768x768.webp)


