Lemon Dill Salmon Cakes Flavorful and Easy Recipe

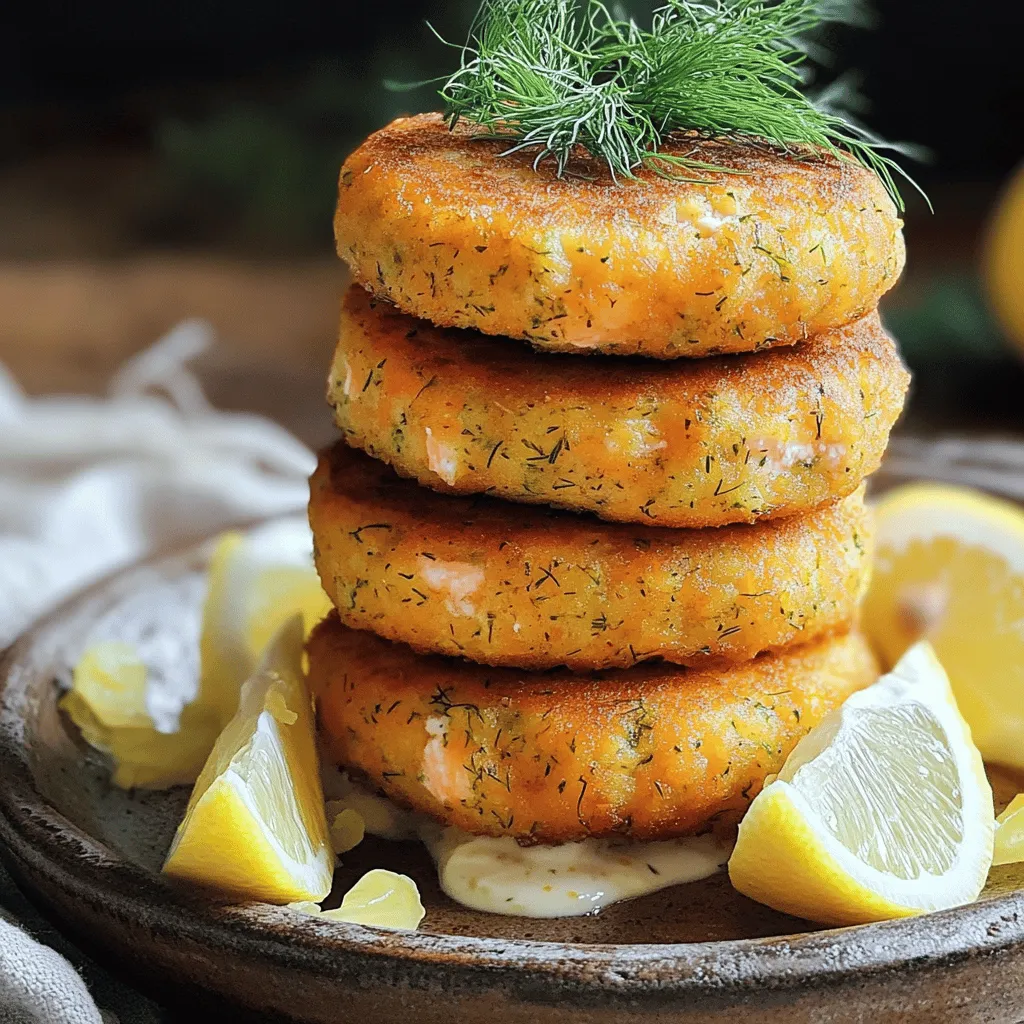
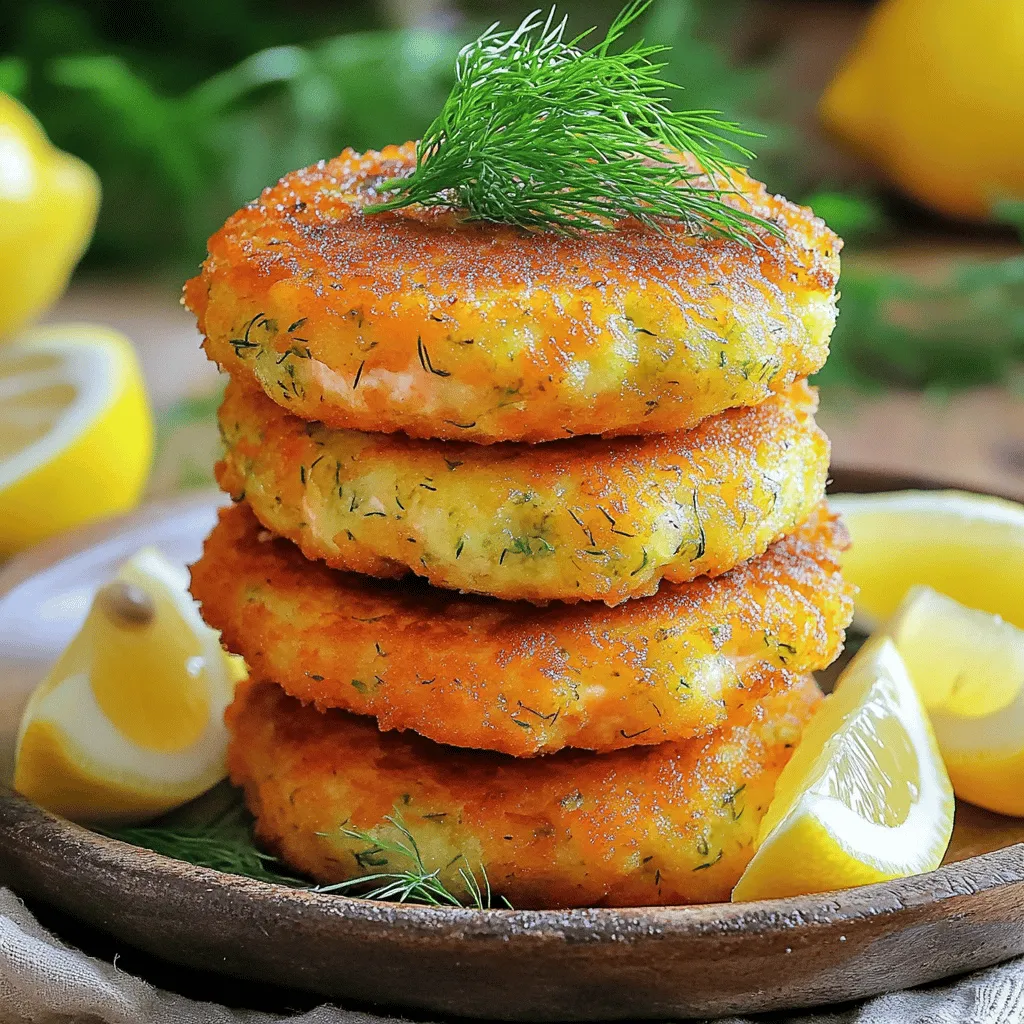
Looking for a quick and tasty seafood dish? Try my Lemon Dill Salmon Cakes! Packed with fresh salmon, zesty lemon, and aromatic dill, these easy-to-make cakes deliver big flavor without the hassle. Whether you want to impress guests or savor a simple weeknight meal, this recipe offers a satisfying bite every time. Stick around to learn how to make this delightful dish step by step!
Ingredients
Here’s what you need to make Lemon Dill Salmon Cakes:
- 1 lb fresh salmon fillets, skin removed
- 1/2 cup Panko breadcrumbs
- 1/4 cup plain Greek yogurt
- 1 large egg, lightly beaten
- 2 tablespoons fresh lemon juice
- 1 tablespoon lemon zest
- 2 tablespoons fresh dill, finely chopped
- 1 clove garlic, minced
- Salt and pepper, to taste
- 2 tablespoons olive oil
These ingredients create a burst of flavor. The fresh salmon gives a rich taste. Panko breadcrumbs add a nice crunch. Greek yogurt keeps the cakes moist and creamy. Lemon juice and zest bring a bright note. Dill adds a fresh, herby flavor. Garlic gives the cakes a savory touch. Use salt and pepper to season to your liking. Olive oil is perfect for frying to a golden brown.
Step-by-Step Instructions
Preparing the Salmon
1. Preheating the oven: Start by preheating your oven to 375°F (190°C). This helps cook the salmon evenly.
2. Baking salmon fillets: Place the salmon fillets on a baking sheet lined with parchment paper. Bake them for about 15 minutes. You want the fish to look opaque and flake easily with a fork.
3. Flaking salmon: Let the salmon cool slightly after baking. Then, transfer it to a large mixing bowl. Use a fork to flake the salmon into small pieces.
Mixing the Ingredients
1. Combining the flaked salmon with other ingredients: In the bowl with the flaked salmon, add the Panko breadcrumbs, Greek yogurt, beaten egg, lemon juice, lemon zest, chopped dill, and minced garlic.
2. Ensuring moisture and consistency: Add salt and pepper to taste. Mix everything well. You want a moist mixture that can still hold its shape.
Forming the Cakes
1. Shaping the salmon mixture into patties: With clean hands, divide the mixture into equal portions. Shape each portion into a patty about 3 inches in diameter and 1/2 inch thick.
2. Yielding a specific number of cakes: You should get around 8 patties from this mixture, depending on how you shape them.
Cooking the Salmon Cakes
1. Heating the oil in a skillet: In a non-stick skillet, heat 2 tablespoons of olive oil over medium heat until it shimmers.
2. Cooking times and flipping tips: Carefully place the salmon cakes in the skillet. Cook for about 4-5 minutes on each side. They should turn golden brown and crispy. Flip them gently to keep their shape.
Serving Suggestions
- Presentation and garnishing ideas: Once cooked, place the salmon cakes on a paper towel-lined plate to drain excess oil. Serve warm with lemon wedges. You can place them on a bed of mixed greens for a colorful touch. Stack the cakes for a beautiful presentation and add a sprig of fresh dill on top. Drizzle with extra lemon juice for a burst of flavor.
Tips & Tricks
Perfecting Texture
To get a crispy outside for your salmon cakes, use Panko breadcrumbs. They make the cakes crunchy and golden. Make sure your oil is hot before adding the cakes. This helps them crisp up fast. Avoid dryness by not overcooking them. A good rule is to cook them for 4 to 5 minutes on each side. If they seem too dry, add a bit more yogurt to the mix next time.
Flavor Enhancements
Herbs and spices can take your salmon cakes to the next level. Try adding parsley or chives along with the dill. They add freshness and depth to the flavor. The lemon is key too. It brightens the dish and balances the richness of the salmon. Always use fresh lemon juice and zest for the best taste.
Cooking Techniques
You can bake or grill these cakes if you want healthier options. To bake, set your oven to 375°F (190°C) and cook for about 15 minutes. For grilling, use a medium heat and oil the grill grates well. This prevents sticking. When using a skillet, keep the heat medium to avoid burning. Always flip the cakes gently to keep them intact.

Variations
Ingredient Substitutions
You can easily swap fresh salmon for canned or smoked salmon. Canned salmon works well when you are short on time. It offers a good flavor and saves prep time. Smoked salmon adds a unique, rich taste. Just ensure you break it into small pieces before mixing it in.
Instead of Greek yogurt, you can use sour cream or even cottage cheese. Each brings a different flavor and texture. Sour cream adds a tangy taste, while cottage cheese offers a lighter feel. Both options keep your salmon cakes moist.
Flavor Variations
To change up the taste, you can add fresh herbs like parsley or chives. These herbs add a fresh twist. They brighten the flavor and give your cakes a lovely color. You can also mix in spices like paprika or cayenne. Paprika adds warmth, while cayenne gives a nice kick. Adjust the amount based on your spice preference.
Serving Styles
You can pair your salmon cakes with various sides. A crisp salad or grains like quinoa work great. They add texture and a balanced plate. For a fun twist, turn the salmon cakes into sliders or appetizers. Just use smaller patties and serve them on mini buns. This style is perfect for parties or casual gatherings.
Storage Info
Refrigeration
Store leftover salmon cakes in an airtight container. This keeps them fresh and safe. They stay good for about 3 days in the fridge. To reheat, use a skillet or microwave. This helps keep their texture nice.
Freezing
You can freeze salmon cakes for later. To do this, place them in a single layer on a baking sheet. Freeze for one hour, then transfer them to a freezer bag. They keep well for up to 3 months. When ready to eat, thaw them in the fridge overnight. Cook them in a skillet until warm and crispy. Enjoy your delicious meal anytime!
FAQs
How do I make sure my salmon cakes don’t fall apart?
To keep your salmon cakes from falling apart, you need to bind the ingredients well. Here are some tips:
- Use Panko breadcrumbs for a better hold.
- Add Greek yogurt for moisture and binding.
- Use a beaten egg to help the mixture stick together.
- Don’t skip the chilling step. Refrigerate the cakes for 30 minutes before cooking. This helps them firm up.
Mix the ingredients until just combined. Overmixing can make them dry.
Can I bake these salmon cakes instead of frying?
Yes, you can bake the salmon cakes. This method is healthier and still tasty. Here’s how:
- Preheat your oven to 375°F (190°C).
- Place the formed cakes on a lined baking sheet.
- Brush them lightly with olive oil.
- Bake for about 20 minutes, flipping halfway for even cooking.
Baking gives you a crispy texture without the oil.
What can I serve with Lemon Dill Salmon Cakes?
These salmon cakes pair well with several sides. Here are some great options:
- A fresh green salad with lemon vinaigrette.
- Roasted vegetables for a warm side.
- Quinoa or rice for a filling option.
- Tartar sauce or a yogurt dip adds a nice touch.
These sides complement the lemon and dill flavors perfectly.
How long do leftovers last in the fridge?
Leftovers can last for up to 3 days in the fridge. To store them:
- Place them in an airtight container.
- Make sure they are completely cooled before sealing.
Reheat them in the oven or skillet for the best taste. Always check for any signs of spoilage before eating.
In this post, we explored a delicious lemon dill salmon cake recipe. You learned about key ingredients like fresh salmon, Greek yogurt, and herbs. We also covered simple steps for mixing, shaping, and cooking the cakes. With tips for perfect texture and variations for added flavor, you can customize these cakes to suit your taste. Remember to store leftovers properly for best freshness.
Enjoy making these tasty salmon cakes and share them with friends!


![To make Crispy Parmesan Ranch Potato Skins, gather these simple ingredients: - 4 large russet potatoes - 1 cup shredded sharp cheddar cheese - 1/2 cup grated Parmesan cheese - 1/4 cup sour cream - 2 tablespoons ranch seasoning mix - 1/4 cup green onions, chopped - 3 tablespoons olive oil - Salt and pepper to taste - Optional: hot sauce for serving These items will help you create a tasty snack that everyone loves. The russet potatoes give a sturdy base, while the cheese brings flavor and creaminess. The ranch seasoning mix adds a punch of taste that makes these skins special. I always keep a few extra green onions on hand for garnish. They add color and a mild onion flavor that enhances the dish. I recommend using fresh ingredients for the best results. Fresh potatoes will give you a crispier skin. The cheese should be high-quality for a richer flavor. If you like spice, have hot sauce ready for a kick! For the full recipe, visit the [Full Recipe] section. 1. Preheat your oven to 400°F (200°C) to get it ready for baking. 2. Scrub the russet potatoes under cold running water. Dry them completely with a clean towel. 3. Prick each potato with a fork six to eight times. This helps steam escape while they bake. 1. Rub each potato with olive oil. Make sure they are well-coated. 2. Sprinkle salt on the potatoes for extra flavor. 3. Place the potatoes on the middle rack of the oven. Bake for 45-60 minutes. Check their doneness by piercing with a fork. 1. Once baked, let the potatoes cool for about 10 minutes. This makes them easier to handle. 2. Slice each potato in half lengthwise. Now you have boat-like shapes! 3. Scoop out a bit of the flesh, leaving about 1/4 inch intact along the skin. 1. Brush the insides of each potato skin with olive oil. Season with salt and pepper for taste. 2. Add a generous amount of shredded cheddar cheese in each skin. Then sprinkle the remaining Parmesan cheese on top. 3. Put the filled skins back in the oven, cut-side up. Bake for an extra 10-15 minutes. The cheese should melt and the edges should crisp. 4. While baking, mix the remaining Parmesan cheese, ranch seasoning, and chopped green onions in a bowl. 5. When the potato skins are crispy, take them out. Top each skin with the ranch mix. 6. Return the potato skins to the oven for 5 more minutes. This lets the flavors meld beautifully. Enjoy your Crispy Parmesan Ranch Potato Skins hot, served with sour cream and optional hot sauce! For complete details, refer to the Full Recipe. To make your potato skins crispy, follow these simple steps: - Bake at a high temperature: Set your oven to 400°F (200°C). High heat gets the skins nice and crisp. - Use olive oil: Coat the skins well in olive oil. This helps them crisp up and adds flavor. - Season well: Don’t skip the salt and pepper. Seasoning is key for great taste. You can switch up the cheese for your potato skins. Here are some ideas: - Monterey Jack: This cheese melts well and adds a creamy texture. - Gouda: It gives a smoky flavor that pairs nicely with ranch. - Feta: For a tangy twist, sprinkle some crumbled feta on top. Balancing flavors is important. Use milder cheeses with stronger toppings. Adding more flavor is easy! Here are some tips: - Spices: Try adding paprika or garlic powder for extra kick. - Herbs: Fresh herbs like parsley or chives brighten up the dish. - Toppings: Consider adding crispy bacon bits or diced tomatoes for extra texture. These tips help you make the best crispy Parmesan ranch potato skins. For the complete recipe, check out the Full Recipe section. {{image_4}} For a twist, try different spice blends. You can use garlic powder, onion powder, or smoked paprika. Each adds a unique taste. You can also switch the ranch seasoning for taco seasoning. It gives a fun and zesty flavor. - Garlic powder - Onion powder - Smoked paprika - Taco seasoning Explore different flavor profiles. For a spicy kick, add cayenne pepper or chili powder. If you like fresh herbs, try dill or parsley. These choices keep your potato skins exciting and tasty. Get creative with toppings to suit your taste. You can add crispy bacon bits for a savory crunch. If you're vegan, top with dairy-free cheese or avocado. - Crispy bacon bits - Dairy-free cheese - Avocado slices For a fresh touch, add chopped tomatoes or jalapeños. You can also sprinkle some fresh cilantro or green onions. This way, everyone can enjoy their potato skins just how they like them. Pair your potato skins with a hearty soup or salad. A warm chili or creamy broccoli soup works well. These sides make a filling meal. - Hearty chili - Creamy broccoli soup - Fresh garden salad You can also serve them with grilled chicken or fish. This gives a nice balance to your meal. The crispy potato skins shine as a fun side dish. For more ideas, check out the full recipe. To keep your crispy potato skins fresh, store them in the fridge. Place them in an airtight container. They will stay good for about 3 days. Make sure they cool completely before sealing. This helps prevent excess moisture. When you want to enjoy your leftovers, use an oven for the best taste. Preheat it to 350°F (175°C). Place the potato skins on a baking sheet. Heat them for about 10-15 minutes. This keeps them crispy. Avoid using a microwave, as it can make them soggy. Yes, you can freeze potato skins! To freeze, let them cool completely. Place them in a single layer on a baking sheet. Freeze them for about 1-2 hours. After that, transfer them to a freezer bag. Remove as much air as possible. For thawing, place the skins in the fridge overnight before reheating. The best potatoes for potato skins are large russet potatoes. They have thick skin and a fluffy interior. This makes them perfect for holding toppings. Their size allows for a good amount of filling. Plus, they get crispy when baked, which is what we want. Yes, you can prepare them ahead of time. Bake the potatoes and scoop out the flesh. Store the skins in the fridge until you're ready to bake. Just add cheese and toppings before the final bake. This saves time and makes serving easier. To keep potato skins crispy, follow these tips: - Ensure you coat the skins with olive oil. - Bake them at a high temperature. - Avoid overcrowding the baking sheet. - Don't cover them while they cool. These steps help maintain crunchiness and flavor. Crispy Parmesan Ranch Potato Skins go well with several sauces. Here are some tasty pairings: - Sour cream - Ranch dressing - Hot sauce - Guacamole - Salsa These sauces add flavor and enhance your snack experience. Yes, you can freeze potato skins for later use. Bake the skins and let them cool completely. Then, store them in airtight containers. They can last a couple of months in the freezer. When ready to enjoy, bake them directly from frozen. This way, you get to savor that crispy goodness again! This blog post guides you on making Crispy Parmesan Ranch Potato Skins, covering every step. You learned about needed ingredients and how to prepare them. I shared tips for achieving crispy skins and creative topping ideas. You also discovered ways to store and reheat leftovers. Enjoy making this tasty treat! With your new skills, you can impress friends and family. These potato skins are simple and delicious.](https://dishtreats.com/wp-content/uploads/2025/07/2d854721-5686-49a1-8fc7-db971342c8a3-768x768.webp)

. If you love salmon, here are some other tasty recipes to try: - Lemon Dill Salmon - A bright and zesty dish that's easy to make. [Read more here](#). - Honey Garlic Salmon - Sweet and savory, this recipe is a crowd-pleaser. [Check it out here](#). - Teriyaki Salmon - A flavorful twist with an Asian flair. [Explore this recipe here](#). For more spinach dishes, try these: - Spinach and Feta Stuffed Chicken - A great way to enjoy fresh spinach. [Find the recipe here](#). - Creamy Spinach Pasta - Pasta lovers will adore this creamy dish. [Discover it here](#). To make creamy spinach stuffed salmon, you’ll need some handy kitchen tools: - Sharp Knife - Perfect for cutting pockets in the salmon fillets. [Get yours here](#). - Mixing Bowl - Ideal for mixing the creamy filling. [Purchase a set here](#). - Oven-Safe Skillet - Great for searing and baking the salmon. [Find one here](#). - Spatula - Useful for flipping the salmon without breaking it. [Check it out here](#). These tools will help you create the best salmon dish ever! This recipe for creamy spinach stuffed salmon combines simple ingredients with bold flavors. You learned how to prepare, cook, and serve this dish. Plus, I shared tips to make it perfect every time. Cooking should be fun and rewarding. I hope you feel ready to try this recipe! Enjoy this meal paired with your favorite sides and watch your loved ones smile. Get creative with variations and make it your own. Happy cooking!](https://dishtreats.com/wp-content/uploads/2025/11/eda5ad80-a239-44cc-b461-b36428c6ca92_3-768x768.webp)


