Lemon Cheesecake Bars Delightfully Creamy Dessert

Looking for a sweet treat that’s easy to make and bursting with flavor? Lemon cheesecake bars are your answer! I love their creamy texture and zesty taste. In this post, I’ll guide you through every step, from the crunchy crust to the silky filling. Plus, I’ll share tips, variations, and storage info to ensure your bars shine. Get ready to impress with this delightful dessert!
Ingredients
Complete List of Ingredients
- 1 ½ cups graham cracker crumbs
- ½ cup unsalted butter, melted
- ¼ cup granulated sugar (for the crust)
- 16 oz cream cheese, softened to room temperature
- 1 cup granulated sugar (for the filling)
- 3 large eggs, at room temperature
- ½ cup sour cream, room temperature
- Zest of 2 lemons
- ¼ cup freshly squeezed lemon juice
- 1 teaspoon vanilla extract
- A pinch of salt
- Powdered sugar, for dusting (optional)
- Fresh mint leaves, for garnish (optional)
I love using fresh ingredients for my Lemon Cheesecake Bars. They make the dessert bright and flavorful. Start with graham cracker crumbs. They form the base and add crunch. I mix them with melted unsalted butter and a bit of sugar for sweetness. This mixture creates a crust that holds everything together.
Next, I use cream cheese as the star of the filling. It gives the bars a rich and creamy texture. Make sure to soften it first; this helps avoid lumps. I add sugar to sweeten it up and blend well until smooth.
Eggs come next. They add structure and help the bars set. I add them one at a time, mixing well after each. Then, I introduce sour cream for a tangy twist. Lemon zest and juice bring a bright, zesty flavor that makes these bars pop.
I finish the filling with vanilla extract and a pinch of salt. This balance is key to enhancing all the flavors. Optional garnishes like powdered sugar and mint leaves can make your bars look extra special.
Gather these ingredients, and you’re on your way to making a delicious treat!
Step-by-Step Instructions
Prepare the Crust
- Preheat your oven to 325°F (160°C).
- In a medium bowl, mix together:
- 1 ½ cups graham cracker crumbs
- ½ cup unsalted butter, melted
- ¼ cup granulated sugar
- Stir until all crumbs are coated with butter.
- Firmly press the mixture into a greased 9×9-inch baking pan.
- Bake for 8-10 minutes until lightly golden brown.
- Remove and let it cool completely.
Make the Filling
- In a large bowl, beat together:
- 16 oz cream cheese, softened
- 1 cup granulated sugar
- Mix until smooth and creamy.
- Add 3 large eggs, one at a time.
- Mix well after each egg, scraping the bowl’s sides.
- Add:
- ½ cup sour cream
- Zest of 2 lemons
- ¼ cup lemon juice
- 1 teaspoon vanilla extract
- A pinch of salt
- Mix on low speed until fully combined.
Bake and Cool
- Carefully pour the lemon cheesecake filling over the cooled crust.
- Bake for 30-35 minutes. The center should jiggle slightly.
- Remove from the oven and cool at room temperature for 30 minutes.
- Transfer to the fridge and chill for at least 4 hours, or overnight.
- Once chilled, lift the cheesecake out of the pan using parchment paper.
- Slice into squares and enjoy!
Tips & Tricks
Getting the Right Texture
To achieve a creamy filling, start with softened cream cheese. This helps mix well and avoids lumps. Beat the cream cheese with sugar until smooth. Add the eggs one at a time. Mix gently after each egg until combined. This method keeps your filling light and airy.
Avoiding overbaking is key. Bake the cheesecake bars until the center just jiggles a little. If it sets completely, the bars may turn out dry. After baking, let them cool at room temperature. Chill them in the fridge for at least four hours. This step makes the texture rich and creamy.
Presentation Ideas
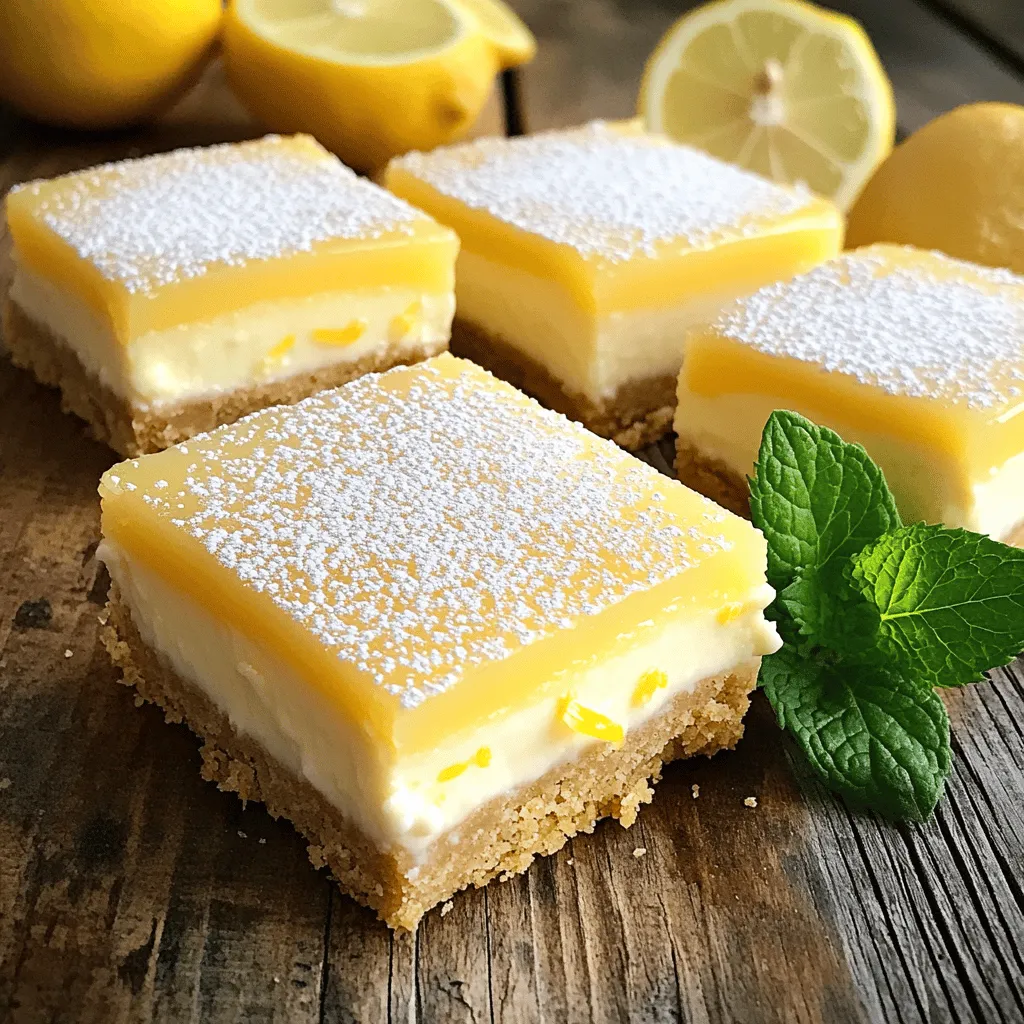
For serving suggestions, cut the bars into neat squares or rectangles. Use a sharp knife for clean edges. Place them on a pretty plate to make them look even better. You can also serve them with fresh fruit or a dollop of whipped cream for extra flair.
Garnishing tips can elevate your dessert. Dust the tops with powdered sugar right before serving. This adds sweetness and makes them look elegant. A few fresh mint leaves can add a pop of color. This simple touch invites your guests to dig in!

Variations
Flavor Variations
You can switch up the flavor in your lemon cheesecake bars easily. Here are some fun ideas:
- Adding different citrus fruits: Try mixing in zest from oranges or limes. This adds a bright twist. You can even use grapefruit for a unique taste. Each fruit brings its own flavor to the dessert.
- Incorporating flavored extracts: Use almond or coconut extracts for a new layer of taste. Just a teaspoon can change the whole vibe. Experimenting with extracts can yield yummy surprises.
Dietary Adjustments
You can make these delicious bars fit different diets:
- Gluten-free options: Swap graham cracker crumbs with ground almonds or gluten-free cookies. It keeps the crust tasty and safe for those with gluten issues.
- Vegan adaptations: Replace cream cheese with a vegan version made from nuts. Use flax eggs instead of chicken eggs. You can still enjoy a creamy texture without dairy, making it perfect for plant-based diets.
Storage Info
How to Store Lemon Cheesecake Bars
To keep your lemon cheesecake bars fresh, store them in the refrigerator. Use an airtight container or cover the pan tightly with plastic wrap. This helps prevent them from drying out or absorbing other smells. These bars will stay good for about 5 days in the fridge.
Freezing Instructions
If you want to save some for later, freezing is a great option. First, slice the bars and wrap each piece in plastic wrap. Then, place the wrapped bars in a freezer-safe bag or container. This protects them from freezer burn. They can last up to 3 months in the freezer.
To enjoy them later, thaw the bars in the fridge overnight. This way, they will stay creamy and delicious. You can also let them sit at room temperature for about 30 minutes before serving. This helps restore their lovely texture and taste.
FAQs
Common Questions
How long do these bars last?
These lemon cheesecake bars can last up to five days in the fridge. Store them in an airtight container for best results.
Can I use store-bought crust?
Yes, you can use a store-bought graham cracker crust. This saves time and still tastes great.
What can I substitute for sour cream?
Greek yogurt works well as a substitute for sour cream. It keeps the bars creamy and adds a nice tang.
Is it possible to make these bars ahead of time?
Absolutely! You can make them a day in advance. Just remember to chill them for at least four hours.
Additional FAQs
Can I double the recipe?
Yes, you can double the recipe. Use a larger baking pan to accommodate the extra filling.
What to do if the filling is too runny?
If your filling is runny, beat it more to incorporate air. You can also bake it a little longer to firm it up.
How to cut the bars cleanly?
To cut the bars cleanly, use a sharp knife. Dip the knife in hot water and wipe it dry between cuts for neat edges.
Lemon cheesecake bars are simple to make with key ingredients and steps. Start by preparing the crust and filling, then bake to perfection. Remember tips for texture and presentation to impress everyone. There are fun variations to explore, along with easy storage tips.
These bars are a delicious treat for any occasion. Enjoy making and sharing them with friends and family!


![To make creamy avocado toast, you need these fresh ingredients: - 4 ripe avocados - 8 slices of whole grain bread - 1 tablespoon fresh lemon juice - ½ teaspoon garlic powder - ½ teaspoon smoked paprika - Salt and black pepper, to taste - 1 cup cherry tomatoes, halved - Fresh basil leaves for garnish These ingredients come together to create a bright and tasty dish. The avocados provide creaminess, while the lemon juice adds a zing. Garlic powder and smoked paprika give the avocado spread a delicious depth. You can customize your toast with these optional toppings: - Crumbled feta cheese - Red chili flakes - A drizzle of balsamic glaze These extras let you explore different flavors. Feta adds a salty kick, while red chili flakes bring heat. Balsamic glaze offers a sweet contrast. Feel free to mix and match to suit your taste! Avocados are not just tasty; they also pack a punch in nutrition. They are rich in healthy fats, which can help lower bad cholesterol. They also contain fiber, which aids digestion. Plus, avocados are high in vitamins C, E, and K, supporting your immune system and skin health. Eating avocados promotes heart health and keeps you feeling full longer. This creamy avocado toast is not only a simple delight but a smart choice for your meals. For the full recipe, check out the detailed instructions! To make creamy avocado toast, start by toasting your bread. Use a toaster or a skillet. Aim for a golden brown color. This creates a firm base for your toppings. While the bread toasts, cut the ripe avocados in half. Remove the pits carefully. Use a spoon to scoop the soft flesh into a bowl. Next, add fresh lemon juice, garlic powder, smoked paprika, salt, and black pepper. Mix these into the avocado. Use a fork to mash it until creamy. It should still have some small chunks for texture. Taste it and adjust the seasoning if needed. Once the bread is ready, spread the avocado mix generously over each slice. Make sure to cover the bread completely. For the best toast, choose whole grain bread. It adds flavor and nutrition. Toasting in a skillet gives a nice crispness. Preheat the skillet over medium heat. Add a bit of olive oil for extra flavor. If using a toaster, toast twice for extra crunch. Keep an eye on the bread to avoid burning. Perfect toast should be firm and golden. To achieve the best creaminess, use ripe avocados. They should yield slightly when pressed. Start mashing with a fork in a bowl. Press down firmly to break it up. Mix in your other ingredients as you mash. This helps blend the flavors well. You want a creamy texture, but some chunks are great for bite. Don’t over-mash; keep it fun and textured. For the full recipe, you can check out the [Full Recipe]. When choosing avocados, look for ones that feel slightly soft when you gently squeeze them. A ripe avocado should give a little but not feel mushy. Check the skin color too; darker skin often means it's ripe. If you find hard avocados, leave them at room temperature for a few days to ripen. You can speed this up by placing them in a paper bag with a banana. If you have leftover avocado mixture, store it in an airtight container. To keep it fresh, add a layer of plastic wrap on top, pressing it directly against the surface. This prevents air from causing browning. You can also add a little extra lemon juice for added protection. Serve your creamy avocado toast with fresh toppings for added flavor and fun. Consider adding sliced radishes for crunch, or a poached egg for protein. You can also try smoked salmon or a sprinkle of nuts for extra texture. Customize each slice to create a unique bite every time. For the full recipe, check out the detailed steps and enjoy this simple dish! {{image_4}} Let’s get creative with your creamy avocado toast! You can mix and match toppings to make each bite special. Here are some ideas: - Crumbled feta cheese: This adds a salty kick. - Red chili flakes: For a spicy touch, sprinkle these on top. - Balsamic glaze: Drizzle it for a sweet and tangy flavor. - Radish slices: These add crunch and a peppery note. - Sliced boiled eggs: They provide extra protein and creaminess. You can change the whole vibe of your toast with different flavors. Here are some tasty combos: - Spicy: Mash in jalapeños or add hot sauce for heat. - Mediterranean: Mix in olives, sun-dried tomatoes, and a bit of oregano. - Mexican: Top with black beans, corn, and a squeeze of lime. - Asian: Add sesame seeds, soy sauce, and sliced green onions. Avocado toast is great for everyone! Here are some easy swaps: - Vegan bread: Choose gluten-free bread to keep it vegan and gluten-free. - Nutritional yeast: Use this instead of cheese for a cheesy flavor. - Chickpeas: Mash these into the avocado for added protein and flavor. - Hummus: Spread a layer of hummus under the avocado for extra creaminess. Feel free to explore these variations and make this dish your own. For the full recipe, check the recipe section above. If you have leftover toast, store it in an airtight container. This keeps it from getting soggy. You can also wrap it in foil or plastic wrap. Toast is best eaten fresh, but you can enjoy it later. Just reheat it in a toaster or oven to bring back its crunch. To keep avocados fresh, sprinkle lemon juice on the cut side. The acid slows browning. Cover the avocado tightly with plastic wrap. You can also store it in an airtight container. Place the pit back in the unused half to help it stay fresh longer. If you prepare avocado toast but can't eat it right away, store it carefully. Place the toast in a container with a lid. Avoid stacking to prevent sogginess. When ready to eat, reheat it for a few minutes in an oven. This brings back the crispy texture. For the best taste, enjoy it fresh if you can. Check out the Full Recipe for more tips! To make creamy avocado toast, you need ripe avocados, whole grain bread, and a few spices. Start by toasting the slices of bread until golden brown. Next, cut the avocados in half, remove the pits, and scoop the flesh into a bowl. Add lemon juice, garlic powder, smoked paprika, salt, and pepper. Mash the mixture until creamy but slightly chunky. Spread it on the toast, top with cherry tomatoes, and finish with fresh basil. For full details, check out the Full Recipe. Avocados are packed with good fats. They are rich in fiber, which helps digestion. They also contain vitamins like C, E, K, and B6. These nutrients support heart health and skin. Eating avocados can also boost your mood and give you energy. Plus, they can help lower cholesterol! You can prepare the avocado mixture ahead of time. Store it in an airtight container with lemon juice to prevent browning. However, I advise against toasting the bread too early. Toasted bread tastes best fresh and crunchy. Assemble your avocado toast right before serving for the best flavor and texture. Whole grain bread is my go-to choice. It adds a nice nutty flavor and fiber. Sourdough is also excellent for a tangy twist. Gluten-free bread works well too. Choose a bread that you enjoy, as it will make your toast even better! Creamy avocado toast is simple and delicious. You learned the key ingredients, from ripe avocados to tasty toppings. Following the steps ensures the perfect texture and creaminess. Remember to choose ripe avocados and store them right. You can explore unique flavor combos for a fun twist. This dish offers great health benefits and endless variations. Enjoy making this tasty treat!](https://dishtreats.com/wp-content/uploads/2025/06/dc41bef5-23d5-41ad-b579-59fa0f16c9c9-768x768.webp)


