Lemon Blueberry Muffin Bread Fluffy and Flavorful Treat

Are you ready for a delicious twist on your favorite breakfast treat? This Lemon Blueberry Muffin Bread is fluffy, flavorful, and the perfect way to brighten your day. Packed with fresh blueberries and zesty lemon, it’s easy to make and will impress everyone. Whether you enjoy it warm or toasted, this bread will surely become a family favorite. Let’s dive into the simple ingredients and steps to create this mouthwatering delight!
Why I Love This Recipe
- Bright and Fresh Flavor: The combination of lemon and blueberries creates a refreshing taste that is perfect for any time of day.
- Easy to Make: With simple ingredients and straightforward steps, this recipe is perfect for both beginner and experienced bakers.
- Perfect for Sharing: This loaf can be sliced into generous servings, making it ideal for brunches or gatherings with friends and family.
- Versatile Treat: Enjoy it as a breakfast item, a snack, or even a dessert, and feel free to customize with nuts or spices!
Ingredients
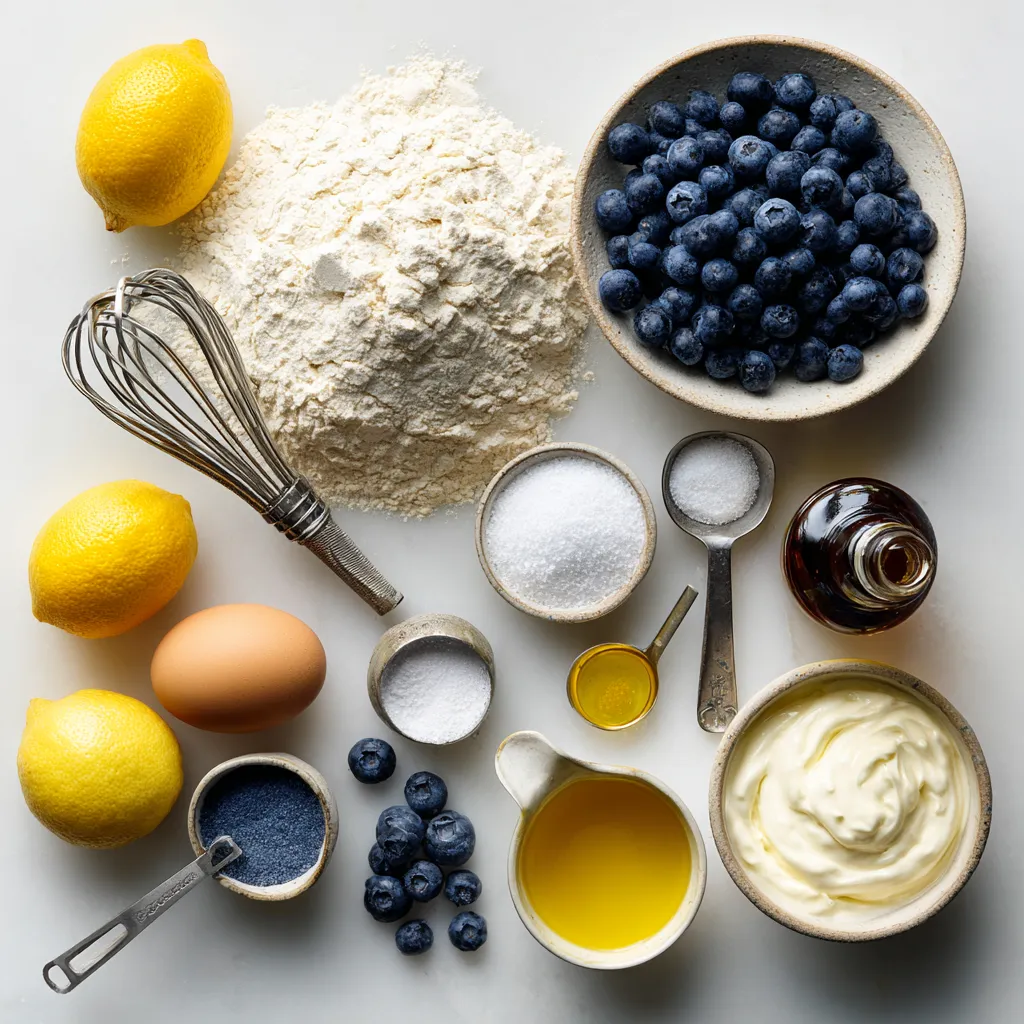
Gather these simple items to create a delicious lemon blueberry muffin bread:
- 1 ½ cups all-purpose flour
- 1 cup fresh or frozen blueberries
- ½ cup granulated sugar
- 2 teaspoons baking powder
- ½ teaspoon baking soda
- ½ teaspoon salt
- 1 large lemon (zested and juiced)
- ½ cup vegetable oil
- 2 large eggs
- 1 teaspoon vanilla extract
- ½ cup plain or Greek yogurt
These ingredients work together to create a fluffy and flavorful treat. The flour gives the bread structure, while the blueberries add sweetness and moisture. Lemon zest brings a bright flavor, making every bite refreshing. The yogurt and oil keep the texture soft, while eggs help it rise.
If you use frozen blueberries, they can work just as well. Don’t worry about thawing them first; just fold them in. The sugar and vanilla extract enhance the overall taste. This combination is perfect for breakfast or as an afternoon snack.
When you have everything ready, you can dive into the fun part: baking!

Step-by-Step Instructions
Preheat and Prepare the Pan
- Preheat oven to 350°F (175°C).
- Grease a 9×5 inch loaf pan or line with parchment paper.
Start by preheating your oven. This step is key. A hot oven helps the bread rise well. Next, prepare your loaf pan. Greasing it or using parchment paper makes it easy to remove the bread later.
Mix Dry Ingredients
- Combine flour, baking powder, baking soda, and salt in a mixing bowl.
In a medium bowl, mix your dry ingredients. Whisk together the flour, baking powder, baking soda, and salt. This helps your bread rise evenly. Set this bowl aside for now.
Combine Wet Ingredients
- Rub lemon zest into sugar for flavor enhancement.
- Whisk together eggs, lemon juice, vegetable oil, yogurt, and vanilla extract.
In a larger bowl, add the sugar and lemon zest. Using your fingers, rub the zest into the sugar. This releases the lemon oils and gives great flavor. Then, add in the eggs, lemon juice, vegetable oil, yogurt, and vanilla extract. Whisk until the mixture is smooth and well blended.
Combine Mixtures
- Fold dry ingredients into wet ingredients carefully.
- Incorporate blueberries gently.
Once your wet mixture is ready, slowly add the dry ingredients. Use a spatula to fold them together gently. Be careful not to over-mix. This keeps the bread soft. Now, add the blueberries. Fold them in gently to avoid crushing them.
Pour and Bake
- Pour batter into the loaf pan, sprinkle reserved blueberries.
- Bake for 50-60 minutes or until toothpick comes out clean.
Now, pour the batter into your prepared loaf pan. Spread it evenly. If you saved some blueberries, sprinkle them on top for a nice look. Place the pan in the oven and bake for 50 to 60 minutes. Check if it’s done by inserting a toothpick. If it comes out clean, it’s ready.
Cooling and Serving
- Cool in the pan before transferring to wire rack.
After baking, take the loaf out of the oven. Let it cool in the pan for about 10 minutes. Then, carefully move it to a wire rack. Let it cool completely before slicing. Enjoy your delicious lemon blueberry muffin bread!
Tips & Tricks
Enhancing Flavor
To boost the lemon flavor, use fresh lemons. Their zest adds a bright taste. Rub lemon zest into sugar before mixing. This helps release the oils, making the bread zingy. If you need a yogurt substitute, use sour cream or buttermilk. Both keep the bread moist and tasty.
Perfecting the Texture
Mixing too much can make your bread tough. After adding the dry ingredients, stir until just combined. You want some lumps to keep it fluffy. When adding blueberries, fold them in gently. This prevents them from breaking apart and coloring the batter.
Baking Tips
To check if your bread is done, insert a toothpick into the center. If it comes out clean, it’s ready. If the top browns too fast, cover it with foil. Ovens can vary, so keep an eye on baking times. Start checking for doneness around 50 minutes.
Pro Tips
- Use Fresh Blueberries: For the best flavor and texture, opt for fresh blueberries when they’re in season. If using frozen, do not thaw them before adding to the batter to prevent them from bleeding into the bread.
- Zest Before Juicing: Always zest the lemon before juicing. This ensures you get the maximum amount of aromatic oils, enhancing the bread’s lemon flavor.
- Check for Doneness: To avoid overbaking, start checking the bread at the 50-minute mark. Insert a toothpick into the center; it should come out clean or with a few moist crumbs.
- Cool Before Slicing: Allow the bread to cool in the pan for 10 minutes before transferring it to a wire rack. This helps maintain its structure and prevents it from becoming gummy.

Variations
Different Fruit Options
You can swap blueberries for other fruits. Raspberries add a nice tartness. Cranberries bring a bit of sweetness and a pop of color. Chopped strawberries work well too. Each fruit changes the taste and look of the bread. Try mixing fruits for a fun twist!
Flavor Additions
Spices can lift the bread’s flavor. Consider adding cinnamon for warmth. A hint of nutmeg offers a cozy touch. You can also mix in almond or coconut extracts. These small changes make the bread even more delightful and unique.
Gluten-Free Version
If you need a gluten-free option, almond flour or oat flour works well. Use a mix of these flours for the best texture. Make sure to add a binding agent like xanthan gum. This helps the bread hold together and rise nicely.
Storage Info
Best Storage Practices
To keep your lemon blueberry muffin bread fresh, wrap it tightly in plastic wrap. You can also place it in an airtight container. Store it at room temperature for up to three days. If you want it to last longer, consider refrigerating it. This will keep it fresh for about a week. Just remember, chilling may change its texture a bit.
Freezing the Bread
Freezing is a great way to save leftover bread. Start by slicing the loaf into pieces. Wrap each slice in plastic wrap. Then, place the wrapped slices in a freezer bag or airtight container. Make sure to remove as much air as possible. The bread can stay frozen for up to three months. When you’re ready to eat, thaw it at room temperature or pop it in the microwave for a few seconds.
Serving Suggestions
Lemon blueberry muffin bread is delightful on its own, but you can add more flavor. Serve it with a dollop of yogurt or a sprinkle of powdered sugar on top. Fresh blueberries make a great garnish, too. For a special touch, pair it with a cup of tea or coffee. This combo makes for a perfect breakfast or snack!
FAQs
Can I use frozen blueberries in this recipe?
Yes, you can use frozen blueberries. They work just as well as fresh ones. Just fold them into the batter gently to avoid turning it blue. If you use frozen berries, do not thaw them first. This keeps the bread light and fluffy.
How do I know when the bread is done baking?
To check if the bread is done, insert a toothpick in the center. If it comes out clean, the bread is ready. If you see wet batter, bake a little longer. Keep an eye on the top. If it browns too fast, cover it with foil.
Can I substitute ingredients for dietary restrictions?
Yes, you can. For a dairy-free option, use almond milk yogurt or coconut yogurt. If you need an egg-free version, replace each egg with one mashed banana or 1/4 cup of applesauce. These swaps keep the bread moist and tasty.
How long does lemon blueberry muffin bread last?
Lemon blueberry muffin bread lasts about 3 to 4 days at room temperature. Keep it in an airtight container to keep it fresh. For longer storage, freeze it. It can last for up to 3 months in the freezer. Just slice it before freezing for easy use.
This blog post covered how to make delicious lemon blueberry muffin bread. I shared the ingredients, simple steps, and tips for perfecting the recipe. You can even try variations with different fruits or gluten-free options. Remember to store it well for fresh taste. Baking allows for fun changes, so don’t hesitate to experiment. Enjoy your tasty treat and share it with friends and family. With these easy instructions, you’ll bake a dish everyone love

Lemon Blueberry Muffin Bread
Ingredients
- 1.5 cups all-purpose flour
- 1 cup fresh blueberries
- 0.5 cups granulated sugar
- 2 teaspoons baking powder
- 0.5 teaspoon baking soda
- 0.5 teaspoon salt
- 1 large lemon (zested and juiced)
- 0.5 cups vegetable oil
- 2 large eggs
- 1 teaspoon vanilla extract
- 0.5 cups plain yogurt
Instructions
- Begin by preheating your oven to 350°F (175°C). Prepare a 9x5 inch loaf pan by greasing it lightly or lining it with parchment paper to ensure effortless removal after baking.
- In a medium mixing bowl, whisk together the all-purpose flour, baking powder, baking soda, and salt until well combined. Set the bowl aside for later use.
- In a large mixing bowl, add the granulated sugar and the zest of the lemon. Using your fingers, rub the lemon zest into the sugar to release its aromatic oils, which will enhance the lemon flavor throughout the bread.
- Next, add the eggs, freshly squeezed lemon juice, vegetable oil, yogurt, and vanilla extract to the bowl containing the sugar and lemon zest. Whisk these ingredients together until the mixture is smooth and well blended.
- Slowly incorporate the dry mixture into the wet mixture, folding gently with a spatula. Avoid over-mixing to maintain the bread's tenderness. Carefully fold in the blueberries, reserving a few to sprinkle on top for added decoration.
- Carefully pour the batter into the prepared loaf pan, spreading it evenly. Sprinkle the reserved blueberries over the top for a vibrant presentation.
- Place the loaf pan in the preheated oven and bake for 50-60 minutes. The bread is done when a toothpick inserted into the center comes out clean. If the top begins to brown too quickly, loosely cover it with aluminum foil.
- Once baked, remove the loaf from the oven and let it cool in the pan for about 10 minutes. After that, carefully transfer the bread to a wire rack to cool completely before slicing.


![To create this tasty dip, you will need key ingredients that bring out the fall flavors. Here’s what you’ll need: - 8 oz cream cheese, softened to room temperature - 1 cup pumpkin puree (not pumpkin pie filling) - 1/2 cup powdered sugar - 1 tablespoon packed brown sugar - 1 teaspoon pure vanilla extract - 1 teaspoon pumpkin pie spice (plus extra for garnish) - 1/2 teaspoon ground cinnamon - 1/2 cup whipped topping (such as Cool Whip) - Assorted dippers: graham crackers, fresh apple slices, or pretzels Using the correct measurements is vital for the best flavor and texture. Too much cream cheese can make the dip thick. Too little sugar can make it bland. I recommend sticking closely to these amounts. This balance creates a creamy dip that is not too sweet. When it comes to serving your dip, you need the right dippers. Here are my favorites: - Graham crackers give a nice crunch. - Fresh apple slices add a crisp and juicy touch. - Pretzels offer a salty contrast. Feel free to mix and match! These options will make your dip even more fun. For the full recipe, check the recipe section. Start by taking your softened cream cheese. Place it in a large mixing bowl. Use an electric mixer on medium speed. Beat the cream cheese until it is smooth. Make sure there are no lumps left. This step is key for a creamy dip. Next, add the pumpkin puree into the cream cheese. Mix it in well. Now, add the powdered sugar, brown sugar, and vanilla extract. Include the pumpkin pie spice and ground cinnamon. Continue mixing on low speed. Ensure everything is combined but still smooth. You want a uniform texture without any streaks. Take your whipped topping and gently fold it in. Use a spatula for this step. Be careful to keep the dip light and fluffy. Stop mixing as soon as the whipped topping is blended in. This lightness adds to the creamy texture of the dip. For the full recipe, you can refer back to the beginning. Enjoy your creamy pumpkin spice cheesecake dip! To boost the flavor of your Pumpkin Spice Cheesecake Dip, try adding a pinch of nutmeg. This spice adds depth and warmth. If you like it sweeter, add more powdered sugar or brown sugar. You can also swap in maple syrup for a rich twist. For a touch of tang, mix in a bit of cream cheese with a hint of lemon juice. Taste as you go for the best result. Serving your dip in a fun bowl can make it pop. Use a bright or themed bowl for special occasions. A light dusting of pumpkin pie spice on top looks nice and smells great. Arrange your dippers around the bowl for a colorful display. This not only makes it pretty but also invites guests to dig in. You can even use cookie cutters to shape apple slices for extra flair. Making this dip ahead of time is a smart move. Chill it for at least 30 minutes before serving. This helps the flavors mix well and taste better. You can prepare it a day in advance and keep it covered in the fridge. Just remember to add the whipped topping right before serving for that fluffy texture. For the full recipe, check out the details above. {{image_4}} You can make a lighter version of this dip. Use Greek yogurt instead of cream cheese. Greek yogurt adds protein and tang. It keeps the dip creamy and delicious. Just blend 1 cup of Greek yogurt with the other ingredients. This swap helps cut down on calories while keeping flavor intact. Want to try something different? You can change the flavor profile easily. Swap pumpkin puree for sweet potato puree. This gives a unique taste that is still rich. You can also add a splash of maple syrup for a sweet twist. Another fun option is to mix in some Nutella for a chocolatey delight. Use seasonal ingredients to enhance your dip. In fall, add a handful of chopped pecans or walnuts for crunch. In winter, try mixing in dried cranberries for a tart flavor. You can also sprinkle some fresh nutmeg on top for a fragrant touch. These seasonal additions make your dip even more inviting and festive. For the full recipe, check out the [Full Recipe]. To keep your pumpkin spice cheesecake dip fresh, store it in an airtight container. Make sure the lid is tight to prevent air from getting in. I recommend refrigerating it as soon as you're done serving. This dip stays creamy and flavorful when stored properly. You can freeze this dip, but keep in mind it may change texture. To freeze, place the dip in a freezer-safe container. Leave some space at the top for expansion. When you're ready to use it, let it thaw in the fridge overnight. Stir well before serving to help regain some creaminess. The dip lasts about 3 to 5 days in the fridge. Check for any off smells or changes in texture. If it looks or smells funny, it’s best to toss it. To enjoy its best flavor, eat it within the first couple of days. For full instructions, see the Full Recipe. Yes, you can use homemade pumpkin puree! It adds a fresh taste. To make it, roast a pumpkin until soft, then blend until smooth. Just ensure it is thick like store-bought puree. This helps your dip stay creamy. To cut the sweetness, reduce the powdered sugar. You can also add more cream cheese. Another option is to mix in a bit of plain yogurt. This gives a nice tang, balancing the sweet flavors. Taste as you go to find your perfect mix. Absolutely! If you want to make it dairy-free, try vegan cream cheese. For a lower sugar option, use a sugar substitute. If you need gluten-free dippers, serve with apple slices or gluten-free pretzels. Be creative and adapt the recipe to fit your needs! For the full recipe, check out the details above. This article explored how to make a delicious pumpkin spice cheesecake dip. We covered key ingredients, the steps for mixing and folding, and helpful tips for flavor enhancements. You learned about storage options and creative variations, like using Greek yogurt or seasonal ingredients. Remember, making this dip can be fun and easy. Use fresh ingredients for the best taste. Enjoy creating your own version, and don’t forget to share with friends!](https://dishtreats.com/wp-content/uploads/2025/07/05024715-abe0-47f7-b5fb-2040be13b0f2-768x768.webp)
![To make these delightful cookies, you need a few key ingredients: - 1 cup ricotta cheese - 1/2 cup unsalted butter, softened - 1 cup granulated sugar - 1 large egg - 2 teaspoons fresh lemon zest - 2 tablespoons fresh lemon juice - 2 cups all-purpose flour - 1 teaspoon baking powder - 1/2 teaspoon baking soda - 1/4 teaspoon fine sea salt - Powdered sugar for dusting These ingredients create a soft and tasty cookie that bursts with lemon flavor. For this recipe, you will need: - A large mixing bowl - An electric mixer - A medium mixing bowl - Whisk - Baking sheet - Parchment paper - Cookie scoop or spoon - Wire rack Having the right tools makes baking easy and fun. You can easily swap some ingredients if needed: - Use low-fat ricotta for a lighter option. - Replace unsalted butter with coconut oil for a dairy-free cookie. - Substitute lemon with orange for a different flavor. - Use gluten-free flour to make these cookies gluten-free. These alternatives let you customize the recipe to fit your needs. For the full recipe, check the details provided above. First, heat your oven to 350°F (175°C). This step is key for baking. Next, line a baking sheet with parchment paper. This prevents the cookies from sticking. In a large bowl, mix the ricotta cheese and softened butter. Use an electric mixer on medium speed. Beat them for about 2-3 minutes. You want a smooth and creamy mix. This will be the base of your cookies. Now, it’s time to add the sugar. Gradually sprinkle in the granulated sugar, mixing as you go. Keep beating until it’s light and fluffy. Next, crack in the egg. Add the lemon zest and lemon juice. Mix until everything is well combined. In a separate bowl, whisk together the flour, baking powder, baking soda, and sea salt. Once mixed, add the dry ingredients to the ricotta mix. Stir gently until just combined. Be careful not to overmix. This helps keep the cookies soft. Use a spoon or cookie scoop to drop rounded tablespoons of dough onto the baking sheet. Leave about 2 inches of space between each cookie. This allows them to spread while baking. Place the sheet in the oven and bake for 12-15 minutes. Look for lightly golden edges and soft centers. After baking, let the cookies cool on the sheet for about 5 minutes. Then carefully transfer them to a wire rack. Let them cool completely. Once cooled, dust lightly with powdered sugar for a sweet touch. Enjoy these delightful lemon ricotta cookies! For the complete recipe, check out the [Full Recipe]. To make your lemon ricotta cookies soft, use fresh ricotta cheese. It adds moisture and flavor. Avoid overmixing the dough. Mix just until combined. This keeps the cookies light. Let the dough chill for about 30 minutes. Chilling helps the cookies hold their shape while baking. Accurate measurements are key to great cookies. Use dry measuring cups for flour and sugar. Spoon the flour into the cup, then level it off with a knife. Do not pack it down. For liquids, use a clear liquid measuring cup. Fill it to the desired line while checking at eye level. One common mistake is not preheating the oven. Always preheat to ensure even baking. Another mistake is baking on an ungreased or unlined pan. Use parchment paper to prevent sticking. Finally, don’t skip cooling the cookies on a wire rack. This helps them set and stay soft. For the full recipe, check out the step-by-step guide. {{image_4}} You can add chocolate chips for a sweet twist. Use semi-sweet or milk chocolate chips. Just fold in one cup of chips into the dough after mixing in the dry ingredients. This change creates a fun contrast with the lemon flavor. The rich chocolate and bright lemon make each bite exciting! To make these cookies gluten-free, swap the all-purpose flour with a gluten-free blend. Look for a blend that includes xanthan gum. This ingredient helps the cookies hold their shape. Follow the same recipe steps, and you will have delicious gluten-free cookies that everyone can enjoy. You can enhance the flavor by adding herbs or spices. Try mixing in a teaspoon of fresh thyme or rosemary for a unique taste. You could also use vanilla extract for warmth. These small changes can take your lemon ricotta cookies to a whole new level. Experiment with flavors and find what you like best! To keep your lemon ricotta cookies fresh, place them in an airtight container. This will help maintain their soft texture. I recommend layering the cookies with parchment paper. This way, they won’t stick together. Store the container at room temperature for up to five days. If you live in a humid area, consider refrigerating them. Just remember to bring them to room temperature before enjoying. If you want to save some cookies for later, freezing is a great option. First, let the cookies cool completely. Then, place them in a single layer on a baking sheet. Freeze for about an hour until firm. After that, transfer the cookies to a freezer-safe bag or container. Make sure to remove as much air as possible. You can freeze them for up to three months. When you’re ready to enjoy, thaw them in the fridge overnight. Lemon ricotta cookies are best enjoyed fresh, but they can last. If stored correctly, they stay soft for about five days at room temperature. Over time, they may become a bit dry. To refresh them, you can microwave a cookie for about 10 seconds. This will bring back some of the softness. Always check for any signs of spoilage before eating. If they smell off or look strange, it’s best to toss them. Enjoy your cookies! For the full recipe, refer to the main article. Yes, you can use pre-made ricotta cheese. Just make sure it is fresh and creamy. Store-bought ricotta saves time and still brings great taste. If it's a bit watery, drain it before use. This will keep your cookies from getting too soggy. To make these cookies dairy-free, replace ricotta cheese with tofu. Use firm tofu, blend it, and add a bit of lemon juice for flavor. For butter, try coconut oil or a dairy-free spread. These swaps keep the cookies soft and delicious without dairy. The best way to glaze these cookies is with a simple lemon glaze. Mix powdered sugar with fresh lemon juice until smooth. Drizzle the glaze over cooled cookies for a sweet finish. You can also add lemon zest on top for extra flavor. You will know the cookies are done when the edges turn golden. The centers should still look soft and puffy. A toothpick inserted in the center should come out clean or with a few crumbs. Avoid over-baking for the softest texture. Yes, you can make these cookies healthier. Use whole wheat flour instead of all-purpose flour. Replace granulated sugar with coconut sugar or a sugar substitute. You can also cut down on butter by using applesauce or Greek yogurt. These changes keep cookies tasty and lower in calories. For the full recipe, check the [Full Recipe]. In this post, we covered how to make lemon ricotta cookies step by step. We explored key ingredients, baking equipment, and helpful tips. I shared ways to customize the cookies with flavors and special diets. Finally, we discussed storage methods to keep them fresh. With these insights, you can bake delicious cookies that are soft and bright in flavor. Enjoy your baking experience and share these treats with friends!](https://dishtreats.com/wp-content/uploads/2025/07/5405bae2-00aa-4997-8585-ece8a42539ac-768x768.webp)


