Lemon Blueberry Crumble Delightful and Easy Recipe

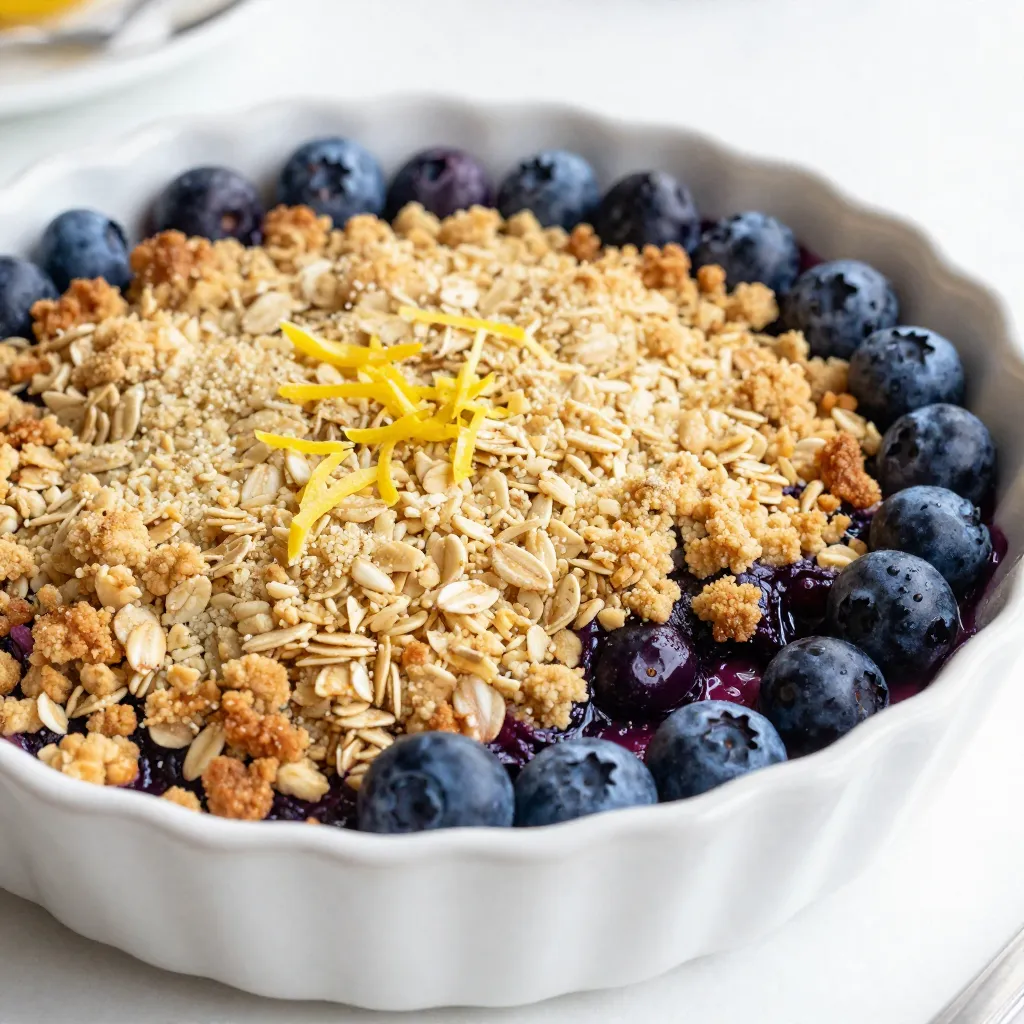
If you love bright, tangy flavors and warm desserts, you’ll adore my Lemon Blueberry Crumble. This easy recipe combines fresh blueberries with zesty lemon for a treat that sings of summer. Not only does it taste fantastic, but it also comes together in just a few simple steps. Get ready to impress your family and friends with a dessert that is both delicious and easy to make!
Why I Love This Recipe
- Bright Citrus Flavor: The combination of fresh lemon juice and zest elevates the blueberry flavor, making every bite refreshing and zesty.
- Easy to Make: This crumble comes together quickly, with simple ingredients and minimal prep time, perfect for a weeknight dessert.
- Perfectly Sweet: With adjustable sugar levels, you can customize the sweetness to fit your taste, making it a versatile treat.
- Comforting Texture: The combination of juicy blueberries and a crumbly topping creates a delightful contrast that is satisfying to eat.
Ingredients
Fresh Ingredients Needed
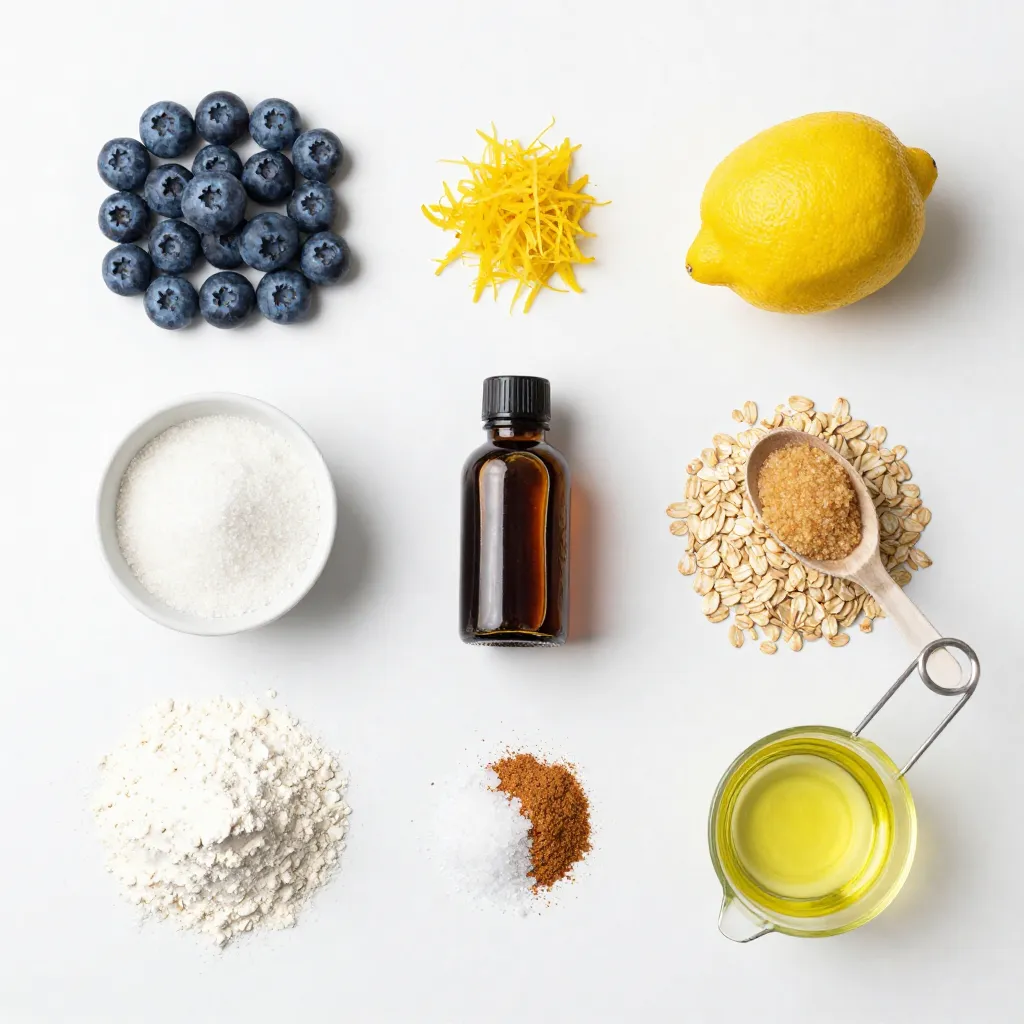
- 2 cups fresh blueberries
- 1 tablespoon freshly grated lemon zest
- 2 tablespoons freshly squeezed lemon juice
To start, gather your fresh ingredients. Blueberries are the star here. Their sweet and tart flavor shines in this dish. Grating lemon zest adds a bright kick. Squeezing lemon juice gives more zestiness. These fresh ingredients bring life to your crumble.
Dry Ingredients
- 1/4 cup granulated sugar
- 1 tablespoon cornstarch
- 1 cup rolled oats
- 1/2 cup all-purpose flour
- 1/4 cup packed brown sugar
- 1/2 teaspoon ground cinnamon
- 1/4 teaspoon salt
Next, let’s move on to the dry ingredients. The granulated sugar sweetens the berries. Cornstarch helps thicken the mixture. Rolled oats form the crunchy topping. All-purpose flour binds everything together. Brown sugar adds a rich flavor. Ground cinnamon gives warmth, while salt balances the sweetness.
Wet Ingredients
- 1 teaspoon pure vanilla extract
- 1/3 cup melted coconut oil or unsalted butter
Lastly, we have the wet ingredients. Vanilla extract enhances the overall flavor. Choose coconut oil or butter for richness. This combination keeps the topping moist and delicious.
With all these ingredients ready, you set the stage for a tasty lemon blueberry crumble.

Step-by-Step Instructions
Preheat and Prepare
- Preheat oven to 350°F (175°C).
- Grease the baking dish.
Start by heating your oven. A hot oven helps the crumble cook evenly. Greasing the dish keeps the crumble from sticking. Use cooking spray or melted oil for this task.
Mixing the Blueberry Base
- Combine blueberries with lemon ingredients.
- Let mixture rest for flavor development.
In a large bowl, mix the blueberries with lemon zest, lemon juice, sugar, cornstarch, and vanilla. Stir gently. This ensures that each blueberry gets coated. Let this mix sit for 10 minutes. This time helps the flavors blend together.
Creating the Crumble Topping
- Mix dry topping ingredients.
- Incorporate melted oil or butter.
In another bowl, mix oats, flour, brown sugar, cinnamon, and salt. Make sure everything is combined well. Now add melted coconut oil or butter. Use a fork or your hands to mix it until it looks crumbly.
Assembling the Dish
- Layer the blueberry mixture.
- Add the crumble topping evenly.
Carefully pour the blueberry mix into your greased dish. Spread it out evenly. Now take the crumble topping and sprinkle it over the blueberries. Make sure to cover every part.
Baking Instructions
- Bake time and temperature.
- Signs of doneness.
Place the dish in your preheated oven. Bake for 30-35 minutes. Look for a golden brown top and bubbling blueberries. This shows it’s ready to come out. Let it cool for a few minutes before serving.
Tips & Tricks
Perfecting the Flavor
- Adjusting sugar levels: You can change the sugar to match your taste. If you prefer less sweetness, use less sugar. For a sweeter treat, add more. Just remember, the blueberries can also be sweet or tart, so taste as you go!
- Importance of fresh ingredients: Fresh blueberries and real lemon zest make a big difference. They add bright, bold flavors to your crumble. Use ripe, plump blueberries for the best results. Fresh ingredients will always give your dish a delicious boost.
Baking Tips
- Ovens may vary in temperature: Every oven is a bit different. Check the crumble a few minutes before the time ends. If your oven runs hot, it may bake faster. If it runs cool, it may take longer.
- Adjusting baking time based on dish size: The size of your baking dish matters. A larger dish will spread the crumble out, and it may need less time. A smaller dish keeps the filling deep and may need more time. Keep an eye on it!
Presentation Tips
- Serving suggestions: Serve the crumble warm for the best taste. A scoop of vanilla ice cream or a dollop of whipped cream makes it even better. You can also sprinkle extra lemon zest on top for a nice touch.
- Best serving temperature: This crumble tastes great warm. Let it cool for about 5-10 minutes after baking. This way, the flavors settle and it won’t burn your mouth! Enjoy every bite!
Pro Tips
- Use Fresh Ingredients: For the best flavor, always opt for fresh blueberries and freshly squeezed lemon juice. This will enhance the overall taste of your crumble.
- Adjust Sweetness: Taste the blueberry mixture before baking and adjust the sugar based on your preference and the natural sweetness of the berries.
- Experiment with Spices: Feel free to add a pinch of nutmeg or a splash of almond extract to the crumble topping for an extra layer of flavor.
- Let it Cool: Allow the crumble to cool for a few minutes after baking. This helps the filling set slightly, making it easier to serve.
Variations
Alternative Fruits
You can switch up the fruits in your crumble. Try adding raspberries or blackberries. These fruits pair well with the lemon. They add a nice tartness and color. You can also use frozen berries. Just make sure to thaw and drain them first. This keeps the crumble from getting too watery.
Healthier Options
If you want a healthier twist, consider substituting coconut oil for applesauce. This reduces the fat while keeping it moist. Another great swap is using whole grain flour instead of all-purpose flour. Whole grain flour adds fiber and nutrients. Both swaps keep your dessert tasty and a bit healthier.
Flavor Enhancements
Adding spices can take your crumble to the next level. Nutmeg brings a warm, cozy flavor. Just a pinch goes a long way. You can also incorporate nuts like walnuts or pecans for a delightful crunch. This adds texture and richness to each bite. Don’t be afraid to experiment and find your perfect mix!
Storage Info
Short-term Storage
Store your Lemon Blueberry Crumble in the fridge if you have leftovers. Place it in an airtight container. This keeps it fresh for about 3 days. If you cover the dish with plastic wrap or foil, it helps prevent drying out. Just make sure it seals well to lock in moisture.
Long-term Storage
For long-term storage, freezing is a great option. Let the crumble cool completely before freezing. Wrap it tightly in plastic wrap or foil. You can also use a freezer-safe container. It should stay good for up to 3 months. When you’re ready to enjoy it again, thaw it in the fridge overnight. This keeps the texture nice.
Reheating Instructions
To reheat your crumble, you have a couple of good options. The oven works best. Preheat it to 350°F (175°C). Place the crumble in an oven-safe dish and cover it with foil. Heat for about 15-20 minutes until warm. You can also use the microwave if you’re in a hurry. Heat it in short bursts of 30 seconds, checking often to avoid overheating. Enjoy your dessert warm for the best taste!
FAQs
What is the best way to ripen blueberries?
The best way to ripen blueberries is to choose ones that are plump and firm. Look for berries that are deep blue and have a powdery finish. Avoid any that are green or have wrinkles. If your blueberries are not sweet enough, you can let them sit at room temperature for a day or two. This will help them become sweeter as they ripen.
Can I use frozen blueberries for this recipe?
Yes, you can use frozen blueberries in this recipe! They are a great option when fresh berries are not in season. Just remember to let them thaw before using. Drain any excess liquid to prevent a soggy crumble. You might also want to add a bit more cornstarch to help thicken the juices.
How long does Lemon Blueberry Crumble last?
Lemon Blueberry Crumble lasts about 3-4 days in the fridge. Just make sure to cover it well with plastic wrap or a lid. If you want to keep it longer, you can freeze it. In the freezer, it can last up to 2-3 months. Just thaw it overnight in the fridge before serving.
Is it possible to make this recipe vegan?
Yes, you can easily make this recipe vegan! Substitute the melted butter with coconut oil or a plant-based butter. For the sugar, choose organic sugar since some granulated sugars are processed with bone char. You can also replace the cornstarch with arrowroot powder for thickening.
This blog post shared a simple recipe for Lemon Blueberry Crumble. We covered fresh and dry ingredients, plus tips to enhance flavor and texture. You learned how to prepare, bake, and store this dish. Remember to use fresh blueberries for the best taste. Experiment with different fruits and healthier options to make it your own. Enjoy creating this delightful dessert that pleases everyone’s taste bud

Zesty Lemon Blueberry Crumble
Ingredients
- 2 cups fresh blueberries
- 1 tablespoon freshly grated lemon zest
- 2 tablespoons freshly squeezed lemon juice
- 1 4 cup granulated sugar
- 1 tablespoon cornstarch
- 1 teaspoon pure vanilla extract
- 1 cup rolled oats
- 1 2 cup all-purpose flour
- 1 4 cup packed brown sugar
- 1 2 teaspoon ground cinnamon
- 1 4 teaspoon salt
- 1 3 cup melted coconut oil or unsalted butter
Instructions
- Begin by preheating your oven to 350°F (175°C). Lightly grease an 8-inch square baking dish or any similar-sized dish with cooking spray or a little extra melted oil.
- In a large mixing bowl, combine the fresh blueberries, lemon zest, lemon juice, granulated sugar, cornstarch, and vanilla extract. Stir gently to ensure the blueberries are well-coated, then set aside the mixture to allow the juices to meld for about 10 minutes.
- In a separate bowl, mix together the rolled oats, flour, brown sugar, cinnamon, and salt until thoroughly combined. Pour in the melted coconut oil (or butter) and mix with a fork or your hands until the mixture resembles a crumbly texture, with some larger clumps.
- Carefully pour the blueberry mixture into the prepared baking dish, spreading it evenly across the bottom to create a base layer.
- Evenly sprinkle the crumble mixture over the blueberries, ensuring every part of the blueberry layer is covered for a delicious topping.
- Place the baking dish in the preheated oven and bake for 30-35 minutes, or until the crumble topping turns golden brown and the blueberries begin to bubble invitingly around the edges.
- After baking, remove the dish from the oven and allow it to cool for about 5-10 minutes before serving to let the flavors settle.


![To create the Roasted Beet and Goat Cheese Salad, you will need the following ingredients: - 4 medium beets, scrubbed and trimmed - 2 tablespoons extra virgin olive oil, divided - Sea salt and freshly ground black pepper to taste - 4 cups mixed greens (arugula, spinach, and kale) - 1/2 cup creamy goat cheese, crumbled - 1/4 cup walnuts, toasted and roughly chopped - 1/4 cup dried cranberries - 2 tablespoons balsamic vinegar - 1 tablespoon pure honey - Fresh herbs (basil or parsley) for garnish Each ingredient adds not just flavor, but also nutrition. Beets are rich in vitamins and minerals. They help boost your energy levels. Goat cheese brings a creamy texture and a tangy taste. It pairs well with the sweetness of beets and cranberries. Walnuts add crunch and healthy fats, while mixed greens provide fiber. The dressing of balsamic vinegar and honey ties all the flavors together. You can find the Full Recipe for step-by-step instructions to make this delightful salad. 1. Preheat the oven: Set your oven to 400°F (200°C). This makes sure the beets roast well. 2. Wrap the beets: Take each beet and wrap it in foil. Drizzle 1 tablespoon of olive oil on them. Add sea salt and black pepper for flavor. Seal the foil tightly. 3. Roast the beets: Place the wrapped beets on a baking sheet. Roast them in the oven for 45-60 minutes. They are done when a fork easily pierces them. 1. Peel and slice the beets: Let the beets cool a bit. Then, peel off the skin. I recommend wearing gloves to avoid stains. Cut the beets into wedges for a nice look. 2. Combine salad ingredients: In a large mixing bowl, add the mixed greens, sliced roasted beets, crumbled goat cheese, toasted walnuts, and dried cranberries. Gently mix everything together. 1. Prepare the dressing: In a small bowl, whisk together the balsamic vinegar, the last tablespoon of olive oil, and honey. Stir well until combined. Taste it and add salt and pepper as needed. 2. Dress the salad: Drizzle the dressing over the salad. Toss everything gently to coat the greens and other ingredients. 3. Serve the salad: Plate the salad right away. Garnish with fresh herbs for a pop of color and extra flavor. For the full recipe, check out the Beet the Ordinary: Roasted Beet and Goat Cheese Salad. - Choosing the right beet size for even cooking: I recommend using medium beets. They cook evenly and are easy to handle. If you use larger beets, they may take longer to roast, leading to uneven texture. Smaller beets cook too quickly and may dry out. - How to properly season the beets: Before wrapping the beets in foil, drizzle them with olive oil. Add a generous pinch of sea salt and freshly ground black pepper. This simple seasoning enhances their natural sweetness and flavor during roasting. - Creative ways to plate the salad: For a stunning presentation, use a large, flat platter. Layer mixed greens as a base. Fan out the roasted beet wedges on top and sprinkle crumbled goat cheese and walnuts over the salad. This method creates a colorful and inviting look. - Garnishing tips to elevate the dish: Fresh herbs can add color and flavor. A sprinkle of chopped basil or parsley brightens the dish. You can also use edible flowers for a special touch, making it perfect for gatherings or celebrations. - Best practices for prepping ingredients in advance: You can roast the beets a day ahead. Once cooled, wrap them in plastic to keep fresh. Store the mixed greens and other ingredients separately. This way, you can quickly assemble your salad just before serving, keeping everything crisp and tasty. For the complete recipe, see [Full Recipe]. {{image_4}} You can switch up the greens in your salad to make it special. Try using arugula for a peppery kick or romaine for a crisp bite. Each green offers a different taste and texture, giving your salad a new vibe. If you want to change the cheese, feta or blue cheese can work wonders. Feta adds a salty flavor, while blue cheese brings a bold touch. Both complement the sweetness of the beets nicely. The right dressing can elevate your salad. A citrus vinaigrette adds a bright and zesty flavor. Mix fresh lemon juice with olive oil for a quick option. If you want something creamy, a yogurt dressing is perfect. It pairs well with the tang of goat cheese and makes the salad feel lush. Don’t hesitate to experiment with different dressings to find your favorite. Add protein to make your salad more filling. Grilled chicken is a great choice, giving the salad a hearty feel. For a plant-based option, chickpeas work well. They add protein and texture. You can also sprinkle seeds, like pumpkin or sunflower seeds, for some crunch. Fresh fruit, such as sliced pears or apples, can add a sweet note. Each add-in brings its own charm to the dish, making it unique every time. Don’t forget to check out the Full Recipe for more inspiration! To keep your roasted beet and goat cheese salad fresh, store it in an airtight container. Place any leftovers in the fridge. The salad will stay good for about three days. Make sure to keep the dressing separate until you are ready to eat. This helps keep the greens crisp and fresh. If you want to store beets for longer, you can freeze them. First, roast the beets as in the Full Recipe. Let them cool, then peel and slice them. Place the slices in a freezer-safe bag, removing as much air as possible. Beets can last up to six months in the freezer. However, I do not recommend freezing the prepared salad. The greens won't hold up well after thawing. When it's time to eat your stored salad, you can reheat the beets if you like. Just warm them in the microwave for about 30 seconds. Toss the salad again after reheating. This helps mix the flavors back together. If you stored the salad dressed, consider adding a bit more dressing before serving. This keeps everything tasty and vibrant. How long do roasted beets last in the fridge? Roasted beets can last up to five days in your fridge. Store them in an airtight container. This way, they stay fresh and tasty for your salads. Can I use pre-cooked beets for this recipe? Yes, you can use pre-cooked beets. They are a great time-saver. Just cut them into wedges and add them to your salad. They will still taste delicious! What type of goat cheese is best for salads? A creamy goat cheese works best for this salad. It adds a nice richness and tang. Look for soft, crumbled varieties for easy mixing. Can I substitute goat cheese with a dairy-free option? Absolutely! You can use a dairy-free cheese made from nuts. Look for a creamy cashew cheese or tofu-based option. Both will provide a nice flavor. What are the health benefits of beet and goat cheese salad? This salad is packed with nutrients. Beets are high in fiber and antioxidants. Goat cheese adds protein and calcium. Together, they support heart health and digestion. How many calories are in a serving of this salad? One serving of this salad has about 300 calories. This includes the beets, goat cheese, nuts, and dressing. It’s a great balance of flavors and nutrients without too many calories. For the complete recipe, check out the Full Recipe. This salad combines roasted beets, fresh greens, and tangy goat cheese. You learned how to roast beets and mix vibrant ingredients for a delicious dish. Remember to choose the right beet size and season well for great texture. Don't hesitate to try different greens or dressings to make it your own. Salad prep can be easy, helping you save time. Enjoy this healthy meal that packs flavor and nutrients. Make it today and impress yourself with your cooking skills!](https://dishtreats.com/wp-content/uploads/2025/06/a3a0567a-1f00-4857-8ef4-d1e9b38b024f-768x768.webp)
![- 2 cups watermelon, diced into bite-sized cubes - 1 cup fresh pineapple, diced - 1 cup ripe mango, peeled and diced - 1 cup strawberries, hulled and sliced - 1 cup plump blueberries - 1 tablespoon pure honey - 2 tablespoons freshly squeezed lime juice - 1 teaspoon finely grated lime zest - Fresh mint leaves, for a lovely garnish When picking fruits, look for bright colors and firm textures. Choose watermelon that feels heavy for its size. Make sure the skin is smooth and free from blemishes. For pineapple, smell the base; a sweet scent means it's ripe. Ripe mangoes should yield slightly when you press them. Strawberries should be bright red, without white tips. Pick blueberries that are firm and plump, with a deep color. This fruit salad is not just tasty; it’s also packed with nutrients. Watermelon is hydrating and low in calories. Pineapple provides vitamin C and enzymes that aid digestion. Mango is rich in antioxidants and vitamins A and C. Strawberries boost heart health due to their high fiber and vitamin C content. Blueberries are known for their powerful antioxidants. The honey adds a natural sweetness, while lime juice helps with vitamin C and adds a zesty kick. Each bite not only delights your taste buds but also nourishes your body. First, gather all your fruits. You will need watermelon, pineapple, mango, strawberries, and blueberries. Wash each fruit well to remove any dirt. Dice the watermelon into cubes. Cut the pineapple and mango into small pieces. Hull and slice the strawberries. Finally, add the blueberries. Place all the fruit into a large mixing bowl. Be gentle while mixing to keep the fruit intact. In a separate small bowl, combine one tablespoon of honey with two tablespoons of freshly squeezed lime juice. Add one teaspoon of finely grated lime zest for extra flavor. Whisk the mixture together until it is smooth and well-blended. This honey lime dressing will add a sweet and tangy flavor to your salad. Now, drizzle the honey lime dressing over the fruit. Make sure to cover every piece of fruit for the best taste. Use a gentle motion to toss the salad. This helps the dressing coat all the fruit without mashing it. Let the salad sit for about 10 minutes. This resting time allows the flavors to blend well. When ready to serve, garnish with fresh mint leaves. This adds a lovely touch to your fruit salad. Enjoy your Honey Lime Fruit Salad Delight! For a full recipe, visit the [Full Recipe]. Cutting fruit can be fun and easy. Start with a sharp knife for safety. For watermelon, slice it in half. Then, cut each half into thick wedges. Remove the rind and dice the flesh into cubes. Pineapple is best peeled and cored first. Cut the fruit into thick slices, then dice. For strawberries, remove the green tops and slice them. Keep your cuts even for a pretty look. You can add more fun to the salad. Try adding a splash of orange juice. This will give it a citrus twist. You can also mix in a pinch of cinnamon for warmth. Chopped nuts like almonds or walnuts add crunch. If you like creamy, add a dollop of yogurt. These extra flavors make the salad pop! Make your fruit salad shine with great presentation. Use a clear glass bowl to show off the colors. You can layer the fruits for a rainbow effect. Garnish with mint leaves on top for a fresh touch. A few extra blueberries scattered around add visual flair. Serve with colorful spoons for added fun. Remember, we eat with our eyes first! {{image_4}} You can switch up fruits in your Honey Lime Fruit Salad. Try using peaches or nectarines for a juicy twist. Grapes add a nice pop, and kiwi brings a tart flavor. You might also add oranges for an extra citrus kick. Mix and match based on your taste! Change your fruit salad with the seasons. In summer, use berries and stone fruits for freshness. Fall is great for apples and pears, while winter calls for citrus fruits like clementines and grapefruits. Spring gives you the chance to add strawberries and rhubarb for a bright taste. Add nuts or seeds for a crunchy texture. Almonds and walnuts are perfect options. If you prefer seeds, sprinkle in some pumpkin or sunflower seeds. These additions not only improve texture, but they also boost the nutrition of your salad. Enjoy the added flavor and health benefits! Store leftover honey lime fruit salad in an airtight container. This keeps the fruit fresh and tasty. If you can, eat it within a day or two. The longer it sits, the softer the fruit may get. I recommend using glass or plastic containers with tight-fitting lids. These help lock in moisture and prevent spills. If you have smaller portions, use smaller containers for easy access. The salad stays fresh for about two days in the fridge. Keep it away from foods with strong odors. To refresh the taste, add a little more honey or lime juice before serving. If you notice any browning, remove those pieces before enjoying. For the full recipe, make sure to check the main article! Yes, you can make Honey Lime Fruit Salad a few hours ahead. However, I recommend serving it fresh. If you prepare it too early, the fruit may get soft and lose its crunch. If you decide to make it ahead, store it in the fridge. This keeps it cool and fresh. Just remember to add the dressing right before serving to keep the fruit juicy. The best fruits for Honey Lime Fruit Salad are those that are ripe and sweet. I love using: - Watermelon - Pineapple - Mango - Strawberries - Blueberries These fruits blend well together, creating a vibrant and tasty mix. You can also try using kiwi or grapes for extra flavor. The key is to choose fruits that you enjoy and that are in season. Yes, you can use another sweetener if you prefer. Options include agave syrup or maple syrup. These sweeteners work great in the dressing. Just keep in mind that the flavor may change slightly. I suggest starting with the same amount as the honey. You can always adjust it to your taste. For a sugar-free option, consider using a sugar substitute that you like. In this blog post, we explored how to make a tasty Honey Lime Fruit Salad. We discussed the key ingredients, tips for selecting fresh fruits, and the nutritional benefits they offer. You learned step-by-step instructions for preparation, dressing, and serving. We also shared tips for cutting fruits and enhancing flavor. Plus, variations for using different fruits and tips for storage were provided. Creating this salad is simple and rewarding. Enjoy it yourself or share it with friends. It’s a fun and healthy treat everyone will love.](https://dishtreats.com/wp-content/uploads/2025/07/a7fe8aa9-0619-4c4c-8a63-94d099c8a4d2-768x768.webp)
