Lemon Blueberry Cheesecake Dip Tasty and Simple Treat

Are you ready for a delicious treat that’s easy to make? This Lemon Blueberry Cheesecake Dip combines creamy goodness with fresh flavors. Perfect for parties or a quick snack, you’ll impress your friends with this simple, tasty recipe. Get ready to enjoy every bite as you whip up this delightful dip. Let’s dive into the fun and see just how easy it is to create this sweet sensation!
Why I Love This Recipe
- Deliciously Creamy: This dip combines the richness of cream cheese with the tanginess of Greek yogurt, creating a wonderfully smooth texture that’s hard to resist.
- Bright and Fresh Flavor: The addition of lemon zest and juice gives this dip a refreshing citrus kick, perfectly complementing the sweetness of the blueberries.
- Quick and Easy: With just 10 minutes of prep time, you can whip up this delightful dip, making it a perfect choice for last-minute gatherings or snack cravings.
- Versatile Serving Options: This dip pairs beautifully with graham crackers and a variety of fresh fruits, making it a versatile treat for all occasions.
Ingredients
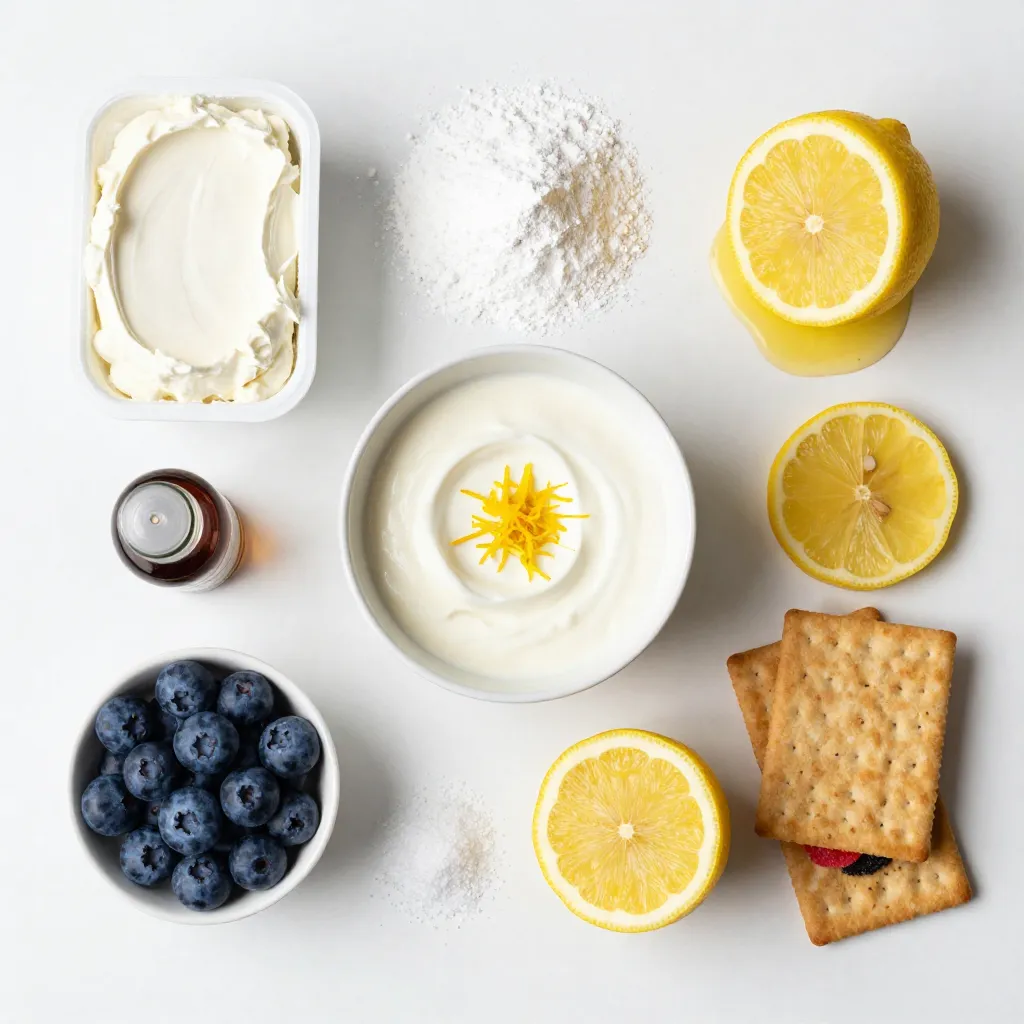
List of Ingredients with Measurements
To make this delicious lemon blueberry cheesecake dip, you’ll need:
- 1 package (8 oz) cream cheese, softened
- 1 cup powdered sugar
- 1 cup plain Greek yogurt
- Zest of 1 medium lemon
- 2 tablespoons freshly squeezed lemon juice
- 1 cup blueberries (fresh or frozen, thawed if frozen)
- 1 teaspoon pure vanilla extract
- 1/4 teaspoon sea salt
- Graham crackers or assorted fruit slices for serving
Tips for Selecting Fresh Blueberries
When picking blueberries, look for firm, plump berries. They should have a deep blue color. Avoid berries that are mushy or have white spots. Fresh blueberries should have a slight shine and no wrinkles. If you can, choose organic blueberries for better flavor and safety. Rinse them gently before using to remove dirt and pesticides.
Optional Serving Suggestions
This dip pairs well with many treats. Try serving it with graham crackers for a classic touch. You can also use fruit slices like strawberries, apples, or bananas for a colorful platter. For a fun twist, add mini pretzels for a salty crunch. You could even top it with whipped cream for extra sweetness!

Step-by-Step Instructions
Preparation of the Cream Cheese Base
Start by taking the cream cheese out. Let it sit at room temperature until it is soft. This makes it easier to mix. In a large bowl, use an electric mixer. Beat the cream cheese until it is smooth. You want to make sure there are no lumps. This step is key for a creamy dip.
Incorporating Flavor Ingredients
Next, add the powdered sugar slowly. Sift it into the bowl while mixing. This helps to keep the dip fluffy. Then, mix in the plain Greek yogurt. Add the zest of one lemon and the fresh lemon juice. Don’t forget the vanilla extract and sea salt. Keep mixing until everything is smooth and well blended. The flavors will start to come together nicely.
Folding in Blueberries Carefully
Now it’s time for the blueberries. Gently fold them into the mixture. Use a spatula to keep their shape. Be careful not to over-mix. You want those beautiful berries to stay whole. Set aside a few blueberries for garnish. Once everything is combined, scoop the dip into a serving bowl. Smooth the top for an inviting look.
Tips & Tricks
Best Practices for a Creamy Texture
To make your dip creamy, start with room-temperature cream cheese. Cold cream cheese can lead to lumps. Use an electric mixer to beat it until smooth. This step is key for a rich base. After mixing in the powdered sugar, add Greek yogurt. This adds creaminess and a nice tart flavor. Mix until smooth, but don’t overdo it.
How to Avoid Over-Mixing Blueberries
When adding blueberries, be gentle. Fold them into the dip carefully. This keeps them whole and beautiful. If you mix too hard, they will break apart. Reserve some blueberries for garnish. This adds a nice touch to your final dish. It makes the dip look fresh and inviting.
Presentation Tips for Serving
For serving, choose a bright bowl that stands out. A colorful bowl makes the dip pop. Use a spatula to smooth the top of the dip. Garnish with reserved blueberries and a sprinkle of lemon zest. This gives your dip a fresh look. Arrange graham crackers and fruit slices around the bowl. This creates a pretty platter everyone will enjoy.
Pro Tips
- Softened Cream Cheese: Make sure your cream cheese is at room temperature before mixing to ensure a smooth and creamy texture without lumps.
- Gentle Blueberry Folding: When adding blueberries to the mixture, fold them in gently to maintain their shape and prevent them from breaking apart.
- Fresh Lemon Zest: For an extra burst of flavor, use freshly grated lemon zest rather than pre-packaged zest for the best taste.
- Chill Before Serving: Allow the dip to chill in the refrigerator for about 30 minutes before serving to enhance the flavors and improve the texture.
Variations
Alternative Fruit Suggestions for Different Flavors
You can change the fruit in this dip for new tastes. Try ripe strawberries for a sweet twist. Fresh raspberries add a tart touch. You can even use peaches for a summer vibe. Mix and match to find your favorite. The key is to keep the fruit fresh and juicy. This way, your dip stays vibrant and tasty.
Healthy Swaps: Using Low-Fat Cream Cheese
If you’re watching your calories, low-fat cream cheese works well. It keeps the dip creamy without the extra fat. You can also cut back on sugar. Just reduce the powdered sugar by half. The Greek yogurt adds a nice texture and taste. This swap makes the dip lighter, but still delicious.
Adding Spices or Extracts for Extra Flavor
Want to jazz up your dip? Consider adding spices like cinnamon or nutmeg. A pinch can bring warmth and depth. You can also try flavored extracts like almond or coconut. Just a little goes a long way. These small changes can create new flavor profiles, making each bite exciting.
Storage Info
How to Store Leftover Dip Properly
To store leftover dip, place it in an airtight container. Make sure the lid seals well to keep out air. This prevents the dip from drying out. If you do not have a container, cover it tightly with plastic wrap. When storing, ensure the dip is cool before sealing.
Shelf Life and Freezing Recommendations
The dip can last in the fridge for about three days. If you want to keep it longer, you can freeze it. It stays good in the freezer for about one month. When freezing, use a freezer-safe container. Leave some space at the top because the dip will expand as it freezes.
Reheating Tips if Needed
When you want to enjoy your dip again, take it out of the fridge or freezer. If it’s frozen, let it thaw in the fridge overnight. You can gently reheat it in the microwave, but do it in short bursts. Heat for about 20 seconds at a time. Stir in between to ensure it warms evenly. If the dip seems thick, add a little yogurt to bring back the creamy texture.
FAQs
Can I make Lemon Blueberry Cheesecake Dip ahead of time?
Yes, you can make this dip ahead of time. It keeps well in the fridge. I suggest storing it in an airtight container. It tastes even better after chilling for a couple of hours. This lets the flavors blend nicely. Just stir it gently before serving to bring it back to life.
What can I use instead of Greek yogurt?
If you don’t have Greek yogurt, you can use sour cream. It adds a nice tang. You can also use regular plain yogurt, but it may be thinner. To keep the dip thick, add a bit more cream cheese. This helps keep the same creamy texture you want.
Is this recipe suitable for gluten-free diets?
Yes, this recipe can be gluten-free. Just use gluten-free graham crackers or serve it with fruit slices. Fruits like strawberries, apples, and bananas are great options. Always check labels to be safe. This way, everyone can enjoy the dip!
This blog post covered a delightful lemon blueberry cheesecake dip. We explored ingredients, tips for fresh blueberries, and serving ideas. You learned how to prepare the cream cheese base, mix flavors, and fold in blueberries without over-mixing.
Finally, we discussed variations and storage tips. This dip is easy to make and fun to share. With a few simple steps, you can create a tasty treat. Now, gather your ingredients and enjoy every bit

Lemon Blueberry Cheesecake Dip
Ingredients
- 1 package (8 oz) cream cheese, softened to room temperature
- 1 cup powdered sugar
- 1 cup plain Greek yogurt
- 1 medium lemon zest
- 2 tablespoons freshly squeezed lemon juice
- 1 cup blueberries (fresh or frozen, thawed if frozen)
- 1 teaspoon pure vanilla extract
- 1/4 teaspoon sea salt
- to taste graham crackers or assorted fruit slices (such as strawberries, apples, or bananas) for serving
Instructions
- In a large mixing bowl, use an electric mixer to beat the softened cream cheese until it reaches a smooth and creamy consistency, ensuring there are no lumps.
- Gradually sift in the powdered sugar while continuing to mix, blending until the mixture is fluffy and fully combined.
- Add the plain Greek yogurt, lemon zest, fresh lemon juice, vanilla extract, and sea salt to the cream cheese mixture. Beat together until the dip is smooth and all ingredients are well incorporated.
- Carefully fold in the blueberries, taking care to preserve their shape—avoid over-mixing to keep them intact. Reserve a handful of blueberries for garnish.
- Scoop the dip into a serving bowl, using a spatula to smooth the top and create an inviting surface.
- Garnish the dip with the reserved blueberries and an optional sprinkle of additional lemon zest for a fresh touch.
- Serve the dip immediately alongside a selection of graham crackers and colorful fruit slices, perfect for dipping.


![- 1 cup rolled oats - 1/2 cup canned pumpkin puree - 1/4 cup almond butter (or your choice of nut butter) - 1/4 cup honey or maple syrup - 1/2 teaspoon vanilla extract - 1 teaspoon pumpkin pie spice - Pinch of salt - 1/4 cup chopped nuts (walnuts or pecans) - 1/4 cup mini chocolate chips or raisins - Calories per serving: About 100 - Protein content: 2 grams - Fiber content: 3 grams When you gather these ingredients, you set the stage for a tasty treat. Rolled oats serve as the base, giving each bite a hearty texture. Canned pumpkin puree brings moisture and a rich flavor that screams fall. Almond butter adds creaminess and healthy fats, while honey or maple syrup sweetens the mix. The vanilla extract rounds out the flavors, and pumpkin pie spice makes everything feel festive. Optional ingredients like chopped nuts and chocolate chips offer extra crunch and sweetness. You can mix and match to fit your taste. In terms of nutrition, these bites pack a punch. Each serving gives you about 100 calories, 2 grams of protein, and 3 grams of fiber. This makes them a great snack for energy and fullness. For the complete recipe, you can check out the Full Recipe section. - In a large mixing bowl, combine: - 1 cup rolled oats - 1/2 cup canned pumpkin puree - 1/4 cup almond butter (or your choice of nut butter) - 1/4 cup honey or maple syrup - 1/2 teaspoon vanilla extract - 1 teaspoon pumpkin pie spice - Pinch of salt Mix these ingredients well. Use a spatula to ensure everything blends together. You want a sticky dough. This sticky texture helps the bites hold their shape later. If you like, fold in some extras: - 1/4 cup chopped nuts (like walnuts or pecans) - 1/4 cup mini chocolate chips or raisins Make sure to distribute these evenly. This adds crunch and sweetness. The more you mix, the better the flavors combine. Now, it’s time to shape the bites. - Scoop small portions of the mixture. - Roll each portion into 1-inch balls. Place the balls on a plate or parchment paper. Leave space between them. After shaping, refrigerate the bites for at least 30 minutes. This helps them firm up. Enjoy these tasty bites chilled or at room temperature as a quick snack! For the full recipe, check out the details above. To make great energy bites, size matters. Aim for about 1 inch for each bite. This helps them cook evenly. Use a light touch when mixing the dough. Overworking it can make them tough. Gently blend the ingredients until they come together. Want more flavor? Try making your own pumpkin pie spice. Combine cinnamon, nutmeg, and ginger to find your perfect mix. You can also adjust sweetness. Use honey or maple syrup to make them sweeter or less sweet. Taste as you go! When it's time to serve, make it pretty! Arrange your energy bites on a decorative plate. This makes them look special. Add a sprinkle of pumpkin pie spice on top for a nice touch. It looks great and adds extra flavor. For the full recipe, check out [Full Recipe]. {{image_4}} You can make your pumpkin pie energy bites even more fun with flavor twists. Try adding toasted coconut for a tropical vibe. The sweet and crunchy texture makes each bite delightful. You can also switch your nut butter. Use peanut or cashew butter instead of almond butter. Each nut brings its own taste, making the bites unique. If you need a gluten-free snack, use gluten-free oats in your mix. This small change keeps the bites delicious and safe for those with gluten sensitivities. For a vegan option, swap honey with agave nectar. This keeps your bites sweet while fitting a plant-based diet. You can tailor these bites to fit the seasons. For fall, mix in some spiced apple or cider. This adds a warm, cozy flavor that feels like autumn. For summer, a hint of citrus zest can brighten the bites. It gives them a fresh burst that’s perfect for hot days. For the full recipe, check the details above and make your own tasty energy bites! Store your pumpkin pie energy bites in an airtight container in the refrigerator. This keeps them fresh and tasty. If you plan to eat them soon, you can keep them at room temperature for short durations. Just remember, they may not last as long outside the fridge. These energy bites can last up to one week in the fridge. If you want to keep them longer, freeze them. They can stay fresh for up to three months in the freezer. Just make sure to label the container with the date you froze them. You can enjoy these bites chilled or at room temperature. They make a great snack either way! For a delightful treat, pair them with a cup of tea or coffee. The warm drink complements the tasty flavors of the bites perfectly. If you want to try a fun twist, serve them at a party on a festive plate. You can find the full recipe to make these delicious bites. To make pumpkin pie energy bites, follow these steps: 1. In a large bowl, mix rolled oats, canned pumpkin puree, almond butter, and honey. 2. Add vanilla extract, pumpkin pie spice, and a pinch of salt. 3. Stir until the mixture becomes a sticky dough. 4. Fold in chopped nuts and chocolate chips or raisins. 5. Scoop out small portions and roll them into balls, about 1 inch wide. 6. Place the bites on a plate with space between them. 7. Refrigerate for at least 30 minutes to firm up. Enjoy your tasty and healthy snack! For more details, check the Full Recipe. Yes, you can freeze these energy bites. To do this, place the bites on a baking sheet. Freeze them for about an hour until solid. Then, transfer them to a freezer bag or an airtight container. Label the bag with the date. These bites can last up to three months in the freezer. When you’re ready to eat them, just let them thaw in the fridge. Pumpkin pie energy bites have many health benefits. They are rich in fiber from the oats and pumpkin. Fiber helps with digestion and keeps you full. Almond butter provides healthy fats and protein. Honey or maple syrup adds natural sweetness without refined sugar. Pumpkin is packed with vitamins A and C, which support your immune system. Overall, these bites are a nutritious snack option. Yes, these energy bites are safe and nutritious for kids. They contain wholesome ingredients that provide energy without added sugar. Kids love the sweet taste and chewy texture. You can also let your children help make them. This way, they learn about healthy snacks. Just remember to check for any nut allergies before serving. These pumpkin pie energy bites are easy to make and fun to eat. You mix simple main ingredients like oats, pumpkin, and nut butter. Add some nuts or chocolate chips for a tasty twist. Remember to store them well to enjoy later. Whether for a snack, dessert, or lunchbox treat, these bites pack nutrition in every bite. Get creative with flavors and enjoy the flexible recipes. Healthy eating can be delicious and effortless. Make these energy bites today and see for yourself!](https://dishtreats.com/wp-content/uploads/2025/07/b18c9eee-ac7a-43cf-8a14-33dd9ccff863-768x768.webp)

![To make delicious zucchini chocolate chip muffins, gather these simple ingredients: - 1 medium zucchini, grated (approximately 1 cup) - 1 cup all-purpose flour - 1/2 cup whole wheat flour - 1/2 teaspoon baking soda - 1 teaspoon baking powder - 1/2 teaspoon salt - 1/2 teaspoon ground cinnamon - 2 large eggs - 1/2 cup granulated sugar - 1/4 cup packed brown sugar - 1/3 cup vegetable oil - 1 teaspoon vanilla extract - 1/2 cup semi-sweet chocolate chips - 1/4 cup walnuts or pecans, chopped (optional for extra crunch) These ingredients blend well and create a moist muffin. The grated zucchini adds moisture while keeping the muffins healthy. The mix of flours gives a great texture. The sugars balance the chocolatey goodness. You can add nuts for crunch, or leave them out if you want a smoother bite. If you want the full details on how to put this all together, check out the Full Recipe. Start by preheating your oven to 350°F (175°C). This step is key for even baking. Prepare a muffin tin by lining it with paper liners or lightly greasing each cup. In a medium mixing bowl, whisk together the following dry ingredients: - 1 cup all-purpose flour - 1/2 cup whole wheat flour - 1/2 teaspoon baking soda - 1 teaspoon baking powder - 1/2 teaspoon salt - 1/2 teaspoon ground cinnamon Mix well to ensure they are evenly combined. This helps the muffins rise properly. In a larger bowl, crack two large eggs and beat them lightly. Add: - 1/2 cup granulated sugar - 1/4 cup packed brown sugar Mix these until smooth and slightly frothy. This gives the muffins a nice texture. Slowly add in: - 1/3 cup vegetable oil - 1 teaspoon vanilla extract Stir until fully combined. Next, gently fold in 1 cup of grated zucchini. Make sure it’s evenly distributed for great flavor. Gradually add the dry mixture to the wet ingredients. Use a spatula to fold them together gently. It’s okay if there are a few lumps. Next, divide the batter evenly among the prepared muffin cups, filling each about two-thirds full. Place the muffin tin in the preheated oven and bake for 18 to 20 minutes. To check if they are done, insert a toothpick into the center. It should come out clean or with a few moist crumbs. Once done, let the muffins cool in the pan for about 5 minutes before transferring them to a wire rack. This makes them easier to remove without breaking. For the full recipe, refer to the earlier sections. To make great muffins, follow these tips closely: - Use Fresh Ingredients: Fresh baking powder and soda give the best rise. - Room Temperature Eggs: Bring your eggs to room temperature for better mixing. - Preheat the Oven: Always preheat your oven to 350°F (175°C) before baking. - Fill Muffin Cups Evenly: Fill each cup about two-thirds full for a nice dome shape. Overmixing can lead to tough muffins, which we want to avoid. Here’s how: - Mix Dry and Wet Separately: Always mix dry and wet ingredients in separate bowls first. - Fold Gently: When combining, use a spatula to fold the mixture. Stop mixing when you see a few lumps. - Don’t Worry About Lumps: A few lumps are okay; they will bake out in the oven. Presentation is important for making your muffins look as good as they taste. Try these ideas: - Serve Warm: Serve your muffins warm from the oven for a cozy feel. - Use a Basket: Place muffins in a basket lined with a cloth napkin for a rustic touch. - Garnish: Lightly dust with powdered sugar or drizzle melted chocolate on top for flair. For the full recipe of Zucchini Chocolate Chip Muffins, check the earlier section. {{image_4}} You can make these muffins gluten-free easily. Just swap the all-purpose flour with gluten-free flour blend. Make sure it has xanthan gum to help with texture. This change keeps the muffins soft and tasty. You can also mix in other fun ingredients. Dried fruits like raisins or cranberries add sweetness. Chopped nuts like walnuts or pecans give a nice crunch. You can even add seeds for more texture. Just be sure to adjust the amount of chocolate chips if you add more. If you want a lower sugar treat, you have options. Use less granulated sugar or brown sugar. You can try sugar substitutes like stevia or monk fruit sweetener. These options can help keep the muffins sweet without the extra calories. Just remember to check the package for measurements. Check out the [Full Recipe] for more details! To keep your zucchini chocolate chip muffins fresh, store them in an airtight container. You can place them on the counter. They will stay tasty for about three days. If you want to keep them longer, consider freezing. Freezing muffins is easy and smart. First, let the muffins cool completely. Then, wrap each muffin in plastic wrap or aluminum foil. Place them in a freezer-safe bag or container. These muffins can last up to three months in the freezer. When you want one, just take it out and reheat. Reheating is quick and simple. You can use a microwave or an oven. For the microwave, heat one muffin for 15 to 20 seconds. For the oven, preheat to 350°F (175°C). Place the muffin on a baking sheet and warm it for about 5 to 10 minutes. Enjoy your warm muffin with a cup of coffee or tea! To make zucchini chocolate chip muffins from scratch, follow this simple recipe. Start by preheating your oven to 350°F (175°C). Prepare your muffin tin with liners or grease it. In one bowl, mix all-purpose flour, whole wheat flour, baking soda, baking powder, salt, and cinnamon. In another bowl, beat two eggs, then add granulated and brown sugar. Mix in vegetable oil and vanilla extract. Fold in grated zucchini, then combine the wet and dry ingredients. Lastly, add chocolate chips and any nuts if you want. Fill the muffin cups and bake them for 18 to 20 minutes. For the full recipe, check the instructions above. Yes, you can use frozen zucchini in this recipe. Just make sure to thaw it first. Drain any excess water to avoid soggy muffins. Frozen zucchini works well because it retains most of its flavor. It also provides moisture, just like fresh zucchini does. This option is great if you have leftover zucchini from last season. Zucchini offers several health benefits. It is low in calories and high in fiber. This can help keep you feeling full longer. Zucchini is also packed with vitamins like A and C. These vitamins support your immune system and skin health. Plus, adding veggies to your muffins makes them more nutritious. It’s a great way to sneak in some extra greens. Zucchini muffins can last up to a week when stored properly. Keep them in an airtight container at room temperature. If you want them to last longer, you can freeze them. Just make sure they are completely cooled before freezing. They can stay fresh in the freezer for about three months. Yes, you can substitute other types of flour in this recipe. Almond flour, oat flour, or coconut flour are all good options. Each type of flour can change the texture slightly, so keep that in mind. If you use a gluten-free flour blend, make sure it has a binding agent, like xanthan gum, for the best results. You now have a clear guide for making delicious zucchini chocolate chip muffins. We covered the ingredients and step-by-step instructions needed to bake them perfectly. Plus, I shared tips on avoiding common baking mistakes and ways to store your muffins. You can also explore tasty variations to suit your taste. Remember, these muffins are not just yummy; they bring the added health benefits of zucchini. Happy baking, and enjoy these treats!](https://dishtreats.com/wp-content/uploads/2025/06/0cde25ea-110a-42a8-bcb8-b8faa9becc28-768x768.webp)

. This blog post showed you how to make Chocolate Chip Cookie Dough Dip. We covered the ingredients and step-by-step instructions. You learned some tips for the best texture and flavor variations to try. Storage advice ensures you keep the dip fresh. Enjoy your creamy dip with snacks like graham crackers or apple slices. Get creative with add-ins for extra flavor. Happy dipping!](https://dishtreats.com/wp-content/uploads/2025/07/9841c43c-25b7-4553-9f85-c4e222a26afc-768x768.webp)
