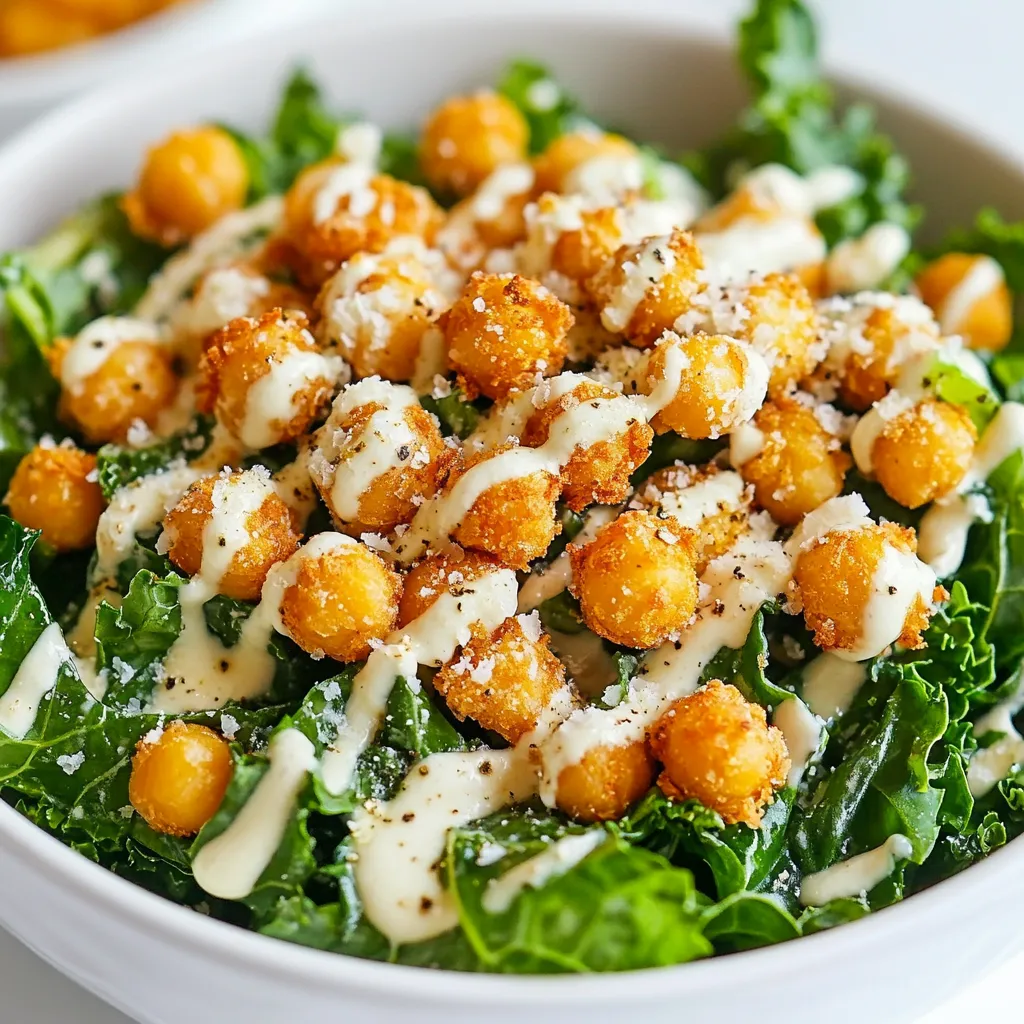
Are you ready to transform your salad game? This Kale Caesar Salad with Crispy Chickpeas Delight is not just any salad—it’s a flavorful masterpiece packed with nutrients. You’ll love crunchy chickpeas, hearty kale, and a creamy tahini dressing that makes every bite memorable. Whether you’re a salad lover or just curious, stick around to discover how easy it is to whip up this healthy dish that everyone will crave!
Why I Love This Recipe
- Healthy and Nutritious: This salad is packed with vitamins and minerals from the kale and chickpeas, making it a wholesome choice for any meal.
- Crispy Texture: The roasted chickpeas add a delightful crunch that contrasts beautifully with the tender kale, enhancing the overall eating experience.
- Flavorful Dressing: The creamy tahini dressing, enriched with nutritional yeast, brings a savory depth that ties all the ingredients together perfectly.
- Easy to Prepare: With simple steps and minimal ingredients, this recipe is quick to whip up, making it ideal for busy weeknight dinners.
Ingredients
Main Ingredients
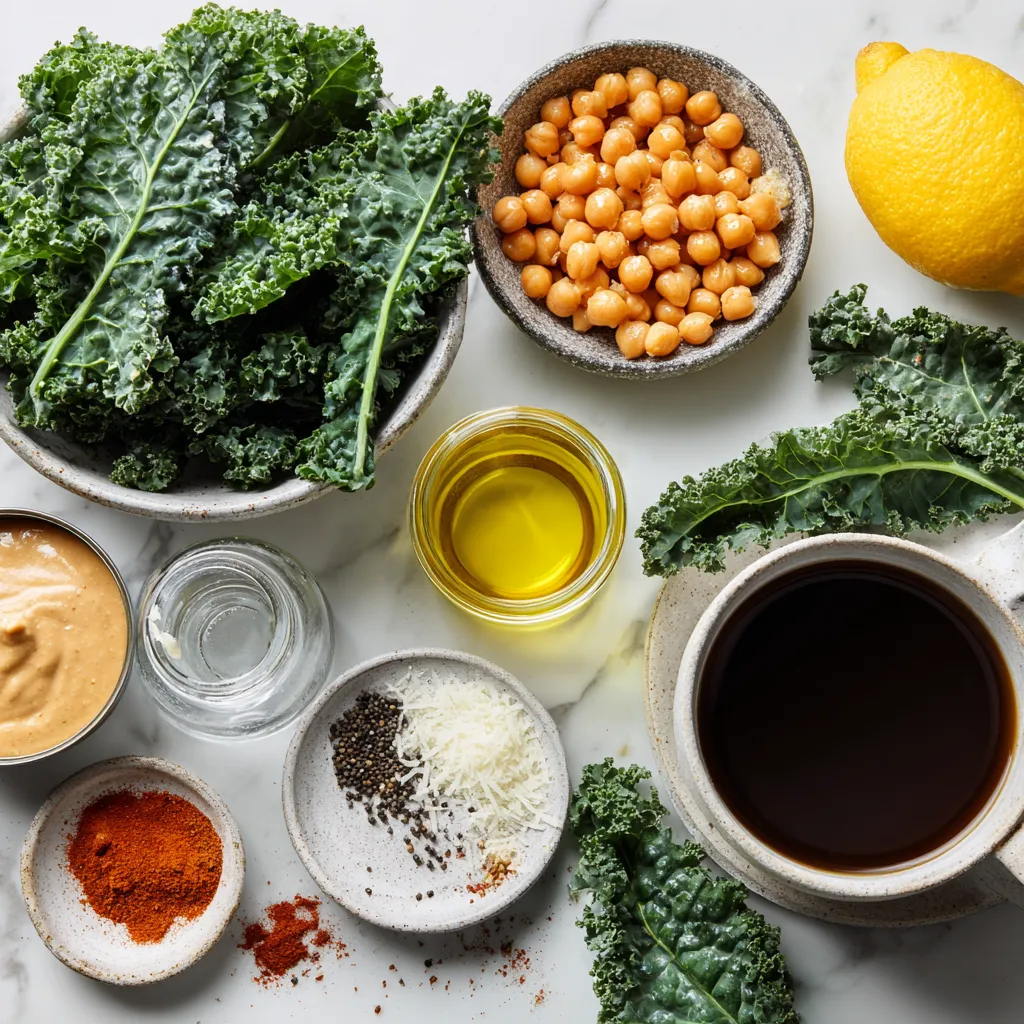
– Kale: 4 cups, chopped
– Chickpeas: 1 can (15 oz), drained and rinsed
– Olive Oil: 3 tablespoons, divided
– Tahini: 1/4 cup
– Nutritional Yeast: 1/4 cup
– Optional: Grated Parmesan cheese
Seasonings
– Garlic powder
– Smoked paprika
– Salt and freshly ground black pepper
– Dijon mustard
– Freshly squeezed lemon juice
Additional Ingredients
– Water (for thinning dressing)
– Freshly cracked black pepper (for garnish)
Kale Caesar Salad with Crispy Chickpeas starts with simple yet wholesome ingredients. First, you need fresh kale. I prefer to use four cups, chopped into bite-sized pieces. This helps you enjoy the crunchy texture.
Next, you’ll add a can of chickpeas. It’s important to drain and rinse them well. This step helps remove excess sodium and makes them cleaner.
Olive oil is key for flavor. You will use three tablespoons. This oil adds richness to both the chickpeas and the dressing.
For that creamy texture, you will need tahini. A quarter cup gives the dressing a nutty flavor. Nutritional yeast adds a cheesy taste without dairy. You’ll also use a quarter cup of this ingredient.
If you want a non-vegan option, grated Parmesan cheese makes a great addition.
Now, let’s talk seasonings. You’ll need garlic powder, smoked paprika, salt, and black pepper. These spices add depth to the dish. Dijon mustard and freshly squeezed lemon juice give the dressing a tangy punch.
Finally, you’ll need water to thin the dressing. This makes it easier to coat the kale evenly. And don’t forget freshly cracked black pepper for garnish. It adds a nice touch to the final dish.
Step-by-Step Instructions
Preheat the Oven
Set your oven to 400°F (200°C). Grab a baking sheet and line it with parchment paper. This helps with easy cleanup later.
Prepare the Chickpeas
In a medium bowl, add the drained chickpeas. Pour in 1 tablespoon of olive oil. Then, sprinkle in garlic powder, smoked paprika, salt, and pepper. Mix well until the chickpeas are coated evenly.
Roast the Chickpeas
Spread the seasoned chickpeas in a single layer on the baking sheet. Roast them in the oven for 25-30 minutes. Remember to shake the pan halfway through to crisp them evenly. They should turn golden brown and crunchy.
Prepare the Dressing
In a small bowl, mix tahini, lemon juice, Dijon mustard, and nutritional yeast. Add the remaining 2 tablespoons of olive oil. Gradually stir in water until the dressing is smooth and pourable. Season with salt and pepper to taste.
Massage the Kale
Place the chopped kale in a large mixing bowl. Sprinkle a pinch of salt over it. With clean hands, massage the kale for 2-3 minutes. This makes it softer and brings out its flavor.
Combine Ingredients
Drizzle the creamy tahini dressing over the massaged kale. Toss the salad thoroughly. Make sure every leaf is coated in the delicious dressing.
Add Crispy Chickpeas
Once the chickpeas are roasted and cooled a bit, add them to the kale salad. Gently fold everything together to mix the crispy chickpeas with the kale.
Serve the Salad
Portion the salad into bowls. If you like, sprinkle some grated Parmesan cheese on top and add freshly cracked black pepper for extra flavor. Enjoy your delightful meal!
Tips & Tricks
Ensuring Crispy Chickpeas
To make sure your chickpeas get nice and crispy, rinse and dry them well. After draining the chickpeas, pat them dry with a clean towel. This helps remove excess moisture. Moisture will make them soggy instead of crunchy. Once dry, season them with olive oil, garlic powder, and smoked paprika. Toss them well so they are coated evenly.
Enhancing Kale Flavor
Kale can be tough, but massaging it helps a lot. After chopping the kale, sprinkle a pinch of salt on top. Use your hands to rub the leaves for about 2-3 minutes. This makes the kale softer and sweeter. You will see the color change to a darker green. This process helps the flavors of the dressing soak into the leaves better.
Dressing Variations
Feel free to get creative with the dressing! While the tahini base is great, you can add herbs and spices for fun twists. Try mixing in fresh basil, dill, or even a touch of chili flakes for heat. Lemon zest can also brighten the flavor. Experimenting with these options can give your salad a unique taste that fits your mood.
Pro Tips
- Perfectly Crispy Chickpeas: Make sure to dry the chickpeas thoroughly after rinsing to achieve maximum crispiness during roasting.
- Freshly Massaged Kale: Massaging the kale not only softens it but also enhances its flavor. Don’t skip this step for the best texture!
- Customize Your Dressing: Feel free to adjust the lemon juice and tahini levels in the dressing to suit your taste preference—add more for a tangy kick!
- Serving Suggestions: This salad pairs beautifully with grilled chicken or shrimp for a heartier meal, or enjoy it as a light lunch on its own.
Variations
Vegan Alternative
For a vegan twist, you can swap out the Parmesan cheese. Instead, use nutritional yeast. It adds a cheesy flavor without any dairy. This way, you keep the fun taste while keeping it plant-based.
Add Proteins
Want to make your salad more filling? You can add proteins like grilled chicken, shrimp, or tofu. Each choice brings its own flavor. Grilled chicken adds a smoky touch. Shrimp gives a sweet and briny bite. Tofu is great for a hearty, vegetarian option.
Different Greens
If you want a change, consider using different greens. Spinach or mixed greens work well in place of kale. Spinach is tender and mild, while mixed greens add a variety of textures. This way, you can keep your salad fresh and exciting every time.
Storage Info
How to Store Leftovers
Store your Kale Caesar Salad with Crispy Chickpeas in an airtight container in the refrigerator. This keeps the salad fresh and tasty for later meals. Avoid letting it sit out to prevent spoilage.
Best Practices
For the best taste, consume leftover salad within 2-3 days. The kale stays crisp, and the flavors remain bright. After this time, the salad may lose its crunch and taste.
Reheating Tips
If you have leftover chickpeas, reheat them separately. Crispiness is key, so use an oven or air fryer. This way, they stay crunchy and delicious, adding the perfect texture to your salad.
FAQs
How do you make kale taste less bitter?
To reduce kale’s bitterness, you should massage it. Take your chopped kale and sprinkle a pinch of salt on it. Then, use your hands to knead and squeeze the leaves for 2-3 minutes. This process helps break down the cell walls and softens the leaves. It also brings out the natural flavors. After massaging, drizzle on your tahini dressing. The creamy dressing adds flavor and reduces bitterness.
Can I prep this salad in advance?
Yes, you can prep this salad ahead of time. Store the kale and dressing separately. Massaged kale can last in the fridge for about 2-3 days. Keep the dressing in a sealed container. When you’re ready to serve, just combine the kale and dressing. This way, your salad stays fresh and crisp. You can also store the crispy chickpeas in a separate container. They stay crunchy longer that way.
Is this Kale Caesar Salad gluten-free?
Yes, this Kale Caesar Salad can be made gluten-free. The tahini dressing does not contain gluten. Just check your Dijon mustard and nutritional yeast to ensure they are gluten-free. If you want croutons, use gluten-free bread. You can also skip croutons and enjoy the crispy chickpeas for crunch instead. This salad is tasty and suitable for everyone!
This blog post covers a simple yet tasty kale salad with crispy chickpeas. You learned how to make the dressing and mix ingredients. We explored tips for better flavor and texture. You can even adapt the recipe to fit your needs or restrictions. Keep the salad fresh by storing it right. Enjoy this nutritious meal that’s easy to prepare. Cooking should be fun, so get creative with flavors and variations. Taste and enjoy every bit


