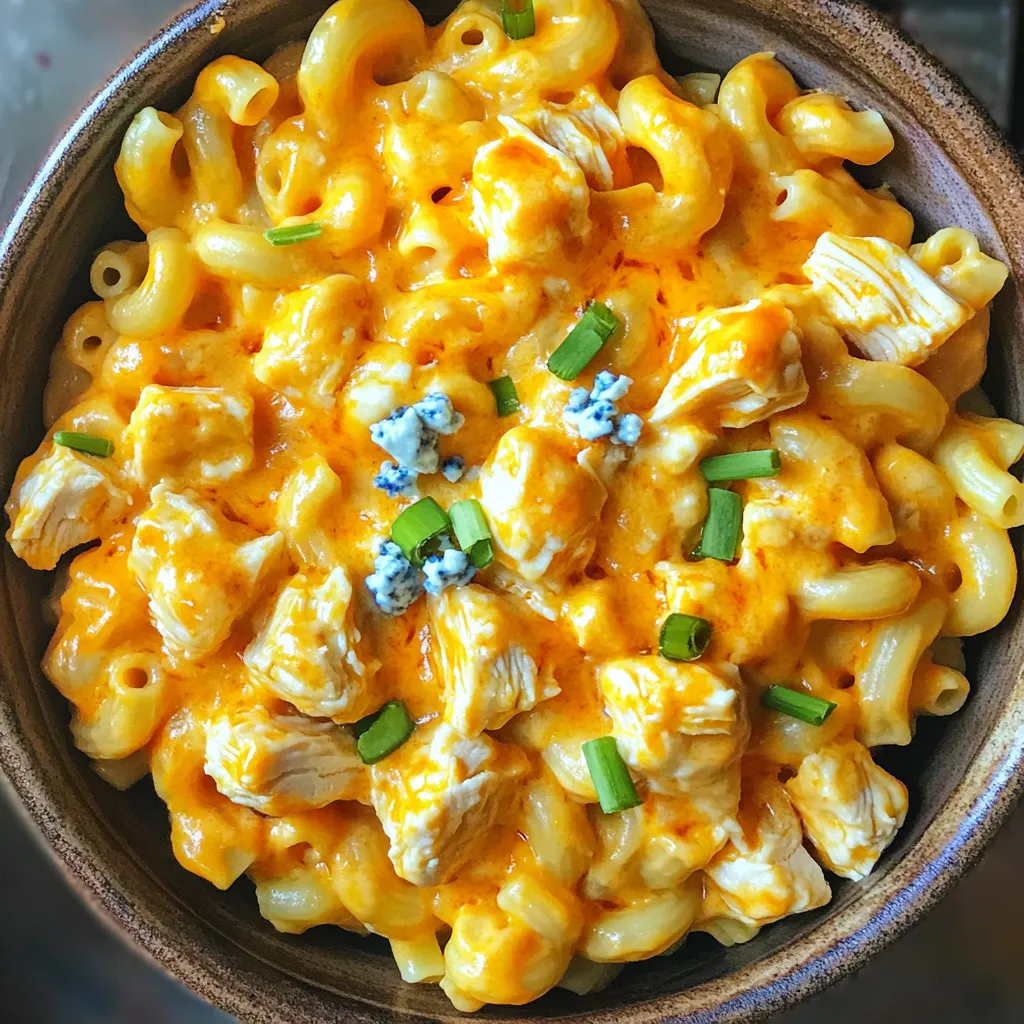
Instant Pot Buffalo Chicken Mac and Cheese Delight

If you love creamy mac and cheese and spicy buffalo chicken, this recipe is for you! I’ll show you how to make Instant Pot Buffalo Chicken Mac and Cheese that is rich, cheesy, and full of flavor. This meal is quick, easy, and perfect for busy nights. With just a few ingredients and simple steps, you can impress family and friends. Let’s dive into this delicious dish!
Ingredients
Main Ingredients
- Cubed chicken breasts
- Buffalo sauce
- Elbow macaroni
- Shredded cheddar and mozzarella cheese
Cooking Essentials
- Chicken broth
- Whole milk
- Olive oil
Seasoning
- Garlic powder
- Onion powder
- Salt and pepper
- Garnishes (scallions, blue cheese)
When I create my Instant Pot Buffalo Chicken Mac and Cheese, I focus on a few key ingredients. First, I use cubed chicken breasts. They cook fast and stay juicy. Next, I add buffalo sauce. This gives the dish that spicy kick everyone loves. Elbow macaroni is my go-to pasta choice. It holds the creamy sauce well. Lastly, I mix in shredded cheddar and mozzarella cheese. These two cheeses melt beautifully together.
For cooking essentials, I always have chicken broth on hand. It adds depth to the flavor. I also use whole milk for creaminess. A splash of olive oil helps to sauté the chicken and adds richness.
Seasoning is crucial. I use garlic powder and onion powder for that savory touch. A bit of salt and pepper enhances all the flavors. For garnishes, I love adding chopped scallions for a fresh pop. If you enjoy blue cheese, crumbled blue cheese is a great option on top.
These ingredients come together to create a dish that is creamy, spicy, and full of flavor. It’s a meal you can whip up in no time!
Step-by-Step Instructions
Preparing the Chicken
1. First, set your Instant Pot to the sauté function.
2. Pour in 1 tablespoon of olive oil and let it heat.
3. Add 1 pound of cubed chicken breasts to the pot.
4. Season the chicken with salt, pepper, garlic powder, and onion powder.
5. Sauté the chicken for about 5 minutes until it turns brown.
Adding Sauces and Pasta
1. Once the chicken is browned, pour in 1 cup of buffalo sauce.
2. Stir well, coating each piece of chicken.
3. Next, pour in 1 cup of chicken broth.
4. Carefully sprinkle 8 ounces of elbow macaroni over the mixture.
5. Avoid stirring to keep the pasta from clumping together.
Cooking and Final Steps
1. Secure the lid on the Instant Pot and set the steam valve to sealing.
2. Choose manual high pressure and set the timer for 4 minutes.
3. After cooking, quickly release the pressure by turning the valve to venting.
4. Once the steam is gone, remove the lid.
5. Stir in 1 cup of whole milk and 2 cups of shredded cheddar and mozzarella cheese.
6. Mix until the cheese melts and the sauce becomes creamy.
7. If needed, add a splash of milk for the right consistency.
8. Taste and adjust the seasoning as desired.
9. Serve hot, garnished with chopped scallions and optional blue cheese.
Tips & Tricks
Achieving the Perfect Texture
Using the right pasta is key. I suggest elbow macaroni, as it holds the sauce well. Cook it in the Instant Pot with the chicken and broth. This method keeps the pasta tender and flavorful.
Adjusting cheese consistency is also important. Start with two cups of cheese, mixing cheddar and mozzarella. If your mac and cheese is too thick, add a splash of milk. This will help create a creamy texture.
Flavor Enhancements
You can customize spice levels easily. Start with one cup of buffalo sauce. If you want more heat, add extra sauce. For less spice, use mild buffalo sauce or reduce the amount.
Adding additional ingredients can enhance flavor. Try mixing in cooked veggies, like spinach or bell peppers. You can also top it with crumbled blue cheese for extra flair.
Presentation Ideas
Serving suggestions can elevate your dish. Serve the mac and cheese hot in individual bowls. This makes it fun and inviting for guests.
Garnishing tips are simple. Sprinkle chopped scallions on top for fresh flavor. You can drizzle extra buffalo sauce for a pop of color. Offer blue cheese crumbles on the side for those who want a tangy kick.

Variations
Ingredient Substitutions
You can change the cheese for a twist. Try using Monterey Jack or Gouda. They melt well and add a different taste. You can also mix cheeses for a flavor boost.
If you want a different protein, swap chicken for turkey or tofu. Both options work great in this dish. Just make sure to adjust cooking time as needed.
Dietary Adjustments
To make this dish gluten-free, use gluten-free pasta. Many brands offer great options that taste just as good. Also, check your buffalo sauce for gluten. Some sauces have wheat, so read labels carefully.
For a vegetarian option, skip the chicken. You can add veggies like bell peppers or mushrooms instead. They add flavor and texture. You can also use chickpeas for protein.
Flavor Twist Ideas
Want something new? Try adding ranch seasoning to make buffalo ranch mac and cheese. It gives a creamy, zesty taste that pairs well with the buffalo sauce.
Another idea is to create BBQ chicken mac and cheese. Swap buffalo sauce with your favorite BBQ sauce. Top it with crispy onions for an extra crunch. Both twists bring fun flavors to your meal.
Storage Info
Refrigeration Guidelines
After enjoying your Instant Pot buffalo chicken mac and cheese, store any leftovers in the fridge. Use an airtight container to keep it fresh. This dish stays good for about three to four days in the fridge. To reheat, simply warm it on the stove or in the microwave. Add a splash of milk to help restore the creamy texture.
Freezing Instructions
If you want to save some for later, freezing is a great option. Let the mac and cheese cool completely before freezing. Scoop portions into freezer-safe containers. It can last for up to three months in the freezer. When you’re ready to enjoy it again, thaw it overnight in the fridge. Reheat in the oven or on the stove. Again, adding a bit of milk helps regain its creamy goodness.
FAQs
How long does it take to cook the mac and cheese in an Instant Pot?
The total cooking time for this dish is about 25 minutes. Here’s the breakdown:
- Prep time: 10 minutes to gather and prepare your ingredients.
- Cooking time: 4 minutes on high pressure in the Instant Pot.
- Pressure release: Allow a few minutes for the pressure to release quickly.
Can I make this recipe without an Instant Pot?
Yes, you can make this dish on the stove. Here’s how:
- Sauté the chicken in a large pot over medium heat until browned.
- Add the buffalo sauce and cook for a few more minutes.
- Stir in the broth and pasta. Bring to a boil, then reduce heat.
- Cover and simmer until pasta is cooked. Stir in the milk and cheese until melted.
How can I make this dish less spicy?
To tone down the heat, try these tips:
- Use mild buffalo sauce instead of spicy versions.
- Add more cheese or milk to balance the heat.
- Mix in sour cream or yogurt for extra creaminess and cooling.
This recipe blends spicy and creamy flavors for a tasty buffalo chicken mac and cheese. We explored key ingredients, detailed cooking steps, and helpful tips. Customizing this dish keeps it fresh, whether you choose different proteins or adjust for dietary needs. Enjoy leftovers with simple storage tips. This meal is quick, fun, and perfect for any occasion! Dive into this flavor-packed dish and make it your own. Get cooking today!


![To make these Air Fryer Parmesan Zucchini Fries, you need just a few simple items. Gather these ingredients: - 2 medium zucchinis, sliced into thin fries - 1 cup breadcrumbs (recommended: panko) - 1/2 cup grated Parmesan cheese - 1 teaspoon garlic powder - 1 teaspoon Italian seasoning - 1/2 teaspoon salt - 1/4 teaspoon black pepper - 2 large eggs, beaten - Olive oil spray Each ingredient plays a key role. The zucchinis provide a fresh base. Panko breadcrumbs add great crunch. Parmesan cheese gives a rich, cheesy flavor. Garlic powder and Italian seasoning make your fries tasty. Salt and pepper enhance all the flavors. Eggs act as glue for the coating. The olive oil spray keeps everything crisp. When selecting zucchinis, choose firm ones with smooth skin. They should feel heavy for their size. This tells you they are fresh. The breadcrumbs should be light and airy, perfect for frying. If you're feeling adventurous, try different herbs or cheeses! For the full recipe, check out this [Full Recipe]. 1. Preheat your air fryer to 400°F (200°C). This step is key for a crispy finish. 2. Wash and dry the zucchinis. Clean veggies are a must for great taste. 3. Cut the zucchinis into 1/4 inch thick fries. Make sure they are even for uniform cooking. 1. In a medium bowl, combine breadcrumbs, Parmesan cheese, garlic powder, Italian seasoning, salt, and black pepper. This mix gives the fries a tasty crust. 2. In a separate bowl, beat the eggs until smooth. This egg wash will help the coating stick well. 1. Dip each zucchini fry in the beaten eggs. Let any extra egg drip back into the bowl. 2. Roll the zucchini in the breadcrumb mixture. Press gently to coat all sides evenly. This ensures every bite is full of flavor. 1. Lightly spray the air fryer basket with olive oil. This helps prevent sticking. 2. Arrange the coated zucchini fries in a single layer in the basket. Avoid crowding to keep them crispy. 3. Mist the tops of the fries with olive oil spray. This adds a lovely golden color. 4. Cook for 10-12 minutes, flipping halfway. This makes sure each side cooks evenly. Once you follow these steps, you will have crispy and tasty Air Fryer Parmesan Zucchini Fries. For the complete recipe, refer to the section above. Enjoy! To keep your zucchini fries crispy, avoid overcrowding the air fryer basket. When fries sit too close, they steam instead of crisp. It’s best to cook in batches if needed. Also, mist the tops of fries lightly with olive oil. This simple step helps them brown nicely. Want to spice things up? Consider adding cayenne pepper for heat. A little goes a long way! You can also play around with different herbs or seasonings. Try adding smoked paprika or fresh thyme for a unique twist. Each option can add depth to the flavor. Pair your zucchini fries with great dipping sauces. I love zesty marinara or creamy ranch. They add a fun taste contrast. For serving, arrange the fries in a single layer on a platter. Garnish with fresh herbs or a sprinkle of more Parmesan cheese for a lovely touch. Add a small bowl of sauce in the center for a delightful display. For the complete recipe, check out the Full Recipe section. {{image_4}} You can switch up the coating for your zucchini fries. Using gluten-free breadcrumbs works great if you need a gluten-free option. They still get nice and crispy. You can also try different cheeses like mozzarella or cheddar. Each cheese brings a unique flavor that can enhance your fries. Don't stop at zucchini! You can add other veggies like eggplant or carrots. Cut them into fries, just like the zucchini. This makes your dish colorful and fun. You might also mix in spices like paprika or cumin. These spices bring extra warmth and flavor to your fries. You can cook zucchini fries in different ways. The air fryer gives you crispy results in less time. Baking in the oven is another option. It takes longer but still tastes great. Stovetop frying is also a choice. You’ll need more oil, but the flavor is rich and satisfying. Each method has its perks, so feel free to experiment! To store Air Fryer Parmesan Zucchini Fries in the fridge, let them cool first. Place the fries in an airtight container. This keeps them fresh for up to three days. I recommend using glass containers, as they seal well and prevent moisture. If you want to save your fries for longer, freeze them. Lay the cooked fries on a baking sheet in a single layer. Freeze for about an hour. Once frozen, transfer them to a freezer bag. This method stops them from sticking together. They can last in the freezer for about two months. To reheat, place the frozen fries in the air fryer. Set it to 400°F (200°C) and cook for about 8-10 minutes. This will help keep them crispy. You can also reheat them in an oven for a similar effect. Air Fryer Parmesan Zucchini Fries stay fresh in the fridge for about 3 to 4 days. To store, place them in an airtight container. For longer storage, freeze them. They can last up to 2 months in the freezer. To freeze, lay them flat on a baking sheet first, then transfer them to a freezer bag. This helps keep them from sticking together. Yes, you can prepare these fries ahead of time. Slice the zucchinis and coat them in the breadcrumb mixture. Keep them in the fridge for up to 24 hours. When you're ready, air fry them directly from the fridge. If you freeze them, let them thaw in the fridge overnight before cooking. This helps them cook evenly and stay crispy. These zucchini fries taste great with many dishes. Serve them with a tangy marinara sauce or creamy ranch dressing for dipping. They also pair well with grilled chicken or fish. For a fun twist, try serving them alongside a fresh salad or as a side to tacos. Their crunch adds a nice texture contrast to softer dishes. Absolutely! You can use yellow squash instead of green zucchini. They have a similar taste and texture. If you have gifted zucchinis from friends or family, feel free to use those too. Just make sure they are firm and fresh for the best results. This recipe is very flexible and lets you enjoy various types of squash. In this post, I shared a simple recipe for Air Fryer Parmesan Zucchini Fries. You learned the ingredients, step-by-step instructions, and useful tips for crispiness. Experiment with flavors or make different versions to keep it fresh. Remember to store leftovers properly for later enjoyment. This dish is easy to make and pairs well with various dips. Enjoy your healthy snack, and have fun trying out new ideas!](https://dishtreats.com/wp-content/uploads/2025/06/3cf59b94-4108-4e4b-8eff-d7b1557676e8-768x768.webp)

