Honey Mustard Glazed Salmon Flavorful and Simple Dish

Looking for a dish that’s both tasty and easy to make? Honey Mustard Glazed Salmon is just that! With its rich, sweet glaze and flaky salmon, it’s perfect for any meal. You can whip it up in no time, even on your busiest days. Stay with me as we explore a simple recipe that will impress your family and friends. Let’s dive into the fun of cooking this delicious salmon!
Ingredients
Main Ingredients for Honey Mustard Glazed Salmon
To make this tasty dish, you need:
- 4 salmon fillets (about 6 oz each)
- 3 tablespoons pure honey
- 2 tablespoons whole grain mustard
- 1 tablespoon Dijon mustard
- 2 tablespoons extra virgin olive oil
- 2 cloves garlic, finely minced
- Salt and freshly cracked black pepper to taste
These ingredients give the salmon a sweet and tangy flavor. The honey adds sweetness, while the mustards bring in a nice kick. Olive oil helps everything stick and adds richness. Garlic gives it depth and a savory note.
Optional Garnishes and Sides
You can add a few extra touches to make your dish shine:
- Fresh parsley, finely chopped (for garnish)
- Lemon wedges (for serving alongside)
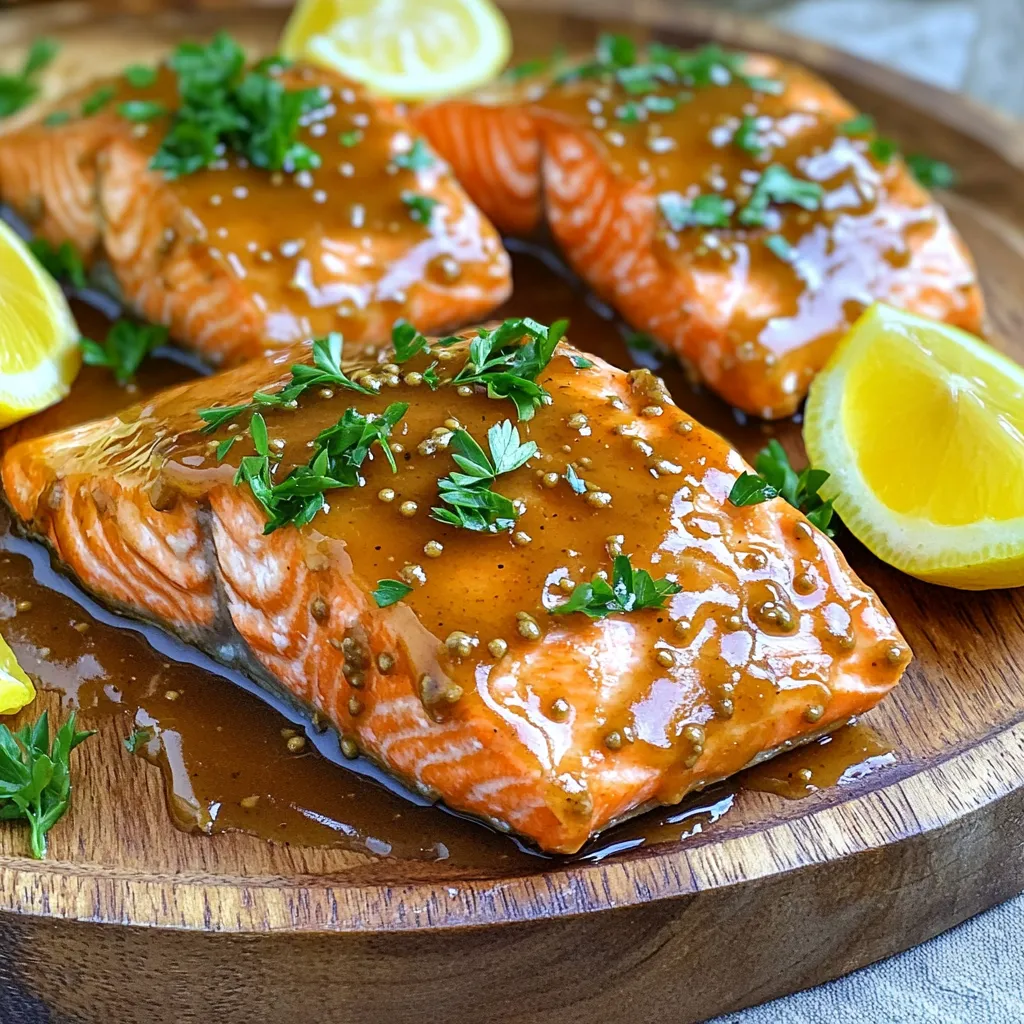
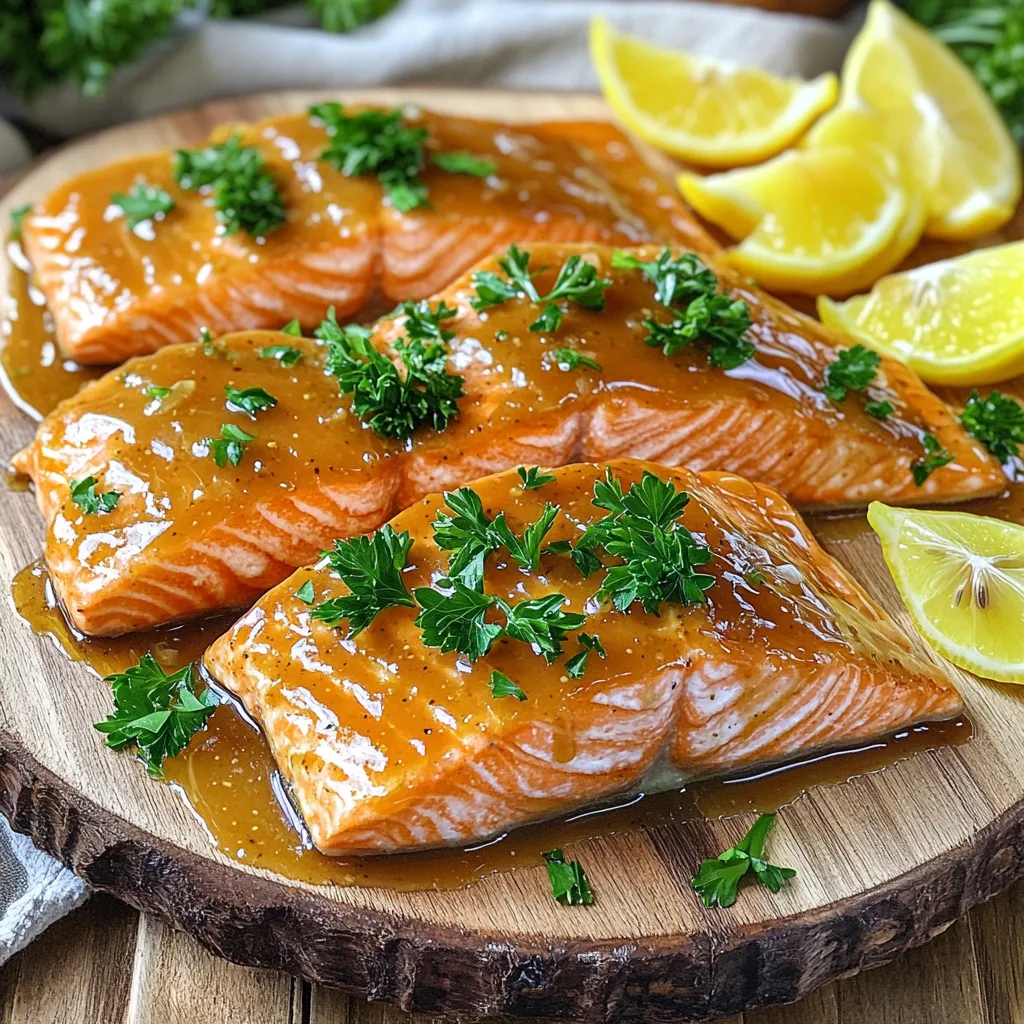
Garnishing with parsley adds color and freshness. Lemon wedges offer a bright flavor that balances the sweetness of the glaze. You can serve the salmon with sides like steamed veggies or rice for a complete meal.
Nutritional Information Overview
This dish is not only delicious but also healthy. Salmon is rich in omega-3 fatty acids. These fats are good for your heart and brain. Plus, honey provides natural sweetness without too much sugar. Each serving has protein, healthy fats, and vitamins. Enjoy this dish knowing you are eating well!
Step-by-Step Instructions
Preparing the Oven and Baking Sheet
First, turn on your oven. Set it to 400°F (200°C). This heat will help cook the salmon just right. To make cleaning easy, line a baking sheet with parchment paper. This paper keeps the fish from sticking and helps it cook evenly.
Making the Honey Mustard Glaze
Now, let’s make the glaze. Grab a small mixing bowl. In it, combine 3 tablespoons of honey, 2 tablespoons of whole grain mustard, and 1 tablespoon of Dijon mustard. Add 2 tablespoons of olive oil and 2 cloves of minced garlic to the bowl. Don’t forget to sprinkle in some salt and pepper! Whisk it all together until the mixture is smooth and shiny.
Arranging and Glazing the Salmon Fillets
Next, place your 4 salmon fillets on the baking sheet, skin side down. This helps keep the fish moist. Now, take that tasty honey mustard glaze and drizzle it over each fillet. Use a brush or the back of a spoon to spread it evenly. Be generous—every bite counts!
Baking the Salmon to Perfection
Slide the baking sheet into the oven. Bake for 12 to 15 minutes. You want the fish to be fully cooked. It should flake easily when you press it with a fork. Look for a caramelized glaze on top. That means it’s perfectly done.
Finishing Touches and Plating
When the salmon is ready, take it out of the oven. Let it rest for a few minutes. This helps the juices stay inside the fish. For a pretty plate, sprinkle fresh, chopped parsley on top. Serve with lemon wedges on the side. The lemon adds a nice zing that pairs well with the sweet glaze. Enjoy your beautiful dish!
Tips & Tricks
Ensuring Even Cooking and Flakiness
To cook salmon evenly, start with fillets of similar size. This helps them cook at the same rate. Place the salmon skin side down on the baking sheet. This allows the skin to crisp up while the fish stays moist. Bake it at 400°F for 12-15 minutes. Always check if it flakes easily with a fork. If it does, it’s done. Let it rest for a few minutes before serving. This step makes it juicier and more flavorful.
Recommended Cooking Tools
Use a baking sheet lined with parchment paper. This makes cleanup simple and helps the glaze stick. A whisk is great for mixing the glaze. You can also use a brush to spread the glaze over the salmon. A fork is handy for checking if the fish flakes. For serving, a stylish platter adds a nice touch. You can also use lemon wedges for a fresh look and taste.
Adjusting Sweetness and Flavor
You can tweak the glaze to fit your taste. If you like it sweeter, add more honey. For a tangy kick, increase the mustard. Experiment with different mustard types. Spicy mustard adds a nice bite, while honey mustard gives a sweet twist. Taste the glaze before using it. Adjust it until it’s just right for you. This way, you create a dish that you truly enjoy!

Variations
Alternative Glaze Ingredients
You can switch up the glaze to add new flavors. Try adding soy sauce for a savory twist. You can also use maple syrup instead of honey for a different sweetness. For a spicy kick, add a pinch of cayenne pepper or some sriracha. If you love herbs, mix in fresh dill or thyme for added depth. These changes make the dish unique and exciting!
Cooking Methods: Grilling vs. Baking
You can cook your honey mustard glazed salmon in different ways. Grilling gives it a smoky flavor and a nice char. Preheat your grill to medium heat. Place the salmon skin-side down on the grill. Cook for about 6-8 minutes per side until it flakes easily. Baking is simple and keeps it moist. In the oven, bake at 400°F for 12-15 minutes. Both methods work well, so choose what you prefer.
Serving Suggestions with Side Dishes
Pair your honey mustard glazed salmon with tasty sides. Roasted vegetables like asparagus or broccoli complement the salmon nicely. A light salad with mixed greens and a lemon vinaigrette also works well. For something hearty, serve it with fluffy rice or creamy mashed potatoes. Don’t forget to add lemon wedges for a fresh touch! These sides enhance the meal and make it more colorful.
Storage Info
How to Store Leftover Salmon
To keep leftover salmon fresh, place it in an airtight container. Make sure to cover it tightly. You can store it in the fridge for up to three days. If you want to save it longer, freezing is a good option.
Reheating Tips without Losing Flavor
When you reheat salmon, do it gently. Preheat your oven to 300°F (150°C). Place the salmon on a baking sheet and cover it with foil. This helps keep it moist. Heat for about 10-15 minutes. Check to see if it’s warm throughout. You can also use a microwave, but do it in short bursts to avoid drying it out.
Freezing Honey Mustard Glazed Salmon
If you have extra salmon, you can freeze it. First, let it cool completely. Then, wrap it tightly in plastic wrap. Place it in a freezer bag and remove as much air as possible. This keeps the salmon from getting freezer burn. You can freeze it for up to three months. When you’re ready to eat it, thaw it overnight in the fridge before reheating.
FAQs
How long should I bake salmon at 400°F?
Bake salmon at 400°F for 12 to 15 minutes. This time ensures the salmon cooks well. When the salmon flakes easily with a fork, it is done. The glaze will caramelize, adding flavor.
Can I use other types of fish for this glaze?
Yes, you can use other fish types. Try trout or tilapia for a tasty change. Both fish absorb flavors well and pair nicely with the glaze. Just adjust the cooking time based on the thickness of the fish.
What can I pair with honey mustard glazed salmon?
Pair salmon with fresh green vegetables like asparagus or broccoli. Rice or quinoa also complements the dish well. For a lighter option, serve it with a crisp salad. Lemon wedges add a nice touch of zest.
How to tell when the salmon is done cooking?
Check if the salmon flakes easily with a fork. The inside should look opaque and no longer shiny. If it’s still translucent, give it a few more minutes. A meat thermometer can help; it should read 145°F for safe eating.
This guide shared how to make delicious honey mustard glazed salmon. We covered ingredients, step-by-step baking, and tips for perfect results. You learned about variations and how to store leftovers.
Exploring this dish gives you tasty options. Enjoy your cooking and feel proud of your meal!


![- Shrimp: Use 1 pound of large shrimp. Fresh shrimp works best. Look for shrimp that is pink and firm. Avoid shrimp that smells strong or has a slimy texture. - Honey: Use pure honey for the best flavor. Clover honey or wildflower honey both work well. They add the right sweetness without being too strong. - Lime Juice: Fresh lime juice is best. It gives a bright, zesty flavor. If you use bottled lime juice, choose one with no added sugars for a true taste. - Soy Sauce: Use low-sodium soy sauce. This keeps the dish from being too salty. It adds depth without overpowering other flavors. - Fresh Cilantro: This herb adds a fresh taste. If you don’t like cilantro, try parsley as a mild substitute. - Lime Wedges: Serving lime wedges with the dish boosts the flavor. Squeezing fresh lime juice on the shrimp adds a nice zing. For the full recipe, check the details above. Start by whisking together the marinade ingredients in a bowl. This mixture includes honey, lime juice, soy sauce, minced garlic, minced ginger, and crushed red pepper flakes. Blending these ingredients well is key. It helps the flavors combine and coat the shrimp evenly. The honey adds sweetness, while lime juice gives a zesty kick. Soy sauce brings depth, and garlic and ginger add warmth. This blend will make your shrimp burst with flavor. Once you have the marinade ready, add the peeled and deveined shrimp. Make sure each shrimp gets a good coat of the marinade. Cover the bowl with plastic wrap and let it sit. The best time for marinating is 15 to 20 minutes at room temperature. This allows the shrimp to soak up the flavors. If you let it sit too long, the acid from the lime juice can change the shrimp's texture. Now it's time to cook! Heat olive oil in a large skillet over medium-high heat. Wait until the oil shimmers before adding the shrimp. This heat ensures a good sear. Add the marinated shrimp to the skillet, but remember to save any leftover marinade. Cook the shrimp for about 2 to 3 minutes without stirring. You want one side to turn pink and opaque. Flip the shrimp and cook for another 2 minutes until done. To finish, pour the reserved marinade into the skillet and let it cook for one more minute. This step helps the flavors come together. Remove the skillet from heat and season with salt and pepper. Your spicy honey lime shrimp is now ready to serve. Enjoy it warm, garnished with fresh cilantro and lime wedges. For the full recipe, refer back to the beginning! To cook shrimp just right, avoid overcooking. Shrimp turns pink and opaque when done. Look for a firm texture. If it curls tightly, it may be overcooked. Using a meat thermometer helps ensure perfect shrimp. The ideal internal temperature is 120°F. This temperature keeps your shrimp juicy and tender. To spice things up, adjust the heat levels to your liking. If you enjoy more heat, add extra crushed red pepper flakes. Start with a little and add more if needed. Consider adding aromatics for extra flavor. Garlic and ginger bring warmth. You can also try adding cumin or smoked paprika for a new twist. Use your creativity to enhance flavors you love. {{image_4}} You can try different proteins for this dish. Chicken works well if you prefer it. Tofu is a great choice for a plant-based option, absorbing flavors nicely. Just cut them into bite-sized pieces and follow the same cooking steps. For sweeteners, honey is fantastic, but maple syrup can add a nice twist. Agave syrup is another option to consider. Both alternatives will still give you that sweet touch without losing flavor. Want to switch up the citrus? You can use lemon or orange juice for a fresh taste. Both add a unique zing that pairs well with shrimp. Adjusting the spice level is easy too. If you want more heat, add extra crushed red pepper flakes. For less spice, reduce the amount or leave it out. This way, you can make the dish just how you like it! For the full recipe, check [Full Recipe]. To keep your Spicy Honey Lime Shrimp fresh, follow these tips. - Refrigerator Storage: Place leftovers in an airtight container. Use glass or plastic containers that seal well. Store the shrimp in the fridge for up to three days. Make sure they cool down before sealing to avoid moisture buildup. - Freezing Options: If you want to save shrimp for later, freezing is a great choice. Lay the shrimp flat in a single layer on a baking sheet. Freeze until solid, then transfer to a freezer-safe bag. This method prevents clumping and keeps shrimp fresh for up to three months. Reheating shrimp can be tricky. Here’s how to do it right. - Best Methods: The microwave is quick but can make shrimp rubbery. Instead, use a skillet for better results. Heat a little oil in the skillet over medium heat. Add the shrimp and cook until warmed through. - Maintaining Texture: To avoid rubbery shrimp, don’t overheat them. Just warm until they are hot but still tender. Stir gently to keep them from sticking to the pan. Enjoy your shrimp like they were just cooked! For the full recipe, check out the [Full Recipe]. You can tell shrimp is done by its color and texture. Cooked shrimp turns pink and becomes firm. They should look opaque, not translucent. The safe internal temperature for shrimp is 120°F (49°C). Use a meat thermometer for the best results. Yes, you can prep this dish ahead. Marinate the shrimp and store it in the fridge. This can last for up to 2 hours. If you want to keep it longer, freeze the marinated shrimp. Thaw in the fridge before cooking. Pair this shrimp with rice or a fresh salad. Here are some great options: - Steamed jasmine rice - Quinoa salad - Grilled vegetables - Avocado slices These sides balance the shrimp's spice and sweetness. You can also serve warm tortillas for a fun twist. Check the Full Recipe for more details! You learned how to make Spicy Honey Lime Shrimp with fresh ingredients and easy steps. We talked about the best shrimp, types of honey, and the importance of lime juice. I shared tips on marinating and cooking to get shrimp just right. Remember to check for doneness and how to store leftovers. You can also try new flavors by changing ingredients. Enjoy your dish, share it, and impress your friends. Simple cooking can lead to big smiles!](https://dishtreats.com/wp-content/uploads/2025/07/32f525eb-631f-4155-a120-c5a025aaa712-768x768.webp)


![To make Indian-spiced chickpea stew, you need fresh and flavorful ingredients. This stew brings warmth and comfort to your table. Here’s what you’ll need: - Canned chickpeas: 2 cups, thoroughly drained and rinsed - Vegetables and aromatics: - 1 medium onion, finely chopped - 2 cloves garlic, minced - 1 tablespoon fresh ginger, grated - Spices and liquids: - 1 can (14 oz) diced tomatoes with juice - 1 can (14 oz) coconut milk - 2 cups vegetable broth - 1 tablespoon curry powder - 1 teaspoon ground cumin - 1 teaspoon turmeric powder - 1/2 teaspoon red chili powder (adjust according to your heat preference) - 1 tablespoon olive oil - Salt and freshly ground black pepper, to taste - Fresh cilantro, chopped (for garnishing) These ingredients create a rich base for your stew. The chickpeas provide protein and texture. The diced tomatoes add acidity and sweetness. Coconut milk gives a creamy touch. Each spice brings its own unique flavor. You can find the full recipe [here]. Enjoy cooking! 1. Sautéing the aromatics Start by heating olive oil in a large pot over medium heat. Add the chopped onion and cook until it turns soft and golden. This should take around five minutes. Then, mix in minced garlic and grated ginger. Cook for one more minute, stirring often. You want to smell the lovely aroma from the garlic and ginger. 2. Adding spices and liquids Next, sprinkle in the curry powder, ground cumin, turmeric powder, and red chili powder. Stir until the onion is coated with these spices. Let them cook for two minutes. This step makes the flavors pop! Now, pour in the diced tomatoes with their juice, followed by the creamy coconut milk and vegetable broth. Mix everything well to combine. 3. Simmering the stew Gently fold in the rinsed chickpeas. Add salt and black pepper to taste. Bring the stew to a gentle simmer. Once simmering, lower the heat, cover the pot, and let it cook for 20 to 25 minutes. Stir occasionally to keep it from sticking. After cooking, taste and tweak the seasoning. If you want it thicker, mash a few chickpeas against the pot. Garnish with fresh cilantro before serving. Enjoy your delicious Indian-spiced chickpea stew! For the full recipe, refer back to the ingredients section. - Ensuring the perfect texture: To get that creamy and thick stew, you should mash some chickpeas. This adds a nice body. Stir gently while mashing to keep some whole. - Adjusting spice levels: If you want more heat, add more red chili powder. Start with a little, then taste and add more if needed. For less spice, cut the chili powder in half. - Enhancing flavor with garnishes: Fresh cilantro adds color and brightness to the stew. Just chop it up and sprinkle it on top before serving. You can also add a squeeze of lime for extra zing. These tips will help you craft a comforting dish. For the complete cooking process, check the Full Recipe. {{image_4}} You can easily change this stew to fit your taste. - Using different legumes or vegetables: If you don’t have chickpeas, try black beans or lentils. You can also add sweet potatoes, carrots, or spinach for more nutrients. - Dairy-free options: The coconut milk gives a rich taste, but you can swap it with almond or soy milk. This keeps the stew creamy without dairy. - Additional spices to suit taste: If you want more heat, add cayenne pepper or fresh chili. For a different flavor, try garam masala or coriander. Play around with spices to find your perfect blend. Feel free to explore these options! Every change can make your stew unique and delicious. Want to try the original? Check out the Full Recipe for the classic dish. To keep your Indian-spiced chickpea stew fresh, let it cool first. This step is key. Place the pot on a cool surface. Give it about 30 minutes to reach room temperature. Use airtight containers for storage. Glass containers work well. They keep the flavors locked in. You can also use plastic containers, but make sure they are BPA-free. When ready to reheat, take the stew from the fridge. Pour it into a pot. Heat it on medium-low. Stir often to stop it from sticking. If it seems thick, add a splash of vegetable broth or water. Heat until it's warm, about 5 to 10 minutes. For safe eating, ensure it reaches at least 165°F. This way, you'll enjoy the stew's warmth and flavor again! For the full recipe, check out the Spicy Indian Chickpea Stew 🥘. Yes, you can freeze this stew. Let it cool first. Then, put it in a safe container. Leave some space at the top for expansion. It stays good for about three months. To thicken your stew, mash some chickpeas. Use the back of a spoon against the pot. You can also simmer it longer. This helps reduce the liquid and makes it thicker. You can serve this stew with rice or naan. Both soak up the flavors well. A side salad or yogurt adds a nice touch too. Enjoy experimenting with different pairings! For the complete recipe, check out the [Full Recipe]. This blog post covered how to make a tasty Indian-spiced chickpea stew. We explored key ingredients like canned chickpeas, various vegetables, and spices. I shared step-by-step instructions for cooking, along with helpful tips for texture and flavor. You learned about fun ingredient variations and how to store leftovers properly. In conclusion, this stew is simple to make and packed with flavor. Feel free to get creative with your ingredients. Enjoy your cooking!](https://dishtreats.com/wp-content/uploads/2025/06/561fcdd4-13bb-4dd2-b7b4-b44f6a9d9028-768x768.webp)