Honey Lime Chicken Kebabs Flavorful and Easy Recipe

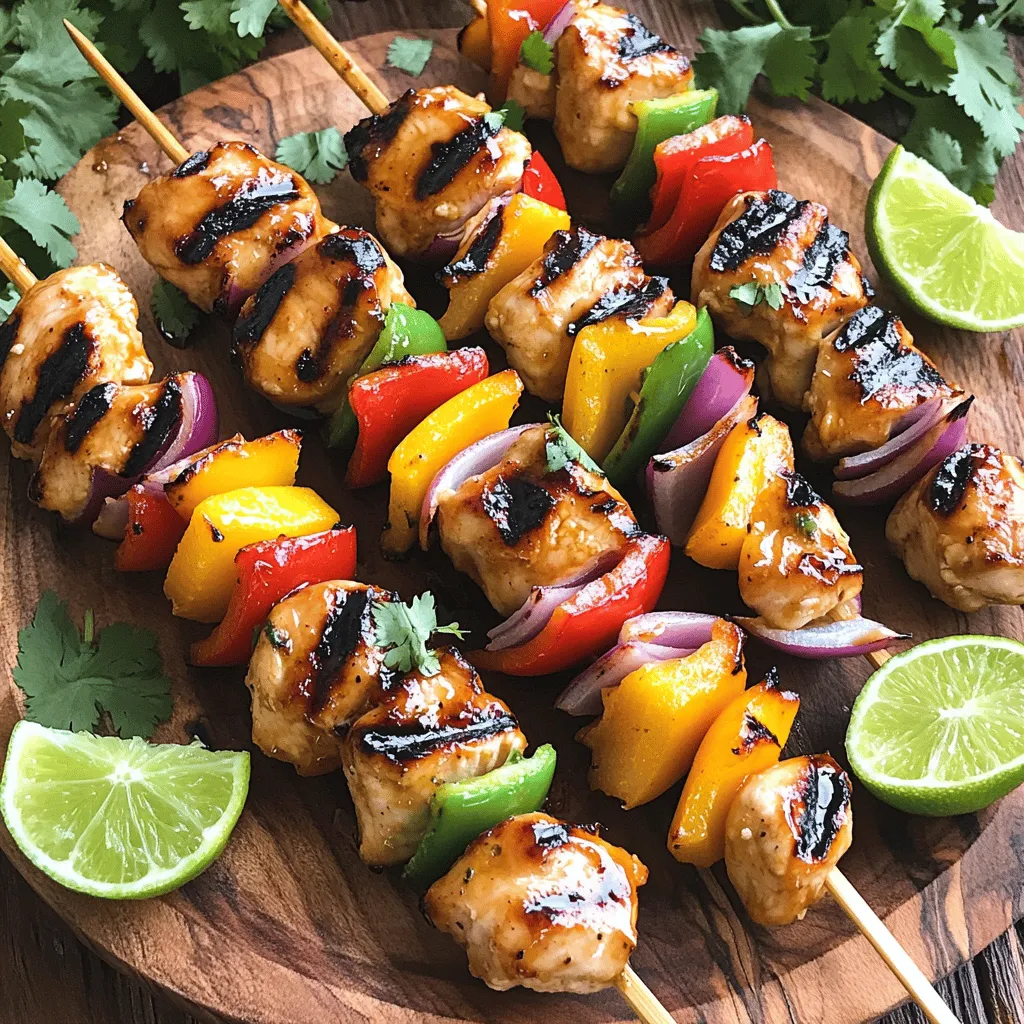
Are you ready to spice up your dinner routine? With my Honey Lime Chicken Kebabs, you can pack flavor and fun into one simple recipe! This dish features juicy chicken marinated in a sweet and tangy mix that will have your taste buds dancing. Whether you’re grilling for family or friends, these kebabs are a sure hit. Let’s dive into the exciting ingredients and the step-by-step guide to make this dish shine!
Ingredients
Main Ingredients for Honey Lime Chicken Kebabs
To make honey lime chicken kebabs, gather these key items:
- 1 lb boneless chicken breast, cut into 1-inch cubes
- 1/4 cup honey
- 1/4 cup freshly squeezed lime juice (about 2 limes)
- 2 tablespoons extra virgin olive oil
- 2 garlic cloves, finely minced
- 1 teaspoon ground cumin
- 1 teaspoon chili powder
- Salt and freshly ground black pepper, to taste
These ingredients create a sweet and tangy flavor. They make the chicken juicy and tasty.
Marinade Components
The marinade is the heart of this dish. It adds rich flavor to the chicken. Here’s what you need for the marinade:
- Honey
- Fresh lime juice
- Extra virgin olive oil
- Minced garlic
- Ground cumin
- Chili powder
- Salt and black pepper
Mix these well in a bowl. This mix helps the chicken soak in all the flavors. The longer you marinate, the better the taste.
Vegetables to Use
Adding vegetables boosts color and taste. I suggest using:
- 1 red bell pepper, cut into 1-inch pieces
- 1 yellow bell pepper, cut into 1-inch pieces
- 1 red onion, cut into 1-inch pieces
These colorful veggies not only look good but also add fresh crunch. You can swap them for your favorites. Just keep the size similar for even cooking.
Step-by-Step Instructions
Preparing the Marinade
To start, gather your ingredients for the marinade. In a large mixing bowl, combine:
- 1/4 cup honey
- 1/4 cup freshly squeezed lime juice
- 2 tablespoons extra virgin olive oil
- 2 minced garlic cloves
- 1 teaspoon ground cumin
- 1 teaspoon chili powder
- Salt and freshly ground black pepper
Whisk these ingredients together until they blend into a smooth marinade. The honey adds sweetness, while the lime gives it a bright zing.
Marinating the Chicken
Next, let’s marinate the chicken. Cut 1 pound of boneless chicken breast into 1-inch cubes. Add the chicken to the marinade, making sure each piece is coated well. Cover the bowl with plastic wrap and put it in the fridge. It’s best to let it sit for at least 30 minutes, but 2 to 4 hours is even better. This helps the chicken soak up all those yummy flavors.
Assembling the Kebabs
Now, it’s time to assemble the kebabs. Take the marinated chicken out of the fridge. Gather your colorful veggies:
- 1 red bell pepper, cut into 1-inch pieces
- 1 yellow bell pepper, cut into 1-inch pieces
- 1 red onion, cut into 1-inch pieces
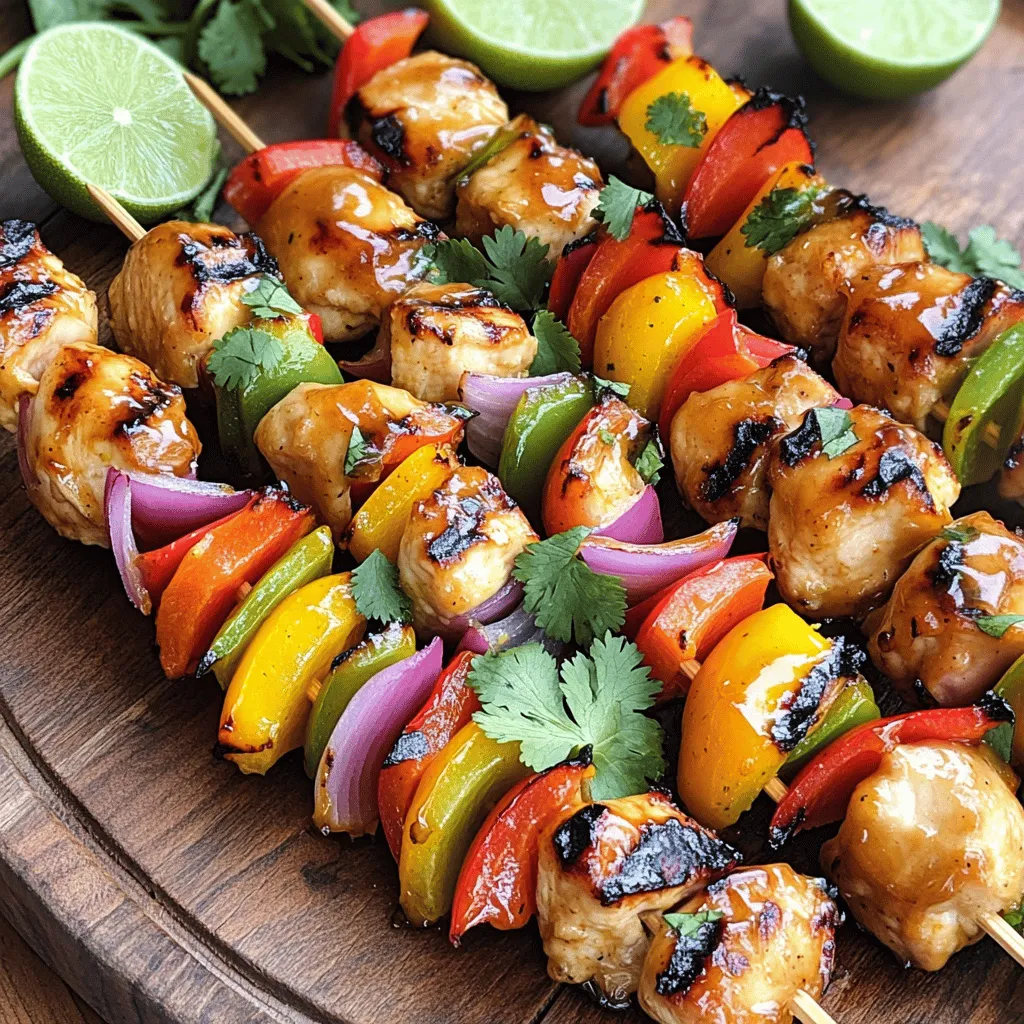
On your skewers, alternate threading pieces of chicken with the bell peppers and onion. This makes the dish look vibrant and tasty.
Grilling the Kebabs
Preheat your grill to medium-high heat. Once hot, place the skewers on the grill. Cook the kebabs for about 10 to 12 minutes. Remember to turn them occasionally. The chicken should no longer be pink inside and reach an internal temperature of 165°F (75°C). The grill marks add a nice touch!
Resting Before Serving
After grilling, remove the kebabs from the grill. Let them rest for a few minutes. This helps the juices stay inside the chicken. Now, you can serve your delicious Honey Lime Chicken Kebabs. Enjoy the tasty flavors and colorful presentation!
Tips & Tricks
Best Practices for Marinating Chicken
To get the best flavor from your chicken, marinate it well. Mix honey, lime juice, olive oil, garlic, cumin, chili powder, salt, and pepper in a bowl. Whisk until smooth. Add cubed chicken and coat every piece. Cover the bowl and chill in the fridge. Let it sit for at least 30 minutes. For the best taste, aim for 2-4 hours. This time helps the flavors seep in deeply.
How to Grill Chicken Kebabs Perfectly
Preheat your grill to medium-high heat before cooking. This helps create nice grill marks. When placing the skewers on the grill, keep an eye on them. Cook for about 10-12 minutes, turning occasionally. You want the chicken to reach an internal temp of 165°F (75°C) and be no longer pink inside. This ensures juicy and tasty kebabs.
Presentation Tips for Serving
Serving is key to impressing your guests. Arrange the kebabs on a large platter. Add fresh cilantro for color and flavor. Place lime wedges around the dish. This not only brightens the look but gives a zesty touch. A beautiful presentation makes the meal more appealing.
Using Fresh Ingredients for Enhanced Flavor
Always use fresh ingredients for the best taste. Fresh limes give a bright zing. Colorful bell peppers add sweetness and crunch. Choosing high-quality chicken makes a huge difference in flavor. Fresh garlic enhances the marinade’s taste. When you use fresh ingredients, your kebabs will shine with flavor and appeal.

Variations
Substituting Proteins
You can switch the chicken for other proteins. Shrimp works well. It cooks fast and soaks up flavor. Tofu is a great choice for a plant-based option. Just press it first to remove excess water. Beef or pork can also work if you cut them into small pieces. Each protein will add its own taste to the kebabs.
Using Different Vegetables
Feel free to mix up the veggies you use. Zucchini and cherry tomatoes add great color and flavor. Mushrooms bring a nice umami taste. You can even try adding pineapple for a sweet touch. The key is to cut the vegetables into similar sizes for even cooking. This will make your kebabs look and taste amazing.
Flavor Boosters and Additional Seasonings
Want to kick up the flavor? Try adding fresh herbs like cilantro or parsley. A pinch of red pepper flakes can add spice. You can also use a splash of soy sauce for extra depth. Don’t forget to play with the marinade. Adding ginger or lime zest will enhance the taste. Each change can make your kebabs unique and delicious.
Storage Info
Storing Leftover Kebabs
Leftover honey lime chicken kebabs are easy to store. First, let the kebabs cool completely. Then, place them in an airtight container. Store them in the fridge for up to three days. Make sure to keep the kebabs away from strong odors. This helps keep their sweet and tangy flavor.
Reheating Tips
When you want to eat your leftover kebabs, you have a few options. You can reheat them in the microwave. Just place them on a plate and cover them with a damp paper towel. Heat for 1-2 minutes until warm. You can also reheat them on the grill. This brings back the nice grill marks and flavor. Heat them for about 5 minutes, turning often to avoid burning.
Freezing Options for Prepared Kebabs
If you want to save kebabs for later, freezing is a great choice. Place the cooled kebabs in a freezer-safe bag. Squeeze out as much air as possible before sealing. You can freeze them for up to three months. When you’re ready to eat, thaw them in the fridge overnight before reheating. This way, you can enjoy tasty kebabs anytime!
FAQs
How long should I marinate chicken for kebabs?
You should marinate the chicken for at least 30 minutes. This helps the chicken soak up the flavors. For the best taste, try to marinate for 2 to 4 hours. This longer time lets the marinade work its magic.
Can I make honey lime chicken kebabs in the oven?
Yes, you can make these kebabs in the oven. Preheat your oven to 400°F (200°C). Place the skewers on a baking sheet. Cook for about 15 to 20 minutes. Turn the kebabs halfway through for even cooking.
What can I serve with honey lime chicken kebabs?
You can serve honey lime chicken kebabs with many sides. Try rice or quinoa for a nice base. Grilled veggies also pair well. A fresh salad adds crunch. Don’t forget some lime wedges for extra zing!
How do I know when the chicken kebabs are done?
Check the chicken’s color to see if it is done. The meat should not be pink in the center. The chicken should reach an internal temperature of 165°F (75°C). Use a meat thermometer for accuracy.
Honey lime chicken kebabs are easy to make and full of flavor. You learned about the main ingredients, marinade, and the best vegetables to use. I shared step-by-step instructions on prepping, marinating, assembling, and grilling the kebabs. Plus, I provided tips for perfect grilling and serving.
Remember, you can switch up proteins and veggies for variety. Store any leftovers properly, and don’t forget to check the FAQs for more help. Enjoy your delicious, homemade kebabs!


![To make this dish, you need a few key items. These ingredients work together for great flavor. Here’s what you will need: - 4 chicken thighs, bone-in and skin-on - 1/4 cup honey - 1/4 cup low-sodium soy sauce - 4 cloves garlic, finely minced - 1 tablespoon fresh ginger, grated - 1 teaspoon sesame oil - 1 tablespoon olive oil - Salt and freshly ground black pepper to taste While the main ingredients shine, you can add optional items for extra flavor. Try using these to enhance your dish: - A splash of rice vinegar for acidity - A pinch of red pepper flakes for heat - Fresh herbs like cilantro or parsley for freshness Presentation matters when serving food! Beautiful garnishes make a dish pop. Here’s what to top your chicken with: - 2 green onions, finely sliced - Sesame seeds for a crunchy finish First, grab a medium mixing bowl. Add 1/4 cup honey, 1/4 cup low-sodium soy sauce, 4 minced garlic cloves, 1 tablespoon of grated ginger, and 1 teaspoon of sesame oil. Whisk them together until mixed well. This sweet and savory blend will become your marinade and glaze. It infuses the chicken thighs with tasty flavor. Next, season the chicken thighs. Use salt and freshly ground black pepper on both sides. Heat 1 tablespoon of olive oil in a large skillet over medium-high heat. Once hot, place the chicken thighs skin-side down. Let them sear for about 6-8 minutes. You want that skin golden brown and crispy. This step adds great texture and taste. After searing, flip the chicken thighs. Pour the honey garlic mixture over them. Let it simmer gently, coating the chicken in flavor. Cover the skillet and reduce the heat. Cook for 15-20 minutes until the chicken reaches 165°F (75°C) inside. When the chicken is ready, remove the lid. Turn the heat back up to medium-high. Let the sauce simmer for 5 minutes, stirring often. This will thicken the sauce, helping it stick to the chicken. Once thickened, take the skillet off the heat. Allow the chicken to rest for a few minutes. This lets the juices settle, keeping the meat tender. Serve the chicken on a platter, drizzling the sauce over the top. Add a sprinkle of sliced green onions and sesame seeds for a bright finish. Enjoy your Honey Garlic Chicken Thighs! For the full recipe, refer to [Full Recipe]. To get crispy skin, start with bone-in, skin-on chicken thighs. Pat the skin dry with paper towels. This step removes moisture and helps the skin crisp up nicely. Heat olive oil in a hot skillet before adding the chicken. Sear it skin-side down for 6-8 minutes. Resist the urge to move the chicken too much. Let it cook undisturbed for a golden crust. For tender chicken, season it well with salt and pepper. This enhances flavor and locks in moisture. When cooking, keep an eye on the internal temperature. Aim for 165°F (75°C) to ensure it’s fully cooked. Let the chicken rest after cooking. This lets the juices settle back in, making each bite juicy and satisfying. Honey garlic chicken pairs well with several sides. Try serving it with steamed rice for a classic combo. The rice soaks up the tasty sauce. You can also serve it with a fresh green salad. The crunch of the veggies complements the soft chicken perfectly. Roasted vegetables add color and flavor, making for a well-rounded meal. For the full recipe, check out [Full Recipe]. {{image_4}} You can change the taste of honey garlic chicken thighs by swapping some ingredients. For a fruitier twist, try using maple syrup instead of honey. This will give your dish a rich, deep flavor. You can also replace soy sauce with coconut aminos for a gluten-free option. If you like citrus, add some fresh orange juice to the marinade. It brightens the flavor and adds a zesty note. While chicken thighs are juicy, you can use other cuts too. Chicken breasts work well if you prefer leaner meat. Just remember, they may dry out faster, so watch the cooking time. Drumsticks are another tasty option. They are fun to eat and stay moist during cooking. Whichever cut you choose, make sure it is about the same size for even cooking. Want some heat? It's easy to spice things up! Add red pepper flakes or sriracha to the marinade for a kick. You can also use fresh jalapeños or chili paste for a bolder flavor. Adjust the amount based on your heat tolerance. If you love spicy food, this will make your honey garlic chicken thighs truly exciting. For the full recipe, check out the [Full Recipe]. Store your honey garlic chicken thighs in an airtight container. Make sure to let them cool to room temperature first. They will stay fresh in the fridge for up to 3 days. This keeps the flavors intact and ensures the chicken remains juicy. To reheat, place the chicken thighs in a skillet over low heat. Cover the skillet to keep moisture in. Heat until warmed through, about 5-10 minutes. You can also microwave them, but cover the dish to prevent drying out. You can freeze the chicken thighs for later use. Wrap each thigh in plastic wrap, then place them in a freezer bag. They will last for about 2-3 months in the freezer. Thaw them in the fridge overnight before reheating. This method keeps the chicken tasty and tender. For the full recipe, refer to the section above. You should cook chicken thighs for about 20-25 minutes. Start by searing them for 6-8 minutes on the skin side. Then, flip them over and pour the sauce on top. Cover the skillet and let them simmer for 15-20 minutes. This method helps keep the meat juicy and full of flavor. Yes, you can use boneless chicken thighs. They will cook faster than bone-in thighs. Sear them for about 5-7 minutes on each side. Make sure to check their internal temperature. It should reach 165°F (75°C) to be safe to eat. The best way to check if the chicken is done is with a meat thermometer. Insert it into the thickest part of the thigh. When it reads 165°F (75°C), the chicken is ready. You can also cut into the meat. If the juices run clear, it’s cooked. To adjust the sweetness, add more honey for a sweeter taste. If you want it less sweet, add more soy sauce or a splash of vinegar. Taste the sauce as you go. This way, you can find the perfect balance for your dish. For the full recipe, please check the [Full Recipe]. Honey garlic chicken thighs are simple and tasty. We covered the key ingredients and optional marinades. You learned how to prepare the marinade and cook the chicken. I shared tips for crispy skin, tender meat, and delicious sides. We also explored variations and storage tips to keep your meals fresh. When you try this recipe, it will impress your family and friends. Enjoy the rich flavors and make it your own!](https://dishtreats.com/wp-content/uploads/2025/06/32d13aa5-8be9-48e3-be5a-1699ade8ce81-768x768.webp)


![- 2 cups cooked chicken, shredded - 4 cups mixed salad greens - 1 cup cherry tomatoes - 1 cup corn - 1 ripe avocado - 1/2 cup red onion - 1 cup shredded cheddar cheese - 1/2 cup ranch dressing - BBQ sauce - Salt and freshly ground black pepper - Crispy tortilla strips, fresh cilantro leaves When making BBQ Ranch Chicken Salad, start with fresh, quality ingredients. The chicken brings protein and heartiness. I love using shredded chicken that is moist and flavorful. Mixed salad greens add crunch and color. You can choose your favorites like romaine, arugula, or baby spinach. Cherry tomatoes bring sweetness. Always cut them in half to make them easy to eat. Corn adds a pop of sweetness too, and you can use canned or fresh. I prefer fresh corn when it’s in season for the best taste. The avocado adds creaminess. A ripe avocado makes the salad smooth and rich. Red onion gives a nice bite. Keep it thinly sliced so it does not overpower. Shredded cheddar cheese adds a delightful sharpness, making each bite even tastier. The ranch dressing is creamy and tangy, tying everything together. Pair it with BBQ sauce for a smoky flavor boost. This combo is truly delicious. For seasoning, use salt and freshly ground black pepper. These simple touches really enhance the flavors. Lastly, crispy tortilla strips add a fun crunch. Fresh cilantro leaves not only look great but also add a fresh taste. You can find the full recipe [Full Recipe]. Enjoy mixing these ingredients for a vibrant, tasty salad! - Combine shredded chicken with BBQ sauce. - Use a large bowl for easy mixing. - Season with salt and black pepper to taste. - Mix until the chicken is fully coated. This step is key. The BBQ sauce gives the chicken a sweet and smoky flavor. It makes the salad pop with taste. - Create the salad base with mixed greens. - Spread the greens evenly in a large bowl. - Layer fresh ingredients: tomatoes, corn, avocado, and onion. - Arrange each ingredient for a colorful look. The vibrant colors make the salad appealing. Each bite brings a different taste, making it fun to eat! - Top with BBQ chicken and cheddar cheese. - Spoon the chicken evenly over the fresh veggies. - Drizzle with ranch dressing, adjusting to your liking. - Toss gently with clean hands or tongs to mix. This salad is now ready to impress! The creamy ranch dressing and savory chicken blend perfectly. Check the [Full Recipe] for more tips! To make your BBQ Ranch Chicken Salad shine, adjust the ranch dressing to your taste. If you love creamy flavors, add more dressing. For a lighter touch, use less. This lets you control how rich the salad feels. Make sure all ingredients mix well. This way, each bite has a bit of everything. An even spread of chicken, veggies, and cheese creates balance. For a lovely presentation, serve the salad in individual bowls or on a large platter. This makes it easy for everyone to take their share. Add some cilantro leaves and crispy tortilla strips on top. These toppings not only look great but also add flavor and crunch. A colorful display of greens and toppings makes the salad more appealing. Feel free to experiment with different seasonings. A dash of chili powder can add a nice kick. You might also try garlic powder or smoked paprika for depth. Also, think about adding extra ingredients for more variety. Black beans, diced peppers, or even fresh corn can bring new tastes. Each addition offers a chance to create your perfect salad blend. For more details on making this delicious salad, check out the Full Recipe. {{image_4}} You can easily change the protein in this salad. If you want a different taste, use pulled pork or tofu instead of chicken. Both options add great flavor. For a seafood twist, grilled shrimp works well. The shrimp adds a nice, light touch to the salad. While ranch dressing is a favorite, you can swap it out. Blue cheese dressing gives a strong flavor. A vinaigrette adds a tangy kick that brightens the salad. You can also make your own dressing blends. Mix yogurt with herbs for a fresh taste. Don't be afraid to add more veggies. Bell peppers, cucumbers, and radishes give a nice crunch. You can also roast vegetables like zucchini or carrots. Roasting adds a warm, rich taste that contrasts nicely with the cool salad. For a full recipe, check out the BBQ Ranch Chicken Salad with a Crunchy Twist. Store your BBQ Ranch Chicken Salad in an airtight container. This keeps it fresh and tasty. For best results, eat it within 2-3 days. The longer it sits, the soggier it may get. If you want to freeze some, consider freezing the chicken separately. This helps keep the chicken tasty when you eat it later. Avoid freezing the salad with dressing. The dressing makes the greens soggy, and nobody likes that! To refresh your leftovers, toss them with fresh greens. This adds crunch and makes it feel new again. If you want to reheat the BBQ chicken, do it separately. This keeps it warm without making the salad wilt. To make BBQ Ranch Chicken Salad, follow these simple steps: 1. Prepare the BBQ Chicken: Mix shredded chicken with BBQ sauce in a big bowl. Add salt and black pepper. Stir until the chicken is well coated. 2. Build the Salad Base: In another large bowl, spread the mixed greens evenly. This is your salad's base. 3. Layer Fresh Ingredients: Add halved cherry tomatoes, corn, diced avocado, and sliced red onion on top of the greens. This creates a colorful layer. 4. Top with BBQ Chicken: Spoon the BBQ chicken evenly over the fresh layers. This ensures every bite has flavor. 5. Add Creamy Cheese: Sprinkle shredded cheddar cheese over the salad. Let it melt slightly into the warm chicken. 6. Drizzle with Dressing: Pour ranch dressing over the salad. Adjust the amount to fit your taste. 7. Toss Gently: Use clean hands or tongs to mix everything. Make sure the ranch dressing coats all the ingredients. 8. Taste Test: Before serving, taste the salad. Add more salt or black pepper if needed. 9. Add Crunch and Garnish: Top with crispy tortilla strips and fresh cilantro for a nice finish. This process makes a delicious and colorful salad. For the complete recipe, check the Full Recipe above. Yes, you can prep this salad ahead of time. Here are some tips: - Cook the Chicken: You can cook and shred the chicken a day in advance. Store it in the fridge with BBQ sauce. - Chop Veggies: Cut the vegetables, like tomatoes and onions, a few hours before serving. Keep them in airtight containers. - Store Dressing Separately: Keep the ranch dressing separate until serving. This keeps the greens fresh and crisp. - Combine Before Serving: Mix everything together just before you eat. This keeps your salad from becoming soggy. This BBQ Ranch Chicken Salad goes great with several side dishes. Here are some ideas: - Crusty Bread: A nice loaf of bread pairs well and adds a hearty touch. - Chips: Tortilla chips or potato chips add crunch and fun. - Fruit Salad: A fresh fruit salad adds sweetness and a refreshing taste. - Grilled Veggies: Grilled vegetables complement the salad's flavors. - Coleslaw: A crunchy coleslaw gives a nice contrast to the salad. These sides enhance your BBQ Ranch Chicken Salad experience. Enjoy! We explored a tasty BBQ Ranch Chicken Salad. You learned about the main and optional ingredients, along with step-by-step instructions for making it. You also picked up tips for perfecting the salad and ideas for variations. Don’t forget to check the storage info for leftovers. This salad is easy to adjust, making it a fun dish for everyone. Enjoy this recipe and make it your own!](https://dishtreats.com/wp-content/uploads/2025/07/4c564630-ecab-497d-8bae-b951c19ef4f1-768x768.webp)