Honey Lime Chicken Enchiladas Flavorful Dinner Idea

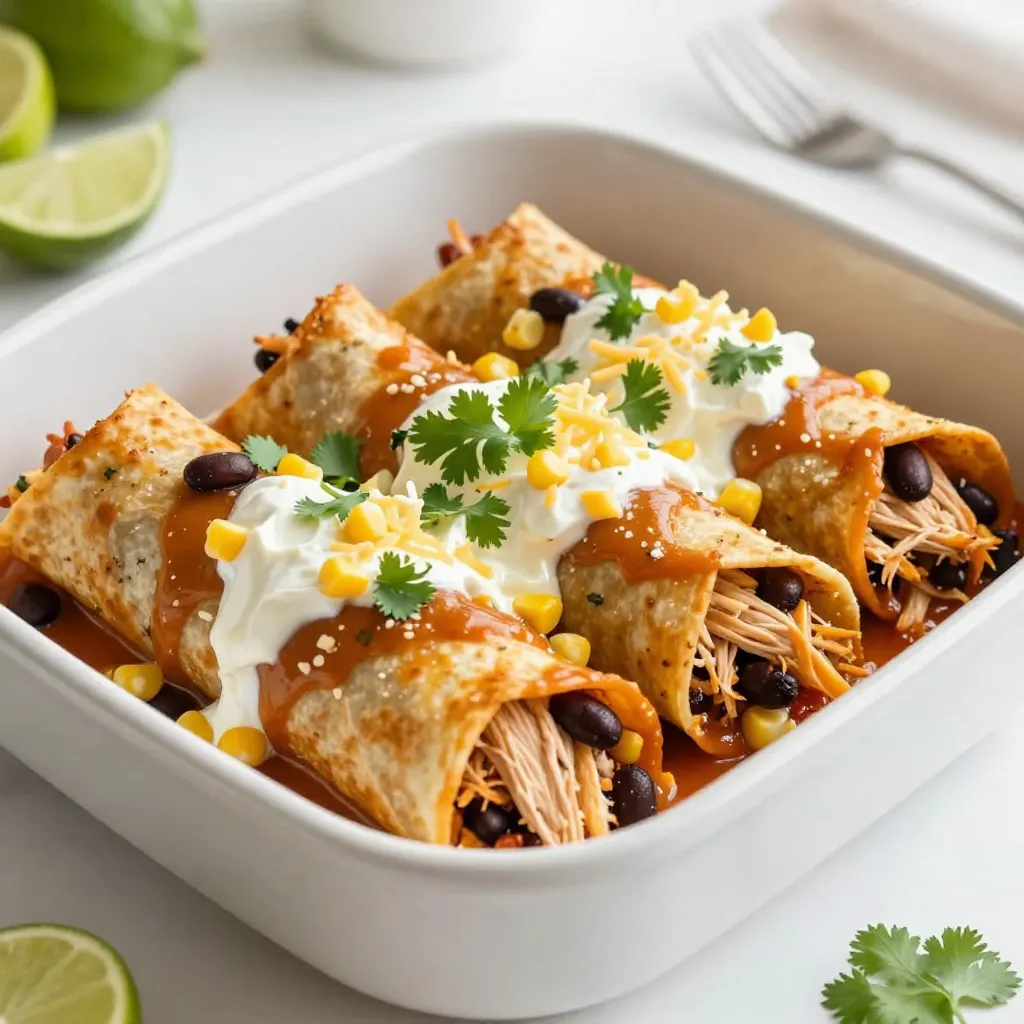
Looking for a quick, tasty dinner that impresses? Try my Honey Lime Chicken Enchiladas! These are packed with flavor from honey, lime, and a mix of spices. With ingredients like shredded chicken, black beans, and yummy cheese, they’re easy to make and fun to eat. Plus, I’ll share tips for the perfect filling and options for spice lovers. Let’s dive into this delightful recipe for a flavorful dinner idea!
Why I Love This Recipe
- Delicious Flavor Combination: The sweet honey and zesty lime create a unique flavor profile that elevates traditional enchiladas to a whole new level.
- Easy to Prepare: This recipe is simple and quick to make, perfect for busy weeknights when you want something tasty without spending hours in the kitchen.
- Customizable Ingredients: Feel free to swap out ingredients based on your preferences or what you have on hand, making it a versatile dish for everyone.
- Kid-Friendly: With its cheesy goodness and mild flavors, kids love these enchiladas, making it a great family dinner option.
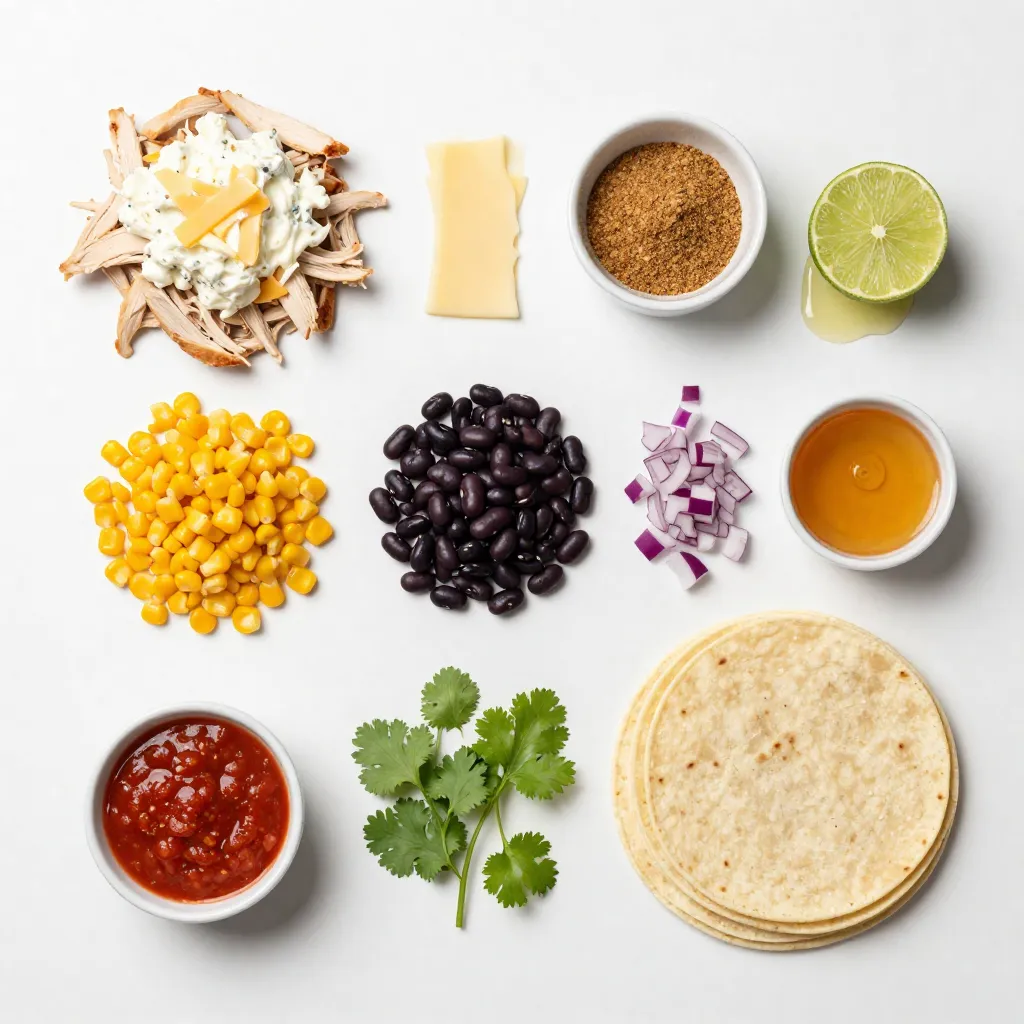
Ingredients
Main Ingredients Needed
- 2 cups cooked chicken, shredded
- 1 cup creamy queso fresco or Monterey Jack cheese, shredded
- 1 cup corn kernels, fresh or frozen
- ½ cup black beans, rinsed and drained
- ½ cup red onion, finely diced
Spices and Other Flavorings
- 1 teaspoon ground cumin
- 1 teaspoon chili powder
- 2 tablespoons honey
- 2 tablespoons fresh lime juice
Tortillas and Sauce
- 8 small corn tortillas
- 1 cup enchilada sauce, store-bought or homemade
- Garnish options: fresh cilantro, salt, and pepper
The main ingredients form the base of your enchiladas. Cooked shredded chicken adds protein and flavor. Queso fresco or Monterey Jack cheese gives a creamy texture. Corn kernels bring sweetness, while black beans add heartiness. Red onion gives a nice crunch and sharpness.
The spices and flavorings elevate your dish. Ground cumin and chili powder provide warmth. Honey adds sweetness, and fresh lime juice brightens the flavors.
Corn tortillas are essential for wrapping your filling. Enchilada sauce ties everything together, adding moisture and depth. Garnish with fresh cilantro, salt, and pepper for a fresh finish. This combination creates a balance of flavors and textures, making each bite delightful.

Step-by-Step Instructions
Prepping the Oven and Ingredients
First, preheat your oven to 375°F (190°C). This step helps cook the enchiladas evenly. In a large bowl, combine the filling ingredients. Mix together 2 cups of shredded chicken, ½ cup of shredded queso fresco, 1 cup of corn kernels, and ½ cup of black beans. Then, add ½ cup of finely diced red onion. Sprinkle in 1 teaspoon of ground cumin, 1 teaspoon of chili powder, 2 tablespoons of honey, and 2 tablespoons of fresh lime juice. Season with salt and pepper, then mix well.
Preparing the Tortillas
To prepare the tortillas, warm them slightly. You can use a skillet or microwave for this. Heat them for about 15-30 seconds until they become soft and easy to roll.
Assembling the Enchiladas
Now it’s time to assemble the enchiladas. Spread about ½ cup of enchilada sauce evenly on the bottom of a 9×13 inch baking dish. This step keeps the enchiladas from sticking. Take one tortilla and fill it with about ¼ cup of the chicken mixture. Roll it up tightly and place it seam-side down in the dish. Repeat this process until all tortillas are filled and in the dish. Pour the remaining enchilada sauce over the top, making sure each enchilada is covered. Sprinkle the rest of the queso fresco on top.
Baking Process
Cover the baking dish with aluminum foil. This keeps moisture in while baking. Bake in the preheated oven for 20 minutes. After that, remove the foil and bake uncovered for another 10 minutes. This helps the cheese become bubbly and golden. Once done, take the enchiladas out and let them cool for a few minutes. Before serving, garnish with chopped fresh cilantro.
Tips & Tricks
Perfecting the Chicken Filling
To make a tasty chicken filling, start with good seasoning. Use ground cumin and chili powder for flavor. You can also add garlic powder or onion powder for extra taste. If you want to change it up, try using shredded beef or roasted vegetables. You can mix in diced bell peppers or even spinach for a fresh twist.
Cooking Techniques
Softening the tortillas is key for easy rolling. Heat them in a skillet for about 15 seconds on each side or microwave them for 15-30 seconds. This makes them soft and easy to work with. For even baking, cover the dish with foil at first. This keeps moisture in and helps the cheese melt well. Remove the foil later to make the top golden and crispy.
Serving Suggestions
For a beautiful presentation, serve the enchiladas on a colorful plate. Add a sprinkle of fresh cilantro on top for color. You can also place lime wedges on the side for a burst of flavor. A dollop of sour cream adds creaminess and pairs well with the dish. Enjoy your meal!
Pro Tips
- Use Fresh Ingredients: For the best flavor, opt for fresh lime juice and high-quality honey. Fresh ingredients elevate the taste of your enchiladas.
- Customize Your Fillings: Feel free to add other ingredients like bell peppers, spinach, or even jalapeños for an extra kick. Make it your own!
- Perfect Tortilla Texture: Soften your tortillas before filling by lightly frying them in oil or microwaving them wrapped in a damp paper towel for a few seconds.
- Let Them Rest: Allow the enchiladas to sit for a few minutes after baking. This helps the flavors meld and makes them easier to serve.
Variations
Vegetarian Option
You can easily make these enchiladas vegetarian. Just swap the chicken for beans or vegetables. Black beans work well for protein and texture. You can also add bell peppers, zucchini, or spinach for extra flavor and nutrients. This option keeps the dish colorful and satisfying.
Spice Level Adjustment
Want more heat? Add some jalapeños or a pinch of cayenne pepper to the filling. For less spice, skip the chili powder or use mild spices. You can also serve with sour cream to cool it down. Adjusting the heat lets you customize the dish for your taste.
Different Cheeses
Experiment with different cheeses to change the flavor. Cheddar adds a sharp taste, while pepper jack brings a spicy kick. You could also use a mix of cheeses for a creamier filling. Each cheese variation gives a unique twist to your enchiladas.
Storage Info
Storing Leftovers
To keep your Honey Lime Chicken Enchiladas fresh, store them in an airtight container. Place them in the fridge within two hours after cooking. This helps prevent bacteria growth. They should stay good for about three to four days. If you want to keep them longer, freezing is the best option.
How to Reheat Enchiladas
When it’s time to eat leftovers, you can reheat them easily. The best method is using an oven. Preheat the oven to 350°F (175°C). Place the enchiladas in a baking dish and cover with foil. Heat for about 15-20 minutes or until warmed through. You can also use a microwave. Heat them for about 1-2 minutes, checking to avoid drying them out.
Freezing Options
Yes, you can freeze these enchiladas! They freeze well and maintain their tasty flavor. To freeze, let them cool completely first. Then, wrap each enchilada in plastic wrap and place them in a freezer-safe bag. They can last up to three months in the freezer. When you’re ready to eat, thaw them in the fridge overnight before reheating. Enjoy your delicious meal anytime!
FAQs
How do I make homemade enchilada sauce?
To make quick enchilada sauce, you need a few simple ingredients. Here’s a fast recipe:
- 1 can of tomato sauce (15 oz)
- 1 cup of chicken broth
- 1 teaspoon of chili powder
- 1 teaspoon of ground cumin
- 1 teaspoon of garlic powder
- Salt and pepper to taste
1. In a pot, combine all the ingredients.
2. Stir well and bring to a simmer.
3. Let it cook for about 10 minutes.
4. Adjust seasoning as needed.
This sauce is rich and tasty. Use it to pour over your enchiladas for extra flavor.
Can these enchiladas be made ahead of time?
Yes, you can prep these enchiladas ahead of time. Here are some tips:
- Make the filling: You can prepare the chicken filling a day before. Store it in an airtight container in the fridge.
- Assemble before baking: You can fill the tortillas and place them in the baking dish. Just cover the dish with foil and refrigerate.
- Bake later: When you are ready to eat, pour the sauce over and bake. This saves time on busy nights.
What sides go well with Honey Lime Chicken Enchiladas?
Many sides pair nicely with these enchiladas. Here are some popular options:
- Mexican rice: A classic choice that complements the flavors.
- Refried beans: Creamy and hearty, they work well.
- Guacamole: Fresh and creamy, it adds a nice touch.
- Corn salad: Light and refreshing, it balances the meal.
These sides enhance the meal and make it more filling. Enjoy your delicious dinner!
You’ve learned how to make tasty Honey Lime Chicken Enchiladas. We covered the key ingredients, from chicken to cheese, spices, and tortillas. I shared step-by-step instructions, tips for the perfect filling, and ways to store leftovers. You also discovered fun variations and answers to common questions.
Now, you can create this dish at home with confidence. Enjoy making and sharing these enchiladas with friends and famil

Honey Lime Chicken Enchiladas
Ingredients
- 2 cups cooked chicken, shredded
- 1 cup creamy queso fresco (or Monterey Jack cheese), shredded
- 1 cup corn kernels (fresh or frozen)
- ½ cup black beans, rinsed and drained
- ½ cup red onion, finely diced
- 1 teaspoon ground cumin
- 1 teaspoon chili powder
- 2 tablespoons honey
- 2 tablespoons fresh lime juice
- 8 small corn tortillas
- 1 cup enchilada sauce (store-bought or homemade)
- to taste salt and pepper
- for garnish fresh cilantro, chopped
Instructions
- Begin by preheating your oven to 375°F (190°C).
- In a large mixing bowl, combine the shredded chicken with ½ cup of shredded queso fresco, corn kernels, black beans, and the diced red onion. Sprinkle in the ground cumin, chili powder, honey, fresh lime juice, and season with salt and pepper. Mix all ingredients together until evenly combined.
- To soften the corn tortillas for easy rolling, warm them slightly in a skillet or microwave until they become pliable, approximately 15-30 seconds.
- Spread about ½ cup of enchilada sauce evenly over the bottom of a 9x13 inch baking dish to prevent sticking.
- For assembly, take one tortilla and fill it with approximately ¼ cup of the chicken mixture. Carefully roll it up tightly and place it seam-side down in the prepared baking dish. Repeat this process until all tortillas are filled and placed in the dish.
- Once all enchiladas are arranged in the baking dish, pour the remaining enchilada sauce over the top, ensuring each enchilada is generously covered. Finish by sprinkling the remaining queso fresco over the sauce.
- Cover the baking dish with aluminum foil to keep moisture in, and bake in the preheated oven for 20 minutes.
- After 20 minutes, remove the foil and return the dish to the oven. Bake uncovered for an additional 10 minutes, until the cheese is bubbly and golden.
- Carefully take the enchiladas out of the oven and let them cool for a few minutes. Garnish generously with chopped fresh cilantro before serving.


![- 1 lb beef sirloin, thinly sliced against the grain - 1 medium onion, finely chopped - 2 cloves garlic, minced - 8 oz mushrooms, sliced (cremini or button) - 1 cup beef broth (preferably low-sodium) - 1 cup sour cream (or Greek yogurt for a lighter option) - 2 tablespoons all-purpose flour - 2 tablespoons olive oil - 1 teaspoon Dijon mustard - Salt and freshly ground black pepper to taste - 12 oz egg noodles (or your favorite pasta) The beef sirloin is the star of the dish. It should be tender and flavorful. Use fresh onions and garlic to build a tasty base. The mushrooms add a nice earthiness. A good beef broth gives depth to the sauce. The sour cream adds creaminess and tang. If you want a lighter dish, Greek yogurt works well too. - Greek yogurt instead of sour cream - Alternative pasta types If you do not have sour cream, Greek yogurt is a great swap. It gives a similar creamy texture while being a bit healthier. You can also try different pasta types, like fettuccine or penne, based on your preference. - 1 teaspoon Dijon mustard - Salt and freshly ground black pepper - Fresh parsley, finely chopped for garnish Dijon mustard adds a subtle kick and depth of flavor. Salt and pepper are key for bringing out the taste in all the ingredients. A sprinkle of fresh parsley on top makes the dish look bright and fresh. It is a simple way to enhance the visual appeal. - Start by boiling salted water in a large pot. - Once boiling, add 12 oz of egg noodles. - Cook them until al dente, following package instructions. - When ready, drain the noodles and set them aside. - Toss the noodles with a drop of olive oil to keep them from sticking. - Heat 2 tablespoons of olive oil in a large skillet over medium-high heat. - Add 1 lb of thinly sliced beef sirloin to the hot pan. - Season the beef with salt and freshly ground black pepper. - Cook for about 3 to 4 minutes until the beef is browned. - Use a slotted spoon to remove the beef and place it on a plate. - In the same skillet, add the remaining olive oil. - Once hot, stir in 1 medium chopped onion and 2 minced garlic cloves. - Sauté for 2 to 3 minutes until the onion is soft and clear. - Next, add 8 oz of sliced mushrooms, cooking for another 4 to 5 minutes. - When the mushrooms are golden, sprinkle 2 tablespoons of flour over the mix. - Slowly pour in 1 cup of beef broth, whisking constantly. - Keep stirring until the mixture thickens, about 3 to 4 minutes. - Lower the heat to medium-low, then stir in 1 cup of sour cream. - Add 1 teaspoon of Dijon mustard for extra flavor. - Return the beef to the skillet, mixing well in the sauce. - Warm it through for 2 to 3 minutes without boiling. - Taste and adjust the seasoning as needed. - For plating, place a generous portion of noodles on each plate. - Ladle the creamy beef stroganoff over the noodles. - Finish by garnishing with finely chopped fresh parsley. - This adds a pop of color and freshness to your dish. For the full recipe, check out the [Full Recipe]. Enjoy this comforting meal! To make a smooth sauce, avoid lumps. When you add flour, stir it well before adding beef broth. This will help mix everything perfectly. Keep the heat low. You want to see gentle bubbles, not a rolling boil. A simmer will thicken your sauce without breaking it down. Slice your beef against the grain. This makes it tender and easy to chew. If you cut with the grain, the beef will be tough. Pay attention to the mushrooms too. Cook them until they are golden brown. This brings out their flavor and gives a nice texture. About 4-5 minutes should do the trick. Serve your beef stroganoff in shallow bowls. This allows the sauce to spread out and look rich. Add a sprinkle of fresh parsley on top for color. A bit of greenery makes the dish pop. It also adds a fresh taste to each bite. {{image_4}} You can make a tasty vegetarian beef stroganoff. Simply swap the beef for mushrooms or tofu. Mushrooms give a great, meaty flavor. Tofu adds protein and absorbs the sauce well. For a creamy mushroom stroganoff, follow these steps: - Use 16 oz of sliced mushrooms instead of beef. - Cook the mushrooms until they are soft and browned. - Add 1 cup of vegetable broth instead of beef broth. - Stir in the same sour cream for creaminess. If you want a lighter option, try using chicken or turkey. Both cook quickly and taste great in stroganoff. Use diced chicken breast or turkey breast instead of beef. Adjust the cooking time to about 5-7 minutes. Ensure the chicken or turkey is cooked through before adding the sauce. To elevate the flavor, consider adding Worcestershire sauce or a splash of red wine. These ingredients add depth and richness. You can also include fresh herbs like thyme or rosemary. They bring a nice aroma and complement the creamy sauce. A teaspoon of Worcestershire sauce or a ¼ cup of red wine can make a big difference. After enjoying your beef stroganoff, you may have some leftovers. Store them in an airtight container. Refrigerate the stroganoff within two hours of cooking. It will stay fresh for about three to four days. When you reheat, warm it gently over low heat. This keeps the sauce creamy. Stir often to avoid burning. You can also use a microwave. Heat it in short bursts, stirring in between. This method helps the dish heat evenly. If you want to keep beef stroganoff longer, freezing is a great option. To freeze, let the dish cool completely. Then, transfer it to a freezer-safe container. Leave some space at the top for expansion. Seal it tightly to prevent freezer burn. For thawing, the best method is overnight in the fridge. This keeps the flavor and texture nice. If you need it fast, you can use the microwave. Set it to defrost and check every few minutes. After thawing, reheat as I mentioned before, ensuring it warms evenly. You can find the full recipe for this comforting dish above. Enjoy every bite! You can enjoy Classic Beef Stroganoff with several tasty sides. Here are some great options: - Steamed green beans - Roasted broccoli - Mashed potatoes - A fresh garden salad - Garlic bread Each side adds a nice touch. Steamed veggies give color and crunch. Mashed potatoes soak up the sauce well. A salad offers a refreshing contrast. Classic Beef Stroganoff lasts about 3 to 4 days in the fridge. Store it in an airtight container. Always cool the dish before sealing it up. Check for any signs of spoilage before eating. If it smells off or looks strange, throw it away. Yes, you can prepare parts of Classic Beef Stroganoff ahead of time. Cook the beef and sauce, then store them separately from the noodles. When you’re ready to eat, heat the beef and sauce. Cook the noodles fresh for best results. This way, you keep everything tasty and warm. Classic Beef Stroganoff is not gluten-free due to the flour in the sauce. You can make it gluten-free by using cornstarch or gluten-free flour. Be sure to check that your beef broth and noodles are also gluten-free. This way, everyone can enjoy this delicious meal. For the full recipe, check my earlier section. You learned about the key ingredients for Classic Beef Stroganoff, including beef sirloin and egg noodles. We discussed how to cook the noodles, sauté the beef, and prepare a rich sauce. You also saw tips for perfecting the dish and its various options for customization, like vegetarian alternatives. In summary, you can make a delicious meal everyone will enjoy. Remember, cooking is about creativity. Feel free to experiment with flavors and ingredients until it’s just right for you. Enjoy your cooking journey!](https://dishtreats.com/wp-content/uploads/2025/06/f14c56cb-cc13-4cc3-a3ff-e0f76ee8bdb9-768x768.webp)


![- 1 pre-made pizza dough - 1/2 cup fresh basil pesto - 1 cup shredded mozzarella cheese - 1 medium lemon (zested and juiced) - 1 cup cherry tomatoes, halved - 1/4 cup finely grated Parmesan cheese - 1 tablespoon extra-virgin olive oil - Salt and freshly ground black pepper to taste - Fresh basil leaves for garnish - Additional toppings (e.g., olives, peppers) - Alternative cheese options (feta, goat cheese) To make a great Lemon Basil Pesto Pizza, you need these ingredients. They work together to create a fresh, bright flavor. First, the pre-made pizza dough saves time and makes this recipe easy. You can find it in stores. Fresh basil pesto adds a rich, herby taste. It’s the star of this dish. Shredded mozzarella cheese melts beautifully. It gives that familiar cheesy texture we love. The lemon zest and juice bring a tangy punch. Cherry tomatoes add sweetness and color. Grated Parmesan cheese gives a nutty, salty flavor. The olive oil helps everything blend well. Salt and pepper round out the taste. For those who want to mix things up, you can add more toppings. Olives and peppers are great choices. You might also try different cheeses like feta or goat cheese for a twist. With these simple and tasty ingredients, you’re on your way to making a delightful pizza. For the full recipe and step-by-step guide, check out the [Full Recipe]. 1. Preheat your oven to 475°F (245°C). If you have a pizza stone, place it in the oven. This helps the crust cook evenly. If not, use a baking sheet. 2. Lightly flour a clean surface. Roll out the pizza dough to your desired thickness. Make sure it fits your baking surface. 3. Once rolled out, move the dough onto parchment paper. This will help you transfer the pizza later. 1. Spread the fresh basil pesto over the dough. Leave a half-inch border for the crust. 2. Sprinkle the shredded mozzarella cheese over the pesto. Make sure it covers the whole pizza. 3. Add the halved cherry tomatoes on top of the cheese. This adds color and flavor. 4. Drizzle the extra-virgin olive oil over everything. Season with salt and freshly ground black pepper to taste. 5. Zest the lemon and sprinkle it evenly on the pizza. This adds a fresh citrus aroma. 1. Slide the parchment paper with the pizza onto the preheated pizza stone or baking sheet. 2. Bake for about 12-15 minutes. Look for a golden brown crust and bubbling cheese. 3. Carefully take the pizza out of the oven. Drizzle fresh lemon juice over the top. 4. Sprinkle grated Parmesan cheese over the warm pizza. Add fresh basil leaves for garnish. 5. Use a sharp knife or pizza cutter to slice the pizza into wedges. Serve hot for the best taste. You can find the Full Recipe for this delicious Lemon Basil Pesto Pizza above. To get the best crust, I recommend using a pizza stone. It heats up and gives your pizza a crispy base. If you don’t have one, a baking sheet works too. Just make sure you preheat it well. Roll your pizza dough to the right thickness. Aim for about a quarter-inch thick. This allows for a nice rise and crunch without being too thin. For flavor, balance the saltiness with fresh lemon juice. A squeeze of lemon brightens up the taste. It makes the pizza feel fresh and lively. Use only fresh ingredients. Fresh basil, ripe tomatoes, and good cheese make a big difference. They add depth and vibrancy to your dish. When serving, place the pizza on a rustic wooden board. It adds a nice touch. You can also use a colorful platter for a fun look. Garnish with whole basil leaves and a lemon wedge. This makes it visually appealing and invites your guests to dig in. Serve it hot for the best taste! For the full recipe, check out the complete details above. {{image_4}} You can switch up the sauce for your pizza. Tomato sauce works well if you want a classic taste. You can also try a creamy white sauce. This adds a rich flavor that pairs nicely with lemon. Seasonal pesto is another fun option. You can make it with fresh herbs like parsley or cilantro. This gives a new twist to your dish. If you need a gluten-free pizza, several dough options are available. Many stores sell gluten-free pizza crusts. You can also make your own using almond flour or cauliflower. For those who follow a vegan diet, you can skip the cheese. There are many tasty vegan cheese substitutes. Look for brands made from nuts or soy for a creamy texture. Toppings can make your pizza unique. Popular choices include pepperoni, mushrooms, and bell peppers. Try mixing and matching your favorites. Seasonal vegetables add color and flavor. In summer, fresh zucchini or bell peppers work well. In winter, roasted butternut squash or kale can be a great choice. Don't be afraid to get creative with your toppings! To keep your Lemon Basil Pesto Pizza fresh, let it cool to room temperature. This step is key to avoid moisture buildup. Wrap each slice in plastic wrap or aluminum foil. You can also place them in an airtight container. This helps retain flavor and texture. Store the pizza in the fridge for up to three days. For best results, enjoy it within this time frame. When it's time to eat leftovers, you can use either an oven or a microwave. The oven is best for maintaining crispiness. Preheat your oven to 375°F (190°C). Place the pizza on a baking sheet and heat for about 10 minutes. This warms it up well without making it soggy. If you choose the microwave, place a slice on a microwave-safe plate. Add a cup of water next to it. This helps keep the crust from getting too chewy. Heat in 30-second intervals until warm. But remember, the microwave won't keep it crispy. For the best taste, the oven is your friend! Use these tips to enjoy your pizza even after the first delightful slice. For the full recipe, check out the complete article. To make your own basil pesto, you need a few simple ingredients. Combine fresh basil, garlic, pine nuts, Parmesan cheese, and olive oil in a food processor. Blend until smooth. Adjust the taste with salt and pepper. This mix adds great flavor to your pizza. Yes, you can freeze lemon basil pesto pizza. First, let the pizza cool completely. Then, wrap it in plastic wrap and place it in a freezer bag. It can last for up to three months. When you are ready to eat, bake it straight from the freezer. This makes a quick meal! Several side dishes pair well with lemon basil pesto pizza. Here are some of my favorites: - A light green salad with vinaigrette - Garlic bread for a crunchy side - Roasted vegetables for added flavor These sides balance the pizza's taste and make for a complete meal. To cut your pizza into even slices, use a sharp pizza cutter or knife. Start by cutting it in half, then cut each half into smaller sections. Aim for 8 slices for a standard pizza. This way, everyone gets a fair share! You can find high-quality pre-made pizza dough at many grocery stores. Look in the refrigerated section or the freezer aisle. Some local pizzerias also sell their dough. If you want a special option, check out artisan bakeries. They often have fresh dough made with quality ingredients. In this pizza guide, we covered essential ingredients, step-by-step instructions, and useful tips. You learned how to customize your pizza and store leftovers. Remember, fresh ingredients make a big difference in taste. If you try different toppings or variations, have fun with it! I believe cooking should be enjoyable and creative. Follow these steps, and you’ll create delicious pizza every time. Enjoy your cooking adventure!](https://dishtreats.com/wp-content/uploads/2025/06/c2cede7a-626b-4fd1-91be-1b09c425b287-768x768.webp)

