Honey Ginger Glazed Carrots Simple Flavor Delight

Are you ready to turn ordinary carrots into a sweet and zesty treat? In this article, I’ll show you how to make Honey Ginger Glazed Carrots: a simple yet delightful side dish. With just a few fresh ingredients, you’ll create a dish bursting with flavor. Whether you’re cooking for a family dinner or a festive gathering, this recipe will impress everyone at the table. Let’s dive in and make those carrots shine!
Why I Love This Recipe
- Sweet and Savory Balance: The combination of honey and ginger creates a delightful contrast, making these carrots both sweet and savory, perfect for any palate.
- Quick and Easy Preparation: This recipe takes just 25 minutes from start to finish, making it a perfect side dish for busy weeknights.
- Health Benefits: Carrots are packed with vitamins and nutrients, while ginger is known for its anti-inflammatory properties, making this dish a nutritious choice.
- Visually Appealing: The vibrant color of the glazed carrots garnished with fresh parsley adds a beautiful touch to your dining table.
Ingredients
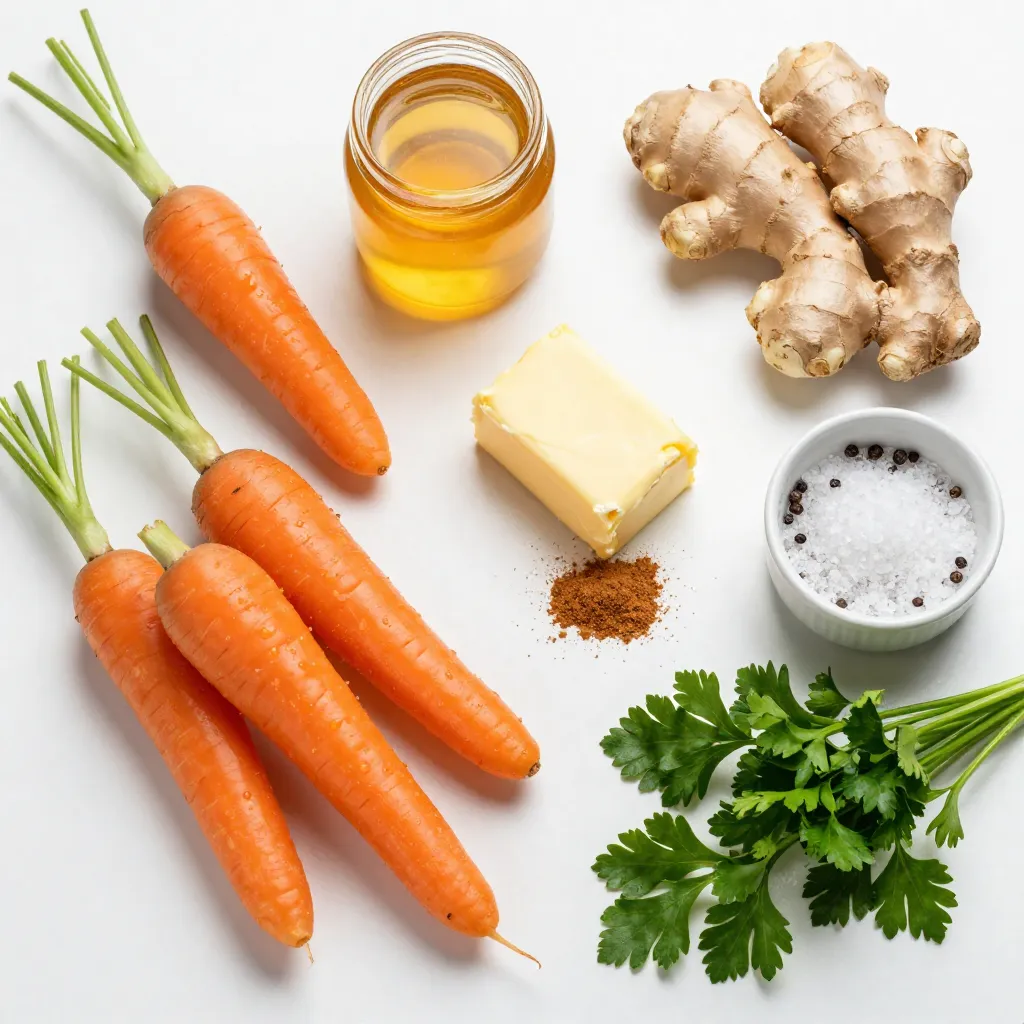
List of Main Ingredients
- 1 pound baby carrots (or regular carrots, peeled and cut into sticks)
- 3 tablespoons honey
- 2 tablespoons unsalted butter
- 1 tablespoon fresh ginger, finely grated
- 1/4 teaspoon ground cinnamon
- Salt and freshly cracked pepper to taste
- 2 tablespoons chopped fresh parsley (for garnish)
Measurements and Substitutions
- For this recipe, you need 1 pound of baby carrots. If you use regular carrots, peel and cut them into sticks.
- Use 3 tablespoons of honey to give your dish a sweet taste. Maple syrup works well if you want a different flavor.
- You’ll need 2 tablespoons of unsalted butter to create a rich base for the glaze.
- Fresh ginger adds a nice kick; use 1 tablespoon, finely grated. Ground ginger can be a quicker substitute.
- A pinch of ground cinnamon (1/4 teaspoon) adds warmth. You can skip it if you prefer.
- Season with salt and freshly cracked pepper to taste.
- Use 2 tablespoons of chopped fresh parsley for a colorful finish. You can use other herbs like chives if you like.
This list of ingredients makes the dish simple yet full of flavor. Each one adds something special to the final dish.

Step-by-Step Instructions
Preparation Steps
1. Start by heating a large skillet over medium heat. Add 2 tablespoons of unsalted butter. Let it melt fully. Be careful not to let it brown.
2. Once the butter melts, add 1 tablespoon of finely grated fresh ginger. Sauté it for about 1 minute. You want the ginger to smell really good.
3. Next, pour in 3 tablespoons of honey. Sprinkle in 1/4 teaspoon of ground cinnamon. Mix everything well. You want a fragrant glaze that smells sweet and spicy.
Cooking Techniques
1. Carefully add 1 pound of baby carrots to the skillet. If you use regular carrots, peel and cut them into sticks first. Toss the carrots gently. Make sure they are coated with the honey-ginger mixture.
2. Season the carrots with salt and freshly cracked pepper to taste. This adds flavor to each bite.
3. Lower the heat to a simmer. Cover the skillet and let the carrots cook for about 10 to 12 minutes. Stir them occasionally. The carrots should be tender but still hold their shape.
4. After 10 to 12 minutes, remove the lid. Continue cooking for an extra 2 to 3 minutes. This helps the glaze thicken and stick to the carrots.
Serving Instructions
1. Once the carrots are glazed nicely, transfer them to a vibrant serving dish. A shallow bowl or platter works great.
2. Garnish with 2 tablespoons of chopped fresh parsley. This adds a pop of color and freshness.
3. For a beautiful look, consider serving the glazed carrots with roasted meats. It makes a complete and tasty meal.
Tips & Tricks
Perfecting the Flavor
Balancing sweetness and spice is key to this dish. The honey gives a lovely sweetness, while fresh ginger adds a warm kick. Adjust the honey if you want it sweeter, or add more ginger for more spice. Ground cinnamon brings a cozy flavor that ties everything together.
To gain that perfect glaze, keep an eye on the cooking time. Once the carrots are tender, you want to reduce the heat and let the glaze thicken. Stir the carrots often so they get a nice coating. This helps the glaze stick and gives each bite a burst of flavor.
Cooking Time Adjustments
Carrots come in different sizes. For baby carrots, 10-12 minutes should work well. If you use larger carrots, cut them into smaller sticks. This helps them cook evenly. You may need to add a few extra minutes to ensure they are tender.
To ensure even cooking, stir the carrots occasionally. This helps them cook through and absorb the glaze. If you want them extra tender, cover the skillet with a lid while they cook. This traps steam and speeds up the cooking process.
Pro Tips
- Choose the Right Carrots: Opt for fresh, vibrant baby carrots for a sweeter taste and better texture. If using regular carrots, ensure they are firm and not woody.
- Adjusting Sweetness: Feel free to adjust the amount of honey based on your preference for sweetness. You can also substitute maple syrup for a different flavor profile.
- Ginger Alternatives: If fresh ginger is unavailable, ground ginger can be used as a substitute. Use about 1/2 teaspoon of ground ginger for this recipe.
- Make Ahead: These glazed carrots can be prepared ahead of time. Simply reheat them in the skillet with a splash of water to prevent drying out before serving.
Variations
Ingredient Variations
You can change the sweetener in this recipe. Instead of honey, try maple syrup. It gives a nice flavor twist. You can also use agave nectar for a lighter taste. Each sweetener adds its own charm.
Adding spices can elevate your glazed carrots. Try nutmeg for warmth or clove for a spicy kick. Just a pinch can make a big difference. Play around with these spices to find your favorite mix.
Recipe Twists
Feel free to add more vegetables to this dish. Peas, green beans, or bell peppers work well. They add color and texture, making the dish even more appealing. Just adjust cooking times to keep everything tender.
You can also use the honey ginger glaze on other foods. Try it on chicken or salmon for a sweet and spicy touch. It’s a flexible sauce that can enhance many meals. Use your creativity and enjoy!
Storage Info
Storing Leftovers
To keep your honey ginger glazed carrots fresh, place them in an airtight container. Store them in the fridge. The carrots will stay good for about 3 to 5 days. If you want to enjoy them longer, freeze them. They can last up to 3 months in the freezer. Just make sure they cool down before storing.
Reheating Instructions
When reheating your glazed carrots, aim for gentle methods. You can use the microwave or the stove. For the microwave, place the carrots in a bowl, cover them, and heat for 1 to 2 minutes. Stir halfway through. This keeps them moist. If using the stove, add a splash of water to a pan. Heat over low heat and stir until warm. This method helps to keep the texture nice and tender.
FAQs
Common Questions
Can I use frozen carrots for this recipe?
Yes, you can use frozen carrots. They may take a bit longer to cook. Just follow the same steps. Keep an eye on them to ensure they get tender.
How can I make this dish vegan?
To make honey ginger glazed carrots vegan, replace honey with maple syrup. Use vegan butter in place of unsalted butter. The flavor will still shine through.
What dishes pair well with honey ginger glazed carrots?
These carrots go great with roasted chicken or pork. They also pair nicely with rice or quinoa. Their sweet and spicy flavor adds a nice touch to any plate.
Cooking Techniques
Can I roast the carrots instead of glazing them?
Yes, you can roast the carrots for a different flavor. Toss them with honey, ginger, and spices, then roast at 400°F until tender. This method gives great caramelization.
What’s the best way to clean and prepare fresh ginger?
To clean fresh ginger, rinse it under water and scrub gently. Peel the skin with a spoon for easy removal. Then, grate it finely for your recipe.
This blog post covered a simple recipe for honey ginger glazed carrots. We explored key ingredients, step-by-step cooking instructions, and useful tips for perfecting flavor. Variations and storage methods help to make this dish your own.
In conclusion, this recipe is versatile and easy. You can customize it to fit your taste. Enjoy cooking and sharing this delicious side dis

Honey Ginger Glazed Carrots
Ingredients
- 1 pound baby carrots
- 3 tablespoons honey
- 2 tablespoons unsalted butter
- 1 tablespoon fresh ginger, finely grated
- 0.25 teaspoon ground cinnamon
- to taste salt
- to taste freshly cracked pepper
- 2 tablespoons chopped fresh parsley (for garnish)
Instructions
- Begin by heating a large skillet over medium heat. Add the unsalted butter and let it melt completely, ensuring it doesn’t brown.
- Once the butter has melted, add the finely grated fresh ginger to the skillet. Sauté for about 1 minute until the ginger becomes aromatic and releases its fragrance.
- Pour in the honey and sprinkle in the ground cinnamon. Mix the ingredients well until the ginger and honey form a deliciously fragrant glaze.
- Carefully add the baby carrots to the skillet. Toss them gently to ensure each carrot is well coated with the honey-ginger mixture.
- Season the carrots with salt and freshly cracked pepper to taste, enhancing the overall flavor of the dish.
- Lower the heat to want a simmer, cover the skillet, and let the carrots cook for approximately 10-12 minutes. Stir occasionally. The carrots are ready when they are tender but still hold their shape.
- After the initial cooking time, remove the lid and continue to cook for an additional 2-3 minutes. This will allow the glaze to thicken and adhere beautifully to the carrots.
- Once the carrots are glazed to your liking, transfer them to a vibrant serving dish. Garnish with chopped fresh parsley for a pop of color and freshness.


 for Garlic Butter Lemon Salmon Foil Packs. In this article, you learned how to make Garlic Butter Lemon Salmon Foil Packs. We covered the main ingredients, step-by-step cooking instructions, and helpful tips to ensure success. You can also explore flavor variations and storage options for leftovers. This dish is simple yet delicious, making it perfect for dinner. With these techniques, you can impress friends and family with your cooking. Enjoy your meal and feel proud of your kitchen skills!](https://dishtreats.com/wp-content/uploads/2025/07/636e4153-d701-4cda-a9a1-5094e2b11f0e-768x768.webp)
![- 2 medium zucchinis, grated - 1 can (15 oz) black beans, drained and rinsed - 1 cup corn kernels (fresh or frozen) - 1 small red onion, finely chopped - 2 cloves garlic, minced - 1 teaspoon ground cumin - 1 teaspoon smoked paprika - 1 cup enchilada sauce (store-bought or homemade) - 8 whole wheat tortillas - 1 cup shredded cheese (cheddar or a vegan alternative) - 2 tablespoons olive oil - Salt and pepper, to taste - Fresh cilantro, chopped, for garnish - Cooking timeline (Prep time: 15 mins, Total time: 40 mins) - Serving Size information (Servings: 4) When I gather ingredients for zucchini and black bean enchiladas, I love how simple it is. Fresh zucchinis are key for flavor and texture. Black beans add protein and fiber. You can use frozen corn or fresh, depending on what you have. A small red onion gives a sweet taste, while garlic adds a nice kick. Spices like cumin and smoked paprika bring warmth and depth to the dish. I like using enchilada sauce from the store to save time, but homemade is always a treat. Whole wheat tortillas provide a hearty base, and shredded cheese ties everything together. Olive oil helps cook the veggies and adds richness. Adding salt and pepper to taste is important. Finally, a sprinkle of fresh cilantro on top makes the dish pop with color and flavor. For the full recipe, check out the details above. - Step 1: Preheat your oven to 375°F (190°C). This helps your enchiladas cook evenly. - Step 2: Heat 2 tablespoons of olive oil in a skillet over medium heat. Add 1 small red onion, finely chopped. Sauté for about 3-4 minutes, until the onion turns soft and clear. - Step 3: Add 2 cloves of minced garlic to the skillet. Cook for 1 minute, stirring often. The garlic should smell strong but not brown. - Step 4: Mix in 2 medium zucchinis, grated, 1 can of black beans (drained and rinsed), and 1 cup of corn. Sprinkle in 1 teaspoon of ground cumin, 1 teaspoon of smoked paprika, salt, and pepper. Cook this mix for 5-7 minutes. The zucchini should be tender and well mixed. - Step 5: Remove the skillet from heat. Stir in half of the 1 cup of enchilada sauce, making sure everything is coated well. - Step 6: Take a whole wheat tortilla and place it flat. Spoon some of the zucchini mixture down the center. Roll it tightly, then place it seam-side down in a baking dish. Repeat this for all tortillas. - Step 7: Once all tortillas are rolled, pour the remaining enchilada sauce evenly over the top. - Step 8: Sprinkle 1 cup of shredded cheese over the enchiladas. Make sure to cover them well. - Step 9: Cover the baking dish with foil. Bake for 20 minutes to let the flavors blend. - Step 10: Remove the foil and bake for another 10 minutes. The cheese should be melted and slightly golden. Feel free to check the Full Recipe for more details and tips! To keep your zucchini filling just right, follow these tips. First, grate your zucchini and then salt it lightly. Let it sit for about ten minutes. This step helps draw out excess moisture. After that, squeeze the zucchini to remove the water. This way, your filling stays firm, not soggy. Next, adjust the seasoning to match your taste. Start with the suggested spices, but feel free to add more cumin or paprika if you want a stronger flavor. A dash of lime juice can also brighten up the dish. When serving these enchiladas, presentation is key. Use a colorful plate to make the dish pop. A sprinkle of fresh cilantro on top adds a nice touch. You can also add a wedge of lime for extra flair. Pair these enchiladas with a simple salad or some fluffy rice. Both options complement the flavors well. Try a side of avocado or a dollop of sour cream to make it even better. Avoid overstuffing the tortillas. If you pack too much filling in, they may tear. Just a good spoonful is enough. Also, let the enchiladas cool for a few minutes after baking. This step helps them set up nicely. If you serve them too hot, the filling may spill out. Trust me, waiting a bit is worth it! If you want the full recipe, remember to check out the [Full Recipe]. {{image_4}} You can change the beans in this dish. Pinto or kidney beans work great too. They add a different taste while keeping it healthy. You can also add other veggies. Bell peppers or spinach can give your enchiladas a new twist. Just chop them up and mix them in with the other filling. If you need gluten-free options, you can use corn tortillas instead of wheat ones. They taste great and work well with the filling. For a dairy-free version, try vegan cheese. It melts nicely and keeps the dish creamy without the dairy. Want more kick? Add spices or hot sauce to the filling. A bit of chili powder or cayenne can spice things up. You can also try different types of enchilada sauce. Green sauce or mole sauce can change the whole flavor profile. Experiment to find what you love best! To keep your zucchini and black bean enchiladas fresh, store them in the fridge. Place them in an airtight container. This will help seal in flavors and moisture. If you have a lot of leftovers, you can freeze them too. Wrap each enchilada tightly in plastic wrap, then place them in a freezer-safe bag. This method prevents freezer burn and keeps them tasty. When it comes to reheating, I recommend using the oven. Preheat it to 350°F (175°C). Place the enchiladas in a baking dish. Cover them with foil to keep the moisture in. Heat for about 20 minutes. This way, they won’t dry out. You can also use a microwave, but they might lose some texture. If you use the microwave, heat in short bursts to check the warmth. In the fridge, these enchiladas last for about 3 to 4 days. Make sure to eat them before then for the best taste. If you freeze them, they can last for up to 3 months. Just remember to label your bags with dates. This helps you keep track of how long they’ve been there. For the best flavor, try to eat frozen enchiladas within that time frame. You can prep the filling in advance. Just cook the zucchini, black beans, and spices as described in the recipe. Allow it to cool, then store it in the fridge for up to two days. When you’re ready to eat, just assemble the enchiladas with the tortillas and sauce. You can also roll the enchiladas and place them in the baking dish. Cover them tightly and refrigerate. Bake them when you're ready to serve. This method saves time and keeps flavors fresh. Yes, you can. To make cheese-free enchiladas, simply skip the cheese or use a plant-based option. You can add extra veggies or a sprinkle of nutritional yeast for a cheesy flavor. Another option is to serve guacamole or a creamy avocado sauce on top after baking. This adds richness and pairs well with the enchiladas. There are several great options! For a low-carb choice, use large lettuce leaves like romaine or kale. You can also use thinly sliced zucchini or eggplant as a gluten-free alternative. If you want something heartier, try using corn tortillas or even large portobello mushrooms. Each option gives a unique flavor and texture to the dish. Yes, you can use frozen zucchini. Just remember to thaw it first and drain any excess water. This helps keep your filling from becoming too watery. Frozen zucchini is convenient and still delivers great taste in the enchiladas. Just follow the same cooking steps as fresh zucchini. It’s an easy way to enjoy this dish anytime. For the full recipe, refer to the earlier section. In this post, we explored how to make tasty zucchini and black bean enchiladas. I shared a simple recipe, with clear steps and helpful tips. You learned about ingredient choices, cooking methods, and ways to store leftovers. Always remember to check the filling, so it stays moist but not soggy. These enchiladas are not just easy to make; they also fit various diets. Enjoy creating your own version and delight in the flavors! Your kitchen adventure starts here.](https://dishtreats.com/wp-content/uploads/2025/07/2cd92dac-f668-457e-8990-b41595643bf1-768x768.webp)
