Honey Garlic Turkey Meatballs Joyful and Easy Recipe

Looking for a simple yet delicious dinner idea? Honey Garlic Turkey Meatballs are your answer! With just a handful of easy-to-find ingredients, you can whip up a meal your family will love. In this post, I’ll guide you through each step, from mixing the perfect meatball blend to creating a mouthwatering sauce. Let’s make dinner joyful and stress-free with this easy recipe!
Why I Love This Recipe
- Healthier Option: Ground turkey is a lean protein, making these meatballs a healthier alternative to traditional beef meatballs.
- Easy to Make: This recipe comes together quickly, perfect for weeknight dinners or meal prep.
- Sweet and Savory Flavor: The honey garlic sauce brings a delightful balance of sweetness and umami that complements the turkey perfectly.
- Versatile Dish: These meatballs can be served as an appetizer, over rice, or in a sub sandwich for a delicious twist.
Ingredients
Main Ingredients for Honey Garlic Turkey Meatballs
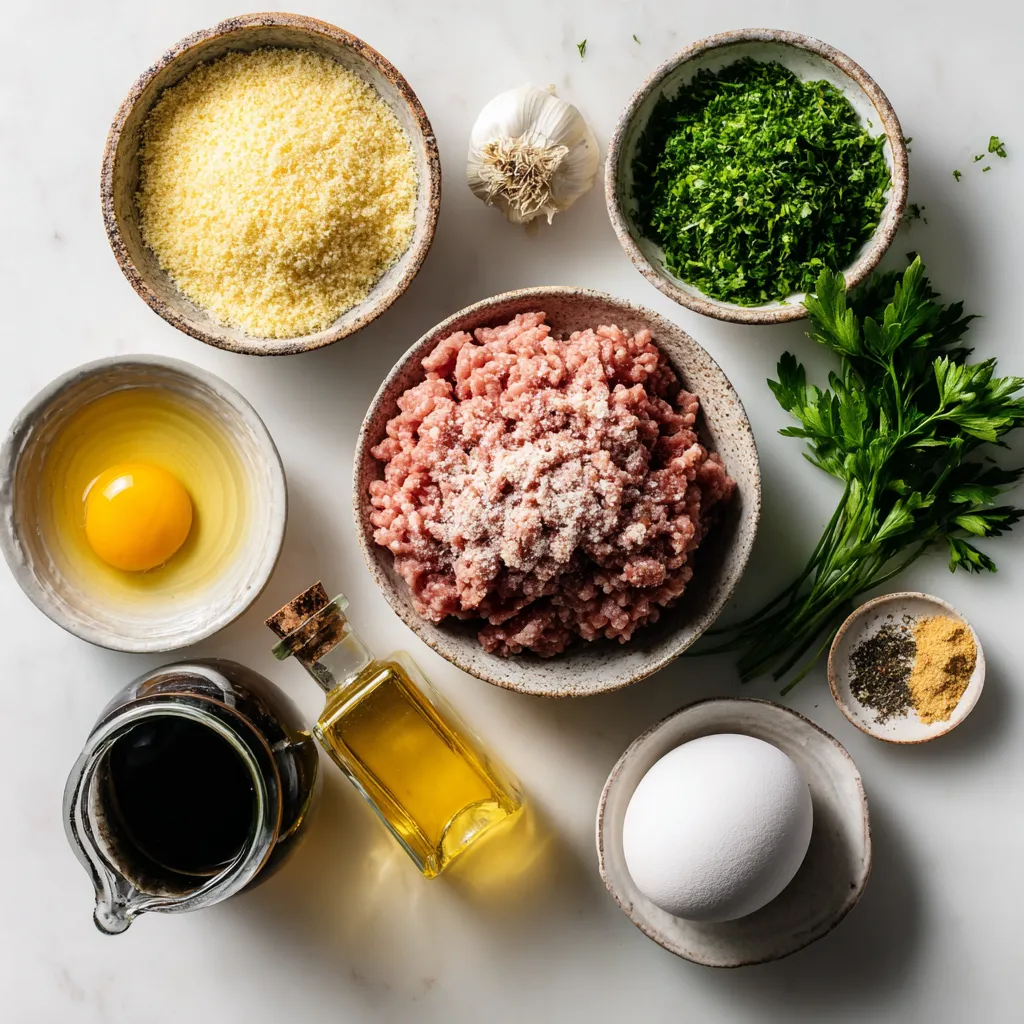
- 1 lb ground turkey
- 1/4 cup breadcrumbs
- 1/4 cup grated Parmesan cheese
- 1/4 cup finely chopped fresh parsley
- 1 large egg
- 2 cloves garlic, minced
Seasonings and Sauce Ingredients
- 1/2 tsp salt
- 1/4 tsp black pepper
- 1/2 tsp onion powder
- 1/2 cup honey
- 1/4 cup low-sodium soy sauce
- 1 tsp sesame oil (optional for extra flavor)
Thickening Agent
- 1 tsp cornstarch mixed with 2 tsp water
The main ingredients create a tasty base for our meatballs. Ground turkey is lean and healthy. Breadcrumbs keep the meatballs soft. Parmesan cheese adds a nice flavor. Fresh parsley gives a bright touch. The egg helps bind everything together. Garlic adds a bold kick that enhances the dish.
For seasonings, salt and pepper bring out all the flavors. Onion powder adds depth. Honey and soy sauce create that sweet and savory sauce we love. If you want extra flavor, sesame oil is a great option.
Lastly, the cornstarch and water mixture thickens the sauce. This gives it a nice coating for the meatballs. Each ingredient plays a vital role in making this dish both fun and delicious.

Step-by-Step Instructions
Preparing the Meatball Mixture
Start by gathering all your main ingredients. In a large mixing bowl, combine:
- 1 lb ground turkey
- 1/4 cup breadcrumbs
- 1/4 cup grated Parmesan cheese
- 1/4 cup finely chopped fresh parsley
- 1 large egg
- 2 cloves garlic, minced
- 1/2 tsp salt
- 1/4 tsp black pepper
- 1/2 tsp onion powder
Use your hands or a spatula to mix everything well. Make sure all the ingredients blend together. This step is key for getting the right texture. You want a sticky mixture that holds together.
Baking the Meatballs
Preheat your oven to 400°F (200°C). This step ensures even cooking. While the oven heats, prepare a baking sheet. Line it with parchment paper or lightly grease it to prevent sticking.
Now, scoop out portions of the turkey mixture. Roll them into meatballs about 1 inch in diameter. Place each meatball on the baking sheet. Keep them spaced apart for even cooking.
Bake the meatballs for about 20 minutes. They should be fully cooked through and golden brown on the outside. The internal temperature must reach 165°F.
Making the Honey Garlic Sauce
While the meatballs bake, let’s make the honey garlic sauce. In a small saucepan over medium heat, combine:
- 1/2 cup honey
- 1/4 cup low-sodium soy sauce
- 1 tsp sesame oil (optional)
Stir the mixture well and let it simmer gently. This allows the flavors to meld together nicely.
When the sauce simmers, add the cornstarch mixture. This is made from 1 tsp cornstarch mixed with 2 tsp water. Stir continuously to thicken the sauce. Keep stirring until it reaches your desired thickness. This should take around 1-2 minutes.
Tips & Tricks
Achieving Perfect Meatballs
When making meatballs, the mix is key. I like to use my hands for mixing. This way, I can feel if the turkey is blended well with the other ingredients. Combine the ground turkey, breadcrumbs, Parmesan, parsley, egg, garlic, salt, pepper, and onion powder in a large bowl. Roll the mixture into meatballs about 1 inch wide. Keep them uniform for even cooking.
To avoid dry meatballs, don’t overmix. Just blend until everything is combined. Also, use fresh ingredients. Fresh parsley and garlic add moisture and flavor.
Sauce Consistency
For the perfect sauce, start with equal parts honey and soy sauce. Heat them in a saucepan until they simmer. This step brings out the flavors. Add the cornstarch mixture slowly, stirring all the time. This helps the sauce thicken without lumps. You want it thick but pourable. If it’s too thick, add a splash of water.
Feel free to adjust the flavor. Want it sweeter? Add more honey. Need a saltier kick? A dash more soy sauce works well.
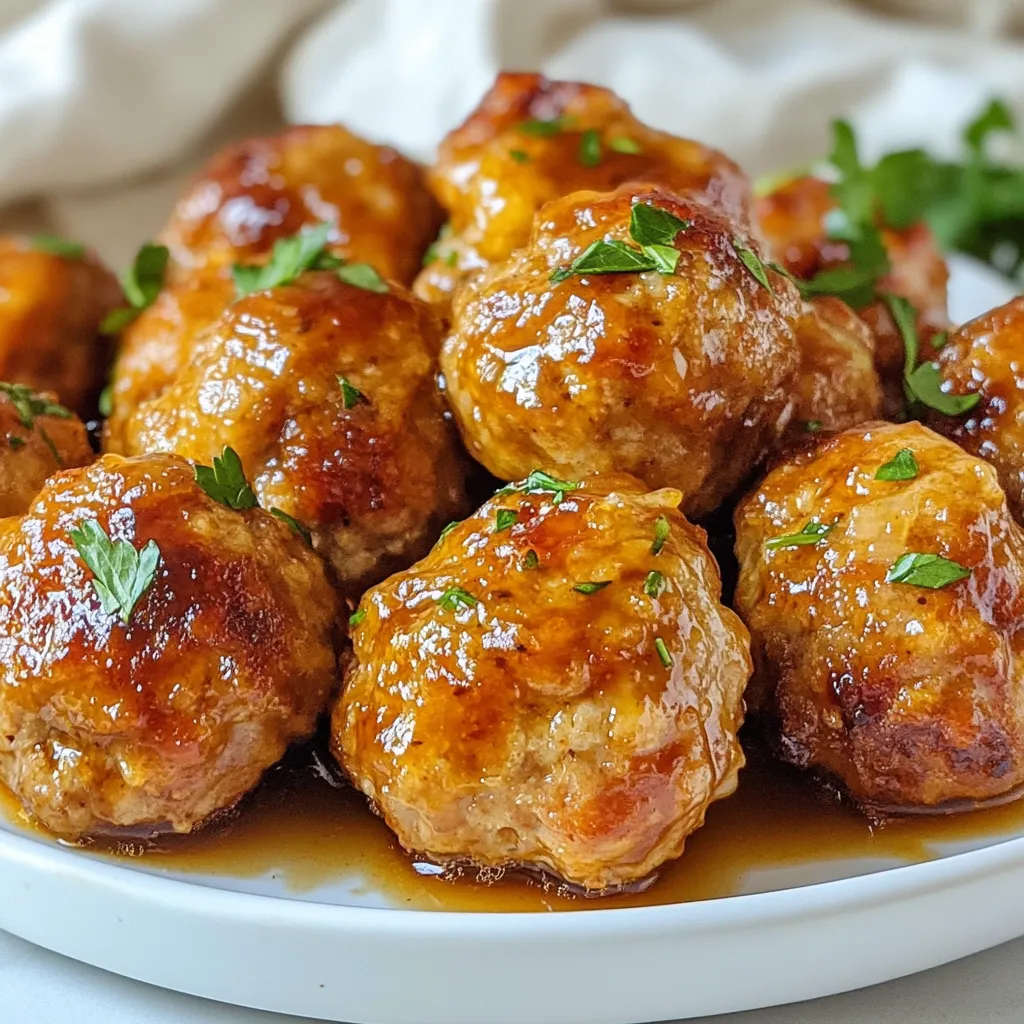
Garnish and Presentation
Garnishing your meatballs can make them pop. I love using extra chopped parsley on top. It adds color and freshness. You can also sprinkle sesame seeds for crunch and visual appeal.
Serve the meatballs warm on a nice plate. Pair them with rice or noodles for a complete meal. You can also make a meatball sub with fresh bread. This adds fun and variety to your dinner.
Pro Tips
- Use Fresh Ingredients: Always opt for fresh parsley and garlic to enhance the flavor of your meatballs significantly.
- Don’t Overmix: When combining the ingredients, mix just until combined to keep the meatballs tender and not tough.
- Adjust Sauce Consistency: If you prefer a thinner sauce, you can skip the cornstarch or add more water to achieve your desired consistency.
- Experiment with Spices: Feel free to add your favorite spices or herbs to the meatball mixture for an extra flavor twist.

Variations
Healthy Alternatives
You can make this meal even healthier. Use lean turkey for a lighter option. Lean turkey has less fat. It keeps the meatballs moist while cutting calories. You can also swap regular breadcrumbs for gluten-free breadcrumbs. This swap works well for anyone avoiding gluten. It helps you stay on track with your diet without losing taste.
Flavor Additions
Want to spice things up? Add some paprika or cayenne pepper for a kick. A sprinkle of Italian herbs can also enhance the flavor. These spices can make your meatballs more exciting. You might also try different sauces. BBQ sauce or sweet chili sauce can add a new twist. Experiment with your favorites to find the perfect match.
Serving Suggestions
Pair your meatballs with sides to make a full meal. Serve them over rice, noodles, or even a salad. They can also go well in a sub with cheese. For a fun twist, make meatball sliders on small buns. Don’t forget to garnish with fresh parsley for color. It adds a nice touch and keeps the dish bright.
Storage Info
Refrigeration Guidelines
To store leftover meatballs, let them cool first. Place them in an airtight container. This helps keep them fresh. You can also wrap them tightly in plastic wrap. Store them in the fridge for up to three days.
Freezing Tips
For proper freezing, place cooled meatballs in a freezer-safe bag. Remove excess air to prevent freezer burn. You can freeze them for up to three months. To thaw, move the meatballs to the fridge overnight. For reheating, bake them in the oven or microwave until hot.
Shelf Life
In the fridge, meatballs last about three days. In the freezer, they can last up to three months. Always check for any off smells or changes in texture before eating.
FAQs
Can I use other meats for this recipe?
Yes, you can use other meats. Ground chicken or beef works well. You can also try pork for a different flavor. Just keep the cooking times in mind, as they may vary.
How do I know when the meatballs are fully cooked?
The meatballs are done when they reach 165°F (74°C). You can check this with a meat thermometer. They should also look golden brown on the outside.
What are some common substitutes for honey?
If you need a honey substitute, try maple syrup or agave nectar. Brown sugar mixed with water is another option. Each substitute will add a unique flavor.
Can I make this recipe ahead of time?
Yes, you can prepare the meatballs ahead of time. Form the meatballs and store them in the fridge. You can bake them later for a quick meal.
How can I make the meatballs spicy?
To add spice, mix in red pepper flakes or cayenne pepper. You can also add spicy sauce to the honey garlic sauce for extra heat.
Are honey garlic turkey meatballs suitable for meal prep?
Absolutely! These meatballs are great for meal prep. They store well in the fridge or freezer. Serve them with rice or veggies for a balanced meal.
You’ve learned how to make tasty honey garlic turkey meatballs. We covered the key ingredients, perfect cooking steps, and essential tips. You can mix up flavors and try healthy swaps too. Don’t forget about storing options for leftovers, and serving ideas for your meals. Making these meatballs can be fun and easy. Now, grab your ingredients and enjoy creating a dish that everyone will love. Cooking should be enjoyable, and these meatballs are a great way to share your skill

Honey Garlic Turkey Meatballs
Ingredients
- 1 lb ground turkey
- 1/4 cup breadcrumbs
- 1/4 cup grated Parmesan cheese
- 1/4 cup finely chopped fresh parsley
- 1 large egg
- 2 cloves garlic, minced
- 1/2 tsp salt
- 1/4 tsp black pepper
- 1/2 tsp onion powder
- 1/2 cup honey
- 1/4 cup low-sodium soy sauce
- 1 tsp sesame oil (optional for extra flavor)
- 1 tsp cornstarch mixed with 2 tsp water (to thicken the sauce)
Instructions
- In a large mixing bowl, combine the ground turkey with the breadcrumbs, grated Parmesan cheese, chopped parsley, egg, minced garlic, salt, black pepper, and onion powder. Use your hands or a spatula to mix everything thoroughly until all ingredients are fully integrated.
- Preheat your oven to 400°F (200°C) and prepare a baking sheet by lining it with parchment paper or lightly greasing it to prevent sticking.
- With your hands, scoop out portions of the turkey mixture and roll them into meatballs approximately 1 inch in diameter. Place each meatball on the prepared baking sheet, ensuring they are spaced apart for even cooking.
- Bake the meatballs in the preheated oven for about 20 minutes, or until they are fully cooked through (internal temperature should reach 165°F) and are golden brown on the outside.
- While the meatballs are baking, make the honey garlic sauce. In a small saucepan over medium heat, combine the honey, low-sodium soy sauce, and sesame oil. Stir the mixture well and allow it to come to a gentle simmer.
- When the sauce is simmering, add the cornstarch mixture, stirring continuously to thicken the sauce. Keep stirring until it reaches your preferred consistency, which should take about 1-2 minutes.
- Once the meatballs are cooked, carefully remove them from the oven and transfer them to a serving dish. Pour the honey garlic sauce generously over the meatballs, ensuring they are thoroughly coated.
- Serve the meatballs warm, garnished with extra chopped parsley for a pop of color and freshness, if desired.


![- 1 lb boneless, skinless chicken thighs, diced into bite-sized pieces - 1 tablespoon olive oil - 1 teaspoon chili powder - 1 teaspoon ground cumin - 1 teaspoon smoked paprika - Salt and pepper, to taste - 1 cup brown rice (or 1 cup cauliflower rice) - 2 cups chicken broth (or vegetable broth) - 1 can black beans, drained and rinsed - 1 cup corn kernels - Juice of 1 lime - 1 ripe avocado, diced - 1 cup cherry tomatoes, halved - 1 cup shredded cheese (such as cheddar) - ½ cup sour cream (or Greek yogurt) - Fresh cilantro, chopped - Sliced jalapeños (optional) - Large skillet - Medium-sized pot - Cooking utensils (spoon, spatula) - Measuring cups and spoons - Serving bowls These ingredients come together to create a tasty meal. The chicken thighs give great flavor. You can use brown rice for a healthy base or cauliflower rice for a low-carb choice. Black beans and corn add fiber and sweetness. For toppings, fresh veggies like avocado and tomatoes brighten the dish. Cheese and sour cream bring richness. You will love how customizable these bowls are! The kitchen tools are simple, making this fun and easy to prepare. Check out the Full Recipe for all the delicious details! To make brown rice, start with a medium pot. Bring chicken broth to a boil. Once boiling, add the rice. Lower the heat, cover, and let it simmer for 30-35 minutes. This method ensures the rice becomes fluffy and tender. If you prefer a low-carb option, use cauliflower rice. Heat a skillet with a splash of water. Sauté the cauliflower rice for 5 minutes until it’s tender. This quick cook keeps it fresh and light. For the chicken, heat olive oil in a large skillet over medium heat. Add diced chicken thighs once the oil is hot. Season the chicken with chili powder, cumin, smoked paprika, salt, and pepper. Cook for 8-10 minutes, stirring often. This helps the chicken cook evenly and become golden brown. The spices create a warm flavor that elevates the dish. After the chicken is cooked, add the rinsed black beans and corn to the skillet. Mix everything well and cook for another 3-4 minutes. This step ensures all ingredients are heated through and flavors blend nicely. Stir gently to keep the chicken tender. Once done, you can move on to building your loaded chicken burrito bowls. Enjoy creating a meal that looks as good as it tastes! Achieving the Perfect Texture To get juicy chicken, use boneless, skinless thighs. They stay moist and tender. Cut them into bite-sized pieces for even cooking. Heat a skillet over medium heat before adding the chicken. This helps lock in the juices and gives a nice sear. Preventing Dry Chicken Don’t overcook the chicken. Cook it until it's no longer pink, about 8-10 minutes. Keep stirring to avoid burning. If you find your chicken is dry, try adding a splash of broth or water. This will help rehydrate the meat. Suggested Toppings You can personalize your burrito bowls with fun toppings. Try adding diced avocados, cherry tomatoes, or shredded cheese. Fresh herbs like cilantro add a burst of flavor. For a kick, use sliced jalapeños or a drizzle of hot sauce. Dietary Modifications Make your burrito bowls fit your diet. If you're vegetarian, swap chicken for black beans or grilled veggies. For a low-carb option, use cauliflower rice instead of brown rice. You can also replace sour cream with Greek yogurt for a healthier choice. Spice Variations Want to spice things up? Add cayenne pepper or crushed red pepper flakes to the chicken. You can also try different spices like oregano or taco seasoning to change the flavor profile. Marinades for Chicken A good marinade can add great taste. Use lime juice, garlic, and cumin for a zesty kick. Marinate the chicken for at least 30 minutes before cooking. This will infuse the chicken with flavor and keep it tender. For the full recipe, check out the section above. {{image_4}} You can easily swap out the chicken. Use firm tofu or tempeh instead. These alternatives add great texture and protein. For a heartier option, try chickpeas or lentils. Both are tasty and filling. If you want a low-carb option, use cauliflower rice. It has fewer carbs and packs in nutrients. Cauliflower rice has a mild taste and absorbs flavors well. You can also add more veggies, like zucchini or bell peppers, for added crunch. You can adjust the spice level for your taste. For a spicy kick, add more chili powder or diced jalapeños. If you prefer mild flavors, skip the spicy ingredients. You can also play with international flavors. Try adding curry powder for an Indian twist or chipotle for a smoky flavor. Explore these variations to make the loaded chicken burrito bowls your own! For the complete recipe, check the [Full Recipe]. To keep your loaded chicken burrito bowls fresh, follow these tips: - Let the bowls cool down before storing. - Use airtight containers for storage. - Separate the toppings from the base for best flavor. For refrigeration: - Store leftovers in the fridge. - They last for up to 3 days. For freezing: - Portion out the chicken and rice mixture. - Use freezer-safe bags or containers. - They can last for up to 3 months. To reheat, you want to keep the flavors fresh. Here are some methods: - Use a microwave for quick heating. - Heat on medium for 2-3 minutes. - Stir halfway through to heat evenly. You can also use a skillet: - Warm it on medium heat. - Add a splash of broth for moisture. - Heat for about 5-7 minutes. Each component has its own shelf life: - Cooked chicken lasts 3 days in the fridge. - Cooked rice stays good for 4 days. - Black beans last up to 5 days. Watch for spoilage signs: - Look for any strange smells. - Check for mold or discoloration. - If it looks or smells off, throw it out. For more details, refer to the Full Recipe for loaded chicken burrito bowls. Yes, you can use different rice types. Here are some great substitutes for brown rice: - White rice: Cooks faster and has a different texture. - Quinoa: Adds protein and a nutty flavor. - Jasmine rice: Offers a fragrant touch to your bowls. - Cauliflower rice: A low-carb option that is light and healthy. If you crave heat, here are some tips to spice up your dish: - Add diced jalapeños to the chicken when cooking. - Use a spicy salsa or hot sauce as a topping. - Sprinkle crushed red pepper flakes into the chicken mix. - Swap chili powder for a hotter variety, like cayenne. If you need alternatives for sour cream, consider these options: - Greek yogurt: Creamy and packed with protein. - Cottage cheese: A lighter option that adds creaminess. - Avocado: Mash it for a rich and creamy topping. - Hummus: Adds flavor and creaminess with a unique twist. Yes, you can prep this dish in advance. Here’s how: - Cook the rice and chicken ahead of time. Store them separately in the fridge. - Prepare toppings like diced avocado and cheese. Keep them fresh in airtight containers. - Assemble the bowls just before serving for the best flavors and textures. - Reheat the chicken and rice gently to avoid drying them out. This article covered how to make delicious loaded chicken burrito bowls. We explored main ingredients, toppings, and kitchen tools needed. I shared step-by-step cooking tips for rice and chicken, followed by customization options to suit your taste. Storage info ensures you keep your leftovers fresh and safe. In closing, this dish is versatile and easy to make. Remember, you can adapt it to fit any diet. Enjoy creating your perfect burrito bowl!](https://dishtreats.com/wp-content/uploads/2025/06/cee601c9-6b34-4063-8b37-4b14688d7edb-768x768.webp)