Honey Garlic Soy Chicken Drumsticks Easy and Tasty Meal

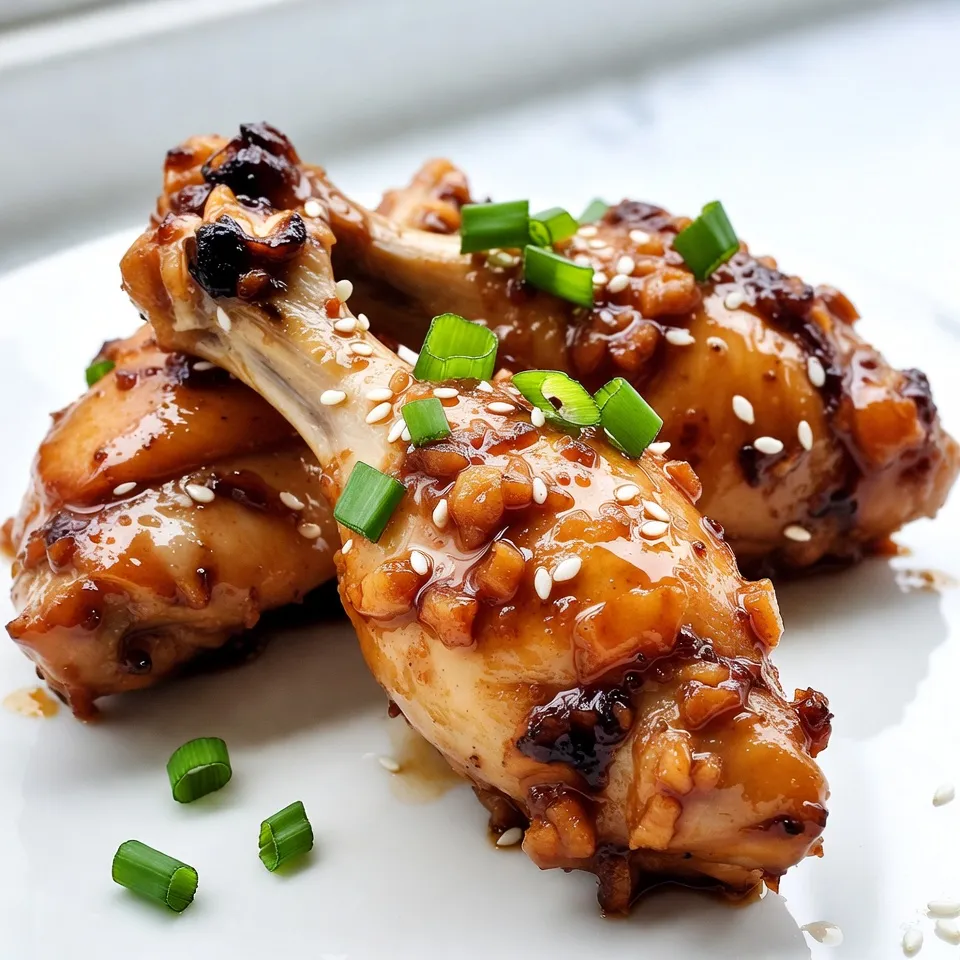
If you’re looking for a quick and delicious meal, Honey Garlic Soy Chicken Drumsticks are for you! This recipe is packed with flavor, yet easy to make. With simple ingredients like honey, soy sauce, and garlic, you’ll impress your family and friends. In just a few steps, your kitchen will smell amazing, and dinner will be ready. Let’s get started on this tasty dish!
Why I Love This Recipe
- Sweet and Savory Balance: The combination of honey and soy sauce creates a perfect harmony of sweetness and umami that elevates the chicken’s flavor.
- Simple Ingredients: With just a handful of pantry staples, this recipe is easy to whip up without any fuss, making it accessible for any home cook.
- Versatile Serving Options: These drumsticks pair well with a variety of sides, from rice to salads, making it a flexible dish for any occasion.
- Deliciously Crispy Skin: Oven-baking with a wire rack ensures that the chicken skin turns out perfectly crispy, enhancing the overall texture of the dish.
Ingredients
To make honey garlic soy chicken drumsticks, you need some key ingredients. Here’s the list for a tasty meal:
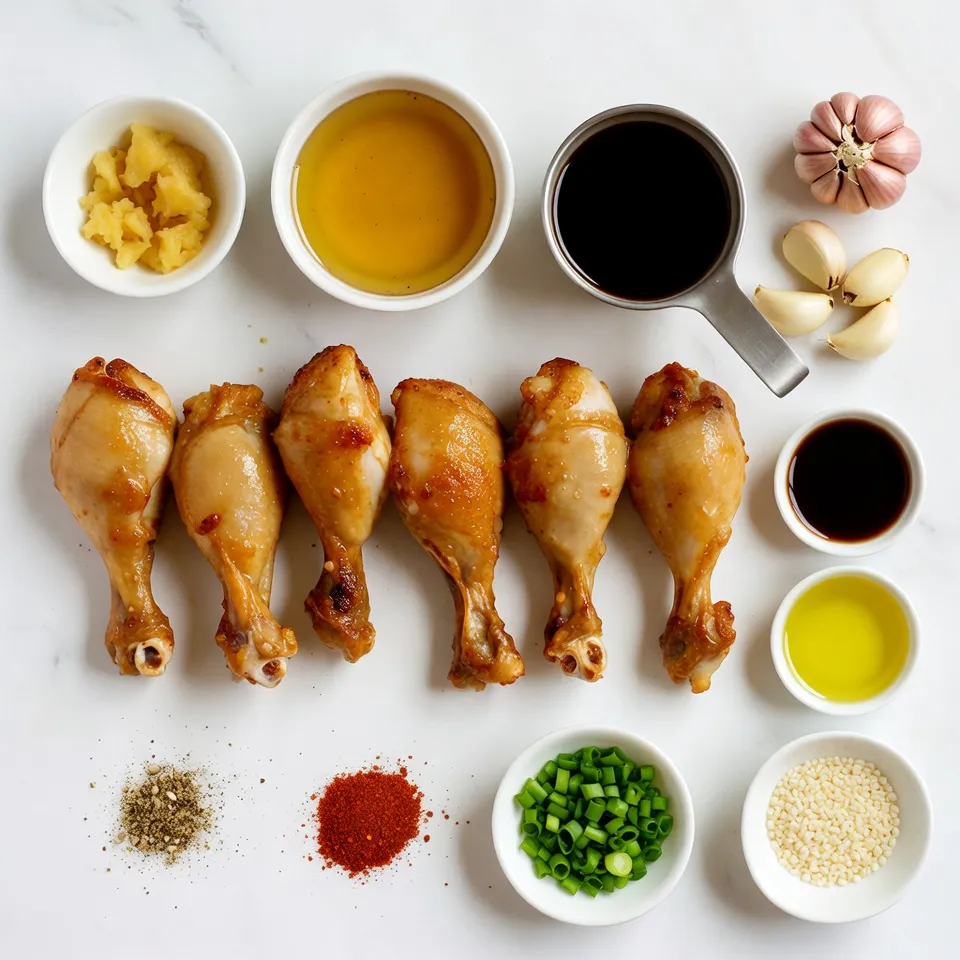
- 8 chicken drumsticks
- 1/3 cup honey
- 1/4 cup low-sodium soy sauce
- 3 cloves garlic, finely minced
- 1 tablespoon freshly grated ginger
- 2 tablespoons olive oil
- 1 teaspoon sesame oil
- 1/2 teaspoon freshly ground black pepper
- 1/2 teaspoon red pepper flakes (optional, for a kick)
- 2 green onions, finely chopped (for garnish)
- 1 tablespoon sesame seeds (for garnish, toasted if desired)
These ingredients blend well to create a flavor-packed dish. Honey gives a sweet touch, while soy sauce adds a savory depth. Garlic and ginger make it aromatic and fresh. The olive and sesame oils bring richness, and black pepper and red pepper flakes add a little heat.
I love using fresh green onions and sesame seeds for garnish. They not only look great but also add a nice crunch. This dish is simple, but the flavors will impress anyone who tries it.

Step-by-Step Instructions
Preparation of Marinade
To start, gather your ingredients. In a medium bowl, take 1/3 cup of honey, 1/4 cup of low-sodium soy sauce, and 3 minced garlic cloves. Add 1 tablespoon of freshly grated ginger, 2 tablespoons of olive oil, and 1 teaspoon of sesame oil. Finally, mix in 1/2 teaspoon of black pepper and, if you like heat, 1/2 teaspoon of red pepper flakes.
Now, whisk these ingredients together until smooth. This step is key for a rich flavor. The honey gives sweetness. The soy sauce adds salt. Garlic and ginger bring fresh notes.
Marinating Chicken
Next, take 8 chicken drumsticks. Place them in a large resealable bag or a shallow dish. Pour the marinade over the chicken, making sure each piece is well coated. Seal the bag or cover the dish tightly.
Refrigerate the chicken for at least 1 hour. For the best taste, let it marinate overnight. This longer time allows the flavors to soak in deeply.
Cooking Process
Now it’s time to cook. Preheat your oven to 400°F (200°C). This heat helps the skin turn crispy while the meat cooks through.
Line a baking sheet with aluminum foil for easy cleanup. Place a wire rack on top of the sheet. This setup ensures heat circulates around the chicken, giving it even cooking. Arrange the marinated drumsticks on the rack. Discard any leftover marinade.
Bake the chicken for 35-40 minutes. You want the skin to turn golden and crispy. For a caramelized look, turn on the broiler for the last 2-3 minutes. Watch closely to prevent burning.
After baking, let the chicken rest for a few minutes. This helps the juices stay inside. Right before serving, sprinkle chopped green onions and sesame seeds on top. This adds flavor and makes your dish look great.
Tips & Tricks
Cooking Tips
Achieving crispy skin
To get that perfect crispy skin, start by patting the chicken drumsticks dry with paper towels. This removes excess moisture and helps the skin crisp up in the oven.
When cooking, place the drumsticks on a wire rack over a lined baking sheet. This allows hot air to circulate around the chicken. The result? Juicy meat with a crunchy outer layer.
Using the broiler effectively
The broiler is your best friend for a golden finish. After baking for 35-40 minutes, switch on the broiler for the last few minutes. This adds a nice caramelization. Keep a close watch to avoid burning. Just a few minutes can make a big difference!
Marinating Advice
Best practices for marinating
Marinating is key for flavor. Use a resealable bag or shallow dish to coat the chicken well. Make sure every piece gets the marinade. This helps the flavors soak into the meat.
Overnight marinating benefits
If you have time, marinate the drumsticks overnight. This deepens the flavor and makes the chicken more tender. Even a few hours can make a big impact, but overnight is best for that rich taste.
Pro Tips
- Marinate Longer for More Flavor: For the best flavor, marinate the chicken drumsticks overnight. This allows the marinade to penetrate the meat, making it more tender and flavorful.
- Use a Meat Thermometer: To ensure that your chicken is cooked perfectly, use a meat thermometer. The internal temperature should reach 165°F (75°C) for safe consumption.
- Broiling for Extra Crispiness: If you want an extra crispy skin, turn on the broiler for the last few minutes of cooking. Just be sure to keep an eye on the chicken to prevent burning.
- Experiment with Marinade Variations: Feel free to customize the marinade by adding other ingredients like orange juice, lime, or even sriracha for a different flavor profile. This will keep your dish exciting!

Variations
Dietary Modifications
You can easily make this dish gluten-free. Use tamari instead of soy sauce. Tamari gives a similar taste without gluten.
If you want to lower the sodium, choose low-sodium soy sauce. This keeps the flavor while reducing salt. You can also skip the soy sauce and use coconut aminos. This option is tasty and low in sodium.
Flavor Variations
To spice things up, add more red pepper flakes. This will give your chicken a nice kick. You can also add a touch of cayenne pepper for extra heat.
If you prefer a sweeter taste, add more honey. A tablespoon or two can really enhance the flavor.
For garnishes, try fresh cilantro or parsley. They add a nice pop of color and flavor. You can serve these drumsticks with rice, quinoa, or a fresh salad. Each side can change the dish’s overall taste and feel.
Storage Info
Storing Leftovers
To keep your honey garlic soy chicken drumsticks fresh, store them in the fridge. Place the cooled drumsticks in an airtight container. You can also wrap them tightly with plastic wrap or aluminum foil. This will prevent moisture loss and keep out odors.
Your chicken will stay good for up to 3 days in the fridge. If you want to keep it longer, you can freeze the drumsticks. Just make sure to use a freezer-safe bag or container. Frozen drumsticks can last up to 3 months.
Reheating Instructions
When reheating, you want to keep the chicken moist. I recommend using the oven for this. Preheat your oven to 350°F (175°C). Place the drumsticks on a baking sheet and cover them with foil. This helps lock in moisture. Heat for about 20 minutes or until warm.
You can also use the microwave, but it may dry out the chicken. If you choose this method, heat in short bursts of 1 minute. Check often to avoid overcooking.
Remember, the goal is to enjoy juicy, flavorful chicken. Avoid methods that dry it out, like frying or grilling without any moisture.
FAQs
How to know when chicken is cooked?
You can tell if chicken is cooked by checking its internal temperature. Use a meat thermometer. The safe temperature for chicken is 165°F (75°C). If you don’t have a thermometer, cut into the thickest part. The juices should run clear, not pink. The meat should be firm and opaque.
Can I use chicken thighs instead of drumsticks?
Yes, you can use chicken thighs instead of drumsticks. Thighs have more fat, so they can be juicier and tastier. Adjust your cooking time to 40-45 minutes, as thighs may take a bit longer. The same marinade works well for both cuts.
What can I serve with honey garlic soy chicken drumsticks?
You can serve these drumsticks with many sides. Here are some tasty options:
- Steamed broccoli
- Rice or quinoa
- Fresh salad
- Roasted vegetables
- Mashed potatoes
These pairings balance the sweet and savory flavors of the chicken. Enjoy your meal!
This article covered how to make tasty honey garlic soy chicken drumsticks. We discussed ingredients, marinade tips, cooking steps, and storage ideas. You learned how to get crispy skin and the best ways to marinate your chicken. Remember, you can modify flavors and make gluten-free versions too. With these tips, you’ll impress your family and friends. Enjoy cooking and savor your delicious dis

Honey Garlic Soy Chicken Drumsticks
Ingredients
- 8 pieces chicken drumsticks
- 1 cup honey
- 1 cup low-sodium soy sauce
- 3 cloves garlic, finely minced
- 1 tablespoon freshly grated ginger
- 2 tablespoons olive oil
- 1 teaspoon sesame oil
- 1 teaspoon freshly ground black pepper
- 1 teaspoon red pepper flakes (optional)
- 2 pieces green onions, finely chopped
- 1 tablespoon sesame seeds
Instructions
- In a medium mixing bowl, thoroughly whisk together the honey, soy sauce, minced garlic, freshly grated ginger, olive oil, sesame oil, black pepper, and red pepper flakes (if you desire some heat). This will create a flavorful marinade for your chicken.
- Place the chicken drumsticks into a large resealable plastic bag or a shallow dish. Pour the marinade over the drumsticks, ensuring each piece is generously coated. Seal the bag or cover the dish, and place it in the refrigerator to marinate for at least 1 hour. For the best results, allow the chicken to marinate overnight to enhance the flavors.
- Preheat your oven to 400°F (200°C). This temperature is perfect for achieving crispy skin while cooking the chicken through properly.
- Line a baking sheet with aluminum foil for quick cleanup, then place a wire rack on top of the lined baking sheet. This will help the hot air circulate around the chicken, ensuring even cooking. Carefully arrange the marinated drumsticks on the rack. Discard any leftover marinade.
- Bake in the preheated oven for 35-40 minutes, or until the chicken is thoroughly cooked and the skin is golden and crispy. For a delightful caramelized finish, you can switch on the broiler for the last 2-3 minutes of baking, but keep a close eye on them to avoid burning.
- Once done, remove the chicken from the oven and let it rest for a few minutes. This will allow the juices to redistribute. Just before serving, sprinkle the drumsticks with finely chopped green onions and a generous sprinkle of sesame seeds for both flavor and visual appeal.


![To make a healthy sweet potato hash, you need these ingredients: - 2 large sweet potatoes, peeled and cut into small cubes - 1 red bell pepper, cut into small cubes - 1 green bell pepper, cut into small cubes - 1 small red onion, finely diced - 3 cloves of garlic, minced - 1 teaspoon smoked paprika - 1 teaspoon ground cumin - ½ teaspoon cayenne pepper (optional, for a spicy kick) - 2 tablespoons olive oil - Sea salt and freshly cracked black pepper, to taste - 4 large eggs (optional, for topping) - Fresh cilantro or parsley, finely chopped (for garnish) These ingredients work well together. Sweet potatoes bring a natural sweetness. Bell peppers add crunch and color. Onions and garlic give a lovely aroma and flavor. Spices like smoked paprika and cumin make this dish really pop. If you want extra protein, you can add eggs on top. Fresh herbs add a nice touch at the end. For the full recipe, you can check the detailed instructions I provided earlier. 1. First, heat 2 tablespoons of olive oil in a large skillet over medium heat. Wait until it shimmers, which means it’s ready. 2. Next, add 2 large sweet potatoes, cut into small cubes. Spread them out in a single layer. Let them cook for about 5 minutes without stirring. This helps them get crispy. 3. After 5 minutes, stir the sweet potatoes. Cook until they are soft and golden, about another 10 minutes. 1. Now, it’s time to add flavor! Stir in 1 small red onion, finely diced. Keep cooking for about 3-4 minutes until the onion is soft and clear. 2. Then, mix in 3 cloves of minced garlic, 1 red bell pepper, and 1 green bell pepper, both cut into small cubes. 3. Add spices: 1 teaspoon smoked paprika, 1 teaspoon ground cumin, and ½ teaspoon cayenne pepper if you want heat. Stir well and let it cook for 5-7 minutes. The peppers should be tender, and the sweet potatoes should be fork-tender. Season with sea salt and black pepper to taste. 1. If you want to add eggs, create 4 small wells in the hash mixture. Crack an egg into each well. 2. Cover the skillet with a lid and cook for about 5 minutes. This cooks the eggs to your liking. For runny yolks, 5 minutes is perfect. This vibrant sweet potato hash is not just easy to make; it’s also packed with flavor. For the full recipe, refer to the earlier sections. To get the best sweet potato hash, focus on the cooking process. Start with small cubes of sweet potato. This helps them cook faster and evenly. Cook them in a hot skillet so they get crispy. I recommend using a cast-iron skillet. It holds heat well and gives a nice sear to your veggies. Spices can really boost the flavor. I love using smoked paprika and cumin. These spices add warmth and depth. If you like heat, add cayenne pepper too. You can adjust the spice levels based on your taste. Start with a small amount and add more if needed. Serving matters! For a pretty look, use shallow bowls. Place the hash in the center, and if you added eggs, make sure they sit on top. This highlights them nicely. A sprinkle of fresh herbs like cilantro or parsley adds color. A slice of creamy avocado on the side makes it even better. For the complete recipe, check out the [Full Recipe]. {{image_4}} Sweet potatoes are packed with nutrients. They are high in vitamins A and C. These vitamins help keep your skin healthy and boost your immune system. One medium sweet potato gives you over 400% of your daily vitamin A needs. This vitamin is great for your eyes and skin. Sweet potatoes also contain fiber. Fiber helps your digestion and keeps you feeling full. By adding sweet potatoes to your breakfast, you get a tasty way to start your day. You include a healthy veggie that fills you with energy. To make this sweet potato hash a balanced meal, add proteins and healthy fats. Protein keeps you strong and satisfied. You can top your hash with eggs for extra protein. Eggs also add a creamy texture. If you want healthy fats, consider adding avocado. This will give your dish a smooth, rich flavor. You can also use nuts or seeds for crunch. Integrating this hash into your diet is easy. It suits different meals, not just breakfast. Serve it for lunch or dinner too. This flexibility makes it a great choice for any day. Enjoy this delicious dish while knowing you are eating well. Check out the Full Recipe for more details! You can change the flavors in your sweet potato hash easily. Adding different vegetables makes it fun. Try adding zucchini or spinach for a fresh twist. Both add great taste and color. You can also use Italian herbs for a different flavor profile. Oregano and basil can enhance your dish. Don't be afraid to mix and match! Adding protein to your hash makes it more filling. You can use chicken or turkey for a hearty meal. Just cook the meat first, then add it to the hash. If you prefer a vegetarian option, tofu or beans work well. Tofu can soak up the flavors of the spices. Beans like black or kidney add fiber and protein. You can serve sweet potato hash in many ways. For breakfast, serve it with eggs on top. The runny yolks add creaminess to each bite. If you're having brunch, add a side salad for balance. You can also create a savory sweet potato bowl. Just layer the hash with your favorite toppings. Think avocado, salsa, or even a dollop of yogurt. Each of these changes keeps your meal exciting! For the full recipe, check out the detailed guide. You can store sweet potato hash in the fridge for up to four days. Make sure to place it in an airtight container. When you’re ready to eat, reheat it on the stove or in the microwave. For the best taste, add a splash of olive oil when reheating. This helps keep the hash moist and tasty. Yes, you can easily make this recipe vegan. Instead of eggs, you can use tofu or chickpea flour. Just scramble the tofu or mix chickpea flour with water to create a batter. You can also replace olive oil with avocado oil or coconut oil. This keeps the flavors rich while making it plant-based. Absolutely! Sweet potato hash is perfect for meal prep. You can cook a big batch and store it in the fridge. Divide it into portions for the week. Just reheat what you need each day. You can also add different proteins or veggies for variety throughout the week. To reheat the hash, use a skillet over medium heat. This helps keep its texture nice. Stir occasionally to ensure even heating. If using a microwave, heat it in short bursts of 30 seconds. Stir in between to avoid hot spots. This way, your hash stays tasty and not mushy. Yes, cheese can add great flavor! Try sharp cheddar or feta for a nice twist. You can sprinkle it on top while the hash is still hot. This lets the cheese melt nicely. If you prefer a creamier texture, consider adding cream cheese or goat cheese. This blog post covered a tasty sweet potato hash recipe from start to finish. We explored essential ingredients, cooking steps, and tips to enhance flavor. You also learned about nutritional benefits and variations to customize your dish. In the end, this recipe is not just easy to make; it’s also a great way to start your day. Try it and enjoy the burst of flavors and textures. You can make it your own with simple adjustments or serve it as is. Your breakfast just got better!](https://dishtreats.com/wp-content/uploads/2025/06/2729619c-b847-4f07-91dc-14d4acdaca85-768x768.webp)

![- 1 lb beef sirloin, thinly sliced against the grain - 1 medium onion, finely chopped - 2 cloves garlic, minced - 8 oz mushrooms, sliced (cremini or button) - 1 cup beef broth (preferably low-sodium) - 1 cup sour cream (or Greek yogurt for a lighter option) - 2 tablespoons all-purpose flour - 2 tablespoons olive oil - 1 teaspoon Dijon mustard - Salt and freshly ground black pepper to taste - 12 oz egg noodles (or your favorite pasta) The beef sirloin is the star of the dish. It should be tender and flavorful. Use fresh onions and garlic to build a tasty base. The mushrooms add a nice earthiness. A good beef broth gives depth to the sauce. The sour cream adds creaminess and tang. If you want a lighter dish, Greek yogurt works well too. - Greek yogurt instead of sour cream - Alternative pasta types If you do not have sour cream, Greek yogurt is a great swap. It gives a similar creamy texture while being a bit healthier. You can also try different pasta types, like fettuccine or penne, based on your preference. - 1 teaspoon Dijon mustard - Salt and freshly ground black pepper - Fresh parsley, finely chopped for garnish Dijon mustard adds a subtle kick and depth of flavor. Salt and pepper are key for bringing out the taste in all the ingredients. A sprinkle of fresh parsley on top makes the dish look bright and fresh. It is a simple way to enhance the visual appeal. - Start by boiling salted water in a large pot. - Once boiling, add 12 oz of egg noodles. - Cook them until al dente, following package instructions. - When ready, drain the noodles and set them aside. - Toss the noodles with a drop of olive oil to keep them from sticking. - Heat 2 tablespoons of olive oil in a large skillet over medium-high heat. - Add 1 lb of thinly sliced beef sirloin to the hot pan. - Season the beef with salt and freshly ground black pepper. - Cook for about 3 to 4 minutes until the beef is browned. - Use a slotted spoon to remove the beef and place it on a plate. - In the same skillet, add the remaining olive oil. - Once hot, stir in 1 medium chopped onion and 2 minced garlic cloves. - Sauté for 2 to 3 minutes until the onion is soft and clear. - Next, add 8 oz of sliced mushrooms, cooking for another 4 to 5 minutes. - When the mushrooms are golden, sprinkle 2 tablespoons of flour over the mix. - Slowly pour in 1 cup of beef broth, whisking constantly. - Keep stirring until the mixture thickens, about 3 to 4 minutes. - Lower the heat to medium-low, then stir in 1 cup of sour cream. - Add 1 teaspoon of Dijon mustard for extra flavor. - Return the beef to the skillet, mixing well in the sauce. - Warm it through for 2 to 3 minutes without boiling. - Taste and adjust the seasoning as needed. - For plating, place a generous portion of noodles on each plate. - Ladle the creamy beef stroganoff over the noodles. - Finish by garnishing with finely chopped fresh parsley. - This adds a pop of color and freshness to your dish. For the full recipe, check out the [Full Recipe]. Enjoy this comforting meal! To make a smooth sauce, avoid lumps. When you add flour, stir it well before adding beef broth. This will help mix everything perfectly. Keep the heat low. You want to see gentle bubbles, not a rolling boil. A simmer will thicken your sauce without breaking it down. Slice your beef against the grain. This makes it tender and easy to chew. If you cut with the grain, the beef will be tough. Pay attention to the mushrooms too. Cook them until they are golden brown. This brings out their flavor and gives a nice texture. About 4-5 minutes should do the trick. Serve your beef stroganoff in shallow bowls. This allows the sauce to spread out and look rich. Add a sprinkle of fresh parsley on top for color. A bit of greenery makes the dish pop. It also adds a fresh taste to each bite. {{image_4}} You can make a tasty vegetarian beef stroganoff. Simply swap the beef for mushrooms or tofu. Mushrooms give a great, meaty flavor. Tofu adds protein and absorbs the sauce well. For a creamy mushroom stroganoff, follow these steps: - Use 16 oz of sliced mushrooms instead of beef. - Cook the mushrooms until they are soft and browned. - Add 1 cup of vegetable broth instead of beef broth. - Stir in the same sour cream for creaminess. If you want a lighter option, try using chicken or turkey. Both cook quickly and taste great in stroganoff. Use diced chicken breast or turkey breast instead of beef. Adjust the cooking time to about 5-7 minutes. Ensure the chicken or turkey is cooked through before adding the sauce. To elevate the flavor, consider adding Worcestershire sauce or a splash of red wine. These ingredients add depth and richness. You can also include fresh herbs like thyme or rosemary. They bring a nice aroma and complement the creamy sauce. A teaspoon of Worcestershire sauce or a ¼ cup of red wine can make a big difference. After enjoying your beef stroganoff, you may have some leftovers. Store them in an airtight container. Refrigerate the stroganoff within two hours of cooking. It will stay fresh for about three to four days. When you reheat, warm it gently over low heat. This keeps the sauce creamy. Stir often to avoid burning. You can also use a microwave. Heat it in short bursts, stirring in between. This method helps the dish heat evenly. If you want to keep beef stroganoff longer, freezing is a great option. To freeze, let the dish cool completely. Then, transfer it to a freezer-safe container. Leave some space at the top for expansion. Seal it tightly to prevent freezer burn. For thawing, the best method is overnight in the fridge. This keeps the flavor and texture nice. If you need it fast, you can use the microwave. Set it to defrost and check every few minutes. After thawing, reheat as I mentioned before, ensuring it warms evenly. You can find the full recipe for this comforting dish above. Enjoy every bite! You can enjoy Classic Beef Stroganoff with several tasty sides. Here are some great options: - Steamed green beans - Roasted broccoli - Mashed potatoes - A fresh garden salad - Garlic bread Each side adds a nice touch. Steamed veggies give color and crunch. Mashed potatoes soak up the sauce well. A salad offers a refreshing contrast. Classic Beef Stroganoff lasts about 3 to 4 days in the fridge. Store it in an airtight container. Always cool the dish before sealing it up. Check for any signs of spoilage before eating. If it smells off or looks strange, throw it away. Yes, you can prepare parts of Classic Beef Stroganoff ahead of time. Cook the beef and sauce, then store them separately from the noodles. When you’re ready to eat, heat the beef and sauce. Cook the noodles fresh for best results. This way, you keep everything tasty and warm. Classic Beef Stroganoff is not gluten-free due to the flour in the sauce. You can make it gluten-free by using cornstarch or gluten-free flour. Be sure to check that your beef broth and noodles are also gluten-free. This way, everyone can enjoy this delicious meal. For the full recipe, check my earlier section. You learned about the key ingredients for Classic Beef Stroganoff, including beef sirloin and egg noodles. We discussed how to cook the noodles, sauté the beef, and prepare a rich sauce. You also saw tips for perfecting the dish and its various options for customization, like vegetarian alternatives. In summary, you can make a delicious meal everyone will enjoy. Remember, cooking is about creativity. Feel free to experiment with flavors and ingredients until it’s just right for you. Enjoy your cooking journey!](https://dishtreats.com/wp-content/uploads/2025/06/f14c56cb-cc13-4cc3-a3ff-e0f76ee8bdb9-768x768.webp)
![To make this dish, you need a few key items. These ingredients work together for great flavor. Here’s what you will need: - 4 chicken thighs, bone-in and skin-on - 1/4 cup honey - 1/4 cup low-sodium soy sauce - 4 cloves garlic, finely minced - 1 tablespoon fresh ginger, grated - 1 teaspoon sesame oil - 1 tablespoon olive oil - Salt and freshly ground black pepper to taste While the main ingredients shine, you can add optional items for extra flavor. Try using these to enhance your dish: - A splash of rice vinegar for acidity - A pinch of red pepper flakes for heat - Fresh herbs like cilantro or parsley for freshness Presentation matters when serving food! Beautiful garnishes make a dish pop. Here’s what to top your chicken with: - 2 green onions, finely sliced - Sesame seeds for a crunchy finish First, grab a medium mixing bowl. Add 1/4 cup honey, 1/4 cup low-sodium soy sauce, 4 minced garlic cloves, 1 tablespoon of grated ginger, and 1 teaspoon of sesame oil. Whisk them together until mixed well. This sweet and savory blend will become your marinade and glaze. It infuses the chicken thighs with tasty flavor. Next, season the chicken thighs. Use salt and freshly ground black pepper on both sides. Heat 1 tablespoon of olive oil in a large skillet over medium-high heat. Once hot, place the chicken thighs skin-side down. Let them sear for about 6-8 minutes. You want that skin golden brown and crispy. This step adds great texture and taste. After searing, flip the chicken thighs. Pour the honey garlic mixture over them. Let it simmer gently, coating the chicken in flavor. Cover the skillet and reduce the heat. Cook for 15-20 minutes until the chicken reaches 165°F (75°C) inside. When the chicken is ready, remove the lid. Turn the heat back up to medium-high. Let the sauce simmer for 5 minutes, stirring often. This will thicken the sauce, helping it stick to the chicken. Once thickened, take the skillet off the heat. Allow the chicken to rest for a few minutes. This lets the juices settle, keeping the meat tender. Serve the chicken on a platter, drizzling the sauce over the top. Add a sprinkle of sliced green onions and sesame seeds for a bright finish. Enjoy your Honey Garlic Chicken Thighs! For the full recipe, refer to [Full Recipe]. To get crispy skin, start with bone-in, skin-on chicken thighs. Pat the skin dry with paper towels. This step removes moisture and helps the skin crisp up nicely. Heat olive oil in a hot skillet before adding the chicken. Sear it skin-side down for 6-8 minutes. Resist the urge to move the chicken too much. Let it cook undisturbed for a golden crust. For tender chicken, season it well with salt and pepper. This enhances flavor and locks in moisture. When cooking, keep an eye on the internal temperature. Aim for 165°F (75°C) to ensure it’s fully cooked. Let the chicken rest after cooking. This lets the juices settle back in, making each bite juicy and satisfying. Honey garlic chicken pairs well with several sides. Try serving it with steamed rice for a classic combo. The rice soaks up the tasty sauce. You can also serve it with a fresh green salad. The crunch of the veggies complements the soft chicken perfectly. Roasted vegetables add color and flavor, making for a well-rounded meal. For the full recipe, check out [Full Recipe]. {{image_4}} You can change the taste of honey garlic chicken thighs by swapping some ingredients. For a fruitier twist, try using maple syrup instead of honey. This will give your dish a rich, deep flavor. You can also replace soy sauce with coconut aminos for a gluten-free option. If you like citrus, add some fresh orange juice to the marinade. It brightens the flavor and adds a zesty note. While chicken thighs are juicy, you can use other cuts too. Chicken breasts work well if you prefer leaner meat. Just remember, they may dry out faster, so watch the cooking time. Drumsticks are another tasty option. They are fun to eat and stay moist during cooking. Whichever cut you choose, make sure it is about the same size for even cooking. Want some heat? It's easy to spice things up! Add red pepper flakes or sriracha to the marinade for a kick. You can also use fresh jalapeños or chili paste for a bolder flavor. Adjust the amount based on your heat tolerance. If you love spicy food, this will make your honey garlic chicken thighs truly exciting. For the full recipe, check out the [Full Recipe]. Store your honey garlic chicken thighs in an airtight container. Make sure to let them cool to room temperature first. They will stay fresh in the fridge for up to 3 days. This keeps the flavors intact and ensures the chicken remains juicy. To reheat, place the chicken thighs in a skillet over low heat. Cover the skillet to keep moisture in. Heat until warmed through, about 5-10 minutes. You can also microwave them, but cover the dish to prevent drying out. You can freeze the chicken thighs for later use. Wrap each thigh in plastic wrap, then place them in a freezer bag. They will last for about 2-3 months in the freezer. Thaw them in the fridge overnight before reheating. This method keeps the chicken tasty and tender. For the full recipe, refer to the section above. You should cook chicken thighs for about 20-25 minutes. Start by searing them for 6-8 minutes on the skin side. Then, flip them over and pour the sauce on top. Cover the skillet and let them simmer for 15-20 minutes. This method helps keep the meat juicy and full of flavor. Yes, you can use boneless chicken thighs. They will cook faster than bone-in thighs. Sear them for about 5-7 minutes on each side. Make sure to check their internal temperature. It should reach 165°F (75°C) to be safe to eat. The best way to check if the chicken is done is with a meat thermometer. Insert it into the thickest part of the thigh. When it reads 165°F (75°C), the chicken is ready. You can also cut into the meat. If the juices run clear, it’s cooked. To adjust the sweetness, add more honey for a sweeter taste. If you want it less sweet, add more soy sauce or a splash of vinegar. Taste the sauce as you go. This way, you can find the perfect balance for your dish. For the full recipe, please check the [Full Recipe]. Honey garlic chicken thighs are simple and tasty. We covered the key ingredients and optional marinades. You learned how to prepare the marinade and cook the chicken. I shared tips for crispy skin, tender meat, and delicious sides. We also explored variations and storage tips to keep your meals fresh. When you try this recipe, it will impress your family and friends. Enjoy the rich flavors and make it your own!](https://dishtreats.com/wp-content/uploads/2025/06/32d13aa5-8be9-48e3-be5a-1699ade8ce81-768x768.webp)

