Honey Garlic Chicken Stir Fry Flavorful and Easy Meal

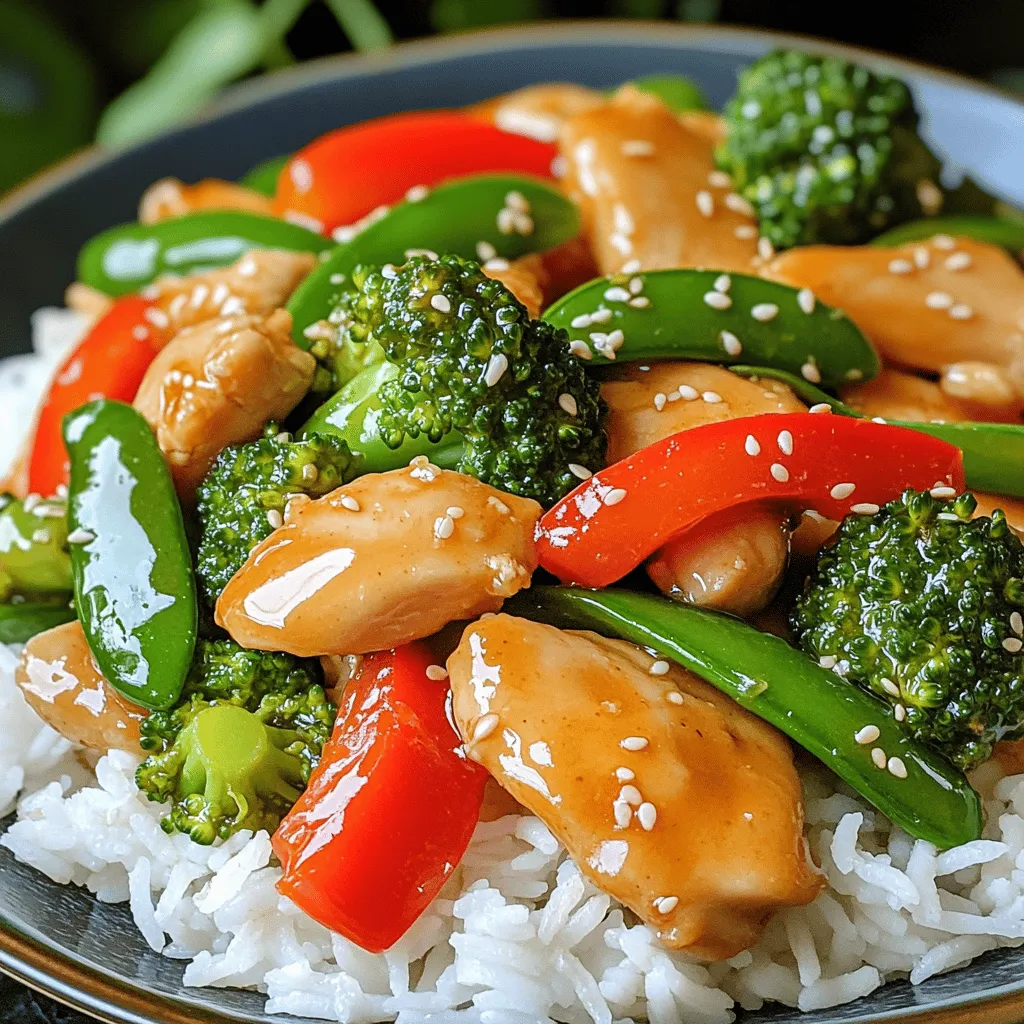
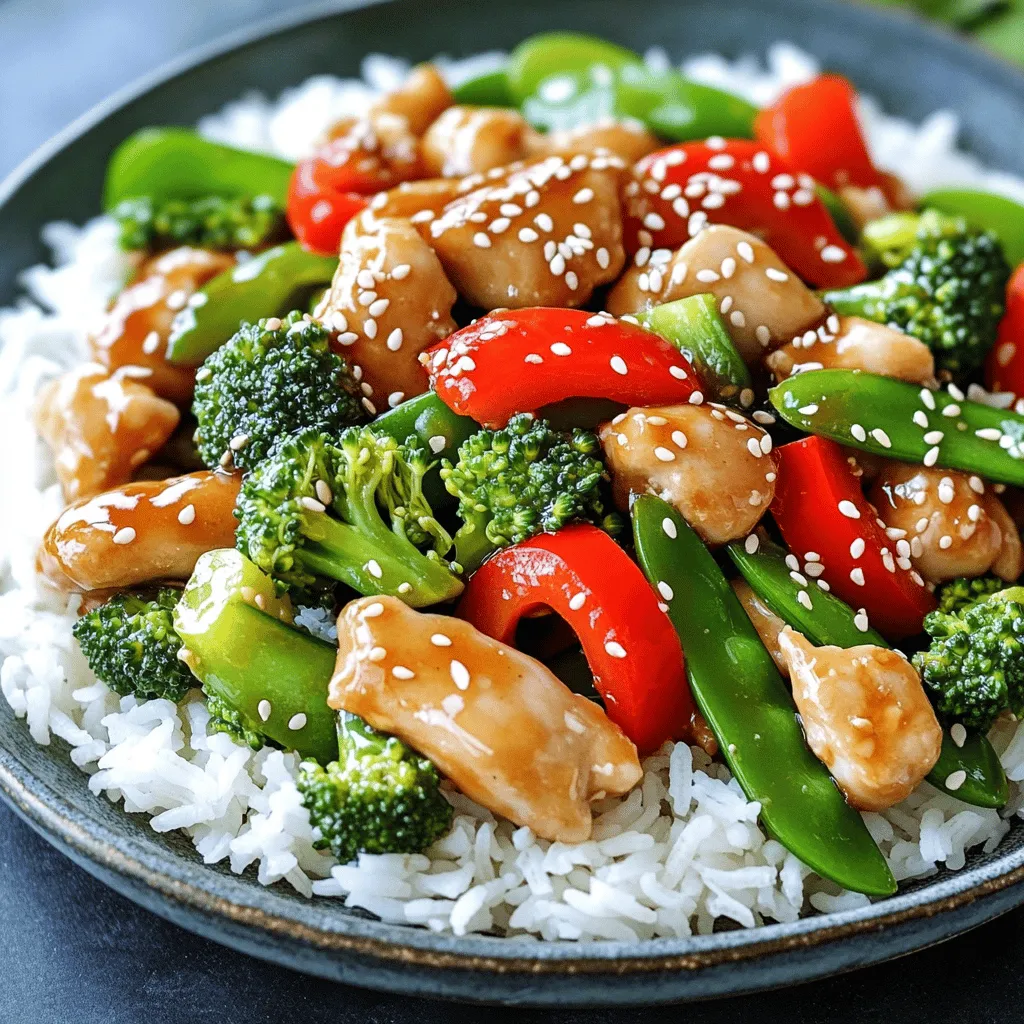
If you’re looking for a quick and satisfying meal, try my Honey Garlic Chicken Stir Fry! This dish is bursting with flavor and comes together in just 30 minutes. With tender chicken, crisp veggies, and a delightful honey soy sauce, it’s perfect for busy nights. Plus, you can customize it to suit your taste. Let’s dive in and learn how to whip up this easy, tasty dinner!
Ingredients
To make Honey Garlic Chicken Stir Fry, gather these fresh ingredients:
- 1 lb boneless, skinless chicken breast
- 2 tablespoons honey
- 3 tablespoons soy sauce
- 4 cloves garlic, minced
- 1 tablespoon fresh ginger, grated
- 1 bell pepper, sliced
- 1 cup broccoli florets
- 1 cup snap peas
- 2 tablespoons vegetable oil
- 1 teaspoon sesame oil
- Salt and black pepper
- Sesame seeds for garnish
- Cooked rice or noodles for serving
These ingredients come together to create a vibrant and tasty meal. The chicken provides protein, while the vegetables add color and crunch. Honey and soy sauce form a sweet and savory base. Garlic and ginger bring warmth and depth of flavor.
Make sure your chicken is cut into bite-sized pieces for even cooking. Fresh vegetables keep the dish light and healthy. You can swap out any of these veggies based on your personal taste or what you have on hand.
Using these ingredients, you can create a dish that is not only delicious but also packed with nutrients. Enjoy cooking!
Step-by-Step Instructions
Preparation of Sauce
- Combine honey, soy sauce, garlic, and ginger in a bowl.
- Whisk until blended.
Making the sauce is super easy. Start by mixing honey, soy sauce, minced garlic, and fresh ginger in a bowl. Using a whisk, blend these ingredients well. This sauce adds a sweet and savory kick to your stir fry.
Cooking Chicken
- Heat vegetable oil in a skillet or wok.
- Add chicken, season, and stir-fry until golden brown.
Next, heat vegetable oil in a large skillet or wok over medium-high heat. Once the oil is hot, add the bite-sized chicken pieces. Sprinkle a little salt and black pepper on the chicken. Stir-fry it for about 5 to 7 minutes until the chicken turns golden brown and is fully cooked.
Adding Vegetables
- Push chicken to one side.
- Place bell pepper, broccoli, and snap peas in the skillet.
- Stir-fry until vegetables are vibrant and slightly tender.
Now, push the chicken to one side of the skillet. This makes room for the veggies. Add sliced bell pepper, broccoli florets, and snap peas. Stir-fry these for about 3 to 4 minutes. You want them to be bright and just tender, keeping some crunch.
Combining Ingredients
- Pour honey garlic sauce over chicken and vegetables.
- Stir and cook for additional 2-3 minutes.
After the veggies are ready, pour your honey garlic sauce over the chicken and veggies. Stir everything gently so that the sauce coats all the pieces. Cook for another 2 to 3 minutes. This allows the sauce to thicken and flavor the mix.
Finishing Touches
- Drizzle sesame oil and toss to combine.
- Serve hot over rice or noodles.
Finally, drizzle sesame oil over your stir fry. Toss everything together to mix well. Serve it hot over a bed of rice or noodles. For a fun touch, sprinkle some sesame seeds on top. Enjoy your delicious meal!
Tips & Tricks
Cooking Tips
- Use high heat for better stir-frying results. This helps the chicken cook fast and stay juicy.
- Ensure chicken is cut evenly for uniform cooking. Small pieces cook more evenly, giving you tasty bites.
Flavor Enhancements
- Add crushed red pepper for heat. This simple step adds a nice kick to the dish.
- Include additional vegetables like carrots or snap peas. These add color and crunch to your stir fry.
Presentation Tips
- Use shallow bowls for serving. This allows the bright colors of your meal to shine through.
- Garnish with sesame seeds and fresh herbs. A sprinkle of these makes your dish look and taste great!

Variations
Veggie-Packed Options
You can make this dish even more fun! Try swapping chicken for tofu or shrimp. Both options add a different taste and texture. You can also load up on veggies. Consider adding mushrooms or zucchini for extra crunch and color. These changes keep the meal fresh and exciting.
Sauces and Marinades
Want to change the flavor? Experiment! Use teriyaki or sweet chili sauce instead of honey garlic. These sauces add a sweet and savory twist. You can also squeeze in some citrus juice. Lemon or lime gives a nice tang that brightens the dish.
Gluten-Free Adaptations
If you need a gluten-free meal, it’s simple! Just use gluten-free soy sauce or tamari. These options taste great and fit your needs. You can also swap noodles for rice. This way, you keep it gluten-free while enjoying a hearty meal.
Storage Info
Refrigeration
Store any leftovers in an airtight container in the fridge. This keeps your food fresh and safe. For the best taste, consume it within 3 days. After that, the flavors may fade.
Freezing Instructions
You can freeze Honey Garlic Chicken Stir Fry. Use a sealed container for this. It will stay good for up to 2 months. When you’re ready to eat, thaw it overnight in the refrigerator. This way, it warms up evenly.
Reheating Methods
To reheat your stir fry, use a skillet over medium heat. This method helps keep the chicken and veggies tasty. You can also use a microwave. Heat until warmed through, stirring occasionally to ensure even heating.
FAQs
How can I make Honey Garlic Chicken Stir Fry spicier?
To spice it up, add red pepper flakes or a dash of sriracha to the sauce. This adds heat without changing the sweet flavor. You can start with a small amount and taste as you mix. Adjust until it suits your taste.
Can I use frozen vegetables?
Yes! You can use frozen vegetables directly in the skillet. There’s no need to thaw them first. This makes quick dinners even easier. Just toss them in with the chicken and cook until they are hot and tender.
What can I serve with Honey Garlic Chicken Stir Fry?
This dish pairs well with cooked rice, noodles, or even lettuce wraps. Rice soaks up the sauce nicely. Noodles add a fun twist, while lettuce wraps give a crunchy bite. Choose what you like best!
How long does it take to prepare?
Prep time is about 10 minutes. The total cooking time is around 20 minutes. This makes it a quick meal option for busy days. You can have dinner ready in under half an hour!
Is this recipe suitable for meal prep?
Yes! Honey Garlic Chicken Stir Fry is great for meal prep. It keeps well in the fridge for several days. You can also freeze it for up to two months. Just reheat when you’re ready to enjoy it!This dish is easy and full of flavor.
Detailed ingredient list
- 1 lb boneless, skinless chicken breast, cut into bite-sized pieces
- 2 tablespoons honey
- 3 tablespoons soy sauce
- 4 cloves garlic, minced
- 1 tablespoon fresh ginger, grated
- 1 bell pepper (red or yellow), sliced into thin strips
- 1 cup broccoli florets, washed
- 1 cup snap peas, trimmed
- 2 tablespoons vegetable oil (for frying)
- 1 teaspoon sesame oil (for finishing)
- Salt and freshly ground black pepper to taste
- Sesame seeds for garnish
- Cooked rice or noodles for serving
Step-by-step cooking guide
1. Mix honey, soy sauce, garlic, and ginger in a bowl. Whisk them well to blend.
2. Heat vegetable oil in a large skillet or wok over medium-high heat.
3. Add chicken pieces. Season with salt and black pepper. Stir-fry for 5-7 minutes, until golden brown.
4. Push chicken to one side of the skillet. Add bell pepper, broccoli, and snap peas. Stir-fry for 3-4 minutes.
5. Pour the honey garlic sauce over chicken and vegetables. Stir gently for 2-3 minutes to coat.
6. Drizzle sesame oil over the stir fry and toss again to mix well.
7. Serve hot over rice or noodles. Top with sesame seeds for extra crunch.
Includes prep time, cook time, and servings
- Prep Time: 10 minutes
- Total Time: 20 minutes
- Servings: 4
This meal is quick to make and tastes great! You can enjoy it with friends or family.
This blog post provides a simple and tasty recipe for Honey Garlic Chicken Stir Fry. You learned about the key ingredients, easy cooking steps, and helpful tips. Plus, I offered variations for different diets and tastes. Remember, this dish is quick to make and perfect for meal prep. With practice, you can make it your own. Enjoy creating a delicious stir fry that your friends and family will love!


![To create the Roasted Beet and Goat Cheese Salad, you will need the following ingredients: - 4 medium beets, scrubbed and trimmed - 2 tablespoons extra virgin olive oil, divided - Sea salt and freshly ground black pepper to taste - 4 cups mixed greens (arugula, spinach, and kale) - 1/2 cup creamy goat cheese, crumbled - 1/4 cup walnuts, toasted and roughly chopped - 1/4 cup dried cranberries - 2 tablespoons balsamic vinegar - 1 tablespoon pure honey - Fresh herbs (basil or parsley) for garnish Each ingredient adds not just flavor, but also nutrition. Beets are rich in vitamins and minerals. They help boost your energy levels. Goat cheese brings a creamy texture and a tangy taste. It pairs well with the sweetness of beets and cranberries. Walnuts add crunch and healthy fats, while mixed greens provide fiber. The dressing of balsamic vinegar and honey ties all the flavors together. You can find the Full Recipe for step-by-step instructions to make this delightful salad. 1. Preheat the oven: Set your oven to 400°F (200°C). This makes sure the beets roast well. 2. Wrap the beets: Take each beet and wrap it in foil. Drizzle 1 tablespoon of olive oil on them. Add sea salt and black pepper for flavor. Seal the foil tightly. 3. Roast the beets: Place the wrapped beets on a baking sheet. Roast them in the oven for 45-60 minutes. They are done when a fork easily pierces them. 1. Peel and slice the beets: Let the beets cool a bit. Then, peel off the skin. I recommend wearing gloves to avoid stains. Cut the beets into wedges for a nice look. 2. Combine salad ingredients: In a large mixing bowl, add the mixed greens, sliced roasted beets, crumbled goat cheese, toasted walnuts, and dried cranberries. Gently mix everything together. 1. Prepare the dressing: In a small bowl, whisk together the balsamic vinegar, the last tablespoon of olive oil, and honey. Stir well until combined. Taste it and add salt and pepper as needed. 2. Dress the salad: Drizzle the dressing over the salad. Toss everything gently to coat the greens and other ingredients. 3. Serve the salad: Plate the salad right away. Garnish with fresh herbs for a pop of color and extra flavor. For the full recipe, check out the Beet the Ordinary: Roasted Beet and Goat Cheese Salad. - Choosing the right beet size for even cooking: I recommend using medium beets. They cook evenly and are easy to handle. If you use larger beets, they may take longer to roast, leading to uneven texture. Smaller beets cook too quickly and may dry out. - How to properly season the beets: Before wrapping the beets in foil, drizzle them with olive oil. Add a generous pinch of sea salt and freshly ground black pepper. This simple seasoning enhances their natural sweetness and flavor during roasting. - Creative ways to plate the salad: For a stunning presentation, use a large, flat platter. Layer mixed greens as a base. Fan out the roasted beet wedges on top and sprinkle crumbled goat cheese and walnuts over the salad. This method creates a colorful and inviting look. - Garnishing tips to elevate the dish: Fresh herbs can add color and flavor. A sprinkle of chopped basil or parsley brightens the dish. You can also use edible flowers for a special touch, making it perfect for gatherings or celebrations. - Best practices for prepping ingredients in advance: You can roast the beets a day ahead. Once cooled, wrap them in plastic to keep fresh. Store the mixed greens and other ingredients separately. This way, you can quickly assemble your salad just before serving, keeping everything crisp and tasty. For the complete recipe, see [Full Recipe]. {{image_4}} You can switch up the greens in your salad to make it special. Try using arugula for a peppery kick or romaine for a crisp bite. Each green offers a different taste and texture, giving your salad a new vibe. If you want to change the cheese, feta or blue cheese can work wonders. Feta adds a salty flavor, while blue cheese brings a bold touch. Both complement the sweetness of the beets nicely. The right dressing can elevate your salad. A citrus vinaigrette adds a bright and zesty flavor. Mix fresh lemon juice with olive oil for a quick option. If you want something creamy, a yogurt dressing is perfect. It pairs well with the tang of goat cheese and makes the salad feel lush. Don’t hesitate to experiment with different dressings to find your favorite. Add protein to make your salad more filling. Grilled chicken is a great choice, giving the salad a hearty feel. For a plant-based option, chickpeas work well. They add protein and texture. You can also sprinkle seeds, like pumpkin or sunflower seeds, for some crunch. Fresh fruit, such as sliced pears or apples, can add a sweet note. Each add-in brings its own charm to the dish, making it unique every time. Don’t forget to check out the Full Recipe for more inspiration! To keep your roasted beet and goat cheese salad fresh, store it in an airtight container. Place any leftovers in the fridge. The salad will stay good for about three days. Make sure to keep the dressing separate until you are ready to eat. This helps keep the greens crisp and fresh. If you want to store beets for longer, you can freeze them. First, roast the beets as in the Full Recipe. Let them cool, then peel and slice them. Place the slices in a freezer-safe bag, removing as much air as possible. Beets can last up to six months in the freezer. However, I do not recommend freezing the prepared salad. The greens won't hold up well after thawing. When it's time to eat your stored salad, you can reheat the beets if you like. Just warm them in the microwave for about 30 seconds. Toss the salad again after reheating. This helps mix the flavors back together. If you stored the salad dressed, consider adding a bit more dressing before serving. This keeps everything tasty and vibrant. How long do roasted beets last in the fridge? Roasted beets can last up to five days in your fridge. Store them in an airtight container. This way, they stay fresh and tasty for your salads. Can I use pre-cooked beets for this recipe? Yes, you can use pre-cooked beets. They are a great time-saver. Just cut them into wedges and add them to your salad. They will still taste delicious! What type of goat cheese is best for salads? A creamy goat cheese works best for this salad. It adds a nice richness and tang. Look for soft, crumbled varieties for easy mixing. Can I substitute goat cheese with a dairy-free option? Absolutely! You can use a dairy-free cheese made from nuts. Look for a creamy cashew cheese or tofu-based option. Both will provide a nice flavor. What are the health benefits of beet and goat cheese salad? This salad is packed with nutrients. Beets are high in fiber and antioxidants. Goat cheese adds protein and calcium. Together, they support heart health and digestion. How many calories are in a serving of this salad? One serving of this salad has about 300 calories. This includes the beets, goat cheese, nuts, and dressing. It’s a great balance of flavors and nutrients without too many calories. For the complete recipe, check out the Full Recipe. This salad combines roasted beets, fresh greens, and tangy goat cheese. You learned how to roast beets and mix vibrant ingredients for a delicious dish. Remember to choose the right beet size and season well for great texture. Don't hesitate to try different greens or dressings to make it your own. Salad prep can be easy, helping you save time. Enjoy this healthy meal that packs flavor and nutrients. Make it today and impress yourself with your cooking skills!](https://dishtreats.com/wp-content/uploads/2025/06/a3a0567a-1f00-4857-8ef4-d1e9b38b024f-768x768.webp)


![- 2 cans young green jackfruit - 1 tablespoon olive oil - 1 medium onion, finely chopped - 1 teaspoon smoked paprika - 1 teaspoon ground cumin - 1 teaspoon chili powder - 1/2 teaspoon black pepper - 1/2 teaspoon cayenne pepper (adjust to taste) - 4 sturdy sandwich rolls - Coleslaw (optional, for topping) When making BBQ pulled pork sandwiches, the ingredients are key. Young green jackfruit is the star. It has a texture similar to pulled pork and absorbs flavors well. Use two cans for four servings, and don’t forget to rinse and drain them! For the base flavor, olive oil and onion work wonders. The oil helps to sauté the onion, which adds sweetness and depth. A finely chopped onion is best for even cooking and flavor distribution. Spices bring the dish to life. Smoked paprika adds a lovely smokiness, and ground cumin gives it warmth. Chili powder adds a kick, while black and cayenne pepper let you control the heat. For the sandwich, sturdy rolls hold up best. Choose your favorite type. Optional coleslaw adds crunch and creaminess. It’s a nice touch that balances the rich BBQ flavor. For the full recipe, follow the steps to create your BBQ pulled pork sandwiches that are simple and tasty! To start, you need to shred the jackfruit. Grab two cans of young green jackfruit, and drain them well. Rinse the jackfruit under cool water. With clean hands or two forks, pull apart the jackfruit into thin strands. Aim for a texture that mimics pulled pork. Set the shredded jackfruit aside for later use. Now, let’s sauté the onions and garlic. Heat one tablespoon of olive oil in a large skillet over medium heat. Add one finely chopped medium onion. Stir occasionally until the onion turns soft and translucent, about five minutes. Next, add minced garlic. Use four cloves for a nice kick. Sauté for another minute. You want the garlic fragrant, not browned. It’s time to bring it all together! Add the shredded jackfruit to the skillet. Mix well to coat the jackfruit with the onion and garlic. Now, it’s spice time! Incorporate one teaspoon of smoked paprika, one teaspoon of ground cumin, and one teaspoon of chili powder. Add half a teaspoon of black pepper and half a teaspoon of cayenne pepper. Stir everything together for a minute to let the flavors meld. Next, pour in one cup of BBQ sauce. You can use store-bought or homemade, depending on your preference. Mix until all the jackfruit strands are covered in sauce. Lower the heat and cover the skillet. Let it simmer for 20 to 25 minutes. Stir occasionally, adding a splash of water if it looks dry. Taste and season with salt as needed. Now, while the jackfruit simmers, you can toast the sandwich rolls. Preheat your oven or a skillet. Lightly toast the rolls until golden brown. This step adds a nice crunch. Once the jackfruit is ready, it’s time to assemble your sandwiches. Grab a toasted roll, spoon a good amount of BBQ jackfruit onto the bottom half. If you want, add some coleslaw for extra crunch. Top with the other half of the roll, and enjoy your smoky sweet BBQ pulled jackfruit sandwich! For the full recipe details, check [Full Recipe]. To get the best taste, adjust the spices to fit your likes. Start with the base spices: smoked paprika, ground cumin, and chili powder. These give the jackfruit a deep, rich flavor. If you like it spicy, add more cayenne pepper. Remember, you can always add more spice, but you can’t take it away! Toasting the rolls makes a big difference. Use a skillet or an oven. If using a skillet, heat it over medium heat. Place the rolls cut-side down and toast until golden brown. If you choose the oven, set it to 375°F (190°C). Bake the rolls for about 5-7 minutes. This adds a nice crunch that pairs well with the soft jackfruit. When serving BBQ pulled pork sandwiches, make it fun! Use a wooden board for a rustic look. Place the sandwiches on it and add a small bowl of BBQ sauce for dipping. You can also add extra coleslaw on the side for a pop of color and crunch. This makes your meal look inviting and delicious. For the full recipe, check out the recipe section! {{image_4}} Using a slow cooker makes this dish simple and hands-off. Start by shredding the jackfruit as before. Place it in the slow cooker with olive oil, chopped onion, and minced garlic. Stir in the spices: smoked paprika, ground cumin, chili powder, and black pepper. Pour in your BBQ sauce. Cover and cook on low for 6 to 8 hours. The jackfruit will absorb all the flavors and become tender. You’ll love how easy this method is! Different areas have their own special takes on BBQ pulled pork. In the South, you might try adding vinegar-based sauces for a tangy twist. In Texas, a smoky chipotle sauce can add a kick. Up North, you might find a sweeter sauce with apple cider. Feel free to explore these local flavors. Your sandwiches will reflect your own region's tastes! If you want to switch things up, there are other great options. You can use mushrooms or lentils. Both provide a hearty texture. For a lighter option, consider using shredded zucchini or eggplant. They soak up flavors well too. Just remember to adjust your spices to match. Enjoy the creativity in your kitchen! To keep your leftover sandwiches tasty, store them in an airtight container. Make sure to separate the jackfruit mixture from the rolls. This helps prevent sogginess. Leftover jackfruit can last in the fridge for about three to four days. If you plan to eat them soon, add some extra BBQ sauce to keep them moist. If you want to save the jackfruit mixture for later, freezing works well. First, let the jackfruit cool completely. Then, place it in a freezer-safe container or bag. Make sure to remove any air. This helps avoid freezer burn. The mixture can stay fresh for about three months. Just remember to label the container with the date. When you’re ready to enjoy your pulled pork sandwiches, reheating is key. For the best results, use the stovetop. Place the jackfruit in a skillet over low heat. Add a splash of water or BBQ sauce to keep it moist. Stir until heated through. If you prefer the oven, preheat it to 350°F (175°C). Cover the jackfruit in a baking dish with foil. Heat for about 15 minutes. Enjoy your delicious BBQ pulled pork sandwiches! Yes, you can make BBQ pulled pork sandwiches ahead of time. This dish is perfect for meal prep. I suggest cooking the jackfruit and storing it in the fridge. It stays fresh for about 3 to 5 days. When you're ready to eat, just reheat it on the stove. You can also toast the rolls just before serving. This way, the sandwiches taste fresh and warm. The best BBQ sauce is one that fits your taste. If you like sweet, try a honey BBQ sauce. If you prefer spicy, go for a chipotle sauce. There are many great store-bought options, like Sweet Baby Ray's or Stubb's. You can also make your own. A mix of ketchup, vinegar, and spices creates a great flavor. To make jackfruit taste like pulled pork, focus on flavor. Start by shredding the jackfruit into thin strands. Cook it with onions, garlic, and spices like smoked paprika and cumin. These add depth to the dish. The BBQ sauce is key too. It coats the jackfruit and infuses it with rich flavor. Let it simmer for a while to soak up all those tasty notes. This article covered how to make BBQ pulled jackfruit sandwiches. You learned about the main ingredients, spices, and how to prepare each component. I shared step-by-step instructions to help you shred, sauté, and combine ingredients. You also received tips for perfecting flavor, toasting rolls, and creative presentations. Lastly, we explored variations, storage info, and frequently asked questions. Enjoy cooking this tasty dish that’s both fun and simple to make!](https://dishtreats.com/wp-content/uploads/2025/06/394fc23c-fade-4441-b59c-acd30966e9f2-768x768.webp)
