High-Protein Banana Bread Oatmeal Cups Recipe

Are you ready to elevate your breakfast game? These High-Protein Banana Bread Oatmeal Cups are not only quick to make, but they also pack a nutritious punch. With ripe bananas, rolled oats, and delicious add-ins, you’ll have a tasty treat that fuels your day. Let’s dive into this easy recipe, packed with protein and flavor, perfect for busy mornings or a snack on the go!
Ingredients
Main Ingredients
- 2 ripe bananas
- 1 ½ cups rolled oats
- 1 cup unsweetened almond milk
- 2 scoops vanilla protein powder
- 1 tsp baking powder
Optional Add-ins
- ¼ cup chopped walnuts or pecans
- ¼ cup dark chocolate chips
- 1 tsp ground cinnamon
- ½ tsp vanilla extract
Equipment Needed
- Muffin tin
- Mixing bowls
- Whisk
Gather these items before you start. The ripe bananas give a sweet taste and make the cups moist. Use rolled oats for a hearty texture. Unsweetened almond milk keeps it light. The vanilla protein powder packs in protein. Baking powder makes the cups rise and stay fluffy.
For a fun twist, add walnuts or pecans. They add crunch and make it more filling. Dark chocolate chips bring a sweet surprise in every bite. Ground cinnamon gives a warm flavor. A splash of vanilla extract enhances the taste.
Make sure you have a muffin tin ready! Muffin cups help shape the oatmeal cups. Mixing bowls are handy for combining all the ingredients. A whisk helps mix everything well. Having these tools ready makes cooking easier and more fun!
Step-by-Step Instructions
Prepping the Oven and Muffin Tin
- Preheat oven to 350°F (175°C).
- Prepare muffin tin with liners or grease.
Mixing the Wet Ingredients
- Mash 2 ripe bananas in a bowl.
- Mix in 1 cup of unsweetened almond milk.
- Add ½ tsp of vanilla extract and stir well.
Combining Dry Ingredients
- Add 1 ½ cups of rolled oats to the bowl.
- Mix in 2 scoops of vanilla protein powder.
- Add 1 tsp of baking powder, 1 tsp of cinnamon, and a pinch of salt.
- Stir gently until everything is combined.
Filling the Muffin Tin
- Spoon the batter into each cup.
- Fill each cup about three-quarters full.
Baking the Oatmeal Cups
- Place the muffin tin in the oven.
- Bake for 20-25 minutes until golden brown.
- Check with a toothpick; it should come out clean.
- Let them cool for 5 minutes in the tin.
- Transfer to a wire rack to cool completely.
Tips & Tricks
Achieving the Perfect Texture
To get the right texture, do not overmix the batter. Mixing too much can make the cups dense. Just stir until the dry and wet ingredients blend. After baking, let the cups cool for five minutes in the tin. Then, transfer them to a wire rack. This cooling time helps them firm up and enhances the overall texture.
Flavor Enhancements
You can add extra spices for more flavor. Try nutmeg or ginger for a warm touch. If you love chocolate, swap in chocolate protein powder for a richer taste. You can also add a splash of maple syrup for sweetness. This adds a lovely touch without much effort.
Serving Suggestions
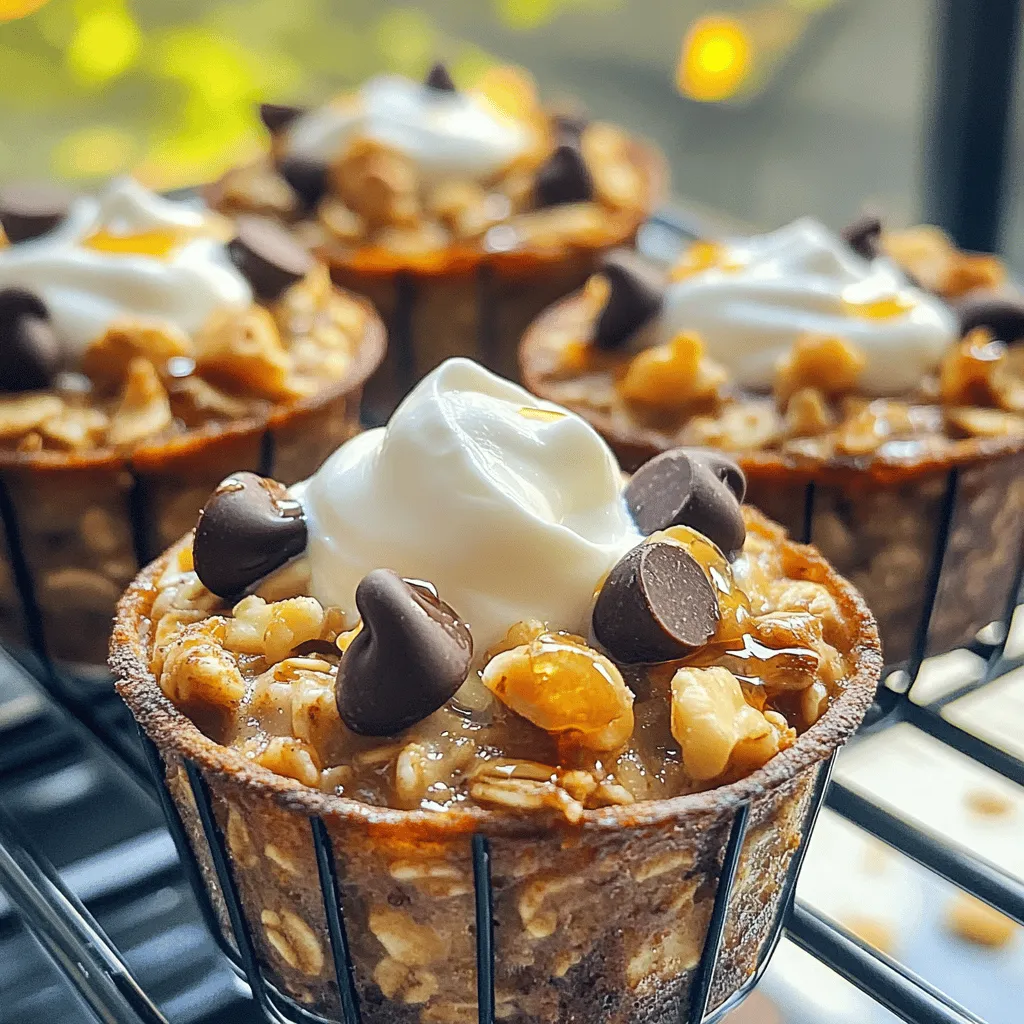
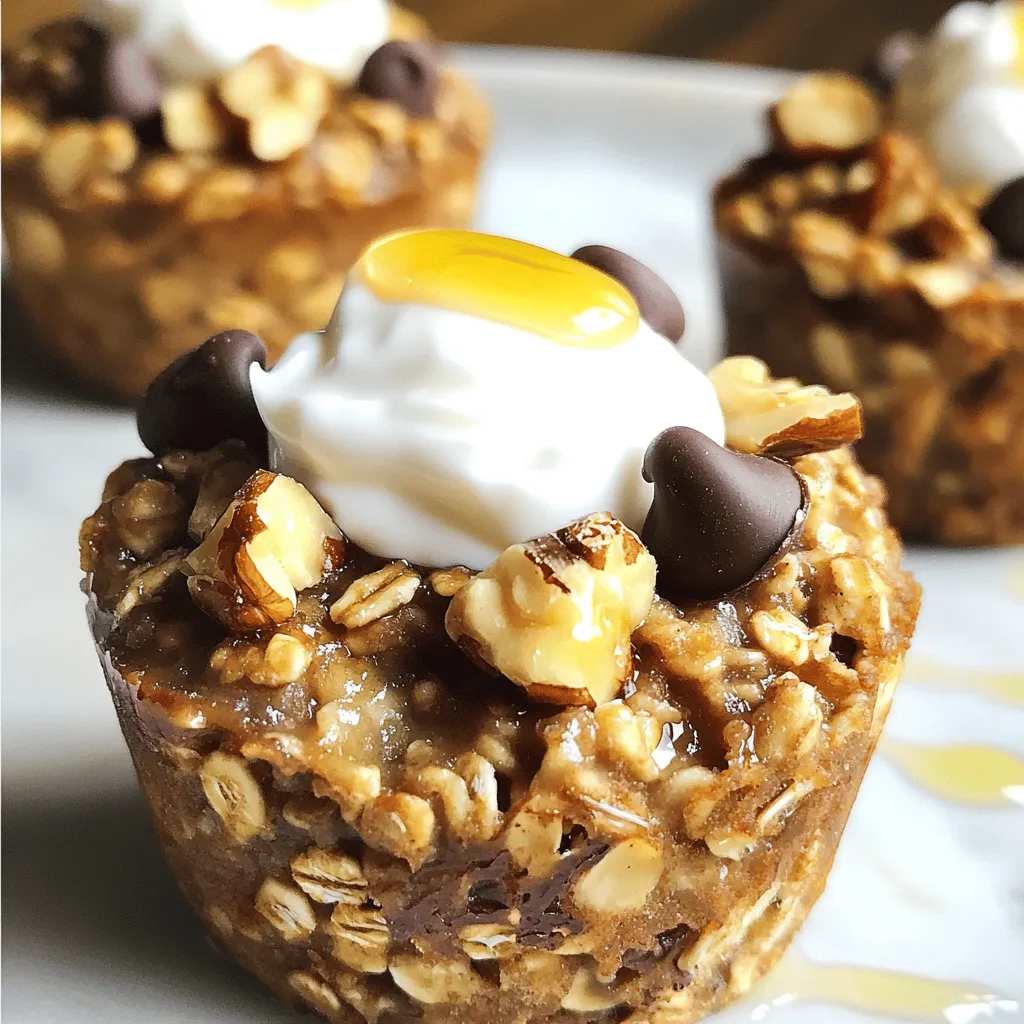
Serve these cups warm for the best taste. Top them with creamy Greek yogurt for extra protein. Drizzle honey on top to make them sweeter. You can also sprinkle some nuts for crunch. These oatmeal cups are great for breakfast or as a snack. Enjoy them fresh, or keep them handy for a quick bite later!

Variations
Flavor Variations
You can change the flavor of your oatmeal cups easily. A peanut butter banana version is a great choice. Just mix in a few tablespoons of peanut butter with the wet ingredients. This adds creaminess and a nutty taste.
Another fun option is a pumpkin spice variation for autumn. Add ½ cup of pumpkin puree and 1 tsp of pumpkin spice to the mixture. This gives a warm, cozy flavor that is perfect for fall.
Dietary Adjustments
If you need gluten-free options, use gluten-free oats. These oats work well just like regular oats. They keep the same texture and taste, so you don’t miss out.
For vegan modifications, simply replace the protein powder with a plant-based option. You can also use soy or oat milk instead of almond milk. This way, everyone can enjoy these tasty cups.
Seasonal Additions
You can add seasonal fruits or nuts to make your oatmeal cups special. In summer, toss in some fresh berries. In winter, think about nuts like pecans or almonds for extra crunch.
Experimenting with flavors based on holidays adds excitement too. For instance, during the winter holidays, add a touch of peppermint extract or some dried cranberries. These small changes can make a big difference in taste and fun!
Storage Info
How to Store Oatmeal Cups
To keep your oatmeal cups fresh, place them in an airtight container. This helps keep moisture out and keeps them from drying out. You can stack them in a single layer or use parchment paper between the layers to avoid sticking. Store them at room temperature for a short time or in the fridge for longer freshness.
Freezing the Oatmeal Cups
If you want to save some for later, freezing is a great option. First, let the oatmeal cups cool completely. Then, wrap each cup tightly in plastic wrap. Place the wrapped cups in a freezer bag or airtight container. When you’re ready to eat, just take one out and reheat it in the microwave for about 30-60 seconds. You can also thaw it overnight in the fridge.
Shelf Life
These oatmeal cups can last up to 5 days in the fridge. When frozen, they stay good for about 2-3 months. Always check for any off smells or changes in texture before eating. This way, you can enjoy your high-protein banana bread oatmeal cups at their best!
FAQs
Can I use quick oats instead of rolled oats?
Yes, you can use quick oats. They cook faster and will still work in this recipe. The texture may be softer, but the taste remains delicious. If you prefer a chewier bite, stick with rolled oats.
How can I make these oatmeal cups sugar-free?
To make these oatmeal cups sugar-free, use a sugar substitute like stevia or monk fruit. You can also skip any added sweeteners. The ripe bananas provide natural sweetness, so the cups will still taste great.
Can I substitute other types of protein powder?
Absolutely! You can use whey, casein, or plant-based protein powders. Just choose a flavor that you enjoy. Vanilla is a safe bet, but chocolate can add a nice twist to the flavor.
Is it possible to make these without bananas?
Yes, you can make these without bananas. Use unsweetened applesauce or mashed sweet potatoes instead. These options will provide moisture and sweetness, making your oatmeal cups tasty.
Can I make a double batch?
Definitely! Just double all the ingredients and use two muffin tins. Keep an eye on the baking time, as it may vary. Enjoy sharing these tasty oatmeal cups with friends and family!
You’ve learned how to make delicious oatmeal cups using simple ingredients and steps. We covered the main ingredients, optional add-ins, and equipment needed. I shared tips for perfect texture and flavorful variations. You can enjoy them warm or store them for later. These oatmeal cups are flexible, healthy, and perfect for any time of day. Experiment with flavors and make them your own. Now, it’s your turn to bake and savor these tasty treats!


![- 1/2 cup rolled oats - 1 tablespoon cocoa powder - 1 tablespoon peanut butter - 1 cup almond milk - 1 tablespoon maple syrup - 1/2 teaspoon vanilla extract - A pinch of salt To create a bowl of chocolate peanut butter overnight oats, you need simple ingredients. Start with rolled oats; they act as the base. Cocoa powder adds rich chocolate flavor. Peanut butter gives a smooth, nutty taste. Use almond milk as a creamy liquid. Maple syrup sweetens the dish naturally. A touch of vanilla extract enhances the flavors. Finally, a pinch of salt brings everything together. - Sliced bananas - Chocolate chips - Crushed peanuts - Assorted fresh berries You can elevate your oats with fun toppings. Sliced bananas add sweetness and texture. Chocolate chips bring extra chocolate goodness. Crushed peanuts offer a nice crunch. Fresh berries brighten the dish with color and flavor. Choose your favorites or mix them up for a tasty treat. For the complete recipe, check out the [Full Recipe]. - Step 1: Combine dry ingredients in a bowl. In a medium mixing bowl, add 1/2 cup rolled oats and 1 tablespoon cocoa powder. Stir these together. This mix gives your oats a deep chocolate flavor. - Step 2: Whisk together wet ingredients separately. In another bowl, mix 1 cup almond milk, 1 tablespoon peanut butter, 1 tablespoon maple syrup, 1/2 teaspoon vanilla extract, and a pinch of salt. Make sure the peanut butter blends in well. - Step 3: Mix dry and wet ingredients thoroughly. Pour the wet mix over the dry oats. Stir with a spoon until every oat is coated. This step ensures creamy and rich oats. - Step 4: Transfer mixture to a jar or container. Carefully spoon the mixed oats into a clean jar. Choose a jar with a lid for best results. - Step 5: Seal and refrigerate overnight. Close the lid tightly. Place the jar in the fridge. Let it chill overnight or for at least 4 hours. The oats will soak up the flavors and soften. - Step 6: Stir before serving. When you’re ready to eat, take the jar out of the fridge. Stir the oats well. If they seem thick, add a little more milk to loosen them up. - Step 7: Add your choice of toppings. Top your oats with sliced bananas, chocolate chips, crushed peanuts, or fresh berries. These toppings add fun flavors and textures to your dish. Enjoy your creamy, chocolatey breakfast! For the full recipe, check out the complete guide. - For creamier oats, use whole milk or a milk alternative. - Allow oats to soak longer for a softer texture. Using whole milk adds richness. If you prefer a lighter option, almond or oat milk works well too. The key is to find what you love. Soaking longer lets the oats absorb more liquid. This makes them softer and more enjoyable to eat. - Try different nut butters like almond or cashew. - Experiment with sweeteners like agave or stevia. Feel free to swap peanut butter with almond or cashew butter for new flavors. Each nut butter brings its own taste. Use different sweeteners to find your perfect balance. Agave has a light flavor, while stevia is sugar-free. - Serve in a clear jar for visual appeal. - Drizzle extra peanut butter on top. Serving in a clear jar lets everyone see those delicious layers. It makes your dish look fancy! A drizzle of peanut butter on top adds a nice touch. It makes it more inviting and tasty. For an added twist, include colorful toppings like fresh berries or chocolate chips. Enjoy crafting your perfect chocolate peanut butter overnight oats! For the complete recipe, check the Full Recipe section. {{image_4}} You can switch up your chocolate peanut butter overnight oats with fun flavors. - Chocolate Banana Overnight Oats: Mash a ripe banana into the mix. The banana adds natural sweetness and a creamy texture. - Mocha Peanut Butter Overnight Oats: Add a teaspoon of instant coffee or espresso powder. This gives your oats a rich coffee flavor. Got dietary needs? No problem! You can easily modify this recipe. - Gluten-free option: Use certified gluten-free oats. This way, everyone can enjoy a tasty breakfast. - Vegan alternative: Swap regular milk for almond milk or oat milk. Use maple syrup or agave for sweetness. Change your oats with the seasons for exciting new tastes. - Adding pumpkin spice for fall: Mix in a teaspoon of pumpkin spice. This brings warmth and a cozy flavor to your oats. - Incorporating fresh berries in summer: Toss in some strawberries or blueberries. Fresh fruit brightens up your oats and adds nutrients. These variations keep your breakfast fun and exciting! You can find the full recipe here to make your own delicious creation. To keep your chocolate peanut butter overnight oats fresh, use an airtight container. This helps prevent moisture and odors from mixing in. Store the container in the refrigerator. Your oats will stay good for up to 5 days. This means you can make a batch and enjoy it throughout the week. Can you freeze overnight oats? Yes, you can freeze them! Freezing is a great way to save extra servings. Just make sure to use a freezer-safe container. How to thaw overnight oats for future use: To thaw, move the container to the fridge the night before you want to eat them. This will help them thaw slowly and evenly. You can also use the microwave if you’re in a hurry. Just heat it in short bursts, stirring in between. Best methods to reheat if desired: If you prefer warm oats, reheat them in the microwave. Place your oats in a microwave-safe bowl and cover it. Heat for 30 seconds, then stir. Repeat until warm enough. You can also reheat on the stove. Just add a splash of milk to a saucepan and warm it over low heat, stirring often. Enjoy your delicious oats however you like! What is the texture of overnight oats supposed to be? Overnight oats should be creamy and thick. They absorb the liquid overnight. This makes them soft but not mushy. You want a nice balance. If they seem too watery, add less milk next time. Can I use steel-cut oats instead of rolled oats? Yes, but steel-cut oats will need more time to soak. They take longer to soften. I recommend soaking them overnight to get a good texture. You may need to adjust the liquid and soaking time. How can I make my overnight oats thicker or creamier? To make your oats thicker, use less milk. You can also add chia seeds. They help absorb liquid and add fiber. Another tip is to let them sit longer in the fridge. Are overnight oats healthy? Yes, overnight oats are very healthy. They offer fiber and protein. This can help keep you full. They also provide vitamins and minerals. Plus, they are low in sugar if you control the toppings. What are the nutritional benefits of using peanut butter? Peanut butter adds healthy fats and protein. It helps keep your energy up. It also has vitamins like E and B. Just make sure to choose a natural peanut butter with no added sugar. What to pair with chocolate peanut butter overnight oats? You can pair them with fresh fruit. Bananas and berries taste great. Nuts or seeds also add a nice crunch. For extra sweetness, consider a drizzle of honey or maple syrup. Can overnight oats be eaten warm? Yes, you can eat them warm if you like. Just heat them gently in the microwave. Add a splash of milk to keep them creamy. Enjoy your warm treat any time of the day! You can create tasty and healthy overnight oats with simple ingredients. We discussed the main ingredients, preparation steps, and optional toppings. You learned tips for customization, serving, and storing your oats. Remember, you can adjust flavors and textures to suit your taste. Try different ingredients and enjoy your meals. Keep experimenting with toppings and variations. This way, overnight oats will always feel new and exciting. Enjoy every delicious bite and make it your own!](https://dishtreats.com/wp-content/uploads/2025/07/90d151b9-6d0c-4c1c-ba31-37512e57091e-768x768.webp)