Herb Garlic Roasted Radishes Simple and Delicious Treat

If you’re looking for a fresh twist on a classic veggie, try my Herb Garlic Roasted Radishes. This simple recipe brings out rich flavors while keeping radishes crunchy and tasty. With just a few easy steps, you can make a delightful side that impresses. Let’s dive into the ingredients and get cooking! You’ll love this simple and delicious treat.
Why I Love This Recipe
- Easy Preparation: This recipe requires minimal prep time, making it a quick and simple option for busy weeknight dinners.
- Flavorful and Aromatic: The combination of garlic and fresh herbs elevates the natural sweetness of the radishes, creating a delicious side dish.
- Healthy Alternative: Roasting radishes not only enhances their flavor but also provides a nutritious, low-calorie side that pairs well with any meal.
- Versatile Serving: This dish can be served warm or at room temperature, making it perfect for any occasion, from casual dinners to elegant gatherings.
Ingredients
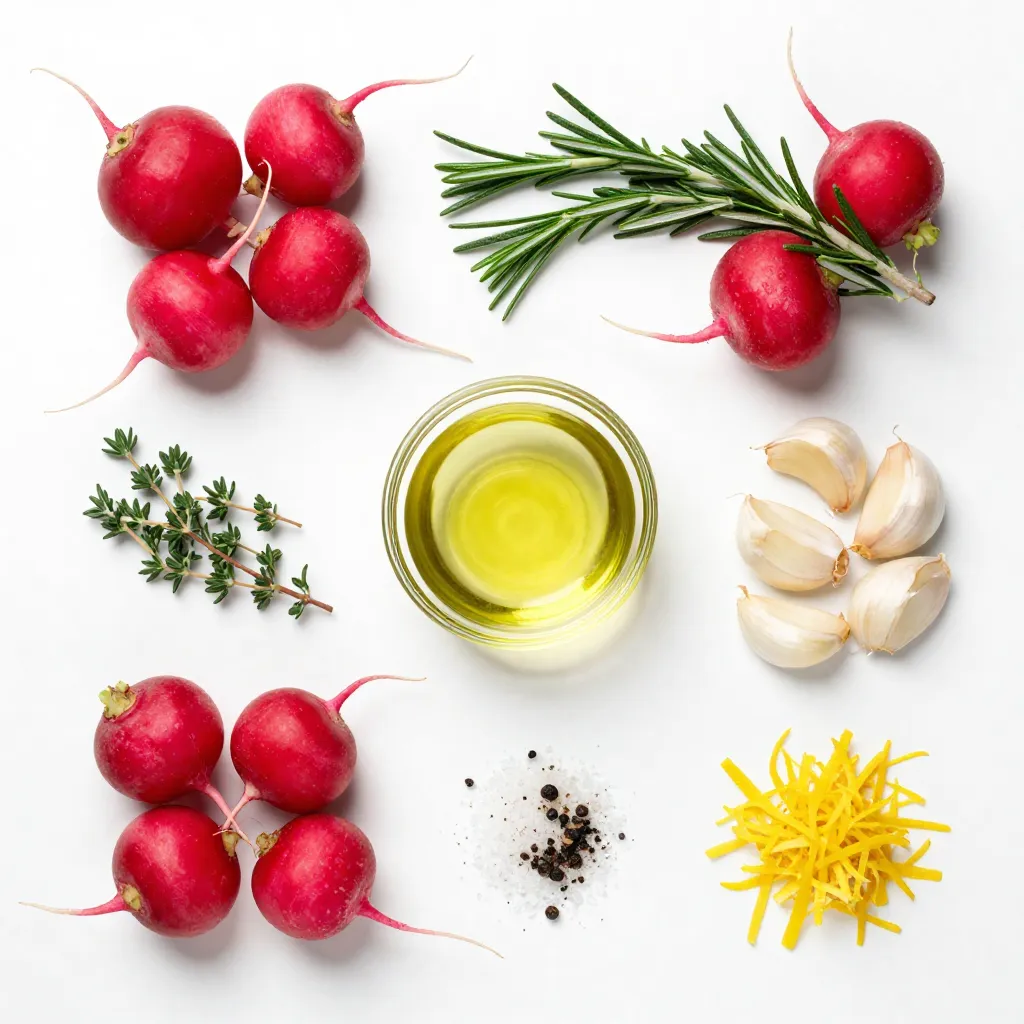
The ingredients for Herb Garlic Roasted Radishes are simple and fresh. Here is what you need:
- Radishes (1 bunch, about 1 pound, washed and trimmed)
- Olive oil (3 tablespoons)
- Garlic (4 cloves, finely minced)
- Herbs (1 teaspoon fresh rosemary, finely chopped; 1 teaspoon fresh thyme, finely chopped)
- Seasoning (sea salt and freshly cracked black pepper, to taste)
- Lemon zest (from 1 large lemon)
Each ingredient plays a role. Radishes offer a crisp texture and a mild flavor. Olive oil adds richness and helps with roasting. Garlic gives a warm, savory taste. Rosemary and thyme bring earthiness. Sea salt and pepper enhance all flavors. Finally, lemon zest adds brightness. This combination creates a dish that is both tasty and easy to prepare.

Step-by-Step Instructions
Preheating the Oven
First, you need to preheat your oven. Set it to 425°F (220°C). This heat helps the radishes roast evenly and get that nice golden color.
Preparing the Radishes
Next, take 1 pound of radishes. Wash them thoroughly and trim the tops and tails. This step is key. Clean radishes cook better and taste fresher.
Mixing and Coating Ingredients
In a large bowl, combine the radishes with 3 tablespoons of olive oil. Add 4 cloves of minced garlic, 1 teaspoon of chopped rosemary, and 1 teaspoon of chopped thyme. Sprinkle in sea salt and black pepper to your taste. Mix well until each radish is coated.
Arranging for Roasting
Spread the radishes out on a large baking sheet. Make sure they are in a single layer. This allows them to roast evenly. If they are too crowded, they won’t caramelize as well.
Roasting Time and Technique
Now, place the baking sheet in your preheated oven. Roast the radishes for about 25-30 minutes. Halfway through, stir them gently to ensure even cooking. The goal is for them to become tender and golden brown.
Final Touches Before Serving
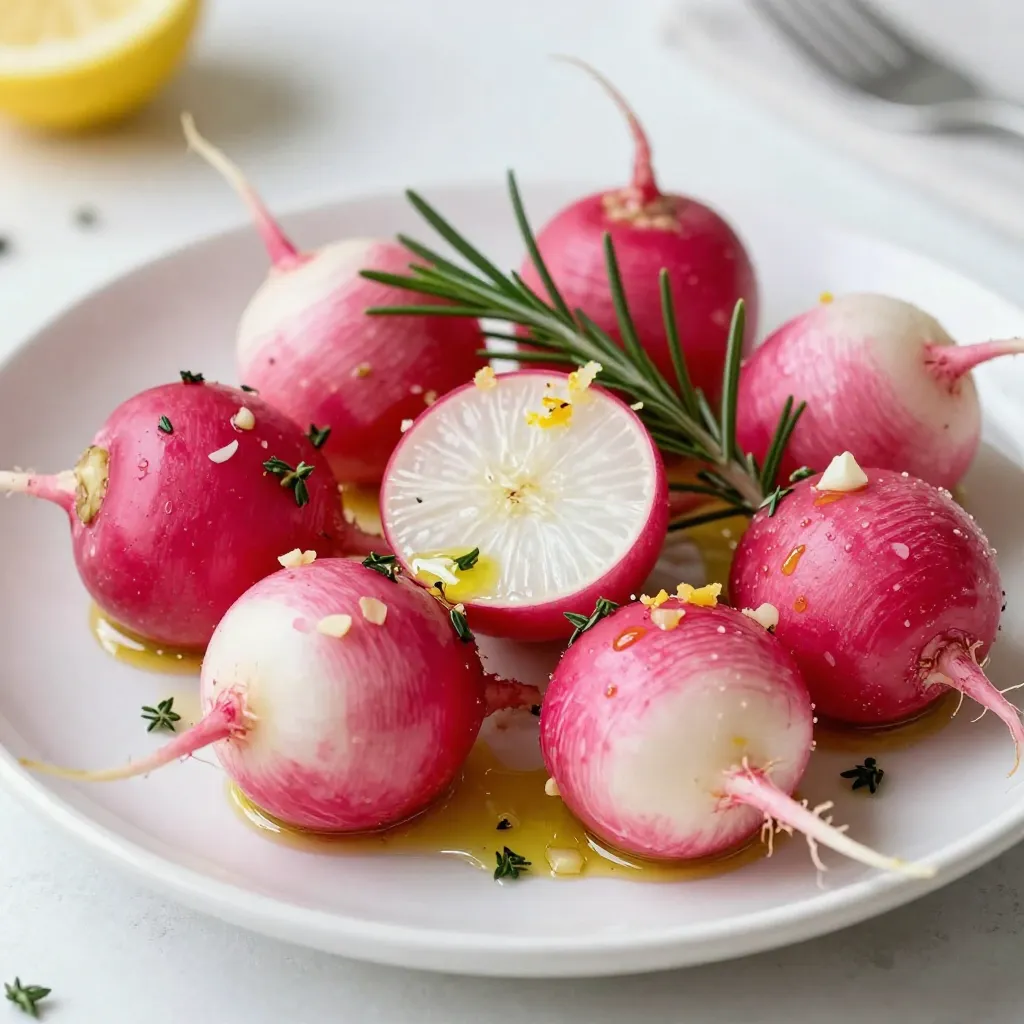
When the radishes are done, take them out of the oven. Toss them with the zest of one large lemon. This adds a bright flavor that complements the dish. Taste your radishes. Adjust the seasoning if needed, then serve them warm. Enjoy this simple and delicious treat!
Tips & Tricks
Selecting Fresh Radishes
Choose firm radishes that feel heavy for their size. Look for bright colors without blemishes. Fresh radishes should have green tops. Check the skin for smoothness; rough skin means age.
Achieving Optimal Roasting
Roasting radishes at 425°F (220°C) gives them a crispy outside and soft inside. Spread them out on a baking sheet. Avoid crowding; this allows hot air to circulate. Stir halfway to ensure even cooking.
Seasoning Adjustments
Feel free to tweak seasonings to your taste. Add more garlic for a stronger flavor. If you love heat, sprinkle in some red pepper flakes. A splash of balsamic vinegar can add depth, too.
Presentation Suggestions
Serve radishes in a decorative bowl for visual appeal. Garnish with fresh herb sprigs for color. Drizzle a bit of olive oil on top for shine. A sprinkle of lemon zest also adds brightness.
Pro Tips
- Choose Fresh Radishes: Look for radishes that are firm and vibrant in color, as this indicates freshness and better flavor.
- Experiment with Herbs: Feel free to mix and match different herbs like parsley or dill to customize the flavor profile to your liking.
- Adjust Roasting Time: Depending on the size of your radishes, you may need to adjust the roasting time for perfect tenderness.
- Enhance with Balsamic Glaze: Drizzle a balsamic reduction over the roasted radishes just before serving for an extra layer of flavor.
Variations
Alternative Herbs and Flavors
You can change the herbs in this recipe. Try using parsley or dill instead of rosemary and thyme. Each herb adds its own taste. You can even use a mix of your favorite herbs. Fresh herbs work best, but dried ones are okay too. Just use less if you choose dried.
Adding Spices for a Kick
Want to spice things up? Add a pinch of cayenne pepper or red pepper flakes. This will give your radishes a nice heat. You can also add smoked paprika for a smoky flavor. Just sprinkle a little before roasting. These spices boost the taste without changing the dish too much.
Incorporating Other Vegetables
You can mix radishes with other veggies. Carrots and potatoes roast well with radishes. Just cut them in similar sizes. Broccoli or cauliflower also work. They will add color and taste to your dish. Feel free to experiment and make it your own!
Storage Info
Refrigeration Guidelines
Store the leftover roasted radishes in an airtight container. They will stay fresh for three to five days in the fridge. Make sure they cool down before sealing them. This will help keep them from getting soggy.
Reheating Instructions
To reheat, place the radishes on a baking sheet. Preheat your oven to 350°F (175°C). Heat them for about 10 to 15 minutes until warm. This method keeps them crispy and tasty. You can also microwave them for 1-2 minutes, but they might lose some crunch.
Freezing Options
You can freeze roasted radishes, but they change in texture. To freeze, let them cool completely. Then, place them in a freezer bag, removing as much air as possible. They will last for up to three months in the freezer. When ready to eat, thaw them in the fridge overnight before reheating.
FAQs
How long do roasted radishes last in the fridge?
Roasted radishes last about 3 to 5 days in the fridge. Store them in an airtight container. Make sure they cool down first. This keeps them fresh and tasty for you.
Can I use baby radishes for this recipe?
Yes, you can use baby radishes! They will roast well and taste great. Their smaller size means they may cook faster. Keep an eye on them while roasting.
What are the health benefits of radishes?
Radishes are low in calories and high in fiber. They can help with digestion and may boost your immune system. They also have antioxidants, which are good for your body. Eating radishes may support healthy skin too.
Can I substitute the olive oil with another oil?
Yes, you can substitute olive oil with other oils. Good options include avocado oil or canola oil. Each oil has its own flavor, so choose one that you like. Just remember to use the same amount as the recipe states.
Roasting radishes is simple and tasty. We covered the ingredients you need, like olive oil and garlic. I walked you through steps to roast them perfectly, from preheating the oven to serving. Plus, I shared tips for picking fresh radishes and ways to spice things up. If you store them right, you can enjoy them later. Experiment with flavors or different veggies for variety. Roasted radishes can brighten any meal. You’re now ready to impress your friends and family with this fun dis

Garlic & Herb Roasted Radishes
Ingredients
- 1 bunch radishes, thoroughly washed and trimmed
- 3 tablespoons extra virgin olive oil
- 4 cloves garlic, finely minced
- 1 teaspoon fresh rosemary, finely chopped
- 1 teaspoon fresh thyme, finely chopped
- to taste Sea salt and freshly cracked black pepper
- 1 large lemon, zest
Instructions
- Preheat your oven to 425°F (220°C) to ensure it's hot and ready for roasting.
- In a spacious mixing bowl, combine the cleaned radishes with the olive oil, minced garlic, chopped rosemary, chopped thyme, and a generous sprinkle of salt and pepper. Toss everything together until the radishes are fully coated in the flavorful mixture.
- Carefully spread the seasoned radishes onto a large baking sheet, arranging them in a single layer. This allows for optimal roasting and caramelization.
- Roast the radishes in the preheated oven for approximately 25-30 minutes, or until they are tender and have developed a beautiful golden brown color. Be sure to stir the radishes halfway through the cooking time to ensure even roasting.
- Once the radishes are perfectly roasted, remove them from the oven and immediately toss with freshly grated lemon zest to enhance the dish with a lively citrus note.
- Taste and adjust the seasoning if needed, adding more sea salt and freshly cracked black pepper to suit your preference. Serve the radishes warm as a delightful side dish.


![To make Chicken Pesto Pasta Salad, you need fresh and tasty ingredients. Here’s what you will use: - 2 cups penne pasta - 1 cup cooked chicken breast, shredded - 1/2 cup cherry tomatoes, halved - 1/2 cup mozzarella balls, drained - 1/4 cup fresh basil leaves, chopped - 1/4 cup pesto sauce - 2 tablespoons extra virgin olive oil - Juice of 1 fresh lemon - Salt and black pepper to taste - Optional: 1/4 cup pine nuts, toasted Each ingredient brings its own flavor. The penne pasta serves as a great base. The chicken adds protein. Tomatoes give freshness, while mozzarella adds creaminess. You can change things up with add-ins. Here are some great options: - Spinach or arugula for extra greens - Bell peppers for crunch - Grated Parmesan cheese for a salty kick - Cooked bacon for a smoky flavor - Quinoa instead of pasta for a healthier twist Feel free to mix and match. Your salad can be unique each time you make it. When it comes to pesto, you have choices. You can use fresh homemade pesto or store-bought pesto. Fresh pesto tastes bright and bold. You can make it with basil, garlic, pine nuts, cheese, and olive oil. Store-bought pesto saves time but may have preservatives. Both options work well in your salad. I recommend trying fresh pesto if you have the time. It elevates the dish and adds a personal touch. For the full recipe, check out the [Full Recipe]. 1. Cook the Pasta: Start by boiling water in a large pot. Add salt for flavor. When it boils, add 2 cups of penne pasta. Cook until al dente, about 8-10 minutes. Drain the pasta and rinse it with cold water to cool it down. 2. Mix the Ingredients: In a big mixing bowl, add 1 cup of shredded cooked chicken, 1/2 cup of halved cherry tomatoes, and 1/2 cup of drained mozzarella balls. Use a spatula to mix them well. 3. Combine with Pasta: Add the cooled penne pasta to the bowl. Gently mix to combine everything. Be careful not to break the mozzarella balls. 4. Make the Dressing: In a small bowl, whisk together 1/4 cup of pesto sauce, 2 tablespoons of extra virgin olive oil, and the juice from 1 fresh lemon. Add a pinch of salt and black pepper. 5. Dress the Salad: Pour the dressing over the pasta salad. Use a spoon or tongs to toss everything gently. Make sure all the ingredients are coated. 6. Fold in Fresh Herbs: Add 1/4 cup of chopped fresh basil and optional 1/4 cup of toasted pine nuts. Gently fold them into the salad without bruising the basil. 7. Taste and Adjust: Taste your salad. If it needs more flavor, add more salt, pepper, or lemon juice. 8. Chill Before Serving: Cover the salad with plastic wrap. Let it chill in the fridge for at least 30 minutes. This helps the flavors mix well. - Use a large pot to give the pasta room to move. - Salt the water before adding pasta. This makes it taste better. - Stir the pasta often while it cooks to prevent sticking. - Always taste the pasta a minute before the time is up. It should be firm but not hard. Making the dressing is quick and easy. In just a few steps, you can create a burst of flavor. Start with fresh pesto sauce. If you like a creamier dressing, mix in some yogurt or sour cream. Always taste your dressing before adding it to the salad. Adjust the flavors based on your taste. This simple dressing brings the whole dish together and makes it shine. For the full recipe, check out the details above. Mixing ingredients well is key to flavor. Start with the pasta. Make sure it is cold before adding other items. This keeps everything fresh. Next, add the chicken, tomatoes, and mozzarella. Use a spatula to fold gently. This ensures the mozzarella stays whole. It adds nice pops of flavor to each bite. Taste your dish as you cook. Start with a pinch of salt and pepper. The lemon juice adds brightness, so taste it first. If it needs more zing, add another squeeze. Always remember that you can add more, but you can't take it out. This rule helps you control the flavors. For a great look, serve the salad in a big bowl. Layer the salad for a beautiful view. Add extra basil leaves on top. A sprinkle of toasted pine nuts adds crunch. This makes your dish eye-catching and fun. Enjoy serving this colorful salad at any gathering! You can find the full recipe in the main article. {{image_4}} You can boost your Chicken Pesto Pasta Salad with more veggies and proteins. Adding fresh spinach or arugula gives a nice crunch. Bell peppers add color and sweetness. Toss in some peas or zucchini for a nutritious kick. You can also swap chicken for shrimp, tofu, or chickpeas. This way, you can cater to different tastes and dietary needs. When it comes to ingredients, you have choices. Using homemade pesto elevates your dish. It tastes fresh and bright. You can easily make pesto with basil, nuts, olive oil, and garlic. If you’re short on time, store-bought pesto works too. Just pick a brand with simple, quality ingredients. This saves time without losing flavor. You can adjust this recipe for various diets. For a gluten-free option, use gluten-free pasta. Many brands offer great alternatives. If you want a vegan version, replace the chicken with chickpeas or roasted vegetables. Use a vegan pesto made from nuts and nutritional yeast instead of cheese. These swaps keep the dish tasty and satisfying for everyone. To store leftover chicken pesto pasta salad, place it in an airtight container. Make sure the lid seals tightly to keep the salad fresh. You can keep it in the fridge for up to three days. If you notice the salad looking dry, add a splash of olive oil or lemon juice before serving. This will help restore some moisture. Freezing pasta salad is not the best choice since the texture can change. If you do want to freeze it, separate the chicken and pasta from the veggies and dressing. Store each part in a freezer-safe bag or container. You can freeze it for up to one month. When ready, thaw it in the fridge overnight before serving. Reheating chicken pesto pasta salad is simple. If you have stored it in the fridge, serve it cold or at room temperature. If you prefer it warm, place it in a microwave-safe dish. Heat it for about 30 seconds at a time until it reaches your desired warmth. Be careful not to overheat, as it can make the pasta mushy. Always check the seasoning again after reheating and adjust as needed. You can use tofu, shrimp, or chickpeas as great chicken alternatives. Tofu gives a nice texture. Shrimp adds a seafood twist. Chickpeas provide protein and a hearty feel. You can also try cooked turkey or beef for a different taste. The key is to use a protein you enjoy. This salad stays fresh in the fridge for three to five days. Make sure to store it in an airtight container. The flavors will blend nicely as it sits. However, the longer it sits, the softer the pasta becomes. Yes, you can prepare this salad a day in advance. It tastes even better after the flavors meld overnight. Just keep it covered in the fridge. If you use fresh basil, add it right before serving to keep it vibrant. Check out the Full Recipe for complete details! This article covered how to make a tasty Chicken Pesto Pasta Salad. You learned about key ingredients, and how to cook pasta just right. I shared some helpful tips for mixing and serving. Remember, you can add veggies or change spices to fit your taste. Store leftovers well for future meals. This salad is great for lunch or a gathering. Enjoy your cooking and happy eating!](https://dishtreats.com/wp-content/uploads/2025/06/0440c548-7b14-481e-8658-8224512ec7fd-768x768.webp)