Healthy Spinach Egg Muffins Nutritious and Simple Treat
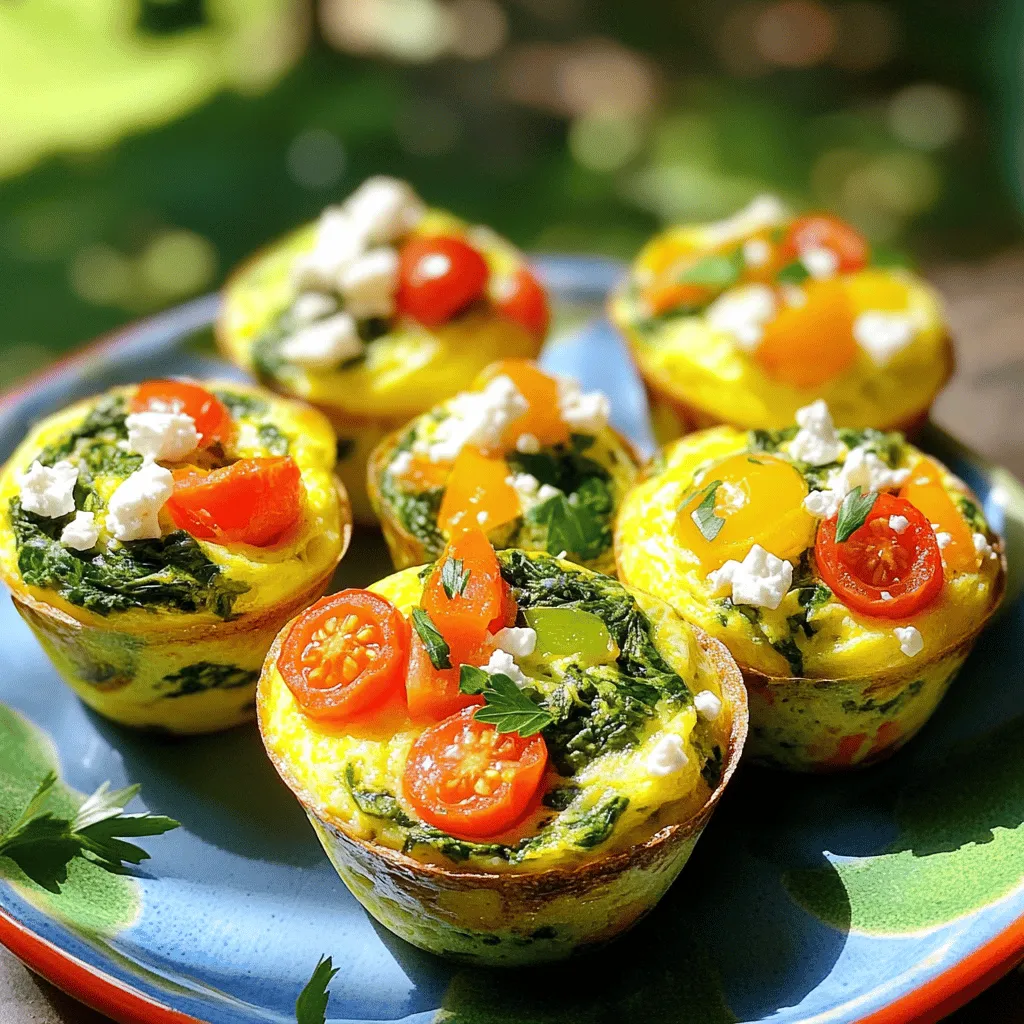
Looking for a nutritious snack that’s easy to make? Try my Healthy Spinach Egg Muffins! Packed with protein and vibrant veggies, these muffins are delicious and perfect for breakfast or a quick bite. I’ll guide you through each step, from selecting ingredients to baking them to perfection. You’ll love how simple and satisfying they are! Ready to cook? Let’s dive in and make these tasty treats together!
Ingredients
List of Ingredients
- 6 large eggs
- 1 cup fresh spinach, finely chopped
- 1/2 cup cherry tomatoes, halved
- 1/2 cup bell pepper, diced
- 1/4 cup onion, diced small
- 1/4 cup feta cheese (optional)
- 1 tablespoon olive oil
- Salt and pepper to taste
- 1/2 teaspoon garlic powder
- 1/2 teaspoon dried oregano
The ingredients for Healthy Spinach Egg Muffins are simple yet full of flavor. Each component adds its own touch, making the muffins tasty and nutritious.
Using fresh spinach is key. It is packed with vitamins and minerals. The eggs provide protein and healthy fats. Cherry tomatoes add sweetness and color. Bell peppers bring crunch and a boost of Vitamin C.
Feta cheese is optional, but I highly recommend it. It adds a creamy texture and salty flavor that pairs well with the eggs. Olive oil helps with cooking and adds healthy fats.
Don’t forget the spices! Salt, pepper, garlic powder, and oregano bring everything together. Each bite bursts with flavor, making these muffins a hit for breakfast or snacks.
Nutritional Information
- Calories per muffin: About 70
- Protein content: Approximately 6 grams
- Health benefits: Spinach is rich in iron and antioxidants. Eggs provide essential amino acids and support eye health.
These muffins offer a great balance of nutrients. They are low in calories but high in taste. Enjoy them knowing they support your health while satisfying your hunger.
Step-by-Step Instructions
Preparation Steps
- Preheat the oven to 350°F (175°C).
- Prepare the muffin tin by greasing it with non-stick spray or olive oil.
Cooking Process
- In a large bowl, crack the eggs.
- Use a whisk to beat the eggs well.
- Season with salt, pepper, garlic powder, and dried oregano. Mix until smooth.
- In a medium skillet, heat olive oil over medium heat.
- Add the diced onion and bell pepper. Sauté for 3-4 minutes until soft.
- Stir in the chopped spinach. Cook for 1-2 minutes until it wilts. Remove from heat.
- Add the sautéed veggies and halved cherry tomatoes to the eggs.
- If you like, fold in crumbled feta cheese for extra flavor.
Baking and Serving
- Carefully pour the mixture into the muffin tin.
- Fill each cup about three-quarters full.
- Place the muffin tin in the oven and bake for 18-20 minutes.
- Check doneness by inserting a toothpick; it should come out clean.
- Remove from the oven and let the muffins cool for a few minutes.
- Gently lift the muffins out with a spoon or fork.
These muffins are perfect for breakfast or as a snack. Enjoy the delicious flavors!
Tips & Tricks
Cooking Tips
To ensure your muffins don’t stick, use non-stick spray or olive oil. Grease each cup well. This helps the muffins pop right out. I recommend letting them cool a bit before removing them. This way, they hold their shape better.
For even cooking, fill each muffin cup to the same level. Try to fill each cup about three-quarters full. This helps them bake evenly. Rotate the muffin tin halfway through baking. This ensures every muffin gets enough heat.
Flavor Enhancement
Adding herbs and spices can boost flavor. Consider fresh basil, thyme, or dill. A pinch of paprika can add a nice kick, too. You can mix in some chopped garlic for a punch of taste.
If you want different cheese options, try cheddar or goat cheese. Both melt nicely and add flavor. You can even skip cheese for a lighter version.
Serving Suggestions
For side dishes, serve these muffins with a light salad or yogurt. A dollop of salsa or hot sauce makes a fun dip.
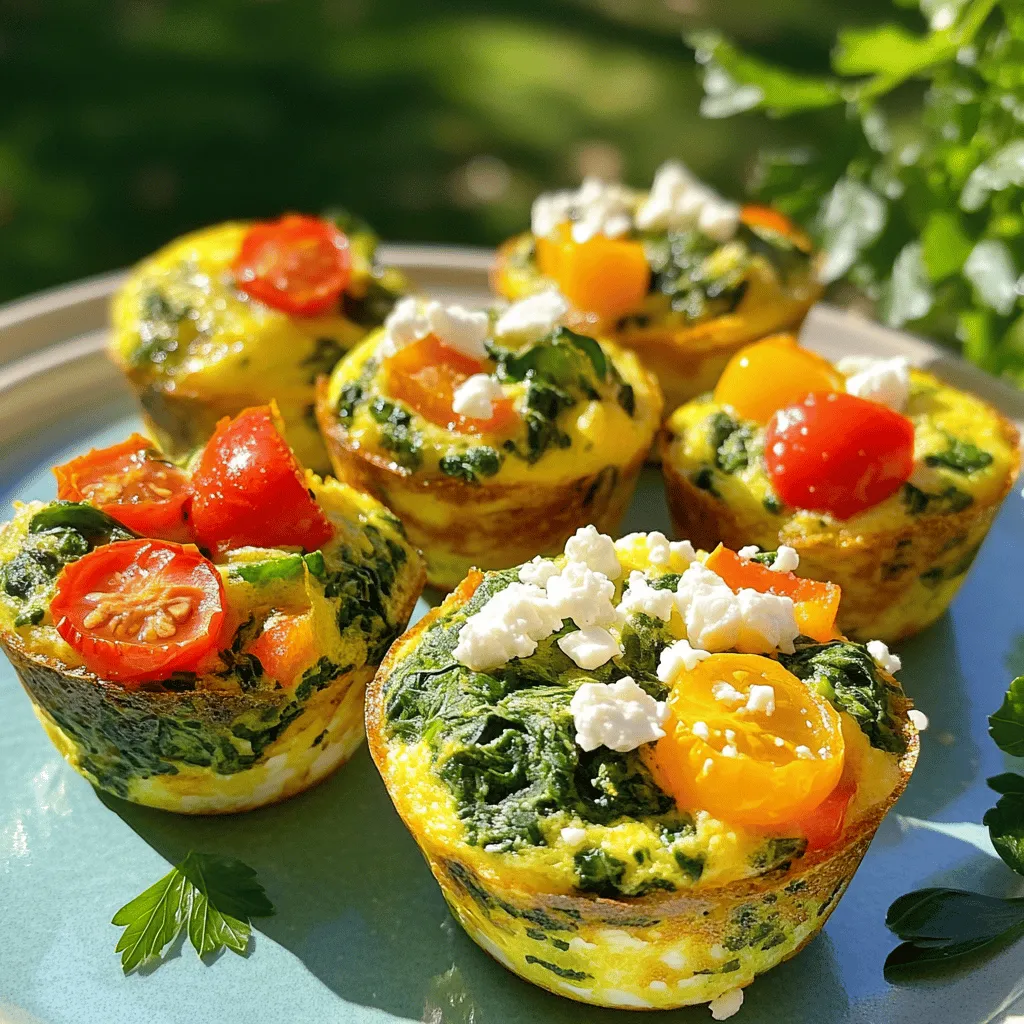
When presenting these muffins, use a bright plate. Garnish with fresh herbs on top. Arrange them in a circle for a lovely display. These muffins are perfect for breakfast or a snack at any event.
Variations
Ingredient Swaps
You can change the veggies in these muffins to suit your taste. Try using:
- Broccoli, finely chopped
- Zucchini, shredded
- Mushrooms, diced
- Carrots, grated
These swaps can give your muffins new flavors. You can also add different proteins. Instead of eggs, use:
- Tofu, crumbled for a vegan twist
- Cooked sausage for extra heartiness
- Chicken, shredded for added protein
These options keep your muffins interesting and delicious.
Dietary Adjustments
If you want vegetarian options, skip the meats and stick with veggies and eggs. For a vegan version, replace eggs with a flaxseed mixture. Combine one tablespoon of flaxseed meal with three tablespoons of water. Let it sit for a few minutes until it thickens. This acts like an egg binder.
For those who need gluten-free options, ensure all your ingredients are gluten-free. Use gluten-free flour if you want a fluffier muffin. This keeps everyone happy at the table.
Flavor Inspirations
You can take your muffins around the world with different flavors. For a Mexican twist, add:
- Jalapeños for heat
- Cilantro for freshness
- A sprinkle of cumin
For a Mediterranean flair, include:
- Olives for saltiness
- Sun-dried tomatoes for sweetness
- Fresh basil for aroma
These ideas can turn a simple muffin into an exciting dish. Explore different flavors and have fun in the kitchen!
Storage Info
Refrigeration Tips
Store your leftover spinach egg muffins in a sealed container. This keeps them fresh and tasty. I recommend using glass or plastic containers with tight lids. These containers prevent air from getting in and keep the muffins moist.
Freezing Instructions
To freeze muffins, let them cool completely first. Then, place them in a single layer on a baking sheet. Freeze for about an hour until solid. After that, transfer them to a freezer-safe bag. Make sure to squeeze out as much air as possible. When you want to eat them, take one out and thaw it in the fridge overnight or heat it in the microwave for a quick snack.
Shelf Life
In the fridge, these muffins last about four to five days. Look for signs of spoilage, like a sour smell or mold. If you see either, it’s best to toss them. Enjoy your healthy spinach egg muffins fresh for breakfast or a snack!
FAQs
Common Questions
Can I make these muffins ahead of time?
Yes, you can make these muffins ahead of time. They store well in the fridge for up to four days. Just cool them completely before placing them in an airtight container. This makes it easy to grab a healthy snack or breakfast on busy mornings.
How to reheat the muffins effectively?
To reheat the muffins, place them in the microwave for about 30 seconds. You can also warm them in the oven at 350°F (175°C) for about 10 minutes. Both methods keep them tasty and moist.
Ingredient Substitutions
What can I use instead of feta cheese?
If you don’t have feta cheese, try using goat cheese or cheddar cheese. Both add a nice flavor. You can even skip the cheese for a dairy-free option.
Can I use egg substitutes?
Yes, you can use egg substitutes. For every egg, use 1/4 cup of unsweetened applesauce or a flax egg. To make a flax egg, mix 1 tablespoon of flaxseed meal with 2.5 tablespoons of water. Let it sit for a few minutes until it thickens.
Cooking Techniques
What type of muffin tin is best?
A non-stick muffin tin works best. It helps the muffins release easily. You can also use silicone muffin cups for easy removal.
Can these muffins be made in a different baking dish?
Yes, you can use an 8×8 inch baking dish. Just pour the mixture into the dish and adjust the baking time. Check for doneness after 25-30 minutes. Cut into squares for serving.
These egg muffins provide a simple and tasty way to enjoy healthy meals. We covered ingredients like eggs, spinach, and bell peppers, which are full of nutrients. You learned how to prepare, bake, and serve these muffins. Plus, I shared tips for flavor boosts and easy variations.
To bring more fun to your cooking, experiment with different flavors and ingredients. Enjoy your time in the kitchen and share these delicious muffins with others!



![- 1 pound Brussels sprouts - 3 tablespoons extra virgin olive oil - 2 tablespoons honey - 2 tablespoons Sriracha sauce - 1 teaspoon garlic powder - Salt and pepper to taste - 1 tablespoon sesame seeds (optional) - 2 green onions (for garnish) Gather these ingredients to create a sweet and spicy dish. The Brussels sprouts are the star here. You’ll want to trim and halve them for even cooking. The olive oil helps the sprouts roast nicely, while honey adds sweetness. Sriracha gives it that kick, which you can adjust based on your taste. Garlic powder adds depth, and salt and pepper enhance the flavors. The sesame seeds add a nice crunch and the green onions bring freshness. You can skip any optional ingredients, but they do make the dish pop. For the full recipe, check out the detailed instructions that guide you through each step of cooking these tasty Honey Sriracha Brussels sprouts! - Preheat oven to 425°F (220°C). - Line baking sheet with parchment paper. Start by heating your oven. This step is key, as it helps the Brussels sprouts roast evenly and get that perfect crisp. Lining the baking sheet with parchment paper keeps the sprouts from sticking. Plus, it makes cleanup easy! - Combine Brussels sprouts with oil, honey, Sriracha, garlic powder, salt, and pepper. In a large bowl, toss the halved Brussels sprouts with olive oil, honey, Sriracha, garlic powder, salt, and pepper. Make sure every sprout gets a good coating. This mix brings out the best flavors. The sweet honey balances the heat from the Sriracha. - Arrange sprouts on baking sheet. - Roast for 20-25 minutes, stirring halfway. Spread the sprouts in a single layer on your baking sheet. Place them cut-side down for a nice caramelization. This helps them turn golden brown and crispy. Roast them for 20 to 25 minutes. Halfway through, stir the sprouts. This ensures they brown evenly. You're aiming for fork-tender sprouts with crispy edges. Once they are done, feel free to check the [Full Recipe] for extra tips! To make sure your Brussels sprouts roast well, follow these tips: - Cut Brussels sprouts for maximum crispiness. Halve them and make sure the cut side faces down. This helps them get that nice, crispy edge. - Check doneness with a fork. When the sprouts are soft inside and crispy outside, they are ready. A fork should easily poke through. You can play with the flavors to suit your taste: - Customize Sriracha amount for desired spice level. If you like it hot, add more Sriracha. If you prefer mild, use less. - Use different sweeteners for variety. You can swap honey for maple syrup or agave nectar to change the flavor. Each sweetener gives a unique taste to the dish. For a full guide on making this yummy dish, check the Full Recipe. {{image_4}} You can make Honey Sriracha Brussels sprouts even better. Try adding bacon or pancetta. The salty taste pairs well with the sweet and spicy sauce. Just cook the bacon first, then toss it in before serving. You can also include extra veggies. Bell peppers add color and sweetness. Cut them into strips and mix with the Brussels sprouts. This way, you get more flavor and texture in every bite. If you want to change the sweet flavor, use maple syrup instead of honey. It gives a different taste, but still sweet. This swap can make the dish a bit more unique. You can also try different chili sauces. Sriracha works great, but others can add interesting flavors. Look for sauces with different heat levels. This lets you control the spice to fit your taste. Store extra Honey Sriracha Brussels sprouts in an airtight container in the fridge. This keeps them fresh and tasty. You can enjoy them for up to 3 days. Make sure to cool them down before sealing the container. This helps avoid condensation and sogginess. For the best texture, reheat the sprouts in the oven. Preheat the oven to 350°F (175°C) and spread them out on a baking sheet. Bake for about 10 minutes or until they are warm and crispy. If you’re in a hurry, you can use the microwave. Just remember, they might lose their crunch this way. Enjoy your tasty dish again! For the full recipe, refer back to the main article. Yes, you can prep the sprouts and sauce ahead. Just trim and halve the Brussels sprouts. Mix the sauce with honey and Sriracha to keep flavors fresh. Store them in the fridge until you're ready to roast. This saves you time on busy nights. These sprouts pair well with grilled meats and rice dishes. The sweet and spicy taste enhances simple proteins like chicken or pork. You can also serve them alongside fried rice or quinoa for a tasty meal. Yes, but they are best consumed fresh for optimal taste. Freezing can change the texture of the sprouts. If you do freeze them, make sure to cool them first. Store in an airtight container and use within a month for the best flavor. In this post, we explored how to make Honey Sriracha Brussels sprouts. We covered the main ingredients, step-by-step instructions, and tips for perfect roasting. You learned how to customize the flavors, add extra ingredients, and store leftovers effectively. With this recipe, you can enjoy a spicy and sweet side dish that pleases any crowd. Try it out, and feel free to get creative with your own variations. Happy cooking!](https://dishtreats.com/wp-content/uploads/2025/06/e27bd237-cd9d-45ea-93fd-8494cb919a9a-768x768.webp)
. - Ensure even space on the baking sheet for optimal roasting. - Toss halfway through cooking for uniform caramelization. Roasting carrots and chickpeas makes them sweet and crunchy. When you spread them out, they cook evenly. If they touch, they steam instead of roast. This can make them soggy and less tasty. Tossing the mixture halfway is key. It helps to brown all sides well. This step adds more flavor and a lovely texture. - Experiment with different citrus juices like lime or orange. - Substitute tahini with Greek yogurt for a creamy dressing. The dressing can change the whole dish. Use lime juice for a zesty twist. Orange juice gives a sweet touch. Both add freshness and brightness. If you want a creamy option, use Greek yogurt instead of tahini. It makes the dressing rich and smooth. This swap gives a fun flavor change too. - Serve in individual bowls for a refined presentation. - Add a lemon wedge for guests to use. Presenting this salad in bowls looks nice. It makes each serving feel special. Guests can enjoy their own portion. Adding a lemon wedge on the side is a great idea. It lets everyone add a splash of fresh juice. This brightens the salad even more. For the full recipe, check the details above. Enjoy your cooking! {{image_4}} You can make this salad even better. Try adding other roasted veggies. Bell peppers bring sweetness. Sweet potatoes add creaminess. Both enhance flavor and texture. You can also toss in nuts or seeds. Almonds or sunflower seeds add a nice crunch. They make the salad more filling and fun. If you want more protein, try grilled chicken or tofu. Both options work well with roasted carrots and chickpeas. Grilled chicken adds a savory touch, while tofu keeps it plant-based. You can also use canned tuna. It gives the salad a different flavor and makes it heartier. Want to boost flavor? Experiment with fresh herbs. Cilantro or mint can brighten the taste. They add freshness that complements the roasted veggies. You can also spice it up with hot sauce. Just a dash gives the salad a nice kick. It’s a fun way to change the flavor profile. For the complete recipe, check out the Full Recipe section above. Store leftovers in an airtight container in the fridge. They are best consumed within 2-3 days. After that, the carrots may lose their crunch, and the flavors fade. Freezing this salad is not recommended. The dressing may separate when frozen. This can change the texture and taste of your salad. You can enjoy this salad cold or at room temperature. If you prefer, reheat in the oven. This helps retain the texture of the roasted carrots and chickpeas. Yes, use maple syrup instead of honey and omit the feta cheese. This keeps the flavors rich and plant-based. You won’t miss the cheese, trust me. The roasted carrots and chickpeas bring enough taste and texture to satisfy everyone. You can use black beans or white beans as alternatives. Both options provide protein and fiber. They also add a nice twist to the taste. Black beans bring a bit of earthiness, while white beans offer a creamier texture. Serve the dressing on the side to keep the greens crisp until serving. This way, they stay fresh and crunchy. Drizzle the dressing just before you eat for the best taste and texture. Spinach, arugula, or chopped kale work well for base greens. Each option adds a different flavor. Spinach is mild, arugula is peppery, and kale adds a hearty bite. Choose what you like best! This blog post shares a tasty recipe featuring roasted carrots and chickpeas on fresh greens. It walks through each step, from prep to assembly, and includes tips for perfect results. You can even tweak the dressing and add your favorite proteins. Don’t hesitate to make this salad your own. Experimenting with flavors makes cooking fun! Enjoy your healthy, vibrant salad that brings flavor and nutrition to your table.](https://dishtreats.com/wp-content/uploads/2025/07/15b40619-46f3-4baf-96e6-94c974b2a42a-768x768.webp)
![To make delicious roasted red pepper hummus, gather these key ingredients: - 1 cup canned chickpeas, drained and thoroughly rinsed - 1 large roasted red pepper (store-bought jarred or homemade) - 2 tablespoons tahini - 2 tablespoons extra virgin olive oil, plus more for drizzling - 2 tablespoons freshly squeezed lemon juice - 1 clove of garlic, finely minced - 1/2 teaspoon ground cumin - Salt, to taste These ingredients create a smooth and creamy dip. Each one plays a vital role. Chickpeas give it body. Roasted red pepper adds sweetness and depth. Tahini brings a nutty flavor, while olive oil adds richness. Lemon juice gives it brightness and balance. Garlic adds a punch, and cumin adds warmth. To make your hummus even better, you can add some garnishes: - Fresh parsley, finely chopped (for garnish, optional) - Paprika, for garnish (optional) These garnishes not only look nice but also enhance the taste. Fresh parsley adds a pop of color and freshness. Paprika gives a hint of smokiness and warmth. You can use these garnishes to personalize your hummus. For the full recipe, check the detailed instructions that guide you through preparation and blending for a perfect dip. Roasting Techniques (Oven & Grill) You can roast red peppers in two main ways. The oven is great for a consistent roast. Start by preheating your oven to 450°F (230°C). Place whole red peppers on a lined baking sheet. Roast them for 20-25 minutes. Turn them every few minutes until the skin is blistered and charred. If you prefer grilling, place the peppers directly on the grill. Turn them often until they are blackened all around. How to Steam and Peel After roasting, steaming helps peel the skin. Place the hot peppers in a heatproof bowl. Cover it tightly with plastic wrap for about 10 minutes. This traps steam, loosening the skin. Once cool enough to handle, peel off the blackened skin. Remove the seeds, and set the peppers aside. Food Processor Tips Using a food processor makes blending easy. Start with the chickpeas and roasted red pepper in the bowl. Add tahini, olive oil, lemon juice, minced garlic, and ground cumin. Blend on low speed first. Gradually increase to high until smooth. Achieving Creamy Consistency To get a creamy texture, you may need to add water. If the hummus is thick, add one tablespoon at a time while blending. Keep processing until it reaches your desired consistency. Importance of Seasoning Seasoning makes a big difference in taste. After blending, taste your hummus. Add salt slowly, mixing well after each addition. This helps to enhance the overall flavor. Customizing Thickness If you want a thinner hummus, keep adding water. Blend in small amounts until you reach the right thickness. Remember, you can always add more, but you can't take it out! - Experimenting with Spices: You can add spices to boost flavor. Try smoked paprika for a smoky taste. Or add a pinch of cayenne pepper for some heat. Each spice adds a unique twist to your hummus. - Using Fresh Ingredients: Fresh ingredients make a big difference. Fresh garlic brings a sharp bite. Choose ripe lemons for the best juice. They add zest and brightness to the dish. - Store-Bought Ingredient Options: If you're short on time, use store-bought roasted red peppers. They save you the hassle of roasting at home. Check the jar for quality; it should have no added sugars. - Quick Prep Hacks: Use canned chickpeas to save time. They are ready to go. Rinse them well to remove excess sodium. This step helps keep your hummus light and tasty. - Best Pairings for Hummus: Roasted red pepper hummus pairs well with fresh veggies. Carrot sticks, cucumber slices, and bell peppers create a colorful plate. You can also serve it with pita chips or crackers. - Creative Serving Ideas: For a fun twist, serve hummus in cute bowls. Drizzle olive oil on top for a glossy finish. Add a sprinkle of paprika and fresh parsley for color. It looks great and tastes even better. For the full recipe, check out the [Full Recipe]. {{image_4}} To make your hummus spicy, add fresh jalapeños or crushed red pepper flakes. Start with a small amount. Blend everything well and taste. Adjust the heat to your liking. For a balanced flavor, add a bit of honey or maple syrup. This sweetness can tone down the heat and enhance the taste. Fresh herbs give hummus a bright twist. Try adding basil, cilantro, or dill. Just chop them finely before blending. These herbs pair well with roasted red pepper. They add freshness and depth. You can also mix in some sun-dried tomatoes for a Mediterranean vibe. It brings a rich flavor that complements the hummus nicely. Want to make your hummus even healthier? Add superfoods like spinach or kale. They blend in well and boost nutrients. If you have dietary needs, this hummus is easy to adjust. It's naturally vegan and gluten-free. You can enjoy it without worry. Check the full recipe for more tips on adding these healthy ingredients. To keep your roasted red pepper hummus fresh, use an airtight container. Glass containers work best to avoid any odors. If you do not have glass, BPA-free plastic containers are also a good choice. This way, your hummus stays tasty and does not absorb other flavors in the fridge. Homemade hummus lasts up to one week in the fridge. Make sure to check for any signs of spoilage before eating. If it looks or smells off, it is best to toss it. You can freeze hummus for longer storage. First, place the hummus in a freezer-safe container. Leave some space at the top for expansion as it freezes. You can also use ice cube trays for smaller portions. To thaw, place the frozen hummus in the fridge overnight. This will help keep its texture smooth. If it seems a bit thick after thawing, simply add a splash of water and stir well. Enjoy your hummus in wraps, sandwiches, or with fresh veggies. - Start by gathering your ingredients. - Roast the red pepper and cool it. - Blend chickpeas, roasted pepper, tahini, olive oil, lemon juice, garlic, and cumin. - Add water for the right texture. - Season with salt and blend again. - Serve it with a drizzle of olive oil. Making roasted red pepper hummus is simple. You can easily prepare it at home. Follow the quick steps above, and you have a fresh dip ready in about 35 minutes. For the full recipe, check out the detailed instructions provided earlier. - Fresh veggie sticks (carrots, cucumbers, bell peppers) - Warm pita bread or pita chips - Crackers or breadsticks - Grilled meats or seafood - Salads as a dressing Roasted red pepper hummus is versatile. It pairs well with many foods. Fresh veggies make a crunchy, healthy option. You can also enjoy it with pita bread for a classic taste. - Local grocery stores often carry it. - Check health food stores for unique brands. - Look in the deli section for fresh options. - Popular brands include Tribe, Sabra, and Hope. If you prefer buying hummus, many stores have pre-made options. Check your local store's shelves or the deli section for fresh varieties. Each brand may offer a unique taste, so explore a few! - High in protein from chickpeas. - Contains healthy fats from olive oil and tahini. - Rich in vitamins from red peppers and garlic. - Low in saturated fat and cholesterol-free. Roasted red pepper hummus is a healthy snack. It offers many nutritional benefits. The chickpeas give protein, while olive oil adds healthy fats. This dip is not just tasty; it's good for you too! Roasted red pepper hummus is easy to make and packed with flavor. We discussed key ingredients like chickpeas, roasted red peppers, and tahini. You learned step-by-step how to prepare and blend, plus tips to enhance taste and texture. Explore variations by adding spices or herbs to fit your taste. Don't forget how to store your hummus for freshness. I hope this guide inspires you to create your own hummus and enjoy it!](https://dishtreats.com/wp-content/uploads/2025/07/4eff3fe8-7a50-4e3c-86ee-c946a92fe799-768x768.webp)


![- 1 can (15 oz) of chickpeas - 2 tablespoons extra virgin olive oil - Spice seasoning options: smoked paprika, garlic powder, ground cumin Crispy air fryer chickpeas need just a few simple ingredients. First, grab a can of chickpeas. They provide protein and fiber. Next, use extra virgin olive oil for richness. This oil helps the spices stick and adds flavor. For seasoning, I love smoked paprika, garlic powder, and ground cumin. These spices add depth and warmth to the dish. - Chopped fresh parsley or cilantro for garnishing - Alternative spices for flavor enhancement You can add fresh herbs like parsley or cilantro to make it pop. They add a burst of color and freshness. Feel free to play with spices. Try cayenne for heat or even cinnamon for a sweet twist. The options are endless! If you want to see the full recipe, check it out [Full Recipe]. - Preheat air fryer to 400°F (200°C). - Rinse and dry chickpeas thoroughly. Start by preheating your air fryer. Set it to 400°F (200°C) and let it heat for about five minutes. While it warms up, rinse the chickpeas well. It’s key to remove all the canning liquid. After rinsing, spread the chickpeas on a kitchen towel. Pat them dry gently. This step helps them get that perfect crisp. - Mix chickpeas with olive oil and spices. - Transfer to air fryer basket. In a large bowl, add the dried chickpeas. Pour in two tablespoons of olive oil. Sprinkle in smoked paprika, garlic powder, ground cumin, sea salt, and black pepper. Mix well so every chickpea gets coated. Next, transfer the seasoned chickpeas to the air fryer basket. Make sure they are in a single layer. Crowding the basket can lead to uneven cooking. - Set cooking time for 15–20 minutes. - Shake basket every 7 minutes for even cooking. Set the timer for 15 to 20 minutes. It’s important to shake the basket every seven minutes. This ensures all sides get crispy. Look for a nice golden-brown color and a satisfying crunch. When they’re done, let them cool for a few minutes. They will crisp up even more as they cool. If you like, garnish with chopped parsley or cilantro for a fresh touch before serving. To get the best crunch, drying chickpeas is key. Start by rinsing them well. Then, spread them on a clean kitchen towel and gently pat them dry. This step removes excess moisture, which helps them crisp up nicely in the air fryer. Next, set your air fryer to 400°F (200°C). Preheat it for about 5 minutes. This heat is crucial for achieving that perfect texture. When you place the chickpeas in the basket, make sure they are in a single layer. Overcrowding can lead to soggy chickpeas. Crispy chickpeas pair well with many dips. Hummus and tzatziki are two of my favorites. They add creaminess that balances the crunch. You can also toss them into salads for an extra crunch or use them to top soups. If you want to get creative, try using crispy chickpeas as a snack on their own. They make a great addition to trail mixes or can be sprinkled on popcorn for a fun twist. Chickpeas are not just tasty; they're nutritious too. They are high in protein and fiber. This makes them a filling snack that can help you feel satisfied. Air frying reduces the amount of oil needed, so you get a low-calorie snack option without sacrificing flavor. These crispy chickpeas are a great way to enjoy a healthy snack without the guilt. You can feel good about munching on them anytime! For the full recipe, check the section above. {{image_4}} You can change the flavor of your crispy air fryer chickpeas. One fun option is to add spice. Try cayenne or chili powder for a spicy kick. Just mix in a little with your other spices before cooking. If you prefer sweet snacks, go for cinnamon and sugar. This will give your chickpeas a unique twist that's fun and tasty. These chickpeas are healthy and fit many diets. They are naturally gluten-free and vegan-friendly. This means everyone can enjoy them! For those watching their salt intake, you can lower the sodium. Simply reduce or skip the sea salt in the recipe for a low-sodium version. If you're hosting a party, you might want more chickpeas. To increase the batch size, just double or triple the ingredients. The cooking time may stay the same, but keep an eye on them. You can also swap chickpeas for other legumes like black beans or lentils. They will work well in the air fryer and offer different flavors. Each option can give you a fun new snack! Check out the [Full Recipe](#) for detailed steps on making these crispy delights! To store your crispy chickpeas, use an airtight container. This will help them stay crunchy. A glass jar or a plastic container with a tight lid works well. Make sure to let them cool completely before sealing. This step prevents moisture buildup. You can easily reheat chickpeas in an air fryer. Set it to 350°F (175°C) and heat for about 5 minutes. This method keeps them crispy. If you prefer the oven, place them on a baking sheet at the same temperature. Check often to avoid sogginess. Crispy chickpeas last for about 3 days at room temperature. If you store them in the fridge, they may last a bit longer, but they can lose some crispiness. For best results, enjoy them fresh! To make air fryer chickpeas crispy, first dry them well. After rinsing, spread them on a clean towel and pat them dry. Removing moisture is key for that perfect crunch. Next, toss the chickpeas with olive oil and spices. The oil helps them crisp up in the air fryer. Set your air fryer to 400°F (200°C). Cook them for 15 to 20 minutes, shaking the basket every 7 minutes. This ensures even cooking and a nice, golden-brown color. Keep an ear out for a satisfying crunch as they cook. Let them cool for a few minutes after frying. They will get even crunchier as they cool. Yes, you can use dried chickpeas, but they require more prep. Start by soaking the dried chickpeas overnight. This softens them and reduces cooking time. After soaking, rinse and boil them until tender, about 1 to 2 hours. Once cooked, follow the same steps to dry and season them. Air frying time may be longer, as dried chickpeas need to lose more moisture. Pay close attention to their texture for that perfect crunch. Crispy chickpeas pair well with many dips. Try hummus for a classic touch. Tzatziki offers a cool contrast. You can also serve them with guacamole for a creamy twist. For a spicy kick, mix them with a sriracha mayo. These dips enhance the flavors of the chickpeas. They make for a fun and tasty snack or appetizer. Enjoy exploring different combinations to find your favorite! For the full recipe, check out the [Full Recipe]. Crispy air fryer chickpeas are easy and fun to make. We covered the main ingredients, like chickpeas and olive oil, and talked about spices for extra flavor. You learned preparation steps, tips for crispiness, and fun ways to enjoy this snack. Try different spices or dips to keep it exciting. Crispy chickpeas are a tasty, healthy option for any event. Enjoy your cooking and happy snacking!](https://dishtreats.com/wp-content/uploads/2025/07/61bc6060-fad3-40a7-be2f-ccc6788a1d37-768x768.webp)