Healthy Chicken Pad Thai Flavorful and Nutritious Meal

Are you craving a tasty meal that’s also good for you? Look no further! This Healthy Chicken Pad Thai is bursting with flavor and packed with nutrients. In this article, I’ll walk you through every step to create a delicious dish that’s simple and satisfying. From fresh veggies to tender chicken, you’ll discover how to make pad thai that your whole family will love. Ready to start cooking? Let’s dive in!
Why I Love This Recipe
- Healthy Ingredients: This dish is packed with nutritious vegetables and lean protein, making it a wholesome meal option.
- Quick to Prepare: With a total cooking time of just 30 minutes, it’s perfect for busy weeknight dinners.
- Customizable Flavors: You can easily adjust the flavors by adding your favorite veggies or adjusting the sauces to your taste.
- Deliciously Satisfying: The combination of textures and flavors makes this Pad Thai a delightful and satisfying dish.
Ingredients
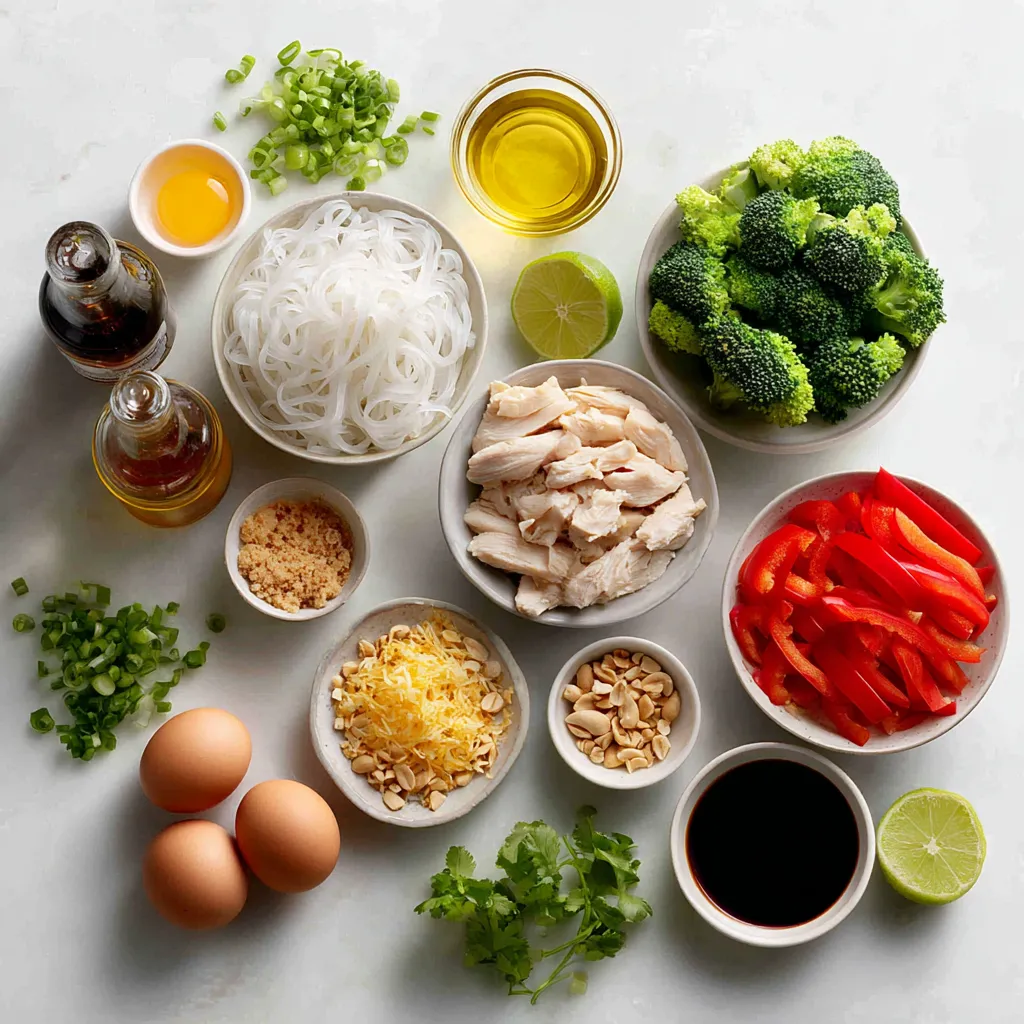
To make a tasty and healthy Chicken Pad Thai, you’ll need the following ingredients:
- 8 oz rice noodles
- 2 chicken breasts, thinly sliced
- 2 tablespoons olive oil
- 3 cloves garlic, minced
- 2 eggs, lightly beaten
- 1 cup bean sprouts
- 1 red bell pepper, thinly sliced
- 1 cup broccoli florets
- 3 green onions, chopped
- ½ cup peanuts, chopped (optional)
- 3 tablespoons low-sodium soy sauce
- 1 tablespoon fish sauce (optional)
- 1 tablespoon lime juice
- 1 teaspoon brown sugar or honey
- Fresh cilantro for garnish
- Lime wedges for serving
Each of these ingredients plays a key role in making this dish flavorful and nutritious. Rice noodles serve as the base, providing a soft texture. Chicken adds protein, while the veggies bring crunch and color. Olive oil helps cook everything evenly. Garlic gives a nice aroma and taste. Eggs add richness, and bean sprouts give a fresh bite. The red bell pepper and broccoli add vitamins and minerals. Green onions and cilantro enhance the flavor. Finally, lime juice and soy sauce provide a zesty finish.
Feel free to customize this list to suit your taste!

Step-by-Step Instructions
Cooking the Rice Noodles
- Start by boiling a large pot of water.
- Add 8 oz of rice noodles to the boiling water.
- Cook the noodles according to the package instructions, usually around 5-7 minutes.
- Once cooked, drain the noodles and rinse them under cold water.
- Set the noodles aside to cool and prevent sticking.
Preparing the Chicken
- Heat 1 tablespoon of olive oil in a large skillet over medium-high heat.
- Add 2 thinly sliced chicken breasts to the skillet.
- Sauté the chicken for about 5-7 minutes until golden brown.
- Make sure the chicken is fully cooked, then remove it from the skillet.
Sautéing Aromatics and Vegetables
- In the same skillet, add 1 tablespoon of olive oil.
- Add 3 minced garlic cloves and sauté for about 30 seconds.
- Watch closely so the garlic does not burn.
- Next, add 1 cup of broccoli florets and 1 sliced red bell pepper.
- Stir-fry the veggies for 3-4 minutes until they soften a bit.
Scrambling the Eggs
- Push the sautéed vegetables to one side of the skillet.
- Pour in 2 lightly beaten eggs on the other side.
- Let the eggs cook without stirring for about 30 seconds.
- Once they begin to set, scramble them until fully cooked.
- Mix the eggs back in with the sautéed veggies.
Combining and Seasoning
- Add the cooked chicken back into the skillet.
- Gently stir in the rice noodles, 1 cup of bean sprouts, and 3 chopped green onions.
- Pour in 3 tablespoons of low-sodium soy sauce, 1 tablespoon of lime juice, and 1 teaspoon of brown sugar.
- If using, add 1 tablespoon of fish sauce.
- Toss everything together gently for about 2-3 minutes until heated through.
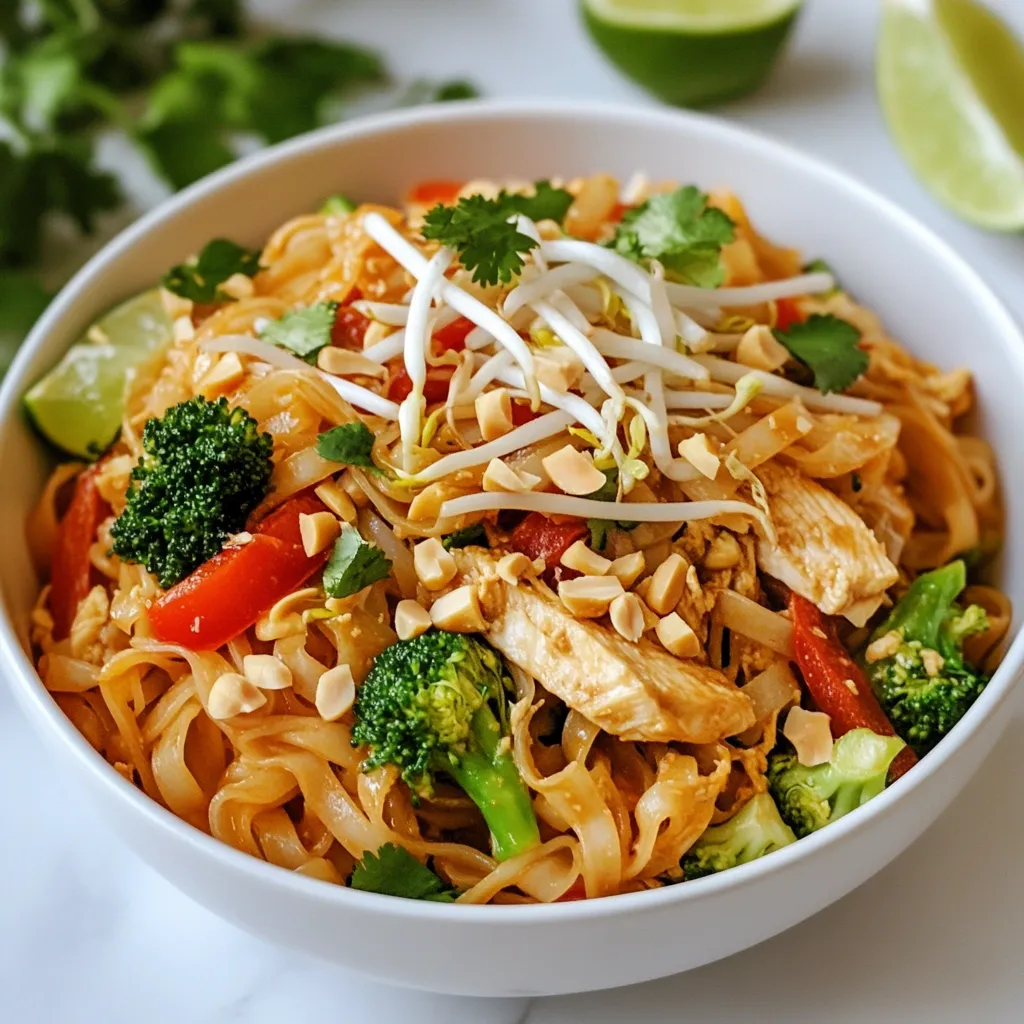
Garnishing and Serving
- Remove the skillet from the heat when done.
- Serve the Pad Thai in large bowls.
- Garnish with fresh cilantro and lime wedges on the side.
- For added crunch, sprinkle chopped peanuts on top.
Tips & Tricks
Health-Conscious Cooking Tips
- To make this dish lighter, cut down on oil and sugar. Use just one tablespoon of olive oil for cooking. Replace brown sugar with honey or skip it altogether.
- You can swap out rice noodles for zucchini noodles or whole wheat noodles. This makes the dish lower in carbs and higher in fiber.
Flavor Enhancement Suggestions
- For a quick flavor boost, add a pinch of red pepper flakes or a splash of lime juice. A sprinkle of sesame seeds can also add a nice crunch.
- Fresh herbs make a big difference! Use chopped cilantro or basil to brighten up the dish. They add freshness and aroma that enhances the overall taste.
Cooking Equipment Recommendations
- A non-stick skillet or a well-seasoned wok works best for this recipe. They help prevent sticking and make cooking easier.
- Keep a spatula and tongs handy. These tools help you stir and toss the ingredients efficiently. Using the right utensils will improve your cooking experience.
Pro Tips
- Prep Your Ingredients: Having all your ingredients prepped and ready to go can make the cooking process smoother and more enjoyable.
- Don’t Overcook the Noodles: Rice noodles can become mushy if overcooked. Follow package instructions closely and rinse them under cold water to stop the cooking process.
- Use Fresh Lime Juice: Freshly squeezed lime juice adds a vibrant flavor that bottled juice can’t replicate. Squeeze it right before serving for the best taste.
- Customize Your Veggies: Feel free to swap in your favorite vegetables or whatever you have on hand, such as carrots or snap peas, for added nutrition and flavor.

Variations
Vegetarian Option
You can easily make a vegetarian version of Healthy Chicken Pad Thai. Simply swap out the chicken for tofu or tempeh. Both options offer great protein. You can also try chickpeas for a different texture. Using these proteins adds a nice twist to the dish while keeping it nutritious.
Gluten-Free Adaptation
If you need a gluten-free option, switch the rice noodles for zucchini noodles or quinoa. Both alternatives still give you that Pad Thai feel. For the sauce, use tamari instead of soy sauce. This keeps the flavor but avoids gluten.
Spice Level Adjustments
Want to add some heat? Sprinkle in red pepper flakes or a dash of sriracha. Start with a small amount and adjust to your taste. If you’re cooking for kids, go easy on the spices. You can leave out the heat or use mild sauces for a family-friendly meal.
Storage Info
Refrigeration Guidelines
Store your Healthy Chicken Pad Thai in airtight containers. Glass or BPA-free plastic works well. Let the dish cool completely before sealing. This helps keep it fresh. Place it in the fridge for up to three days. For best taste, eat it within two days.
Reheating Instructions
To avoid sogginess, reheat gently. You can use a skillet on low heat. Add a splash of water to help steam the noodles. Stir often to heat evenly. If using a microwave, cover the dish with a damp paper towel. This keeps moisture in, preventing dryness. Heat in short bursts, stirring in between.
Freezing Guidelines
You can freeze Healthy Chicken Pad Thai, but the texture may change. Place it in freezer-safe bags or containers. Remove as much air as possible. It can stay fresh for up to three months. To thaw, move it to the fridge overnight. For a quicker method, use the microwave on low power. Always ensure it’s heated through before eating.
FAQs
How to make Healthy Chicken Pad Thai?
To make Healthy Chicken Pad Thai, follow these steps:
1. Cook the Rice Noodles: Boil water in a large pot. Cook the rice noodles as per package instructions. After cooking, drain and rinse under cold water. Set aside.
2. Prepare the Chicken: In a skillet, heat 1 tablespoon of olive oil. Add sliced chicken and sauté until golden brown, about 5-7 minutes. Remove and set aside.
3. Sauté Aromatics: Add another tablespoon of olive oil to the same skillet. Sauté minced garlic for about 30 seconds until fragrant.
4. Add Veggies: Stir in sliced red bell pepper and broccoli florets. Cook for 3-4 minutes until they soften.
5. Scramble the Eggs: Move veggies to one side. Pour in beaten eggs and let them set for 30 seconds before scrambling and mixing with the veggies.
6. Combine and Season: Add chicken back to the skillet. Stir in rice noodles, bean sprouts, green onions, soy sauce, lime juice, and brown sugar. Toss for 2-3 minutes until heated.
7. Garnish and Serve: Remove from heat. Serve with chopped peanuts, fresh cilantro, and lime wedges.
What are the nutritional benefits of this recipe?
Healthy Chicken Pad Thai offers several nutritional benefits:
- Calories: Approximately 450 calories per serving.
- Protein: Chicken provides lean protein, essential for muscle health.
- Vitamins: Bell peppers and broccoli add vitamins A and C, boosting your immune system.
- Fiber: Bean sprouts and vegetables provide fiber, aiding digestion.
- Healthy Fats: Olive oil and peanuts contain healthy fats that support heart health.
Can I meal prep Healthy Chicken Pad Thai?
Yes, you can meal prep Healthy Chicken Pad Thai! Here are some tips:
- Cook in Bulk: Prepare a large batch and divide it into containers.
- Store Properly: Use airtight containers to keep it fresh in the fridge for up to 4 days.
- Reheat Safely: When ready to eat, reheat in the microwave or on the stovetop until hot.
What can I substitute for soy sauce?
If you need soy sauce alternatives, consider these options:
- Coconut Aminos: A soy-free option that is sweeter and less salty.
- Tamari: A gluten-free soy sauce, great for those with gluten sensitivities.
- Liquid Aminos: A soy sauce alternative made from soy protein, lower in sodium.
Is this recipe kid-friendly?
Yes, this recipe can be kid-friendly with a few adjustments:
- Reduce Spice: Skip any hot sauces or spicy ingredients.
- Modify Veggies: Use vegetables kids like, such as carrots or peas.
- Serve Plain: If your kids are picky, serve the noodles with just chicken and a splash of lime.
This blog post guides you to make Healthy Chicken Pad Thai with fresh ingredients and simple steps. You learned about the key ingredients, cooking techniques, and how to store your meal. Remember to try variations to fit your taste or dietary needs. Cooking can be fun and healthy. Enjoy your dish while knowing you made a great choice for your body. The joy of cooking and sharing this meal will make it all worthwhil

Healthy Chicken Pad Thai
Ingredients
- 8 oz rice noodles
- 2 breasts chicken, thinly sliced
- 2 tablespoons olive oil
- 3 cloves garlic, minced
- 2 eggs lightly beaten
- 1 cup bean sprouts
- 1 red bell pepper thinly sliced
- 1 cup broccoli florets
- 3 green onions chopped
- ½ cup peanuts, chopped (optional)
- 3 tablespoons low-sodium soy sauce
- 1 tablespoon fish sauce (optional)
- 1 tablespoon lime juice
- 1 teaspoon brown sugar or honey
- to taste fresh cilantro for garnish
- to serve lime wedges
Instructions
- Cook the rice noodles according to the package instructions. Drain and rinse under cold water to prevent sticking. Set aside.
- In a skillet or wok, heat 1 tablespoon of olive oil over medium-high heat. Add the chicken and sauté until golden brown and cooked through, about 5-7 minutes. Remove from skillet and set aside.
- In the same skillet, add the remaining tablespoon of olive oil. Add the minced garlic and sauté for about 30 seconds until fragrant.
- Add the sliced red bell pepper and broccoli florets. Stir-fry for 3-4 minutes until vegetables soften but remain crunchy.
- Push the vegetables to one side of the skillet. Pour in the beaten eggs and let cook without stirring for about 30 seconds. Scramble until fully cooked and mix with the vegetables.
- Add the cooked chicken back into the skillet. Stir in the rice noodles, bean sprouts, green onions, soy sauce, fish sauce (if using), lime juice, and brown sugar. Toss gently for 2-3 minutes until heated through.
- Remove from heat and serve immediately, garnished with chopped peanuts (if using), fresh cilantro, and lime wedges.


![To make spicy chickpea tacos, you need some key items. Here is what you will need: - 1 can (15 oz) chickpeas, thoroughly drained and rinsed - 2 tablespoons extra virgin olive oil - 1 teaspoon ground chili powder - 1 teaspoon ground cumin - 1/2 teaspoon smoked paprika - 1/4 teaspoon cayenne pepper - Sea salt and freshly cracked black pepper to taste - 8 small corn or flour tortillas - 1 ripe avocado, sliced into thin pieces - 1 cup finely shredded purple cabbage - Fresh cilantro leaves for garnish - Lime wedges for serving These ingredients create a tasty and spicy base for your tacos. The spices bring warmth and depth, while the chickpeas offer a great source of protein and fiber. You can add some unique touches to your tacos. Here are some ideas: - Diced tomatoes for freshness - Sliced jalapeños for extra heat - A dollop of sour cream or yogurt for creaminess - Shredded cheese for richness - Corn or black beans for more texture Feel free to mix and match these extras. They can elevate your tacos to a whole new level. Chickpeas are not just tasty; they are also very healthy. Here are some benefits: - High in protein, which helps build muscle - Rich in fiber, aiding in digestion - Contain vitamins and minerals like iron and magnesium - Low in fat, making them a great choice for heart health Including chickpeas in your diet can support your overall health. They are a smart ingredient in any meal. For the full recipe, check the [Full Recipe]. Start by opening a can of chickpeas. Drain and rinse them well. In a bowl, use a fork or potato masher to gently mash the chickpeas. Leave some chunks for texture. You want them slightly broken but not a paste. This will help them stay firm while cooking. Heat 2 tablespoons of extra virgin olive oil in a skillet over medium heat. Once the oil shimmers, add the mashed chickpeas. Sprinkle in the spices: 1 teaspoon of chili powder, 1 teaspoon of cumin, 1/2 teaspoon of smoked paprika, and 1/4 teaspoon of cayenne pepper. Add sea salt and black pepper to taste. Stir well to coat all the chickpeas. Cook for about 5 to 7 minutes. This will make the spices fragrant and the chickpeas slightly crispy. While the chickpeas cook, warm the tortillas in another skillet for about 30 seconds on each side. You can also heat them in the oven. Once the chickpeas are ready, spoon a generous amount onto each tortilla. Top with sliced avocado, shredded purple cabbage, and fresh cilantro. Serve with lime wedges on the side. This adds a zesty touch just before eating. For the full recipe, check out the complete guide! To make your spicy chickpea tacos pop, use a mix of spices. I love pairing chili powder with cumin for a warm base. Adding smoked paprika brings a nice depth. If you want more heat, cayenne pepper is the way to go. You can also try adding garlic powder or onion powder for extra flavor. Experiment until you find your favorite blend. Warming your tortillas is key to a great taco. You can heat them in a skillet, about 30 seconds on each side. This keeps them soft and pliable. Alternatively, stack them, wrap in foil, and warm in the oven. If you prefer a crispy texture, try frying them lightly in oil. Just be careful not to overcook them! Serving matters! Place your tacos on a large platter. Add lime wedges and fresh cilantro for color. You can even include cherry tomatoes or sliced radishes for a vibrant touch. This not only looks great but also invites your guests to dig in. For a fun twist, serve with a side of salsa or guacamole to enhance the flavor. Enjoy the Full Recipe for more tips! {{image_4}} You can turn your spicy chickpea tacos into a taco bowl. Start with a base of rice or quinoa. Then, add your chickpea mixture on top. Pile on shredded cabbage, avocado, and cilantro. This bowl offers a fun twist on the classic taco. You could also add salsa or hot sauce for extra flavor. Feel free to mix in different proteins or veggies. You can add cooked chicken, beef, or shrimp if you want. For a veggie boost, try bell peppers, corn, or zucchini. These options add variety and nutrition to your meal. You can also swap chickpeas for black beans or lentils for a new taste. Making this dish gluten-free is easy. Just use corn tortillas instead of flour ones. They are tasty and safe for those with gluten issues. This recipe is already vegan, so you can enjoy it as is. To enhance flavors, add avocado or a vegan sour cream. These small changes can make a big difference in taste and texture. For the full recipe, check out the earlier sections. To store leftover chickpeas, place them in a clean, airtight container. Make sure the lid seals tightly. You can keep them in the fridge for up to three days. If you want to store them for longer, freeze the chickpeas. They will last for about three months in the freezer. Just remember to label your container with the date. This helps you keep track of freshness. Reheating your tacos is easy! You can microwave them for about 30 seconds. Make sure to cover them with a damp paper towel. This keeps the tortillas soft. If you prefer a crispier taco, reheat them in a skillet. Heat the skillet on medium and warm each taco for about one minute on each side. This way, you keep that delicious crunch! For storing your ingredients, glass containers are best. They are safe, durable, and help keep food fresh. You can also use plastic containers, but make sure they are BPA-free. Small jars work well for spices and herbs. Label each container so you can find what you need quickly. Keep everything in a cool, dry place for the best results. For a full recipe, check the Spicy Chickpea Tacos section. You can make chickpea tacos spicier by adding more cayenne pepper. Start with 1/2 teaspoon and adjust to your heat level. You can also use hot sauce for an extra kick. Another idea is to add chopped jalapeños or serrano peppers. These fresh peppers bring heat and flavor. If you love smoky flavors, try adding chipotle powder. This will give your tacos a nice depth. Yes, you can prepare chickpea tacos in advance. I suggest cooking the chickpeas and storing them in an airtight container. Keep the tortillas and toppings separate until ready to serve. This way, everything stays fresh. You can store the chickpea mixture in the fridge for up to three days. Just reheat it before serving. Fresh toppings like avocado and cilantro should be added last. Spicy chickpea tacos pair well with many sides. You could serve them with rice or quinoa for a filling meal. A fresh salad adds brightness and crunch. Try a simple cabbage slaw or a corn salad. You might also enjoy salsa or guacamole on the side. For drinks, consider a refreshing limeade or a cold beer. This will balance the spice and add flavor. For the full recipe, check out the detailed instructions above. In this post, we covered how to make spicy chickpea tacos. We explored essential ingredients and their health benefits. You learned step-by-step instructions for preparing and cooking chickpeas, assembling tacos, and customizing them. We shared tips for seasoning, tortilla methods, and serving ideas. Variations included taco bowls and gluten-free options. Finally, we discussed how to store leftovers effectively. These tacos are fun, tasty, and good for you. Ready to enjoy your homemade spicy chickpea tacos?](https://dishtreats.com/wp-content/uploads/2025/06/78aca89b-dca0-4457-a4a9-555278ab1264-768x768.webp)


![To make crispy cauliflower tacos, gather these key ingredients: - 1 head of cauliflower, separated into bite-sized florets - 1 cup panko breadcrumbs - 1 teaspoon smoked paprika - 1 teaspoon garlic powder - 1 teaspoon onion powder - 1/2 teaspoon cayenne pepper (adjust to your spice level) - Salt and pepper to taste - 1 cup all-purpose flour - 1 cup plant-based milk (or regular milk) - Corn tortillas (for assembling the tacos) - 1 ripe avocado, sliced - 1 cup shredded red cabbage - Fresh cilantro, for garnishing - Lime wedges, for serving You can swap some ingredients based on your needs. Here are some ideas: - Use gluten-free flour instead of all-purpose flour. - Replace panko with crushed cornflakes for a different crunch. - Try almond milk or oat milk instead of plant-based milk. - Use different spices, like chili powder or cumin, for a unique flavor. To make your tacos even more delicious, consider these toppings: - Fresh salsa for a burst of flavor. - Pickled onions for a tangy kick. - Crumbled feta or queso for creaminess. - Radish slices for added crunch. - A drizzle of hot sauce for some heat. For the full recipe, refer back to the earlier section. Enjoy creating your crispy cauliflower tacos! Start by preheating your oven to 425°F (220°C). This ensures even cooking and crispiness. Next, take your head of cauliflower and separate it into bite-sized florets. Make sure the pieces are not too big. Smaller florets cook faster and get crispier. Now, let’s set up your breading station. Get three bowls in a row. In the first bowl, add one cup of all-purpose flour. In the second bowl, pour one cup of plant-based milk (or regular milk). In the third bowl, mix one cup of panko breadcrumbs with one teaspoon of smoked paprika, one teaspoon of garlic powder, one teaspoon of onion powder, and half a teaspoon of cayenne pepper. Add salt and pepper to taste. Stir the breadcrumbs well to spread the spices evenly. Once your cauliflower is ready and your breading station is set, it’s time to coat the florets. Dip each floret into the flour first. Make sure it’s fully coated, then shake off the excess. Next, dip the floret into the plant-based milk, letting any extra drip off. Finally, roll it in the breadcrumb mixture, pressing gently. Place the breaded florets on a lined baking sheet, leaving space between them. Now, slide the baking sheet into your preheated oven. Bake for 25-30 minutes. Flip the florets halfway through to ensure they brown evenly. When they turn golden and crispy, they’re ready! Enjoy your crispy cauliflower tacos with all the tasty toppings from the Full Recipe. To get that crunch, the key is the panko breadcrumbs. They create a light and crispy coating. Make sure to coat each cauliflower floret well. When you bake them, place them evenly on the sheet. This allows hot air to circulate, making them crispier. Spice up your tacos with smoked paprika and cayenne pepper. They add a nice kick. You can also mix in herbs like cumin or oregano for extra depth. Don't forget to season with salt and pepper. Taste the breadcrumbs before coating the cauliflower to ensure they are flavorful. For the best serving experience, warm your corn tortillas before filling them. This makes them pliable and tasty. Layer your tacos with fresh avocado and shredded cabbage. Top with chopped cilantro and a squeeze of lime for brightness. For an extra treat, serve with a side of salsa or hot sauce. If you want the full recipe, check out the Crispy Cauliflower Tacos section. {{image_4}} You can easily make these tacos vegan. Use plant-based milk instead of regular milk. For the breading, stick to vegan-friendly panko breadcrumbs. This keeps the flavor and crunch you want. To make these tacos gluten-free, swap regular flour with a gluten-free all-purpose blend. Gluten-free panko will also work well for the breading. This way, everyone can enjoy these tasty tacos. You can change the flavor of your tacos. For a spicy kick, add more cayenne pepper or some chili powder. If you prefer sweet, try adding a drizzle of agave syrup or honey. For a savory twist, consider using smoked paprika or a dash of soy sauce in the batter. Each variation brings a new taste adventure to your table. To store leftover tacos, place them in an airtight container. Separate the crispy cauliflower and tortillas if you can. This keeps the tortillas from getting soggy. Store in the fridge for up to three days. When you are ready to eat, you can reheat them for the best taste. To reheat, place the cauliflower on a baking sheet. Preheat your oven to 350°F (175°C). Bake for about 10-15 minutes until crispy again. For the tortillas, heat them in a dry pan for a minute on each side. This helps to keep them warm and flexible. If you want to freeze the tacos, wrap each taco tightly in plastic wrap. Place them in a freezer-safe bag to avoid freezer burn. They can last up to a month in the freezer. When ready to eat, thaw them overnight in the fridge and reheat as mentioned above. Enjoy the great taste even after storage! For the full recipe, refer back to the beginning of the article. To make your cauliflower tacos crispier, follow these tips: - Use Panko Breadcrumbs: They are lighter and create a better crunch than regular breadcrumbs. - Double Coat: For extra crunch, dip the florets in flour, then milk, and roll in breadcrumbs twice. - Bake at High Heat: Ensure your oven is at 425°F (220°C) for that golden finish. - Don’t Crowd the Pan: Space the florets on the baking sheet. This helps them crisp all over. - Flip Regularly: Halfway through baking, flip the florets to cook evenly. By using these steps, you'll achieve a wonderfully crispy texture every time. Yes, you can use different tortillas! Here are some options: - Flour Tortillas: These are soft and great for holding fillings. - Whole Wheat Tortillas: A healthier choice with more fiber. - Lettuce Wraps: For a low-carb option, try using large lettuce leaves. - Taco Shells: Crunchy taco shells add a fun twist. Choose the tortilla that fits your taste and dietary needs. Pair your crispy cauliflower tacos with these delicious side dishes: - Mexican Rice: Fluffy rice with spices complements the tacos well. - Black Beans: A protein-rich side that adds flavor and nutrition. - Guacamole: Creamy and fresh, it’s always a hit. - Corn Salad: A sweet and tangy salad brightens the meal. - Grilled Vegetables: Charred veggies bring a smoky flavor that pairs nicely. These sides will enhance your taco experience and create a full, flavorful feast. For the complete recipe, check out the [Full Recipe]. This blog covered ingredients, steps, tips, variations, and storage for cauliflower tacos. You learned how to prep, bread, and bake for that perfect crunch. I shared useful flavor boosts and serving ideas. You can explore vegan and gluten-free options to suit your needs. Finally, I provided storage tips to keep leftovers fresh. Cauliflower tacos are fun and flexible. Enjoy making them your own!](https://dishtreats.com/wp-content/uploads/2025/07/b9e73b78-f0ec-4a59-80bf-257d8f9aee98-768x768.webp)