
If you love creamy comfort food but want to stay healthy, I have just the recipe for you! This Healthy Broccoli Cheddar Soup is rich, cheesy, and packed with fresh veggies. It’s the perfect blend of flavors and nutrition. In this post, I will guide you step-by-step through the ingredients and easy cooking process. Get ready to create a delicious meal that warms both your heart and body!
Why I Love This Recipe
- Comforting and Creamy: This soup is the ultimate comfort food, with a rich and creamy texture that warms you up from the inside out.
- Nutritious Ingredients: Packed with fresh broccoli, cauliflower, and carrots, this dish is a great way to sneak in those essential veggies!
- Easy to Make: With simple steps and minimal prep time, you can have this delightful soup ready in no time!
- Versatile and Customizable: You can easily adapt this recipe with different cheeses or add-ins, making it a family favorite!
Ingredients
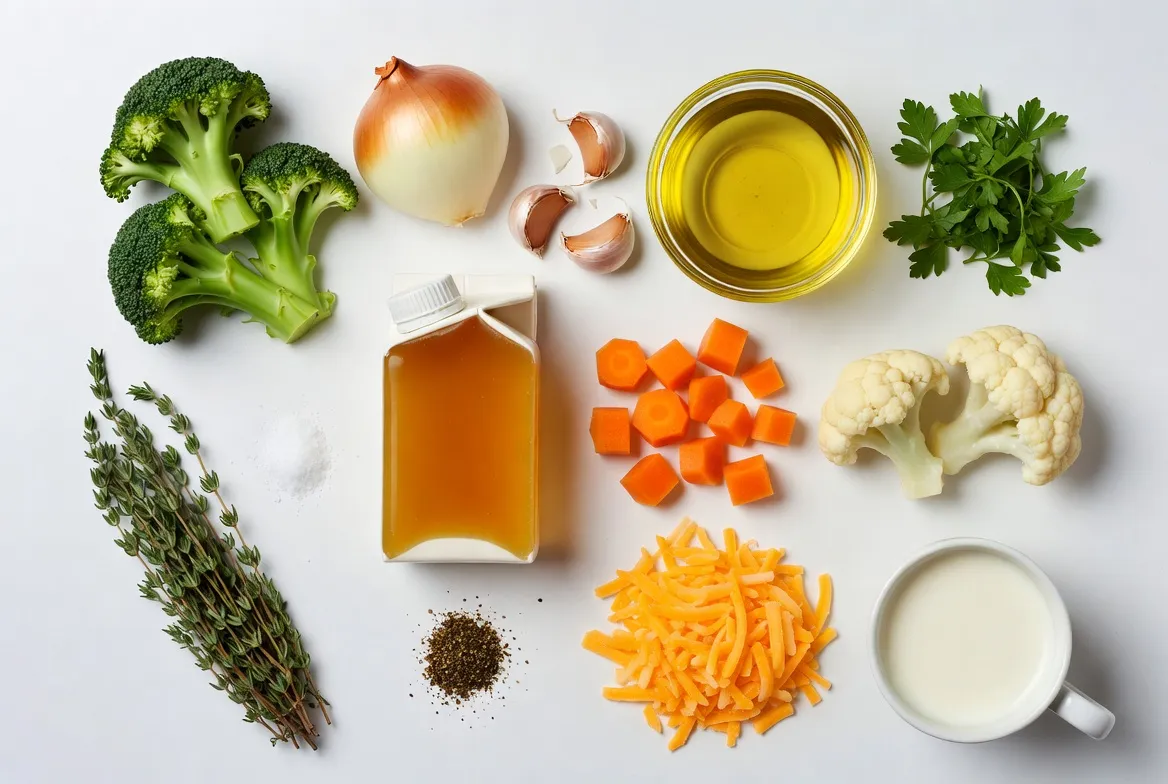
Fresh Produce
– 4 cups fresh broccoli florets
– 1 medium onion, finely diced
– 2 cloves garlic, minced
– 2 medium carrots, diced into small pieces
– 1 cup cauliflower florets
Pantry Staples
– 3 tablespoons extra virgin olive oil
– 4 cups low-sodium vegetable broth
– 1 teaspoon dried thyme
– 1/2 teaspoon freshly ground black pepper
– Salt to taste
Dairy & Alternatives
– 2 cups shredded sharp cheddar cheese
– 1 cup milk or dairy-free alternative
– Optional garnish: Fresh parsley, chopped
When picking broccoli, look for vibrant green florets. They should feel firm and fresh. For the onion, a medium one works best to give just the right flavor. Minced garlic adds a strong taste, so don’t skip it! Carrots and cauliflower add sweetness and creaminess to the soup.
Using extra virgin olive oil not only boosts flavor but also adds healthy fats. Low-sodium vegetable broth keeps the soup rich without too much salt. Dried thyme and black pepper help to elevate the dish.
The cheese is the star! Shredded sharp cheddar gives that classic taste we all love. If you want a dairy-free option, almond or oat milk works well. Finally, fresh parsley adds a pop of color and a hint of freshness on top.
Gathering these ingredients will set you up for a delicious, creamy soup that’s both healthy and satisfying!
Step-by-Step Instructions
Preparation and Sautéing
1. Start by heating 3 tablespoons of extra virgin olive oil in a large pot over medium heat.
2. Once the oil is hot, add 1 medium diced onion. Sauté for about 4-5 minutes. You want the onion to be soft and a bit clear.
3. Next, add 2 minced cloves of garlic into the pot. Sauté for another minute. This makes your kitchen smell great!
Cooking the Vegetables
1. Now, it’s time to add in 4 cups of fresh broccoli florets, 1 cup of cauliflower florets, and 2 diced carrots.
2. Stir everything well and cook for about 5 minutes. This helps the veggies soften a little.
3. Pour in 4 cups of vegetable broth. Add 1 teaspoon of dried thyme and 1/2 teaspoon of freshly ground black pepper.
4. Turn up the heat and bring the mixture to a gentle boil. Once boiling, lower the heat and let it simmer for about 15 minutes. The veggies should be tender.
Blending and Finalizing the Soup
1. Use an immersion blender to puree the soup right in the pot. If you don’t have one, carefully transfer the soup to a blender in batches.
2. Blend until the mixture is smooth, then return it to the pot.
3. Switch the heat to low. Stir in 1 cup of milk and 2 cups of shredded sharp cheddar cheese. Mix until the cheese melts.
4. Taste and add salt as needed. Let the soup simmer for another 5-10 minutes, stirring often.
5. Serve hot, adding chopped parsley on top for a nice touch!
Tips & Tricks
Enhancing Flavor
To make your broccoli cheddar soup even tastier, try adding spices. A pinch of nutmeg can add warmth. You can also sprinkle in some red pepper flakes for a kick. Fresh herbs like basil or dill can brighten the soup. For a richer taste, consider using aged cheddar cheese instead of sharp cheddar. This gives the soup a deeper, more robust flavor.
Serving Ideas
Serving your soup well makes it even more enjoyable. Ladle the soup into warm bowls. Top with extra cheddar cheese for a gooey delight. A drizzle of olive oil adds a nice shine. For crunch, sprinkle on some toasted croutons. This adds texture and a fun bite. Pair your soup with crusty bread or a fresh salad to complete the meal.
Health Considerations
Broccoli is packed with vitamins and fiber. It supports your immune system and helps digestion. Carrots add sweetness and more nutrients. To make the soup even healthier, use low-fat milk or a dairy-free option. You can also add more vegetables, like spinach or zucchini. These keep the flavors fresh and the dish light.
Pro Tips
- Freshness Matters: Always use fresh broccoli and other vegetables for the best flavor and nutritional value. Frozen veggies can work in a pinch but may alter the texture.
- Cheese Choice: For a deeper flavor, opt for aged cheddar instead of regular sharp cheddar. It adds a complex taste that enhances the overall dish.
- Texture Control: If you prefer a chunkier soup, reserve some of the cooked vegetables before blending. Stir them back in after pureeing to add texture.
- Garnish for Flair: Don’t skip the parsley garnish! It not only adds a pop of color but also a fresh flavor that brightens the creamy soup.
Variations
Dairy-Free Options
You can make this soup without dairy. Use non-dairy milk like almond or oat milk. These options still add creaminess. For cheese, try nutritional yeast or vegan cheese. These substitutes keep the flavor and texture without dairy.
Additional Ingredients
Want to boost the soup’s nutrition? Add proteins like cooked chicken or canned beans. They make the soup heartier. You can also mix in different veggies. Try peas, spinach, or bell peppers for extra flavor and color.
Spice Level Adjustments
If you like heat, add chopped jalapeños or red pepper flakes. These spices can kick up the flavor. You can also add herbs like cumin or smoked paprika. These will give the soup a unique twist and depth.
Storage Info
Reheating Instructions
To reheat your soup, you can use either the stove or the microwave. For the stove, pour the soup into a pot. Heat it on low, stirring often. This helps keep it creamy. For the microwave, place the soup in a safe bowl. Heat it in short bursts of 30 seconds. Stir in between to ensure even warming.
– Best practices for reheating on the stove or microwave:
– Use low heat on the stove.
– Stir frequently to prevent sticking.
– Heat in short bursts in the microwave.
– Tips for maintaining creaminess:
– Add a splash of milk while reheating.
– Avoid boiling the soup to keep it smooth.
Freezing Guidelines
Freezing your soup is easy and helps it last longer. First, let the soup cool completely. Next, pour it into airtight containers or freezer bags. Make sure to leave some space for expansion. Label the containers with the date.
– How to freeze portions effectively:
– Use airtight containers or freezer bags.
– Leave space for soup to expand.
– Recommended thawing and reheating methods:
– Thaw overnight in the fridge.
– Reheat on low heat on the stove.
Shelf Life
Your soup can last up to 4 days in the fridge. Store it in an airtight container to keep it fresh. Always check for spoilage before eating. If you see mold or notice a bad smell, it’s best to toss it.
– How long the soup lasts in the fridge:
– Up to 4 days when stored properly.
– Signs of spoilage to watch out for:
– Mold on the surface.
– Off or sour smell.
FAQs
How do I make my broccoli cheddar soup healthier?
To make this soup healthier, swap some ingredients. Here are some easy swaps:
– Use low-fat cheese instead of regular cheese.
– Replace whole milk with unsweetened almond or oat milk.
– Add more veggies like spinach or zucchini for extra nutrients.
– Use less oil; try sautéing with vegetable broth instead.
These changes keep the taste while adding more health benefits.
Can I make this soup in advance?
Yes, you can make this soup ahead of time. Here’s how:
– Cook the soup as directed and let it cool.
– Store it in an airtight container in the fridge for up to three days.
– To freeze, pour the soup into freezer-safe bags and lay them flat. It will last up to three months.
Just reheat on the stove or in the microwave when you’re ready to eat.
What can I serve with broccoli cheddar soup?
You can serve this soup with many tasty sides. Here are some ideas:
– Crusty bread or a baguette for dipping.
– A fresh side salad with lemon vinaigrette.
– Crispy croutons on top for added crunch.
– Grilled cheese sandwiches for a classic combo.
These sides make your meal more filling and enjoyable.
Can I use frozen broccoli instead of fresh?
Yes, using frozen broccoli works well in this soup. Here’s what to know:
– Frozen broccoli is often picked and frozen at peak freshness.
– It cooks faster than fresh broccoli, so reduce cooking time by a few minutes.
– Just thaw it before adding to the pot to ensure even cooking.
Frozen veggies save time and still taste great in your soup!
This blog covered how to make a tasty broccoli cheddar soup. We looked at fresh veggies, pantry staples, and dairy options. I shared step-by-step cooking methods and helpful tips. You learned how to store or freeze your soup, and we explored variations to fit your needs.
In closing, this simple soup is healthy and easy to make. Enjoy experimenting with flavors and ingredients. Your kitchen is now the perfect place for tasty meals. Enjoy every bow


