
Ready to elevate your meal game? This Greek Orzo Salad with Feta packs a punch of vibrant flavors that will leave your taste buds dancing! With easy-to-find ingredients and simple steps, you can whip up this refreshing dish in no time. Whether you’re preparing for a summer gathering or a quick weeknight dinner, this salad is a perfect choice. Let’s dive into the delicious world of Mediterranean cooking!
Why I Love This Recipe
- Fresh and Flavorful: This Greek Orzo Salad bursts with fresh ingredients that create a delightful combination of flavors and textures.
- Easy to Prepare: With simple steps and minimal cooking, this salad can be whipped up quickly, making it perfect for busy days.
- Versatile Dish: This salad works as a light main course or a side dish, ideal for picnics, barbecues, or potlucks.
- Healthy and Nutritious: Packed with vegetables, healthy fats, and protein from feta, this salad is both satisfying and nourishing.
Ingredients
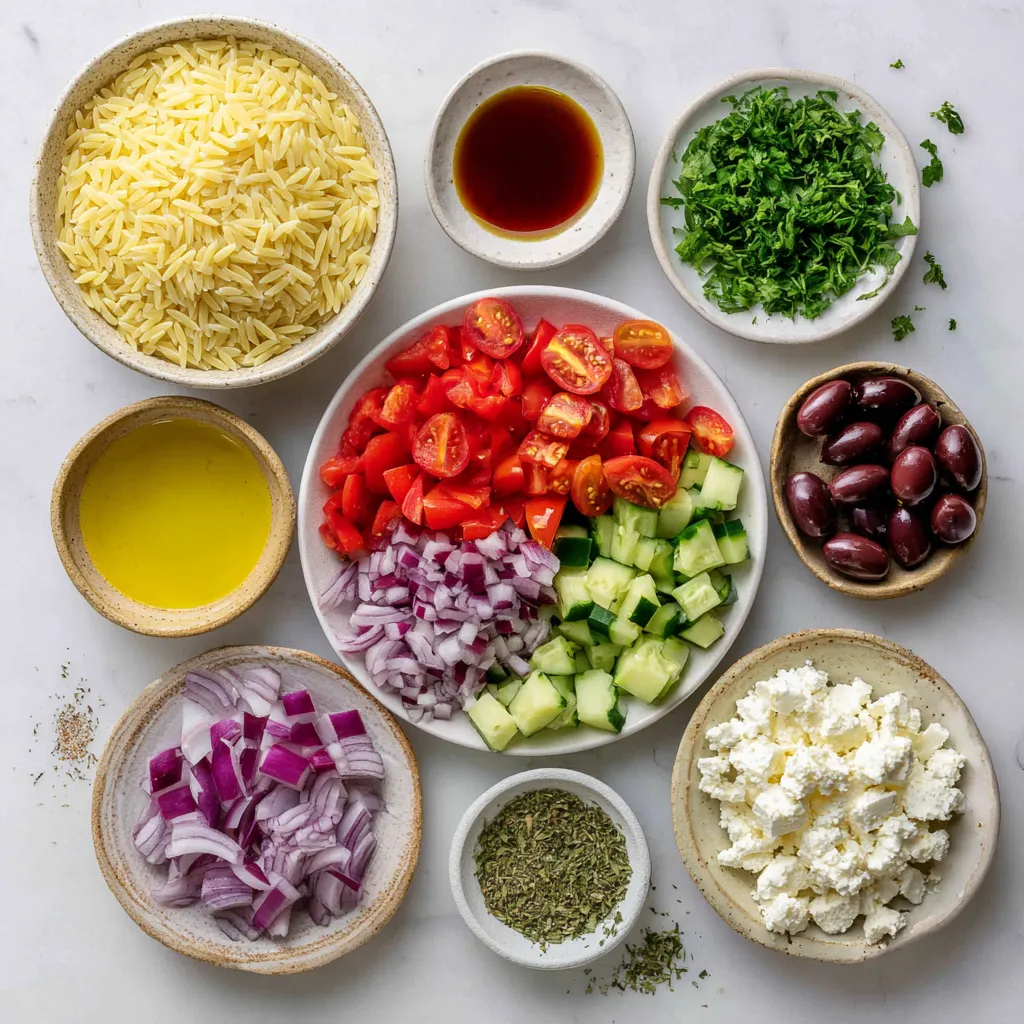
List of Ingredients
– 1 cup orzo pasta
– 1 cup cherry tomatoes, halved
– 1 medium cucumber, diced
– 1 medium red bell pepper, chopped into bite-sized pieces
– 1/2 small red onion, finely chopped
– 1/2 cup Kalamata olives, pitted and sliced in half
– 1 cup feta cheese, crumbled
– 1/4 cup fresh parsley, chopped
– 1/4 cup extra virgin olive oil
– 2 tablespoons red wine vinegar or fresh lemon juice
– 1 tablespoon dried oregano
– Salt and pepper to taste
The ingredients for Greek Orzo Salad with Feta bring a burst of flavor. Orzo pasta is the base. It cooks quickly and has a nice texture. The cherry tomatoes add sweetness. You can halve them easily. The cucumber provides a crisp bite. Dice it small for better mixing. The red bell pepper adds color and crunch. Chop it into small pieces.
Red onion brings a sharp flavor. Finely chop it to blend well. Kalamata olives give a salty touch. Remove the pits and slice them in half. Feta cheese crumbles beautifully. It adds creaminess and tang. Fresh parsley brightens the dish with its green color.
The dressing is simple. Extra virgin olive oil offers richness. Red wine vinegar or lemon juice gives a tangy kick. Dried oregano adds a hint of earthiness. Finally, salt and pepper enhance all the flavors. Together, these ingredients make a vibrant salad full of tastes and textures.
Step-by-Step Instructions
Cooking the Orzo
1. Bring a large pot of salted water to a boil.
2. Add 1 cup of orzo pasta to the boiling water.
3. Cook the orzo for 8 to 10 minutes. Stir occasionally to prevent sticking.
4. Once tender, drain the orzo in a colander. Rinse it under cold water to stop the cooking.
Preparing the Vegetables
1. While the orzo cooks, prepare your vegetables.
2. Halve 1 cup of cherry tomatoes and set them aside.
3. Dice 1 medium cucumber into small cubes.
4. Chop 1 medium red bell pepper into bite-sized pieces.
5. Finely chop 1/2 small red onion. Arrange all veggies on a plate.
Mixing the Salad
1. In a large mixing bowl, combine the drained orzo, halved cherry tomatoes, diced cucumber, chopped red bell pepper, and chopped onion.
2. Add 1/2 cup of Kalamata olives and 1 cup of crumbled feta cheese.
3. Toss in 1/4 cup of chopped parsley. Mix gently to combine everything.
Finishing Touches
1. In a small bowl, whisk together 1/4 cup of extra virgin olive oil, 2 tablespoons of red wine vinegar, and 1 tablespoon of dried oregano.
2. Add a pinch of salt and pepper to the dressing.
3. Drizzle the dressing over the salad mixture. Toss gently to coat the salad evenly.
4. Taste the salad and adjust seasoning as needed.
5. Let the salad sit for about 15 minutes to meld flavors. You can refrigerate it for up to 1 hour to enhance flavors.
Tips & Tricks
Best Practices for Perfect Orzo
To get the best orzo, cook it for 8-10 minutes. You want it to be al dente, which means it should still have a slight bite. Overcooking orzo can make it mushy. Once cooked, rinsing the orzo is key. Rinse it under cool water to stop the cooking process. This makes sure the pasta stays firm and doesn’t stick together.
Dressing Suggestions
When it comes to dressing, you can choose between lemon juice and vinegar. Lemon juice gives a bright, fresh taste. Red wine vinegar adds a deeper, tangy flavor. You can also mix in fresh herbs like dill or mint for extra flavor. These herbs will enhance the taste of your orzo salad and make it pop.
Presentation Tips
For serving, use a large, shallow bowl. This makes your salad look inviting. To add color, sprinkle more crumbled feta on top. A bit of freshly chopped parsley also brightens the dish. Just before serving, drizzle a little olive oil for a shiny finish. These small touches make your Greek orzo salad not just tasty, but also beautiful.
Pro Tips
- Fresh Ingredients: Always use the freshest vegetables and herbs to enhance the flavor and nutritional value of your Greek Orzo Salad.
- Cook Orzo Perfectly: Make sure to cook the orzo al dente for the best texture. Overcooking can make it mushy and less enjoyable.
- Flavor Enhancements: For a more robust flavor, marinate the Kalamata olives in some olive oil and herbs before adding them to the salad.
- Prep Ahead: This salad can be made a few hours in advance. Just dress it right before serving to keep the ingredients fresh and vibrant.
Variations
Protein Additions
You can boost the protein in your Greek Orzo Salad easily. Grilled chicken or shrimp add great flavor and texture. Just slice the chicken or shrimp and mix them in. For a vegetarian choice, add chickpeas. They bring protein and heartiness without meat.
Vegetable Substitutions
Feel free to swap in seasonal veggies. Zucchini or bell peppers can add a fresh twist. You can also try different types of olives. Green olives or even feta-stuffed olives change the taste profile nicely.
Gluten-Free Swaps
If you need a gluten-free version, use alternative pasta. Quinoa is a great base for a Greek salad. It has a nice nutty flavor and works well with all the other ingredients. Just prepare it like you would the orzo for a tasty result.
Storage Info
Refrigeration Guidelines
To store Greek Orzo Salad, place it in an airtight container. This keeps it fresh. Try to use it within three days for the best taste. If you keep it longer, the veggies may get soggy. Always check for freshness before serving. If the salad looks or smells off, it’s best to toss it.
Freezing Considerations
You can freeze Greek Orzo Salad, but it may change in texture. The orzo and veggies might become mushy. If you decide to freeze it, pack it tightly in a freezer-safe container. Use it within one month for the best flavor. When ready to eat, thaw it in the fridge overnight. You can also warm it gently in a pan. If it seems dry, add a little olive oil to help.
FAQs
Can I prepare this salad in advance?
Yes, you can prepare this salad ahead of time. For best results, chop your veggies and cook the orzo a day before. Store each ingredient separately in the fridge. This keeps everything fresh and crisp. When you’re ready to serve, just mix them all together and add the dressing. This will save you time and keep the flavors bright.
What can I substitute for feta cheese?
If you cannot find feta cheese, there are several tasty alternatives. You can use crumbled goat cheese for a tangy flavor. Another option is ricotta cheese, which gives a creamy texture. For a dairy-free choice, try marinated tofu. Each of these options will still give your salad a lovely taste.
Is Greek Orzo Salad healthy?
Greek Orzo Salad is quite healthy. It is loaded with fresh vegetables, which provide vitamins and minerals. The orzo pasta offers good carbs for energy. Feta adds calcium and protein, making it a balanced meal. Just watch the dressing portions if you are counting calories.
How long does Greek Orzo Salad last?
Greek Orzo Salad lasts around 3 to 5 days in the fridge. Store it in an airtight container for the best freshness. Look for signs of spoilage, like off smells or changes in texture. If it looks or smells bad, it’s best to toss it out.
This Greek Orzo Salad combines fresh ingredients for a tasty meal. We covered how to cook the orzo, prepare vegetables, and mix it all together. Adding proteins or switching up veggies makes it versatile and fun. Remember to store it well for later enjoyment. This salad not only tastes great but also offers health benefits. Try it today and discover your favorite twis


