Glow Bowl with Tahini Yogurt Sauce Refreshing Meal

Looking for a refreshing meal that packs a healthy punch? The Glow Bowl with Tahini Yogurt Sauce is your answer! This vibrant dish features quinoa, roasted sweet potatoes, and crisp veggies, all topped with a creamy, zesty sauce. It’s not just tasty; it’s simple to make and perfect for any time of day. Let’s dive into this flavorful recipe that’s as good for you as it is delicious!
Why I Love This Recipe
- Nutritious and Wholesome: This glow bowl is packed with protein, fiber, and healthy fats, making it a nutritious meal option that fuels your body.
- Vibrant and Colorful: The combination of roasted sweet potato, bright green broccoli, and creamy avocado creates a visually stunning dish that is as pleasing to the eyes as it is to the palate.
- Customizable: You can easily swap out ingredients or add your favorite toppings, making this recipe versatile to suit your taste preferences.
- Delicious Tahini Yogurt Sauce: The creamy tahini yogurt sauce adds a rich flavor that ties all the elements of the bowl together beautifully.
Ingredients
Required Ingredients for the Glow Bowl
- 1 cup quinoa, thoroughly rinsed
- 2 cups vegetable broth
- 1 medium sweet potato, peeled and cut into 1-inch cubes
- 1 cup broccoli florets, cut to bite-size
- 1 cup canned chickpeas, drained and rinsed
- 1 ripe avocado, sliced
- 1 tablespoon extra-virgin olive oil
- 1 teaspoon smoked paprika
- Sea salt and freshly ground black pepper to taste
Ingredients for Tahini Yogurt Sauce
- ½ cup plain yogurt (choose dairy or plant-based)
- 2 tablespoons tahini
- 1 tablespoon freshly squeezed lemon juice
- 1 clove garlic, finely minced
- Water (as needed for consistency)
- Sea salt to taste
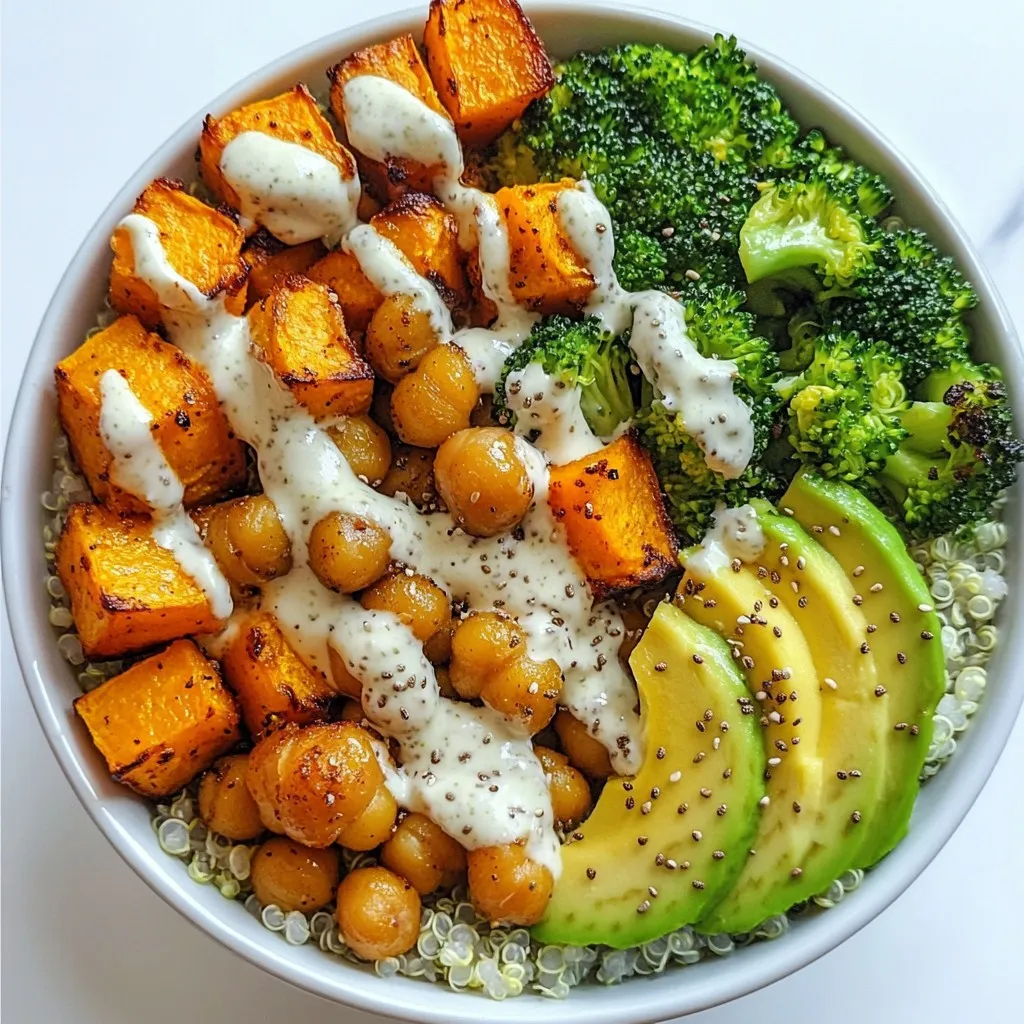
The glow bowl is colorful and packed with nutrients. You need quinoa as the base. It provides good protein and fiber. Vegetable broth adds flavor and moisture. Sweet potatoes give a sweet taste and nice texture. Broccoli adds crunch and vitamins. Chickpeas are a great source of protein. Sliced avocado adds creaminess and healthy fats.
You should also have olive oil, smoked paprika, sea salt, and pepper for seasoning. The tahini yogurt sauce brings it all together. It is creamy and tangy. For the sauce, you need plain yogurt, tahini, lemon juice, garlic, water, and salt.
Using these fresh ingredients makes your glow bowl a feast for the eyes and the body. Each bite offers a blend of textures and tastes. This dish is not just healthy; it’s a delight to eat and share.

Step-by-Step Instructions
Cooking the Quinoa
First, bring the vegetable broth to a boil in a medium saucepan. Rinse 1 cup of quinoa under cold water to remove any bitterness. Add the rinsed quinoa to the boiling broth. After that, reduce the heat to low and cover the pot. Let it simmer for about 15 minutes. When all the liquid is absorbed, take it off the heat. Allow it to rest for 5 minutes, still covered. Fluff the quinoa with a fork before serving.
Roasting the Sweet Potato
Next, preheat your oven to 400°F (200°C). Peel and cut the sweet potato into 1-inch cubes. In a mixing bowl, toss the sweet potato with 1 tablespoon of olive oil, smoked paprika, sea salt, and black pepper. Make sure each piece is coated well. Spread the cubes on a baking sheet in a single layer. Roast them for 25-30 minutes. Stir halfway through to ensure even cooking. They should turn tender and caramelized.
Blanching the Broccoli
While the sweet potato roasts, fill a small pot with water and bring it to a rolling boil. Add a pinch of salt to the water. Throw in 1 cup of broccoli florets and blanch for about 3 minutes. The broccoli should become bright green and just tender. Quickly drain the broccoli and plunge it into a bowl of ice water. This stops the cooking and keeps the color bright.
Sautéing the Chickpeas
Now, heat a splash of olive oil in a small skillet over medium heat. Drain and rinse 1 cup of canned chickpeas. Add them to the skillet and sauté for about 5 minutes. You want them heated through and a bit crispy on the outside. Season with sea salt to taste and stir to coat evenly.
Making the Tahini Yogurt Sauce
For the sauce, grab a mixing bowl. Combine ½ cup of plain yogurt, 2 tablespoons of tahini, 1 tablespoon of lemon juice, and 1 finely minced garlic clove. Add a pinch of salt for flavor. Gradually mix in water, one tablespoon at a time, until you reach your desired creamy consistency. Adjust the seasoning if needed.
Assembling the Glow Bowl
Now, it’s time to put everything together. In a large serving bowl or individual bowls, start with a generous layer of quinoa. Neatly arrange the roasted sweet potatoes, blanched broccoli, and sautéed chickpeas on top. Finish with slices of creamy avocado. Drizzle with the tahini yogurt sauce. For a beautiful touch, consider adding toasted sesame seeds or fresh herbs as a garnish. Enjoy your colorful Glow Bowl!
Tips & Tricks
Perfecting the Quinoa
To make fluffy quinoa, start by rinsing it well. This removes bitter saponins. When cooking, use vegetable broth instead of water for a nice flavor boost. After cooking, let it rest covered for five minutes. Then, fluff it gently with a fork. This keeps the grains separate and light.
- Fluffing techniques: Use a fork, not a spoon, to avoid mushiness.
- Flavor enhancement tips: Add a pinch of salt and a splash of lemon juice before serving.
Sweet Potato Variations
Sweet potatoes are great, but you can roast other veggies too. Carrots, zucchini, or bell peppers work well. Just cut them to similar sizes for even cooking. For a twist, try adding cumin or chili powder to your seasoning mix.
- Other vegetables to roast: Try carrots, zucchini, or bell peppers.
- Seasoning alternatives: Use cumin, chili powder, or garlic powder for different flavors.
Tahini Sauce Customization
The tahini sauce can change based on your taste. If you like it thicker, add less water. If you want it creamier, mix in more yogurt. For a zesty kick, add more lemon juice. If you prefer dairy-free, use plant-based yogurt instead.
- Adjusting flavors and consistencies: Add more tahini for richness or lemon for brightness.
- Dairy-free options: Use plant-based yogurt like almond or coconut yogurt for a vegan sauce.
Pro Tips
- Perfectly Cooked Quinoa: To achieve fluffy quinoa, make sure to rinse it thoroughly before cooking to remove the bitter saponins. Allow it to rest after cooking for a few minutes to enhance its texture.
- Flavorful Roasting: For even more flavor, try adding spices like cumin or garlic powder to the sweet potatoes before roasting. This adds depth and complements the tahini sauce beautifully.
- Chickpea Crispiness: To get those crispy chickpeas, ensure they are fully dried after rinsing. You can even roast them in the oven for a few minutes for an extra crunch before adding to the bowl.
- Customizable Sauce: Feel free to adjust the tahini yogurt sauce by adding herbs like dill or parsley, or a dash of hot sauce for some heat. This allows you to tailor the dressing to your taste.

Variations
Glow Bowl Customization Ideas
You can easily change up your Glow Bowl to suit your tastes. Here are some ideas:
- Switching up base grains: Try brown rice, farro, or barley instead of quinoa. Each grain brings a unique flavor and texture.
- Additional protein options: You can add grilled chicken, tofu, or shrimp for extra protein. Each option makes the bowl heartier.
Seasonal Ingredient Variations
Using fresh, seasonal ingredients can boost flavor and nutrition. Consider these ideas:
- Using seasonal vegetables: In summer, use zucchini and bell peppers. In fall, try roasted carrots or Brussels sprouts. Seasonal veggies add variety and freshness.
- Incorporating different sauces: Swap out the tahini yogurt sauce with pesto or a spicy sriracha sauce. New sauces can change the whole vibe of your bowl.
Healthier Modifications
If you want a lighter meal, here are some easy swaps:
- Reducing calories or fat: Use less olive oil or replace yogurt with a low-fat version. These small changes can make the dish lighter.
- Gluten-free adjustments: Ensure your grains are gluten-free. Quinoa is naturally gluten-free, making it a great choice for everyone.
Feel free to mix and match these ideas to create your perfect Glow Bowl!
Storage Info
Storing Leftovers
To keep your Glow Bowl fresh, store leftovers right away. Use an airtight container for best results. Glass or BPA-free plastic containers work well. Be sure to let the bowl cool before sealing it.
Reheating Instructions
When reheating, do it gently. Use a microwave or stovetop. For the microwave, heat in short bursts. Stir between each burst to avoid hot spots. If using the stovetop, add a splash of water to keep it moist.
Freezing Tips
You can freeze some ingredients. Cooked quinoa and chickpeas freeze well. Place them in freezer bags, remove air, and seal tightly. For sweet potatoes and broccoli, they may lose texture when thawed. For best results, eat within three months of freezing.
To thaw, move them to the fridge overnight. Then, reheat as mentioned above. This way, you keep the flavors and textures you love.
FAQs
What can I substitute for tahini in the sauce?
If you don’t have tahini, you can use sunflower seed butter or almond butter. These will change the flavor slightly, but they still taste great in the sauce. You can also blend sesame seeds with a bit of oil to make a homemade tahini.
Can I make this recipe vegan?
Yes, this recipe can easily be made vegan! Use plant-based yogurt instead of dairy yogurt. Also, ensure the vegetable broth is vegan-friendly. This keeps the dish light and healthy while still being tasty.
How long will leftovers last in the fridge?
Leftovers will stay fresh for about 3 to 5 days in the fridge. Store them in an airtight container for the best results. If you notice any changes in smell or color, it’s best to toss them out.
Can I prepare the tahini yogurt sauce in advance?
You can make the tahini yogurt sauce ahead of time. Store it in the fridge in a sealed container for up to 3 days. To keep the flavor fresh, give it a good stir before serving.
What are some serving suggestions for the glow bowl?
You can serve the glow bowl with a side of warm pita bread or a fresh salad. Adding a sprinkle of nuts or seeds on top gives it a nice crunch. A drizzle of extra tahini sauce can also enhance the flavor.
In this blog post, I shared how to create a delicious Glow Bowl. We covered the key ingredients, from quinoa to chickpeas, and made a tasty tahini yogurt sauce. I provided simple steps for cooking and assembling your bowl. You also learned tips for customizations and storage.
By following these steps, you can enjoy a nutritious and flexible meal. Get creative with variations and enjoy the process. This dish offers great flavors and health benefits, making it fun to prepare and shar

Glow Bowl with Tahini Yogurt Sauce
Ingredients
- 1 cup quinoa, thoroughly rinsed
- 2 cups vegetable broth
- 1 medium sweet potato, peeled and cut into 1-inch cubes
- 1 cup broccoli florets, cut to bite-size
- 1 cup canned chickpeas, drained and rinsed
- 1 ripe avocado, sliced
- 1 tablespoon extra-virgin olive oil
- 1 teaspoon smoked paprika
- to taste sea salt and freshly ground black pepper
- 0.5 cup plain yogurt (choose dairy or plant-based)
- 2 tablespoons tahini
- 1 tablespoon freshly squeezed lemon juice
- 1 clove garlic, finely minced
- as needed water (for consistency)
- to taste sea salt
Instructions
- In a medium saucepan, bring the vegetable broth to a vigorous boil. Stir in the rinsed quinoa, reduce the heat to low, cover, and allow it to simmer for about 15 minutes, or until all the liquid has been absorbed. Once done, remove from the heat and let it rest, covered, for an additional 5 minutes. Fluff the quinoa gently with a fork before serving.
- Preheat your oven to 400°F (200°C). In a mixing bowl, toss together the cubed sweet potato, olive oil, smoked paprika, salt, and pepper until evenly coated. Spread the sweet potato cubes onto a baking sheet in a single layer and roast in the preheated oven for 25-30 minutes, or until they are tender and lightly caramelized, stirring halfway through for even cooking.
- While the sweet potato roasts, fill a small pot with water and bring to a boil. Add a generous pinch of salt to the boiling water, then add the broccoli florets. Blanch for approximately 3 minutes, or until they turn a vibrant green and are just tender. Drain and immediately plunge the broccoli into a bowl of ice water to halt the cooking process and preserve their bright color.
- In a small skillet, heat a splash of olive oil over medium heat. Add the rinsed chickpeas and sauté for about 5 minutes until they are heated through and have developed a slightly crispy texture on the outside. Season with sea salt to taste, stirring to combine.
- In a mixing bowl, combine the plain yogurt, tahini, lemon juice, minced garlic, and a pinch of salt. Gradually mix in water, tablespoon by tablespoon, stirring until the sauce reaches your desired creamy consistency. Adjust seasoning as needed.
- In a large serving bowl or individual bowls, start by layering a generous portion of the fluffy quinoa at the bottom. Neatly arrange the roasted sweet potatoes, blanched broccoli, and sautéed chickpeas on top. Finish with slices of creamy avocado and drizzle liberally with the flavorful tahini yogurt sauce.


![- 4 boneless, skinless chicken thighs - 2 cups long-grain rice - 4 tablespoons unsalted butter, divided - 5 cloves garlic, finely minced - 1 medium onion, finely chopped - 1 teaspoon dried oregano - 1 teaspoon paprika - Salt and freshly ground black pepper, to taste - 3 cups chicken broth - 1 cup frozen peas - Fresh parsley, chopped (for garnish) When I prepare Garlic Butter Chicken and Rice, I love the way the flavors mix. The chicken thighs bring a juicy texture. Long-grain rice soaks up all the savory chicken broth. Unsalted butter adds a rich taste. Aromatics play a big role here. Garlic cloves and onion give a sweet aroma. Dried oregano and paprika add warmth and depth. I always use fresh black pepper and salt to make the dish pop. For a splash of color, I toss in frozen peas. They keep their bright green shade when cooked. Fresh parsley adds a nice finish. It makes the dish look inviting and fresh. If you want to try this dish, check the Full Recipe for all the steps! You'll enjoy making it, and even more, eating it. 1. Start by melting 2 tablespoons of butter in a large skillet over medium heat. This will create a rich base for your dish. 2. Once the butter melts, add the chopped onion. Sauté it for about 5 minutes until it turns soft and fragrant. 3. Next, add 5 cloves of minced garlic to the skillet. Cook it for 1 minute, just until the garlic smells good but isn’t browned. 4. While the onion and garlic are cooking, season 4 chicken thighs on both sides. Use 1 teaspoon of oregano, 1 teaspoon of paprika, salt, and pepper. This will add a lot of flavor. 5. Move the onion and garlic to one side of the skillet. Place the seasoned chicken thighs in the center. Cook each side for 6-7 minutes until they turn golden brown. Once done, take the chicken out and set it aside. 1. In the same skillet, add the remaining 2 tablespoons of butter. Let it melt completely. 2. Now, stir in 2 cups of long-grain rice. Toast the rice for 2-3 minutes, stirring often. This step brings out the nutty flavor. 3. Pour 3 cups of chicken broth over the toasted rice. Gently stir to coat all the grains. Increase the heat to bring the mixture to a boil. 1. Once the broth is boiling, lower the heat to a simmer. Nestle the cooked chicken thighs on top of the rice. Cover the skillet with a lid and let it cook for 15-20 minutes. The rice should absorb most of the broth and become tender. 2. For the last 5 minutes of cooking, sprinkle 1 cup of frozen peas directly over the rice. Do not stir. This will keep the peas bright and fresh. 3. After cooking, remove the skillet from the heat. Leave it covered for an extra 5 minutes. This helps the rice fluff up nicely. 4. Finally, use a fork to fluff the rice and mix in the peas. Serve warm, with fresh parsley on top for color and flavor. This simple process makes Garlic Butter Chicken and Rice a fun and tasty comfort meal. For the complete recipe, check out the [Full Recipe]. To boost the flavor of your garlic butter chicken and rice, consider adding fresh herbs. Thyme, rosemary, or basil can bring new notes to the dish. You can also mix in some red pepper flakes for a little heat. Adjust the spices to fit your taste. If you like it spicy, add more paprika or even cayenne pepper. Remember, always taste as you go to find your perfect balance. Sautéing is key for great flavor. Start with a medium heat to avoid burning the garlic and onions. Stir them often to help them cook evenly. When cooking the chicken, ensure it's golden and cooked through. Use a meat thermometer to check the internal temperature. It should reach 165°F (75°C) for safe eating. This way, you get juicy chicken every time. For a beautiful presentation, serve your garlic butter chicken and rice on a large platter. Sprinkle fresh parsley on top for a pop of color. You can also add lemon wedges on the side. This adds a zesty touch when served. Pair your meal with a simple green salad or steamed vegetables. For drinks, try a light white wine or sparkling water with lemon. Enjoy your delicious creation! You can find the full recipe [here](#). {{image_4}} You can make this dish lighter by swapping rice for cauliflower rice. Cauliflower rice offers a low-carb option that still tastes great. It cooks quickly and absorbs flavors well. Using skinless chicken breasts instead of thighs is another healthy choice. Breasts have less fat but still provide protein. Spice things up by adding cayenne pepper for heat. A pinch can really enhance the dish. You can also try Italian seasoning for a different twist. Adding veggies like bell peppers or carrots boosts nutrition and color. They add crunch and sweetness that pairs well with garlic butter. If you need gluten-free options, use gluten-free chicken broth. It keeps the dish flavorful while meeting dietary needs. For those avoiding dairy, there are great butter substitutes. Look for dairy-free spreads made from plant oils. They work well in this recipe without losing taste. To keep your Garlic Butter Chicken and Rice fresh, store any leftovers in airtight containers. This helps lock in the flavor and moisture. Make sure to let the dish cool down before sealing it up. For longer storage, you can freeze it. Divide the dish into smaller portions to make thawing easier later. When it's time to reheat, use a skillet or a microwave. If using a skillet, add a splash of chicken broth to keep it moist. Heat it over low to medium heat, stirring gently. In the microwave, cover the dish with a damp paper towel. This keeps moisture in and avoids a dry result. Remember, you want your chicken and rice to stay tender. In the fridge, your Garlic Butter Chicken and Rice lasts about 3 to 4 days. Always check for signs before eating. Look for any off smells or changes in color. If it smells funny or looks slimy, it’s best to toss it. Always trust your senses to keep your meals safe and tasty. To amp up the flavor, try adding fresh herbs like thyme or rosemary. You can also mix in spices such as garlic powder or onion powder for extra depth. A splash of lemon juice at the end brightens the dish. For a spicy kick, consider adding crushed red pepper flakes. These little changes can make a big taste difference. Yes, you can! To adapt this recipe, first, brown the chicken thighs in a skillet. This step gives great flavor. Then, place the chicken, onions, garlic, and rice into the slow cooker. Add chicken broth and spices. Cook on low for 4-6 hours. Check the rice for doneness. Slow cooking makes this dish very tender and delicious. This dish pairs well with a side of steamed vegetables like broccoli or green beans. A fresh salad with vinaigrette is also nice. For drinks, consider serving iced tea or a light white wine. These choices balance the rich flavors of the chicken and rice. Absolutely! You can make this dish ahead of time. Store the chicken and rice in separate containers to keep them fresh. It lasts up to four days in the fridge. When ready to eat, simply reheat in the microwave or on the stovetop. This makes it a perfect option for busy weekdays. For the full recipe, check out the link above. This article guides you through making Garlic Butter Chicken and Rice. You learned about key ingredients like chicken thighs, long-grain rice, and garlic. I shared easy steps for cooking flavorful meals, plus tips to enhance taste and presentation. In conclusion, this dish is tasty and versatile. You can adjust it to fit your diet or mood. Enjoy experimenting with flavors and make it your own! Happy cooking!](https://dishtreats.com/wp-content/uploads/2025/05/2b69aced-7351-4258-8c9e-dc4a3c9f0304-768x768.webp)


![- 1 lb boneless, skinless chicken thighs, diced into bite-sized pieces - 1 tablespoon olive oil - 1 teaspoon chili powder - 1 teaspoon ground cumin - 1 teaspoon smoked paprika - Salt and pepper, to taste - 1 cup brown rice (or 1 cup cauliflower rice) - 2 cups chicken broth (or vegetable broth) - 1 can black beans, drained and rinsed - 1 cup corn kernels - Juice of 1 lime - 1 ripe avocado, diced - 1 cup cherry tomatoes, halved - 1 cup shredded cheese (such as cheddar) - ½ cup sour cream (or Greek yogurt) - Fresh cilantro, chopped - Sliced jalapeños (optional) - Large skillet - Medium-sized pot - Cooking utensils (spoon, spatula) - Measuring cups and spoons - Serving bowls These ingredients come together to create a tasty meal. The chicken thighs give great flavor. You can use brown rice for a healthy base or cauliflower rice for a low-carb choice. Black beans and corn add fiber and sweetness. For toppings, fresh veggies like avocado and tomatoes brighten the dish. Cheese and sour cream bring richness. You will love how customizable these bowls are! The kitchen tools are simple, making this fun and easy to prepare. Check out the Full Recipe for all the delicious details! To make brown rice, start with a medium pot. Bring chicken broth to a boil. Once boiling, add the rice. Lower the heat, cover, and let it simmer for 30-35 minutes. This method ensures the rice becomes fluffy and tender. If you prefer a low-carb option, use cauliflower rice. Heat a skillet with a splash of water. Sauté the cauliflower rice for 5 minutes until it’s tender. This quick cook keeps it fresh and light. For the chicken, heat olive oil in a large skillet over medium heat. Add diced chicken thighs once the oil is hot. Season the chicken with chili powder, cumin, smoked paprika, salt, and pepper. Cook for 8-10 minutes, stirring often. This helps the chicken cook evenly and become golden brown. The spices create a warm flavor that elevates the dish. After the chicken is cooked, add the rinsed black beans and corn to the skillet. Mix everything well and cook for another 3-4 minutes. This step ensures all ingredients are heated through and flavors blend nicely. Stir gently to keep the chicken tender. Once done, you can move on to building your loaded chicken burrito bowls. Enjoy creating a meal that looks as good as it tastes! Achieving the Perfect Texture To get juicy chicken, use boneless, skinless thighs. They stay moist and tender. Cut them into bite-sized pieces for even cooking. Heat a skillet over medium heat before adding the chicken. This helps lock in the juices and gives a nice sear. Preventing Dry Chicken Don’t overcook the chicken. Cook it until it's no longer pink, about 8-10 minutes. Keep stirring to avoid burning. If you find your chicken is dry, try adding a splash of broth or water. This will help rehydrate the meat. Suggested Toppings You can personalize your burrito bowls with fun toppings. Try adding diced avocados, cherry tomatoes, or shredded cheese. Fresh herbs like cilantro add a burst of flavor. For a kick, use sliced jalapeños or a drizzle of hot sauce. Dietary Modifications Make your burrito bowls fit your diet. If you're vegetarian, swap chicken for black beans or grilled veggies. For a low-carb option, use cauliflower rice instead of brown rice. You can also replace sour cream with Greek yogurt for a healthier choice. Spice Variations Want to spice things up? Add cayenne pepper or crushed red pepper flakes to the chicken. You can also try different spices like oregano or taco seasoning to change the flavor profile. Marinades for Chicken A good marinade can add great taste. Use lime juice, garlic, and cumin for a zesty kick. Marinate the chicken for at least 30 minutes before cooking. This will infuse the chicken with flavor and keep it tender. For the full recipe, check out the section above. {{image_4}} You can easily swap out the chicken. Use firm tofu or tempeh instead. These alternatives add great texture and protein. For a heartier option, try chickpeas or lentils. Both are tasty and filling. If you want a low-carb option, use cauliflower rice. It has fewer carbs and packs in nutrients. Cauliflower rice has a mild taste and absorbs flavors well. You can also add more veggies, like zucchini or bell peppers, for added crunch. You can adjust the spice level for your taste. For a spicy kick, add more chili powder or diced jalapeños. If you prefer mild flavors, skip the spicy ingredients. You can also play with international flavors. Try adding curry powder for an Indian twist or chipotle for a smoky flavor. Explore these variations to make the loaded chicken burrito bowls your own! For the complete recipe, check the [Full Recipe]. To keep your loaded chicken burrito bowls fresh, follow these tips: - Let the bowls cool down before storing. - Use airtight containers for storage. - Separate the toppings from the base for best flavor. For refrigeration: - Store leftovers in the fridge. - They last for up to 3 days. For freezing: - Portion out the chicken and rice mixture. - Use freezer-safe bags or containers. - They can last for up to 3 months. To reheat, you want to keep the flavors fresh. Here are some methods: - Use a microwave for quick heating. - Heat on medium for 2-3 minutes. - Stir halfway through to heat evenly. You can also use a skillet: - Warm it on medium heat. - Add a splash of broth for moisture. - Heat for about 5-7 minutes. Each component has its own shelf life: - Cooked chicken lasts 3 days in the fridge. - Cooked rice stays good for 4 days. - Black beans last up to 5 days. Watch for spoilage signs: - Look for any strange smells. - Check for mold or discoloration. - If it looks or smells off, throw it out. For more details, refer to the Full Recipe for loaded chicken burrito bowls. Yes, you can use different rice types. Here are some great substitutes for brown rice: - White rice: Cooks faster and has a different texture. - Quinoa: Adds protein and a nutty flavor. - Jasmine rice: Offers a fragrant touch to your bowls. - Cauliflower rice: A low-carb option that is light and healthy. If you crave heat, here are some tips to spice up your dish: - Add diced jalapeños to the chicken when cooking. - Use a spicy salsa or hot sauce as a topping. - Sprinkle crushed red pepper flakes into the chicken mix. - Swap chili powder for a hotter variety, like cayenne. If you need alternatives for sour cream, consider these options: - Greek yogurt: Creamy and packed with protein. - Cottage cheese: A lighter option that adds creaminess. - Avocado: Mash it for a rich and creamy topping. - Hummus: Adds flavor and creaminess with a unique twist. Yes, you can prep this dish in advance. Here’s how: - Cook the rice and chicken ahead of time. Store them separately in the fridge. - Prepare toppings like diced avocado and cheese. Keep them fresh in airtight containers. - Assemble the bowls just before serving for the best flavors and textures. - Reheat the chicken and rice gently to avoid drying them out. This article covered how to make delicious loaded chicken burrito bowls. We explored main ingredients, toppings, and kitchen tools needed. I shared step-by-step cooking tips for rice and chicken, followed by customization options to suit your taste. Storage info ensures you keep your leftovers fresh and safe. In closing, this dish is versatile and easy to make. Remember, you can adapt it to fit any diet. Enjoy creating your perfect burrito bowl!](https://dishtreats.com/wp-content/uploads/2025/06/cee601c9-6b34-4063-8b37-4b14688d7edb-768x768.webp)
