Garlic Parmesan Air Fryer Brussel Sprouts Delight

If you’re ready to transform Brussels sprouts into a tasty delight, you’ve come to the right place! My Garlic Parmesan Air Fryer Brussels Sprouts recipe is simple and packed with flavor. You’ll love how easy it is to get crispy, golden sprouts in just a few steps. Say goodbye to boring veggies and hello to a dish that even picky eaters will crave. Let’s dive in and make something delicious together!
Why I Love This Recipe
- Delicious Flavor Combination: The garlic and Parmesan create a savory, rich flavor that elevates the natural taste of Brussels sprouts.
- Quick and Easy: This recipe takes only 25 minutes from start to finish, making it a perfect side dish for busy weeknights.
- Healthier Cooking Method: Using an air fryer minimizes the need for excessive oil, allowing for a crispy texture without the guilt.
- Customizable Spice Level: With the option to add crushed red pepper flakes, you can easily adjust the heat to suit your taste.
Ingredients
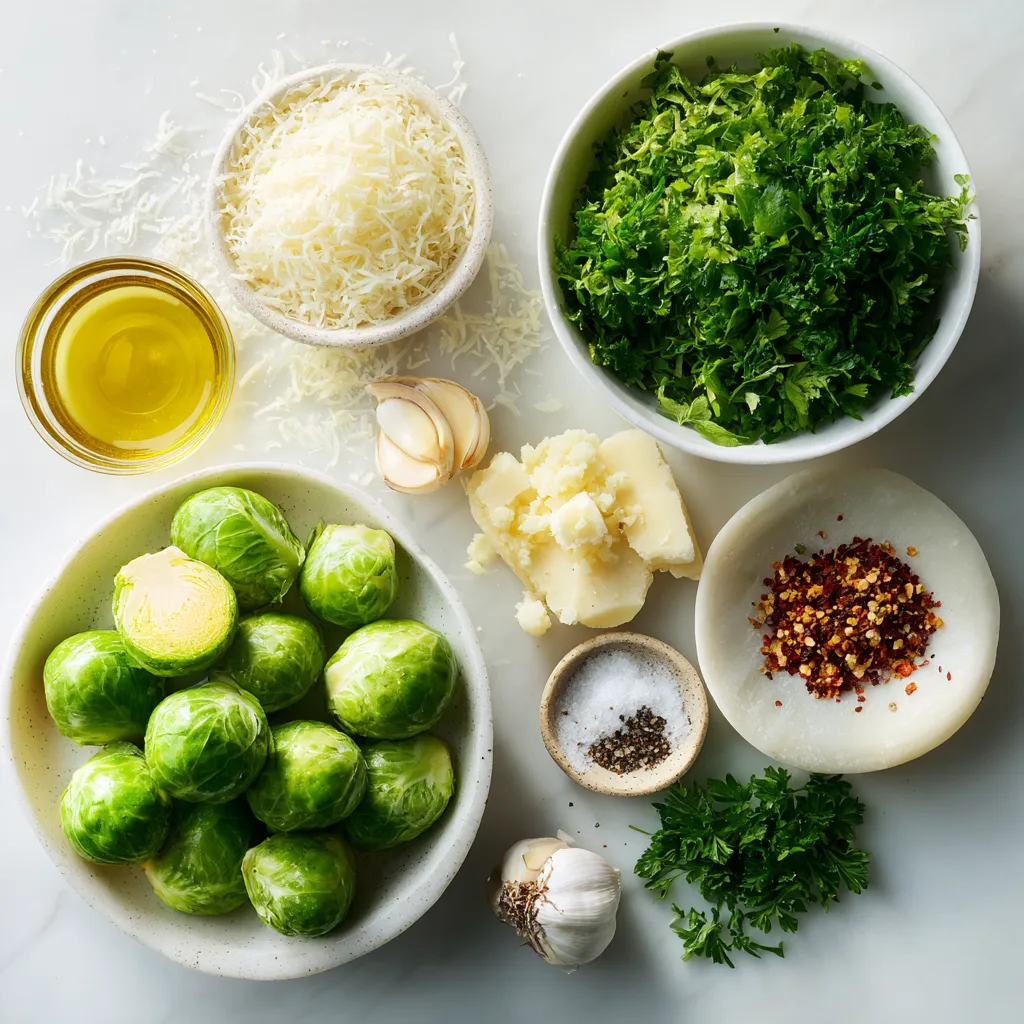
To make Garlic Parmesan Air Fryer Brussels Sprouts, you need these simple ingredients:
- 1 lb Brussels sprouts, trimmed and halved
- 3 tablespoons extra virgin olive oil
- 4 cloves fresh garlic, minced
- 1/2 cup finely grated Parmesan cheese
- 1 teaspoon sea salt
- 1/2 teaspoon freshly ground black pepper
- 1/2 teaspoon crushed red pepper flakes (optional)
- Fresh parsley, finely chopped (for garnish)
These ingredients come together to create a dish full of flavor. The Brussels sprouts are the star, offering a nice crunch. The garlic brings a strong taste, while the Parmesan adds a rich, creamy texture. Olive oil helps everything cook evenly and keeps it moist.
Using fresh garlic is key. It gives a vibrant taste that dried garlic can’t match. The sea salt and black pepper enhance all the flavors. If you like a bit of heat, add some crushed red pepper flakes.
Don’t forget the parsley! It adds a fresh touch and makes the dish look nice. When you mix these ingredients, you create a blend that makes each bite exciting.

Step-by-Step Instructions
Preheating the Air Fryer
First, set your air fryer to 375°F (190°C). Preheating warms up the fryer. This helps the Brussels sprouts cook evenly. It only takes a few minutes.
Mixing the Ingredients
Grab a big mixing bowl. Add the halved Brussels sprouts and olive oil. Then, toss in the minced garlic. Sprinkle the sea salt, black pepper, and red pepper flakes if you want heat. Use your hands or a spatula to mix everything well. You want each sprout coated nicely.
Cooking the Brussels Sprouts
Now, take the seasoned Brussels sprouts and add them to the air fryer basket. Place them in a single layer. If your air fryer is small, you may need to cook in batches. Cook for 12 to 15 minutes. Shake the basket halfway through. This helps them brown evenly. Watch them closely to get that golden-brown look.
Garnishing and Serving
When the Brussels sprouts are done, take them out of the air fryer. They should be crispy and delicious. Sprinkle the grated Parmesan cheese over them. For a fresh touch, add some chopped parsley. Serve these tasty bites warm for the best flavor.
Cooking Times and Serving Information
Prep Time
The prep time for Garlic Parmesan Air Fryer Brussels Sprouts is just 10 minutes. You can trim and halve the Brussels sprouts quickly. Mince the garlic and gather your other ingredients. This fast prep makes it easy to enjoy a tasty dish.
Cook Time
The cook time in the air fryer is about 12 to 15 minutes. Preheat the air fryer to 375°F (190°C) first. Then, place the seasoned Brussels sprouts in a single layer. Shaking the basket halfway through helps them cook evenly and get crispy.
Servings
This recipe serves four people. It makes a great side dish for family meals or gatherings. You can easily double the recipe if you need more servings. Enjoy sharing this flavorful dish with friends and family!
Pro Tips
- Choose Fresh Brussels Sprouts: Look for bright green Brussels sprouts that are firm to the touch. Avoid any that are yellowing or have brown spots for the best flavor.
- Don’t Skip the Olive Oil: The olive oil not only helps crisp the Brussels sprouts but also enhances the flavor. Make sure they are well-coated for the best results.
- Adjust Cooking Time: Depending on the size of your Brussels sprouts, you may need to adjust the cooking time slightly. Keep an eye on them as they air fry to achieve your desired crispiness.
- Add Extra Flavor: Experiment with additional spices or toppings, such as lemon zest or balsamic glaze, to elevate the dish and customize it to your taste.

Tips & Tricks
Achieving Perfect Crispiness
To get your Brussels sprouts crispy, toss them well in oil. This helps them fry evenly. Make sure they are in a single layer in the air fryer. Overcrowding will lead to steaming. Shake the basket halfway through cooking. This helps all sides brown nicely. If they are not crisp enough, add a few more minutes.
Flavor Enhancements
Adding garlic gives a strong flavor. Use fresh garlic for the best taste. If you like heat, add crushed red pepper flakes. You can also try lemon zest for a fresh twist. A squeeze of lemon juice before serving brightens the taste. Mixing in different cheeses can add depth too.
Air Fryer Capacity Considerations
Every air fryer is different. Know your air fryer’s capacity well. If you have a small air fryer, cook in batches. This makes sure each batch cooks well. For larger air fryers, you can fit more at once. Just remember to keep the sprouts in a single layer. This will give you the best results.
Variations
Cheese Substitutes
You can swap Parmesan cheese for other types. Try Pecorino Romano for a sharper taste. Mozzarella gives a milder flavor and a nice stretch. Nutritional yeast is a great vegan option, adding a cheesy taste without dairy.
Adding Additional Vegetables
Brussels sprouts blend well with many veggies. Toss in halved carrots for sweetness. Add bell peppers for color and crunch. You can even mix in cauliflower florets for extra texture and flavor.
Seasoning Alternatives
Get creative with seasonings to change the flavor. Lemon zest adds brightness and freshness. Use smoked paprika for a warm, earthy taste. For a spicy kick, try cayenne pepper or chili powder.
FAQs
Can I make Garlic Parmesan Brussels Sprouts in the oven?
Yes, you can. Preheat your oven to 400°F (200°C). Toss the Brussels sprouts with oil, garlic, salt, pepper, and cheese just like in the air fryer recipe. Spread them on a baking sheet in a single layer. Bake for 20-25 minutes until golden and crispy.
How do I store leftovers?
To store leftovers, let the sprouts cool down first. Place them in an airtight container. You can keep them in the fridge for up to three days. Reheat them in the air fryer or oven to restore some crispiness.
Can I use frozen Brussels sprouts?
You can use frozen Brussels sprouts, but they may not get as crispy. Thaw them first and pat them dry to remove excess moisture. Then, follow the same steps as fresh sprouts, adjusting cooking time as needed for tenderness.
What can I serve with Garlic Parmesan Air Fryer Brussels Sprouts?
These sprouts pair well with many dishes. Try serving them with grilled chicken, steak, or fish. They also go great with pasta or as a side for a hearty salad. Enjoy mixing them into your favorite meals!
In this blog post, we explored how to make delicious Garlic Parmesan Brussels sprouts in an air fryer. We covered the key ingredients and provided simple steps for crispiness and flavor. Don’t forget tips for variations and frequently asked questions to help you.
Try this quick recipe for a tasty side dish or snack. Enjoy the crunch and flavor you create! Get cooking and discover your new favorite dis

Garlic Parmesan Air Fryer Brussels Sprouts
Ingredients
- 1 lb Brussels sprouts, trimmed and halved
- 3 tablespoons extra virgin olive oil
- 4 cloves fresh garlic, minced
- 0.5 cup finely grated Parmesan cheese
- 1 teaspoon sea salt
- 0.5 teaspoon freshly ground black pepper
- 0.5 teaspoon crushed red pepper flakes (optional for heat)
- to taste fresh parsley, finely chopped (for garnish)
Instructions
- Start by preheating your air fryer to 375°F (190°C) to ensure optimal cooking.
- In a large mixing bowl, combine the halved Brussels sprouts with the olive oil, minced garlic, sea salt, black pepper, and crushed red pepper flakes if you desire some heat. Use your hands or a spatula to toss everything together until the Brussels sprouts are thoroughly coated with the mixture.
- Next, sprinkle the grated Parmesan cheese over the seasoned Brussels sprouts and toss again gently to ensure the cheese is evenly distributed throughout the sprouts.
- Carefully arrange the seasoned Brussels sprouts in the air fryer basket, placing them in a single layer for even cooking. If your air fryer is small, you may need to work in batches to avoid overcrowding.
- Air fry the Brussels sprouts for about 12-15 minutes. During cooking, shake the basket halfway through to promote even browning and cooking. Keep an eye on them to achieve that perfect golden-brown color.
- Once the Brussels sprouts are cooked to a crispy perfection, remove them from the air fryer. Finish the dish by garnishing with freshly chopped parsley for a pop of color and freshness before serving.


![The Sun-Dried Tomato Chickpea Salad is simple to make and full of flavor. Here’s what you need: - 1 can (15 oz) chickpeas, thoroughly drained and rinsed - 1/2 cup sun-dried tomatoes, roughly chopped - 1/4 cup red onion, finely diced - 1/2 cucumber, peeled and diced - 1/4 cup feta cheese, crumbled into small pieces - 2 tablespoons fresh parsley, finely chopped - 2 tablespoons extra virgin olive oil - 1 tablespoon freshly squeezed lemon juice - 1 teaspoon dried oregano - Salt and freshly ground black pepper, to taste This mix of ingredients creates a bright, fresh dish. Chickpeas add protein and fiber. Sun-dried tomatoes give a sweet and tangy taste. The red onion adds a sharp bite, while cucumber brings crunch. Feta cheese adds creaminess to the salad. Fresh parsley brightens the flavors. Make sure to use high-quality extra virgin olive oil for the best taste. Fresh lemon juice adds a zesty kick. Dried oregano brings an earthy flavor that ties everything together. Adjust salt and pepper to your liking for a perfect balance. For the full recipe, follow the steps to enjoy this delightful salad. It's quick to prepare and great for lunch or dinner! To make this salad, start with a large mixing bowl. Combine the following ingredients: - 1 can (15 oz) chickpeas, thoroughly drained and rinsed - 1/2 cup sun-dried tomatoes, roughly chopped - 1/4 cup red onion, finely diced - 1/2 cucumber, peeled and diced - 1/4 cup feta cheese, crumbled into small pieces Gently stir the ingredients together. This ensures an even distribution of flavors and textures. In a separate small bowl, whisk together the dressing ingredients: - 2 tablespoons extra virgin olive oil - 1 tablespoon freshly squeezed lemon juice - 1 teaspoon dried oregano - Salt and freshly ground black pepper, to taste Mix until well combined. You want the oil and lemon juice to emulsify, meaning they blend into a smooth mixture. Drizzle the dressing over the salad base. Toss gently to coat everything evenly. Be careful not to break the chickpeas or feta cheese. After mixing, sprinkle the freshly chopped parsley on top. Give it one last gentle toss. Cover the salad and let it rest for at least 15 minutes. This time allows the flavors to meld together, enhancing the taste. You can serve it chilled or at room temperature for the best experience. For the full recipe, check the ingredients and instructions above. To make your Sun-Dried Tomato Chickpea Salad stand out, choose a nice serving bowl. A colorful bowl can catch the eye and add to the meal. You can layer the salad to show off its colors. Start with chickpeas at the bottom, then add layers of sun-dried tomatoes, cucumbers, and red onions. For garnishing, sprinkle extra parsley leaves on top. This adds a fresh touch. You can also add a few crumbles of feta cheese over the top. This gives a nice contrast to the vibrant colors of the salad. If you want to impress, serve it with crusty bread or pita on the side. You can make this salad ahead of time. Store it in the fridge for a quick meal later. After you mix it, cover the salad well. It stays fresh for 2 to 3 days. The flavors will deepen as it sits. For meal prepping, divide the salad into single-serving containers. This makes it easy to grab and go. Keep the dressing separate until you are ready to eat. This keeps the salad crisp and fresh. Enjoy your meal! For the full recipe, check out the details above. {{image_4}} You can switch out chickpeas for other beans. Black beans or kidney beans work well. They add a different taste and texture. If you want to try lentils, they can also be good. For a dairy-free option, use a vegan feta cheese. There are many brands available. You can also skip the cheese and add more vegetables. This keeps the salad fresh and tasty. To boost the flavor, add spices like cumin or paprika. These spices can take your salad to a new level. You could also add bell peppers or corn for a nice crunch. If you want more protein, add grilled chicken or tofu. These options make the salad heartier. You can even mix in some nuts or seeds for added texture. For the full recipe, check out the details above and create your own delicious twist! To keep your Sun-Dried Tomato Chickpea Salad fresh, use these tips: - Store in an airtight container. - Layer ingredients to prevent sogginess. - Keep dressing separate until serving. - Use glass containers for better preservation. Glass keeps the salad fresh longer. It also helps you see the colorful layers. Your salad lasts up to three days in the fridge. After that, it may lose its crunch. Watch for these signs of spoilage: - Change in smell or color. - Soft or mushy chickpeas. - Feta cheese that appears slimy. If you notice these signs, it's best to throw it away. Enjoy the salad while it's fresh for the best taste! For the full recipe, click [Full Recipe]. To make this salad, start by gathering your ingredients. You need chickpeas, sun-dried tomatoes, red onion, cucumber, feta cheese, parsley, olive oil, lemon juice, oregano, salt, and pepper. 1. In a large bowl, mix the chickpeas, sun-dried tomatoes, cucumber, onion, and feta. 2. In a small bowl, whisk olive oil, lemon juice, oregano, salt, and pepper together. 3. Pour the dressing over the salad and toss gently. 4. Add the parsley and mix lightly. 5. Let the salad rest for 15 minutes. This helps the flavors blend well. You can find the full recipe above for detailed steps. Yes! This salad is perfect for meal prep. You can prepare it a day in advance. Just store it in an airtight container in the fridge. The flavors will deepen, making it taste even better. Make sure to keep the salad covered to keep it fresh. This salad pairs well with many dishes. Here are some ideas: - Grilled chicken or fish for added protein. - Crusty bread or pita to scoop up the salad. - A light soup like tomato basil for a cozy meal. - Roasted vegetables for a colorful plate. These options will enhance your meal and make it even more enjoyable! This blog post detailed how to create a refreshing Sun-Dried Tomato Chickpea Salad. We covered the necessary ingredients, simple steps to prepare, and tips for presentation. You can enhance this salad with various substitutes or flavors. Proper storage ensures freshness and keeps meals tasty longer. Remember, this salad is not just easy to make—it's also adaptable. Enjoy making it your own, and delight your taste buds with every bite. Your next meal can be both fun and healthy!](https://dishtreats.com/wp-content/uploads/2025/07/f0fe0f85-1842-4358-ad7f-ac591425fdaf-768x768.webp)


