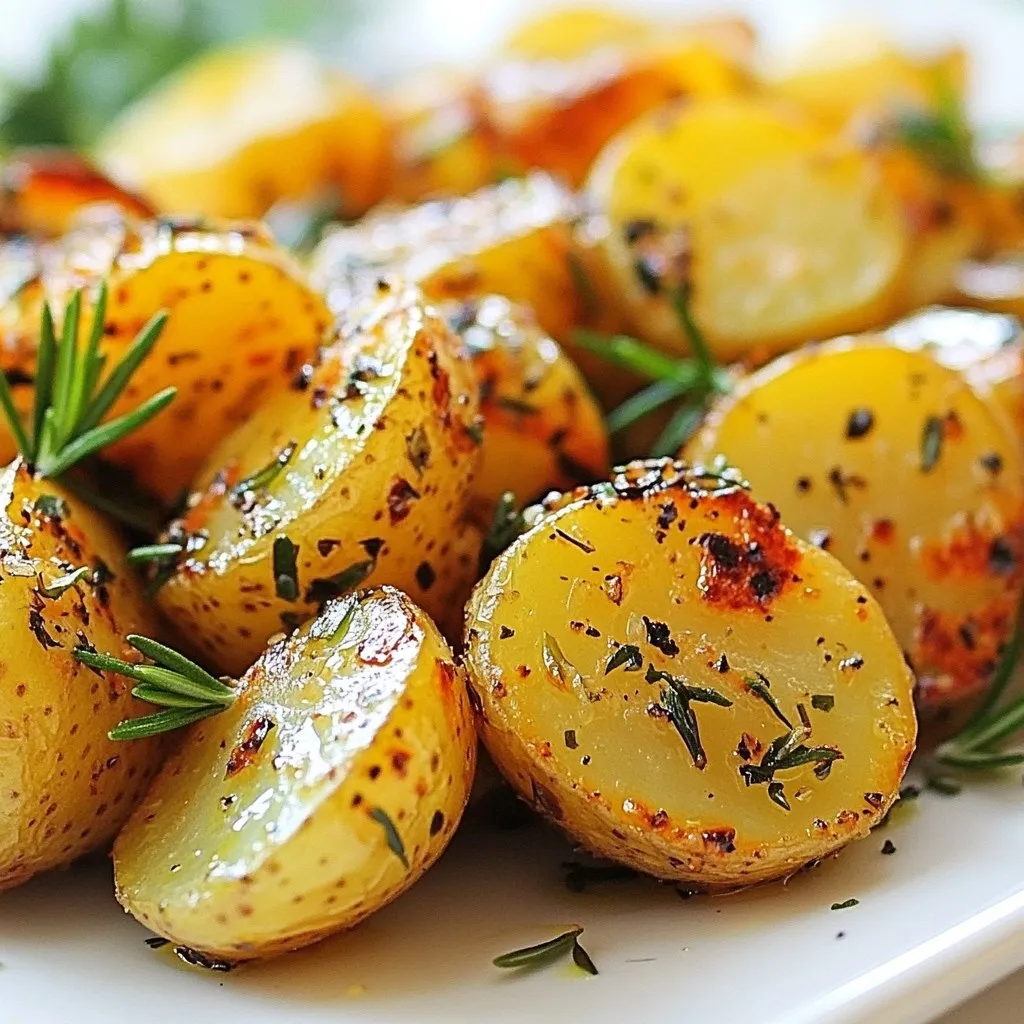
Are you ready to elevate your side dish game? Garlic Herb Roasted Potatoes are simple, tasty, and perfect for any meal. With just a few ingredients, you can create a dish that bursts with flavor and warmth. Imagine crispy, golden potatoes infused with fresh herbs right from your kitchen! Let’s dive into this easy recipe and transform your meals with these delightful bites.
Why I Love This Recipe
- Flavorful Blend: The combination of garlic, fresh herbs, and smoked paprika creates an irresistible aroma and taste that enhances the natural sweetness of the potatoes.
- Easy Preparation: With just a few simple steps and minimal prep time, this recipe is perfect for busy weeknights or casual gatherings.
- Versatile Side Dish: These roasted potatoes pair beautifully with a variety of main courses, from grilled meats to vegetarian dishes, making them a go-to for any meal.
- Healthier Comfort Food: This recipe uses wholesome ingredients and healthy fats, allowing you to enjoy a comforting dish without the guilt.
Ingredients
List of Ingredients
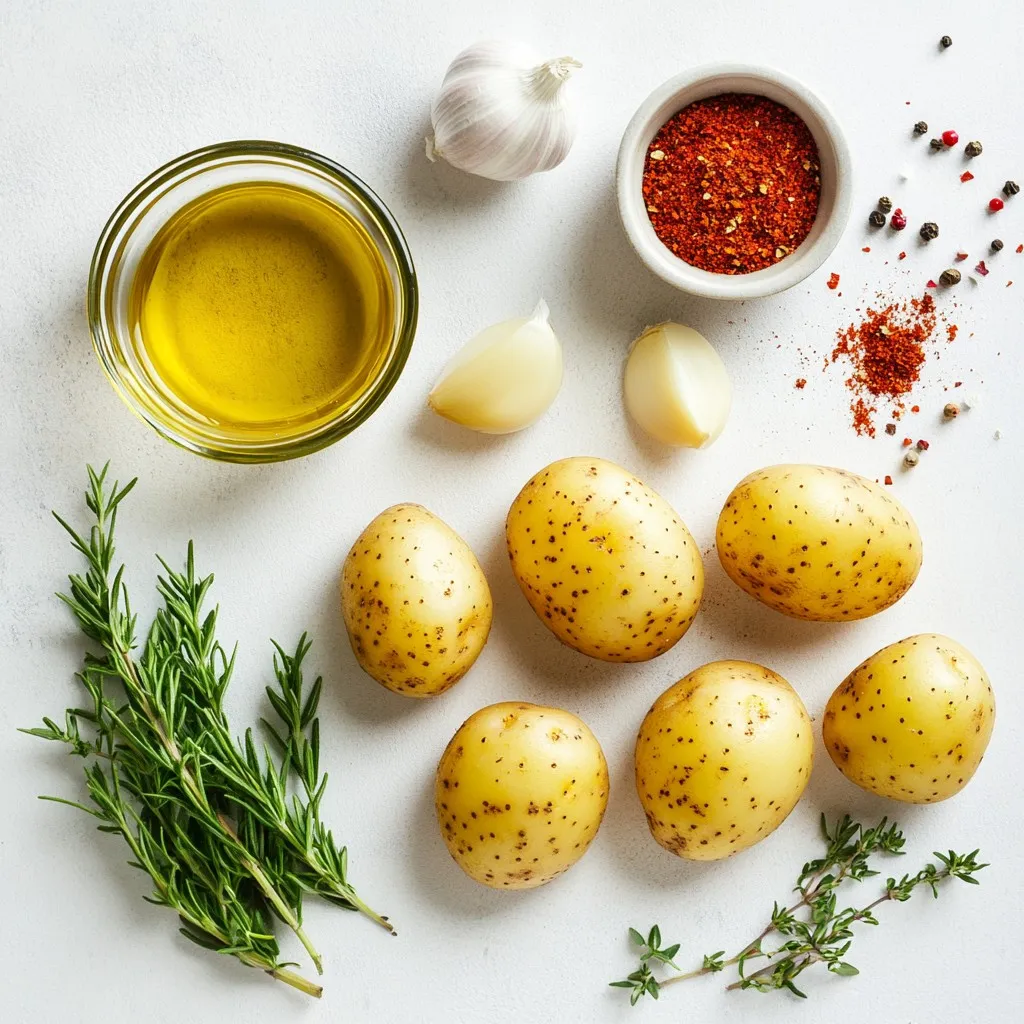
– 2 pounds baby potatoes, halved
– 4 cloves garlic, finely minced
– 3 tablespoons extra virgin olive oil
– 1 tablespoon fresh rosemary, finely chopped
– 1 tablespoon fresh thyme, finely chopped
– 1 teaspoon smoked paprika
– Salt and freshly cracked black pepper, to taste
– Optional: Fresh parsley, finely chopped, for garnish
Garlic herb roasted potatoes are simple yet delicious. The main ingredient is baby potatoes. Their small size makes them perfect for roasting. I love using fresh herbs and spices to boost flavor. Olive oil is key; it helps the herbs stick and adds richness.
I usually add minced garlic for a fragrant touch. Fresh rosemary and thyme bring out the best in the potatoes. Smoked paprika adds a warm, smoky flavor. Salt and black pepper enhance all the tastes.
For a lovely finish, I recommend some fresh parsley on top. It brightens the dish and adds color. You can use any herbs you like, but these are my favorites.
Step-by-Step Instructions
Preheat the Oven
Set your oven to 425°F (220°C). Preheating is key to getting the best roast. It helps the potatoes cook evenly and become crispy. If the oven isn’t hot enough, the potatoes may turn out soft, not crispy.
Prepare the Potatoes
Take 2 pounds of baby potatoes and cut them in half. In a large bowl, add the halved potatoes, 4 minced garlic cloves, and 3 tablespoons of olive oil. Then, add 1 tablespoon of chopped rosemary and 1 tablespoon of chopped thyme. Sprinkle in 1 teaspoon of smoked paprika, plus salt and pepper to taste. Mix everything well, so each potato gets coated in the tasty seasonings.
Roasting Process
Line a baking sheet with parchment paper. This makes cleanup easy. Spread the potatoes in a single layer on the sheet. Make sure they have space in between for even cooking. Place the baking sheet in the hot oven. Roast the potatoes for 25 to 30 minutes. Halfway through, stir them to help them brown nicely. Look for a golden color and a crispy outside. Once done, take the baking sheet out and let the potatoes cool a bit before serving. Optionally, sprinkle some fresh parsley on top for a nice touch.
Tips & Tricks
Achieving the Perfect Roast
To get the best garlic herb roasted potatoes, choose baby potatoes. They cook fast and have a soft inside. Halve them for even cooking. The size should be uniform. This helps them roast at the same rate.
For even browning, space the potatoes well on the baking sheet. If they are too close, they will steam instead of roast. Stir them halfway through cooking. This makes sure every side gets that nice golden color.
Flavor Enhancements
You can add more flavor with different herbs. Try adding oregano or basil for a twist. A touch of red pepper flakes gives a hint of heat.
For garnishes, fresh parsley looks great and adds a pop of color. A drizzle of olive oil right before serving makes everything shine. You can also sprinkle some grated cheese on top for a rich taste.
Pro Tips
- Choose the Right Potatoes: Use waxy potatoes like baby gold or red potatoes for a creamy texture inside and crispy skin outside.
- Don’t Overcrowd the Pan: Ensure the potatoes are spread out in a single layer to allow for even roasting and crisping.
- Experiment with Seasonings: Feel free to add your favorite herbs and spices, such as oregano or Italian seasoning, for a unique flavor twist.
- Serve Immediately: Roasted potatoes are best enjoyed fresh out of the oven while they are still crispy. If needed, reheat in the oven to restore crispiness.
Variations
Different Potatoes to Use
You can use many types of potatoes for this dish. Red potatoes are creamy and sweet. Yukon gold potatoes have a buttery flavor. Fingerling potatoes add a fun shape and texture. Each type brings its own taste, making your roasted potatoes unique.
Alternative Herb Combinations
Switching herbs can change the whole dish. Try using fresh basil or parsley for a fresh twist. Dried herbs like oregano or dill also work well. Mix and match to find your favorite flavor. This way, you can make garlic herb roasted potatoes your own.
Spicy and Cheesy Additions
Want to spice things up? Add cayenne pepper or chili flakes for heat. If you love cheese, sprinkle some grated Parmesan on top before roasting. You can also mix in cheddar for a rich flavor. These simple tweaks give your potatoes a whole new vibe.
Storage Info
Storing Leftovers
To keep your garlic herb roasted potatoes fresh, store them in an airtight container. Place them in the fridge within two hours of cooking. They can last up to three days. Make sure the container seals well to keep moisture out.
Reheating Tips
When it’s time to enjoy leftovers, you have a few options. The best way to reheat is in the oven. Preheat your oven to 350°F (175°C). Spread the potatoes on a baking sheet for about 10-15 minutes. This method keeps them crispy. You can also use the microwave. Heat them in a bowl covered with a damp paper towel. This way, they won’t dry out, but they may lose some crispiness.
Freezing Options
If you want to save some for later, freezing is a good choice. First, let the cooked potatoes cool completely. Then, place them in a freezer-safe bag. Remove as much air as possible before sealing. They can last up to two months in the freezer. To thaw, move the bag to the fridge overnight. Reheat as mentioned above to bring back their flavor and texture.
FAQs
Can I use other types of potatoes?
Yes, you can use other types of potatoes. Baby potatoes are great, but red potatoes and Yukon gold work well too. They have a nice texture and flavor. Just remember to cut them into similar sizes for even cooking. This helps them roast perfectly.
How do I make these potatoes crispy?
To get crispy potatoes, start by using a hot oven. Preheat it to 425°F (220°C). This helps create a nice crust. Next, make sure to coat the potatoes well with olive oil. This adds flavor and helps with crispiness. Spread the potatoes out on the baking sheet. Give them space! Stir them halfway through cooking. This ensures they brown evenly.
What can I serve with garlic herb roasted potatoes?
Garlic herb roasted potatoes pair well with many dishes. Try serving them with grilled chicken or steak for a hearty meal. They also go great with roasted vegetables or a fresh salad. For a lighter option, serve them with fish. These potatoes add a delightful touch to any meal.
In this blog post, we covered how to make delicious garlic herb roasted potatoes. We explored the best ingredients, how to prepare and roast them, and offered tips for perfect results. Remember to choose the right potatoes and use fresh herbs for great flavor.
You now have the tools to create a tasty dish. Try different herbs or potatoes to make it your own. Enjoy your cooking and the tasty potatoes that follo


