Garlic Butter Chicken Skewers Tasty and Simple Dish

Looking for a tasty and simple dish? You’ve come to the right place! Garlic Butter Chicken Skewers are juicy, flavorful, and perfect for any meal. Whether you’re grilling outdoors or cooking indoors, this recipe will impress your family and friends. Let’s dive into the ingredients and steps to create this delicious dish that everyone will love. Get ready to savor the rich taste of garlic and butter!
Ingredients
Complete Ingredients List
- 1 lb (450g) boneless, skinless chicken breasts, cut into 1-inch cubes
- 4 tablespoons unsalted butter, melted
- 4 cloves garlic, minced
- 1 tablespoon fresh parsley, finely chopped (plus extra for garnish)
- 1 teaspoon lemon zest
- 1 teaspoon smoked paprika
- 1 teaspoon onion powder
- Salt and freshly ground black pepper to taste
- Skewers (wooden or metal)
Key Ingredients Explained
The main ingredient is chicken breast. It is lean and cooks quickly. I like using boneless and skinless chicken for this recipe. This keeps it simple and tasty. The garlic adds a strong flavor that pairs well with chicken. Butter gives it richness and helps the spices stick. Fresh parsley adds a nice touch of color and flavor. Lemon zest adds a bit of brightness, while smoked paprika gives it a subtle smokiness. Onion powder adds depth to the dish.
Best Substitutions for Ingredients
If you don’t have chicken, try using shrimp or tofu. For a dairy-free option, use olive oil instead of butter. You can also use garlic powder if you lack fresh garlic. If you want a different herb, try basil or cilantro instead of parsley. For spice, add cayenne pepper instead of smoked paprika. These swaps keep the dish fun and flexible.
Step-by-Step Instructions
Marinating the Chicken
For the best flavor, marinate the chicken first. In a large bowl, mix melted butter, minced garlic, and chopped parsley. Add lemon zest, smoked paprika, onion powder, salt, and pepper. Stir until well combined. Next, add your chicken cubes. Make sure every piece is coated with the marinade. Cover the bowl with plastic wrap. Place it in the fridge for at least 30 minutes. For stronger flavor, let it marinate for up to 2 hours.
Preparing the Skewers
If you use wooden skewers, soak them in water for 30 minutes. This keeps them from burning on the grill. If you have metal skewers, you can skip this step. After soaking, it’s time to thread the chicken onto the skewers. Carefully put the marinated chicken on each skewer. Leave small gaps between pieces. This helps the heat circulate and cooks the chicken evenly.
Grilling Techniques and Timing
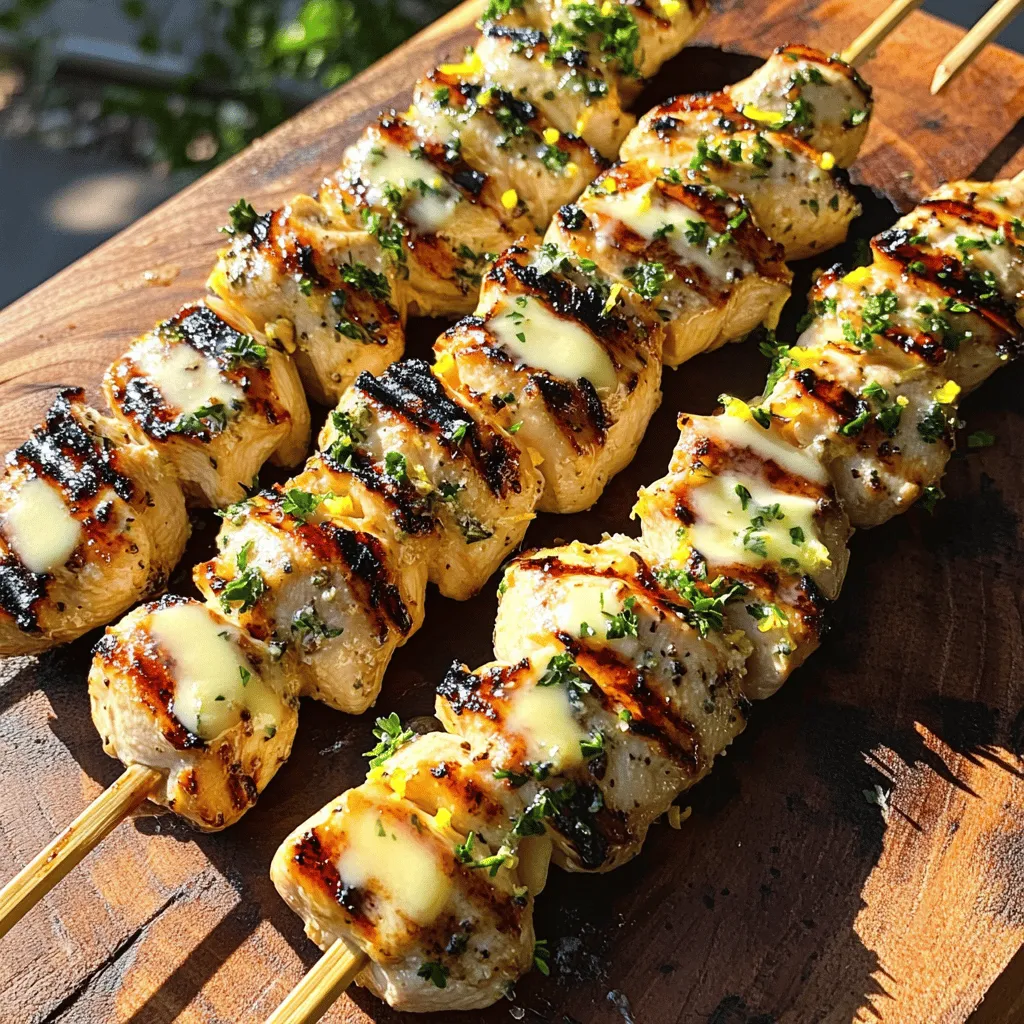
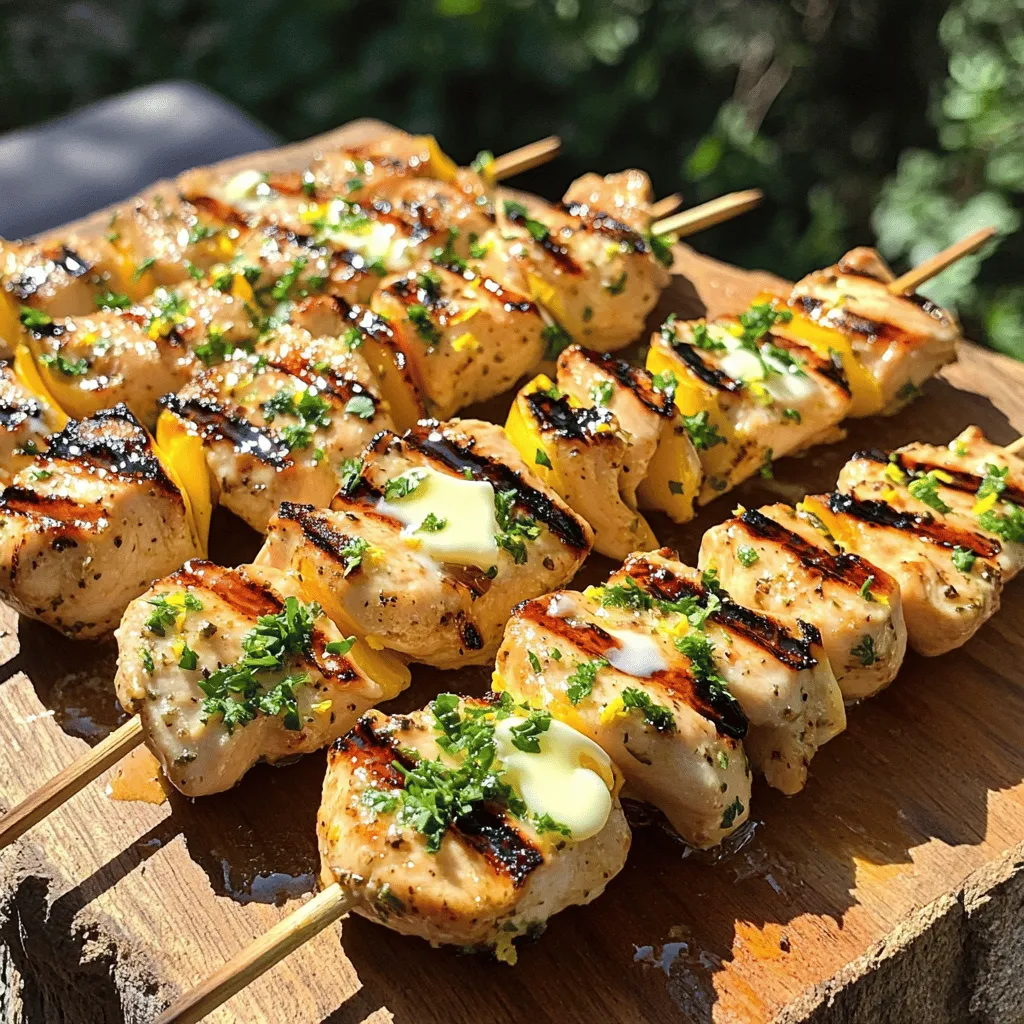
Preheat your grill to medium-high heat. Once hot, place the skewers on the grill. Cook the chicken for 10 to 12 minutes. Turn the skewers every few minutes. This gives you a nice char and helps them cook evenly. Check the chicken’s internal temperature. It should reach 165°F (75°C) and should not be pink inside. In the last few minutes, brush more melted butter on the skewers. This adds richness and flavor. Once cooked, let the skewers rest for a bit before serving. Sprinkle extra parsley on top for a fresh touch.
Tips & Tricks
Perfecting the Marinade
To create a great marinade, start with the right balance. Use melted butter, garlic, and herbs. I love adding lemon zest and smoked paprika for depth. Mix these well and coat the chicken. For the best flavor, let the chicken sit in the marinade for at least 30 minutes. If you have time, marinate for up to two hours. This allows the flavors to soak in.
Achieving the Best Grill Marks
Grilling is all about the heat and timing. Make sure your grill is hot before adding the skewers. Place them on the grill and resist the urge to move them too much. Let them cook for about 2-3 minutes on each side. This gives you those nice grill marks. Check for an internal temperature of 165°F (75°C) to ensure the chicken is done.
Ideal Serving Suggestions
Serve your garlic butter chicken skewers fresh off the grill. A wooden cutting board or bright platter works well. Add lemon wedges for a pop of color and flavor. You can also sprinkle more chopped parsley on top for a fresh touch. Pair these skewers with a light salad or grilled veggies for a complete meal.

Variations
Flavor Variations
You can change the flavor of your garlic butter chicken skewers easily. For a spicy kick, add cayenne pepper or chili flakes to the marinade. This will give your dish a nice heat. If you enjoy herbs, mix in rosemary or thyme. These fresh herbs can brighten the flavor. For a sweet twist, consider adding honey or brown sugar. This will balance the garlic and butter nicely.
Alternative Cooking Methods
You don’t need a grill to make these skewers. You can bake them in the oven. Preheat your oven to 400°F (200°C). Arrange the skewers on a baking tray lined with foil. Bake for about 20 minutes, turning halfway through. For a quick cook, use an air fryer. Set your air fryer to 375°F (190°C) and cook for around 10-12 minutes. Both methods give great results!
Complementary Side Dishes
Pair your garlic butter chicken skewers with tasty sides. A fresh salad with greens and tomatoes works well. You can also serve them with rice or couscous. These sides soak up the delicious garlic butter. Another option is grilled veggies like bell peppers or zucchini. They add color and flavor to your meal.
Storage Info
Storing Leftovers
To store Garlic Butter Chicken Skewers, let them cool first. Place the skewers in an airtight container. You can keep them in the fridge for up to three days. Make sure the container is sealed well to prevent moisture loss. This helps keep the chicken juicy and tasty.
Freezing Tips
You can also freeze leftover skewers. Wrap them tightly in plastic wrap, then place them in a freezer bag. Remove as much air as possible. Frozen skewers last for up to three months. When you’re ready to eat, thaw them in the fridge overnight before reheating.
Reheating Instructions
To reheat the skewers, use your oven or grill. Preheat your oven to 350°F (175°C). Place the skewers on a baking sheet and cover with foil. Heat for about 10-15 minutes or until fully warmed. If using a grill, heat it on medium. Grill the skewers for about 5 minutes, turning them until hot. This will keep them tender and flavorful.
FAQs
What is the best way to marinate chicken?
The best way to marinate chicken is to use a simple mix of flavors. Start with melted butter for richness. Add minced garlic for a bold taste. Fresh herbs like parsley bring brightness, while lemon zest adds zing. Combine these in a bowl and whisk well. This creates a flavorful bath for the chicken. Place your chicken cubes in the bowl and coat them evenly. Cover the bowl and refrigerate for at least 30 minutes. For a stronger flavor, marinate for up to 2 hours.
How long can I store Garlic Butter Chicken Skewers?
You can store Garlic Butter Chicken Skewers in the fridge for up to three days. Make sure they cool down to room temperature first. Place them in an airtight container or wrap them tightly with plastic wrap. If you want to keep them longer, freeze them. They can last up to three months in the freezer. To thaw, simply place them in the fridge overnight before reheating.
What should I serve with Garlic Butter Chicken Skewers?
Garlic Butter Chicken Skewers pair well with many sides. A fresh green salad adds crunch and color. You can also serve them with grilled veggies or a warm pita. If you want something heartier, try rice or couscous. Adding lemon wedges on the side gives a nice touch. You can drizzle extra garlic butter on your sides for more flavor. For a fun twist, serve them with a yogurt dip or tzatziki. These choices make your meal complete and delightful.
In this blog post, we covered how to make Garlic Butter Chicken Skewers from start to finish. We explored the ingredients, marinating steps, and grilling techniques. I shared tips for perfecting your marinade and achieving great grill marks. You learned about flavor variations and how to store leftovers properly.
Remember, with these simple steps, you can create tasty skewers at home. Enjoy cooking and savor every bite!


 for all the details! How can I ensure my shrimp don't overcook? To avoid overcooking shrimp, watch the color. When they turn pink, they are close to done. Cook for about 2-3 minutes on each side. Remove them from heat as soon as they are opaque. This helps keep them tender and juicy. Can I use frozen shrimp for this recipe? Yes, you can use frozen shrimp. Just thaw them first. Place them in cold water for about 15-20 minutes. Pat them dry before cooking. This ensures they cook evenly and absorb the sauce well. What can I substitute for soy sauce? If you need a substitute for soy sauce, try coconut aminos. It has a similar flavor and is often gluten-free. You can also use tamari for a gluten-free option. Both choices will still give you that umami taste. How to make the dish gluten-free? To make this dish gluten-free, use tamari instead of soy sauce. Ensure that all other ingredients, like butter and honey, are also gluten-free. This way, you can enjoy the same great flavor without gluten. What side dishes pair well with honey garlic butter shrimp? Honey garlic butter shrimp tastes great with rice or quinoa. You can also serve it with steamed veggies or a fresh salad. These sides balance the rich flavors of the dish, making a perfect meal. Can this recipe be scaled up for larger servings? Yes, you can easily scale up this recipe. Just double or triple the ingredients based on how many servings you need. Make sure your skillet is large enough, or use two pans to cook everything evenly. This keeps the shrimp from overcrowding and helps them cook well. This blog post offered a complete guide on making honey garlic butter shrimp. We explored each ingredient's role and shared cooking tips to ensure success. I highlighted variations and storage advice for leftovers. In conclusion, with fresh shrimp and the right techniques, you can create a flavorful dish. Explore your options and enjoy your culinary journey. Trust me, this recipe is worth trying!](https://dishtreats.com/wp-content/uploads/2025/07/4796c05b-30f7-4441-b7cb-ba0299151dfe-768x768.webp)


![- Firm tofu (14 oz, pressed and cubed) - Panko breadcrumbs (1 cup) - Cornstarch (1/4 cup) - Soy sauce (1 tablespoon) - Nutritional yeast (optional, 1 tablespoon) - Garlic powder (1 teaspoon) - Onion powder (1 teaspoon) - Dried oregano (1 teaspoon) - Salt and freshly ground black pepper - Air fryer - Mixing bowls - Cooking spray When making crispy air fryer tofu nuggets, the right ingredients matter. Start with firm tofu. Firm tofu holds its shape well and gives a satisfying bite. Press it to remove extra moisture. This step is crucial. It helps the tofu absorb sauces and seasonings better. Next, panko breadcrumbs add crunch. They are lighter than regular breadcrumbs. This texture makes your nuggets crispy and fun to eat. The cornstarch helps create a crispy coating. For seasonings, soy sauce gives a rich flavor. Nutritional yeast adds a cheesy taste, but it is optional. Garlic powder and onion powder enhance the savory notes. Dried oregano adds a nice herbal touch. Always season with salt and pepper to taste. Gather your cooking supplies. An air fryer is key for even cooking and crispiness. Mixing bowls help combine ingredients well. Don't forget cooking spray! It ensures a golden crust on your tofu nuggets. For the full recipe, check the detailed instructions above. Happy cooking! - Preheat air fryer to 400°F (200°C). This helps the nuggets get crispy. - Toss cubed tofu in soy sauce. Make sure every piece is well-coated. - Combine dry ingredients in a bowl. Use panko, cornstarch, and spices. - Coat each tofu cube in the breadcrumb mixture. Press gently to stick well. - Arrange nuggets in a single layer in the air fryer. Space is key for even cooking. - Mist with cooking spray and cook for 12-15 minutes. Shake the basket halfway for best results. Enjoy your crispy air fryer tofu nuggets! Check out the Full Recipe for more tips. To get crispy tofu nuggets, preheat your air fryer to 400°F (200°C). This helps the nuggets cook evenly and become perfectly crunchy. While cooking, use cooking spray. A light mist on the nuggets before frying ensures they get that golden finish. You can change the taste of your tofu nuggets easily. Swap the seasonings for different flavors. Try adding chili powder for heat or smoked paprika for a rich flavor. You can also use other types of breadcrumbs. Regular breadcrumbs or crushed cornflakes can work well. Pair your crispy nuggets with tasty dipping sauces. Sweet chili sauce or spicy mayo works great. For a fun presentation, garnish your dish with fresh cilantro or thinly sliced green onions. This adds color and makes your meal look appealing. Try these tips, and your tofu nuggets will impress everyone! {{image_4}} You can easily make this recipe vegan. If you want to skip the nutritional yeast, that’s fine. The tofu will still taste great. You can also change the seasonings to fit your taste. Try using paprika, cumin, or even curry powder for a unique twist. If you need a gluten-free snack, swap the regular breadcrumbs for gluten-free ones. You should also check the soy sauce. Some brands add gluten, so look for a gluten-free option. This way, everyone can enjoy your crispy tofu nuggets. Feel free to mix in some veggies or spices. Chopped bell peppers or green onions can add a nice crunch. You could also use cheese alternatives. Adding these can create an extra layer of flavor and keep things exciting. To store your crispy air fryer tofu nuggets, let them cool down first. Place them in an airtight container. This keeps them fresh and tasty. They can last in the fridge for 3 to 4 days. Make sure to check for any signs of spoilage before eating. You can freeze cooked tofu nuggets if you want to save some for later. Arrange them in a single layer on a baking sheet. Freeze them for about 1 hour until solid. Then, transfer them to a freezer bag or container. They can stay in the freezer for up to 3 months. When you want to eat them, thaw them in the fridge overnight. To keep your nuggets crispy, use an air fryer or an oven to reheat them. Preheat the air fryer to 350°F (175°C) and cook for about 5 to 7 minutes. If using an oven, place them on a baking sheet and heat at 350°F (175°C) for 10 to 15 minutes. Avoid using a microwave, as it can make them soggy. Enjoy your crispy air fryer tofu nuggets again! To make sure your air fryer tofu nuggets are crispy, follow these tips: - Press your tofu: Remove excess moisture by pressing your tofu. This helps it soak up flavors and become crispier. - Use panko breadcrumbs: Panko gives a better crunch than regular breadcrumbs. - Preheat the air fryer: Always preheat your air fryer to 400°F (200°C) before cooking. This step is key for crispiness. - Don't overcrowd the basket: Place nuggets in a single layer, leaving space between them. This ensures hot air can circulate. - Mist with cooking spray: A light spray helps create a golden, crispy surface. - Shake halfway through: Give the basket a shake halfway through cooking for even crispiness. Yes, you can use different types of tofu for this recipe: - Firm tofu: This works best for nuggets. It holds its shape and crisps well. - Extra firm tofu: This is also a great choice. It will be very crispy and satisfying. - Silken tofu: I do not recommend this type for nuggets. It will crumble and not hold its shape during cooking. To add some heat to your tofu nuggets, try these suggestions: - Add cayenne pepper: Mix cayenne pepper into your breadcrumb mixture for a kick. - Use spicy sauce: Toss the tofu in a spicy sauce before coating with breadcrumbs. - Include chili powder: Mix chili powder into your dry ingredients for a warm flavor. - Serve with hot sauce: Pair your nuggets with a spicy dipping sauce like sriracha or hot chili sauce. For the full recipe and more details on making crispy air fryer tofu nuggets, check out the [Full Recipe]. These tofu nuggets are easy and fun to make. You prep the tofu, coat it, and air fry it for a tasty snack. You can adjust the seasonings and even use different breadcrumbs for variety. Store leftovers well for later enjoyment. In the end, these nuggets are a great meal or snack choice. Explore different flavors and share them with friends. Enjoy your cooking adventures!](https://dishtreats.com/wp-content/uploads/2025/06/79817f14-b7a2-45e9-a748-387ee13ee939-768x768.webp)

![To make classic chocolate brownies, you need the following ingredients: - 1 cup (2 sticks) unsalted butter - 2 cups granulated sugar - 4 large eggs, at room temperature - 1 teaspoon pure vanilla extract - 1 cup all-purpose flour - 1 cup unsweetened cocoa powder - ½ teaspoon baking powder - ½ teaspoon sea salt - 1 cup semi-sweet chocolate chips - Optional: ½ cup chopped walnuts or pecans for added crunch You can use margarine if you need a butter alternative. For a deeper flavor, try using dark cocoa powder instead of regular cocoa. If you want to make this recipe gluten-free, swap the all-purpose flour with a gluten-free blend. Feel free to customize your brownies with these fun ideas: - Nuts: Consider using walnuts or pecans for extra texture. Almonds also work great. - Chocolate types: Mix semi-sweet and dark chocolate chips for rich flavor. - Flavor variations: Add a teaspoon of mint extract or some orange zest for a twist. These add-ins can enhance the taste and make your brownies unique. Mixing flavors can lead to exciting new experiences in every bite. To make the brownie batter, follow these steps: 1. Melt the butter: Start by melting 1 cup of unsalted butter in a medium saucepan over low heat. Stir often until it’s fully melted. 2. Add sugar: Once the butter is melted, remove it from the heat. Stir in 2 cups of granulated sugar until it looks smooth. 3. Add eggs: Crack 4 large eggs into the butter-sugar mix. Add them one at a time. Mix well after each egg, so the batter combines nicely. 4. Mix in vanilla: Add 1 teaspoon of pure vanilla extract. This gives the brownies a nice flavor. 5. Combine dry ingredients: In another bowl, sift together 1 cup of all-purpose flour, 1 cup of unsweetened cocoa powder, ½ teaspoon of baking powder, and ½ teaspoon of sea salt. This helps mix the dry ingredients well. 6. Fold dry into wet: Gently fold the dry mix into the wet mix. Use a spatula to combine until just mixed. Do not overmix, or the brownies won’t be fudgy. 7. Add chocolate chips: Toss in 1 cup of semi-sweet chocolate chips. If you like, add ½ cup of chopped walnuts or pecans for crunch. Mix until they are spread evenly in the batter. 8. Prepare the pan: Grease a 9x13-inch baking pan or line it with parchment paper. This makes it easy to remove the brownies later. 9. Pour batter: Pour the brownie batter into the pan. Use a spatula to spread it evenly. Now, it’s time to bake! 1. Preheat oven: Set your oven to 350°F (175°C). This ensures even baking. 2. Bake brownies: Place the pan in the oven. Bake for 30 to 35 minutes. 3. Check for doneness: To check, insert a toothpick into the center. It should come out with a few moist crumbs. If it’s wet, bake a little longer. Avoid overbaking for that perfect fudgy texture. After baking, let’s cool and cut the brownies. 1. Cool in the pan: Allow the brownies to cool in the pan for at least 15 minutes. This helps them firm up. 2. Transfer to wire rack: After 15 minutes, move the brownies to a wire rack. Let them cool completely before cutting. 3. Cutting tips: Use a sharp knife for clean cuts. Wipe the knife after each cut for neat squares. 4. Serving size: Cut into generous squares. Each piece should be a lovely bite of fudgy goodness. For a special touch, dust the brownies with powdered sugar before serving. Enjoy these delightful treats with a scoop of vanilla ice cream for extra indulgence. For the complete recipe, refer to the Full Recipe. To make the best fudgy brownies, focus on mixing. After melting the butter, stir in the sugar until smooth. Add eggs one at a time. Mix well after each egg. This helps create a rich texture. Don't overmix the dry and wet ingredients. Fold them gently just until combined. Common mistakes include overbaking and using too much flour. Overbaking leads to dry brownies. Aim for a toothpick with few moist crumbs. If you use too much flour, your brownies will be cake-like. Measure carefully for the best results. Brownies keep well at room temperature. Store them in an airtight container for up to five days. If you want to keep them longer, the fridge is a good option. Just remember, cold brownies can lose some flavor. To revive leftovers, warm them in the microwave for 10-15 seconds. This restores their fudgy goodness. You can also serve them with a scoop of ice cream for a tasty treat. For the full recipe, check out the [Full Recipe]. {{image_4}} For a gluten-free treat, try flourless brownies. You can use almond flour or ground oats instead of regular flour. These options add a nice texture and flavor. You should also reduce baking time. Check them after 25 minutes to avoid dryness. If you want a lighter version, use less sugar. You can swap half of the sugar with unsweetened applesauce. This keeps the brownies moist. For fats, use avocado or coconut oil. These substitutes make the brownies healthier but still tasty. To spice things up, add a dash of coffee or a pinch of sea salt. These flavors enhance the chocolate taste. You can also use extracts like almond or orange for a lovely twist. Just a little goes a long way in changing the flavor profile. Serving classic chocolate brownies is easy and fun. You can serve them warm with a scoop of ice cream. Vanilla ice cream works great, but try mint or coffee flavors for a twist. You can also top brownies with whipped cream. A sprinkle of chocolate shavings adds a nice touch. For a beautiful presentation, cut the brownies into squares. Place them on a decorative plate. Dust with powdered sugar for a fancy look. Add fresh berries or a sprig of mint beside each brownie. These details make the dish more appealing. Brownies are versatile and can be served in many ways. One fun idea is a brownie sundae. Start with a warm brownie, add a scoop of ice cream, and drizzle chocolate sauce on top. Finish with whipped cream and a cherry for a delightful treat. You can pair brownies with drinks too. A strong cup of coffee complements the rich chocolate flavor. Hot cocoa or milk also works well. For a unique twist, serve brownies with a side of fresh fruit. The sweetness of the fruit balances the rich brownies. For more ideas, check out the Full Recipe to explore all the delicious details! To check if your brownies are done, look for a few signs. The top should look set and slightly shiny. When you insert a toothpick in the center, it should come out with a few moist crumbs. This means your brownies are fudgy and perfect. If the toothpick comes out with wet batter, they need more time. Keep a close watch in the last few minutes of baking to avoid overbaking. Yes, you can freeze brownies! To freeze them, let them cool completely first. Cut your brownies into squares, then wrap each piece in plastic wrap. Place them in a freezer bag or container. They can last up to three months in the freezer. When you're ready to eat them, thaw them in the fridge overnight or at room temperature for a few hours. For neat cuts, use a sharp knife. First, let the brownies cool completely in the pan. For even cleaner cuts, wipe the knife with a damp cloth after each cut. This way, you have smooth edges. You can also use a pizza cutter for quick slicing. If you want, line your baking pan with parchment paper. This makes it easy to lift out the brownies for cutting. You’ve learned how to make classic chocolate brownies, from ingredients to serving tips. Whether you prefer fudgy or flourless, options abound to suit your taste. Remember, small changes can create big flavors. Experiment with add-ins or healthier swaps to make them your own. With these steps, you can enjoy delicious brownies any time. Happy baking!](https://dishtreats.com/wp-content/uploads/2025/07/8475203d-ada8-4920-a61c-065e4c50bd3f-768x768.webp)