Funfetti Sugar Cookie Bars Delightful and Easy Treat

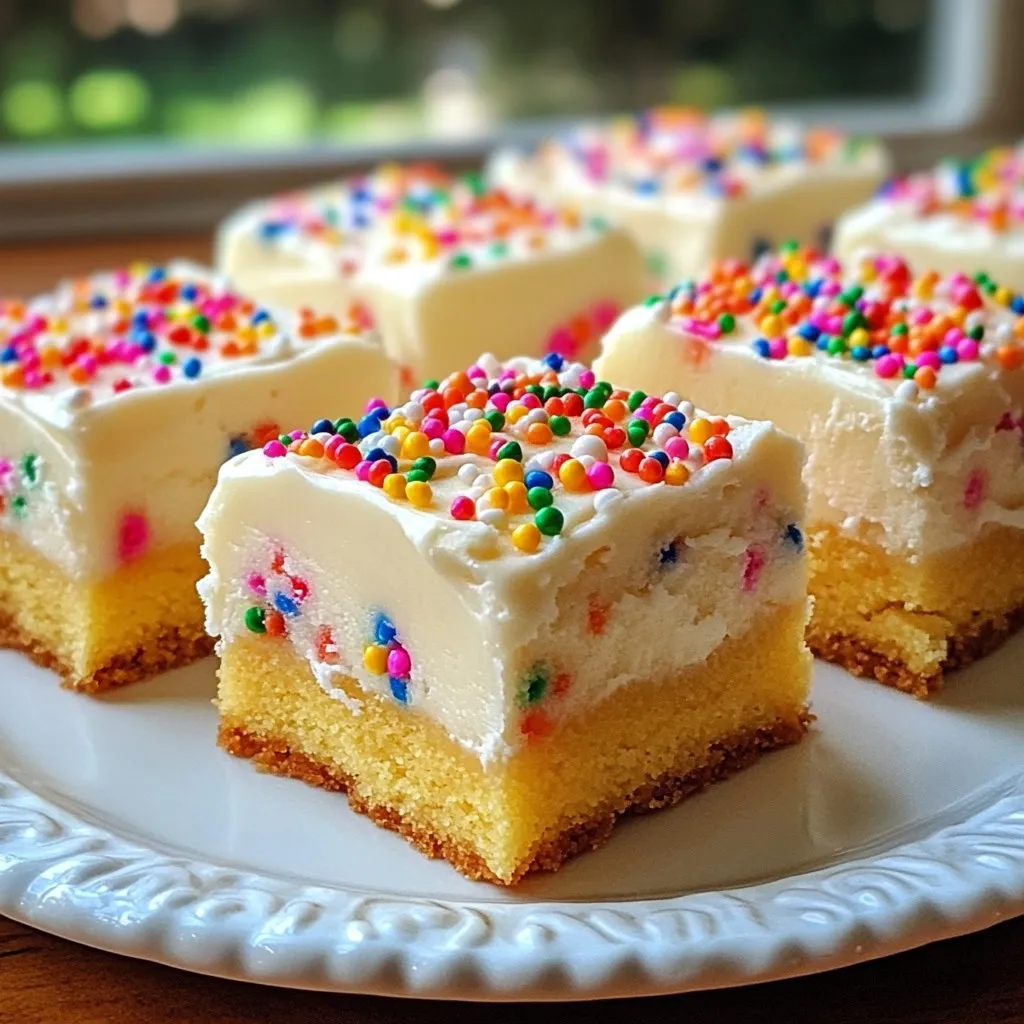
Get ready to satisfy your sweet tooth with these Funfetti Sugar Cookie Bars! Perfect for parties or cozy nights at home, these bars are delightfully easy to make. With just a few common ingredients, you’ll create a colorful treat that bursts with flavor. Follow my simple steps to whip up a batch that’ll impress everyone. Let’s dive into the recipe and start baking this tasty delight!
Why I Love This Recipe
- Delicious Cheerfulness: These Funfetti Sugar Cookie Bars are a delightful treat that adds a splash of color and joy to any occasion, making them perfect for parties and celebrations.
- Easy to Make: With simple ingredients and straightforward steps, this recipe is approachable for bakers of all skill levels, ensuring everyone can enjoy homemade sweetness.
- Soft and Chewy Texture: The combination of butter and cream cheese frosting creates a rich, soft, and chewy texture that melts in your mouth, making each bite irresistible.
- Customizable Fun: Feel free to mix in different types of sprinkles or add your favorite toppings for a personalized twist, ensuring every batch can be unique and exciting!
Ingredients
Here’s what you need to make these Funfetti Sugar Cookie Bars:
- 2 ¾ cups all-purpose flour
- 1 teaspoon baking powder
- ½ teaspoon baking soda
- ½ teaspoon salt
- 1 cup unsalted butter, softened
- 1 ½ cups granulated sugar
- 2 large eggs
- 2 teaspoons vanilla extract
- ½ cup sprinkles
- 1 cup cream cheese frosting
- More sprinkles for decoration
Each ingredient plays a key role in making these bars soft and sweet. The flour gives structure. The baking powder and soda help them rise. The butter adds richness, while the sugar brings sweetness. Eggs bind everything together. Vanilla adds flavor, and sprinkles bring the fun!
Using high-quality ingredients makes a big difference. For instance, fresh butter and eggs improve the taste. Choose colorful sprinkles to make your bars more festive. Don’t forget the cream cheese frosting; it adds a creamy finish.
These simple ingredients come together to create a delightful treat. You can find most of them in your kitchen right now. If you’re missing something, a quick trip to the store will solve it. Now, let’s get ready to bake!

Step-by-Step Instructions
Preheating and Preparing the Pan
- Preheat the oven to 350°F (175°C).
- Grease and line a 9×13 inch baking pan.
Start by getting your oven hot. This helps the cookie bars bake evenly. Next, grab your baking pan. Grease it with some butter or oil. Then, line it with parchment paper. Leave some paper hanging over the sides. This makes it easy to lift the bars out later.
Mixing Dry Ingredients
- Whisk together flour, baking powder, baking soda, and salt.
In a medium bowl, combine the dry ingredients. Whisk the flour, baking powder, baking soda, and salt. Make sure there are no lumps. This step is key for even flavor and texture. Set this bowl aside for later.
Creaming Butter and Sugar
- Cream softened butter and granulated sugar until fluffy (3-4 minutes).
Now, take a large bowl. Add the softened butter and granulated sugar. Use an electric mixer to beat them together. Mix for about 3-4 minutes. The mixture should be light and fluffy. This helps give your bars a nice texture.
Adding Eggs and Vanilla
- Incorporate eggs and vanilla extract to the mixture.
Next, you will add two large eggs. Add them one at a time. Mix well after each egg. Then, pour in the vanilla extract. This adds a lovely flavor that everyone enjoys.
Combining Ingredients
- Gradually mix in dry ingredients with wet ingredients.
- Fold in sprinkles.
Now, it is time to combine. Slowly add the dry mix to the wet mix. Stir until just combined. Be careful not to overmix. Then, gently fold in the sprinkles. This adds fun color and joy to your bars.
Baking the Bars
- Spread dough in the pan and bake for 20-25 minutes.
Spread the dough evenly in the baking pan. Use a spatula to smooth the top. Place it in your preheated oven. Bake for 20-25 minutes. The edges should be golden brown. You can check with a toothpick. If it comes out clean, they are done!
Tips & Tricks
Ensuring the Right Texture
To keep your funfetti sugar cookie bars soft, avoid overmixing the dough. When you mix the dry and wet ingredients, do so gently. Just combine them until you see no dry flour. If you mix too much, the bars will turn out tough. You want them to be soft and chewy.
Cooling and Frosting
Cooling the bars properly is key. After baking, let them sit in the pan for about 10 minutes. This helps them set. Then, lift them out using the parchment paper. Place them on a wire rack to cool completely. If you frost too soon, the frosting will melt. Wait until the bars are cool for the best frosting results.
Serving Suggestions
For a festive display, serve your funfetti bars on a colorful platter. Add extra sprinkles around the bars for a joyful look. You can also cut them into fun shapes using cookie cutters. This makes them even more exciting for parties or get-togethers.
Pro Tips
- Use Room Temperature Ingredients: Make sure your butter and eggs are at room temperature for better mixing and to achieve a fluffy texture in your cookie bars.
- Don’t Overmix the Dough: Mix until just combined to ensure the cookie bars remain soft and chewy rather than tough and dry.
- Chill the Dough (Optional): For thicker bars, consider chilling the dough for 30 minutes before baking to help them hold their shape better.
- Customize Your Sprinkles: Feel free to use themed sprinkles for different occasions, like holiday shapes for festive celebrations!

Variations
Flavor Add-ins
You can switch up the flavor of your Funfetti Sugar Cookie Bars easily. Try using almond extract instead of vanilla for a nutty touch. This small change can make a big difference. You can also use flavored frostings. Think about lemon or chocolate frosting! These flavors can add fun and surprise to every bite.
Dietary Modifications
If you need gluten-free options, swap all-purpose flour for gluten-free flour. This keeps the bars tasty and safe for those with gluten issues. For a vegan twist, use plant-based butter and flax eggs instead of regular eggs. These changes help you enjoy these treats, no matter your diet.
Seasonal Twists
Make your cookie bars fit the season! Use holiday-themed sprinkles for special occasions. Red and green sprinkles for Christmas or pastel colors for Easter can make your bars festive. You can also add seasonal toppings like pumpkin spice in the fall or peppermint in winter. These little touches can turn a great treat into a celebration!
Storage Info
Storing the Cookie Bars
To keep your funfetti sugar cookie bars fresh, store them in an airtight container. This helps keep the bars soft and moist. If you plan to eat them within a few days, you can leave them at room temperature. For longer storage, keep them in the fridge. They will stay fresh for about a week this way. Just remember to allow them to come to room temperature before serving.
Freezing Instructions
If you want to save some cookie bars for later, freezing is simple! First, let the bars cool completely. Next, cut them into squares. Wrap each piece in plastic wrap. Then, place them in a freezer-safe bag or container. Be sure to label the bag with the date. They can last in the freezer for up to three months. When you’re ready to enjoy them, just thaw them in the fridge overnight.
Reheating Tips
To reheat your cookie bars, preheat your oven to 350°F (175°C). Place the bars on a baking sheet. Cover them with aluminum foil to prevent drying out. Heat them for about 10 minutes. You can also use the microwave. Just place a bar on a microwave-safe plate and warm it for 10-15 seconds. Enjoy them warm, with the frosting slightly melty for extra sweetness!
FAQs
How do I know when the cookie bars are done?
To check if your cookie bars are done, look for two signs. First, the edges should turn golden brown. Second, use a toothpick. Insert it in the center; if it comes out clean, the bars are ready. This means they are baked through and not doughy.
Can I use a different type of frosting?
Yes, you can use different frostings. Cream cheese, buttercream, or even chocolate frosting work well. If you want a lighter taste, go for whipped topping. You can also mix flavors, like adding cocoa powder to your buttercream for a chocolate twist. Don’t be afraid to get creative here!
What can I substitute for unsalted butter?
If you need a butter substitute, use coconut oil or margarine. For a dairy-free option, try vegan butter or applesauce. Applesauce keeps the bars moist and adds sweetness. You can also use nut butters for a unique flavor twist. Just remember, each substitute may change the final taste and texture a bit.
This article shared key steps to make delicious cookie bars. You learned about the right ingredients, mixing methods, and baking tips. With simple adjustments, you can customize these bars for any occasion. Remember to cool them before frosting for best results. You can also store or freeze them for later enjoyment. Overall, these cookie bars are fun to make and taste great. Enjoy baking and sharing your sweet treat

Funfetti Sugar Cookie Bars
Ingredients
- 2.75 cups all-purpose flour
- 1 teaspoon baking powder
- 0.5 teaspoon baking soda
- 0.5 teaspoon salt
- 1 cup unsalted butter, softened to room temperature
- 1.5 cups granulated sugar
- 2 large eggs
- 2 teaspoons vanilla extract
- 0.5 cup sprinkles (plus more for decoration)
- 1 cup cream cheese frosting (store-bought or homemade)
Instructions
- Preheat your oven to 350°F (175°C). Prepare a 9x13 inch baking pan by greasing it and lining it with parchment paper, allowing some overhang to facilitate easy removal later.
- In a medium mixing bowl, whisk together the all-purpose flour, baking powder, baking soda, and salt until perfectly blended. Set this mixture aside for later use.
- In a large mixing bowl, cream the softened butter along with the granulated sugar using an electric mixer set to medium speed. Beat this mixture until it becomes light and fluffy, which should take around 3-4 minutes.
- Incorporate the eggs into your mixture one at a time, ensuring to mix thoroughly after each addition. Following that, stir in the vanilla extract for extra flavor.
- Gradually introduce the dry ingredient mixture to the wet ingredients, mixing until just combined. It's important not to overmix to maintain softness in the bars.
- Gently fold in the sprinkles until they are evenly distributed throughout the cookie dough, adding fun color and texture.
- Transfer the cookie dough into the prepared baking pan and use a spatula to spread it evenly across the surface.
- Bake in your preheated oven for approximately 20-25 minutes. They are done when the edges are golden brown and a toothpick inserted into the center comes out clean.
- After baking, remove the pan from the oven and allow the cookie bars to cool in the pan for about 10 minutes. Then, carefully lift them out using the parchment overhang and transfer to a wire rack to cool completely.
- Once the cookie bars have cooled, spread a generous layer of cream cheese frosting over the top, ensuring every corner is covered.
- For a finishing touch, sprinkle additional sprinkles over the frosted surface for added decoration before slicing into squares.


![- 1 cup rolled oats - 1/2 cup canned pumpkin puree - 1/4 cup almond butter (or your choice of nut butter) - 1/4 cup honey or maple syrup - 1/2 teaspoon vanilla extract - 1 teaspoon pumpkin pie spice - Pinch of salt - 1/4 cup chopped nuts (walnuts or pecans) - 1/4 cup mini chocolate chips or raisins - Calories per serving: About 100 - Protein content: 2 grams - Fiber content: 3 grams When you gather these ingredients, you set the stage for a tasty treat. Rolled oats serve as the base, giving each bite a hearty texture. Canned pumpkin puree brings moisture and a rich flavor that screams fall. Almond butter adds creaminess and healthy fats, while honey or maple syrup sweetens the mix. The vanilla extract rounds out the flavors, and pumpkin pie spice makes everything feel festive. Optional ingredients like chopped nuts and chocolate chips offer extra crunch and sweetness. You can mix and match to fit your taste. In terms of nutrition, these bites pack a punch. Each serving gives you about 100 calories, 2 grams of protein, and 3 grams of fiber. This makes them a great snack for energy and fullness. For the complete recipe, you can check out the Full Recipe section. - In a large mixing bowl, combine: - 1 cup rolled oats - 1/2 cup canned pumpkin puree - 1/4 cup almond butter (or your choice of nut butter) - 1/4 cup honey or maple syrup - 1/2 teaspoon vanilla extract - 1 teaspoon pumpkin pie spice - Pinch of salt Mix these ingredients well. Use a spatula to ensure everything blends together. You want a sticky dough. This sticky texture helps the bites hold their shape later. If you like, fold in some extras: - 1/4 cup chopped nuts (like walnuts or pecans) - 1/4 cup mini chocolate chips or raisins Make sure to distribute these evenly. This adds crunch and sweetness. The more you mix, the better the flavors combine. Now, it’s time to shape the bites. - Scoop small portions of the mixture. - Roll each portion into 1-inch balls. Place the balls on a plate or parchment paper. Leave space between them. After shaping, refrigerate the bites for at least 30 minutes. This helps them firm up. Enjoy these tasty bites chilled or at room temperature as a quick snack! For the full recipe, check out the details above. To make great energy bites, size matters. Aim for about 1 inch for each bite. This helps them cook evenly. Use a light touch when mixing the dough. Overworking it can make them tough. Gently blend the ingredients until they come together. Want more flavor? Try making your own pumpkin pie spice. Combine cinnamon, nutmeg, and ginger to find your perfect mix. You can also adjust sweetness. Use honey or maple syrup to make them sweeter or less sweet. Taste as you go! When it's time to serve, make it pretty! Arrange your energy bites on a decorative plate. This makes them look special. Add a sprinkle of pumpkin pie spice on top for a nice touch. It looks great and adds extra flavor. For the full recipe, check out [Full Recipe]. {{image_4}} You can make your pumpkin pie energy bites even more fun with flavor twists. Try adding toasted coconut for a tropical vibe. The sweet and crunchy texture makes each bite delightful. You can also switch your nut butter. Use peanut or cashew butter instead of almond butter. Each nut brings its own taste, making the bites unique. If you need a gluten-free snack, use gluten-free oats in your mix. This small change keeps the bites delicious and safe for those with gluten sensitivities. For a vegan option, swap honey with agave nectar. This keeps your bites sweet while fitting a plant-based diet. You can tailor these bites to fit the seasons. For fall, mix in some spiced apple or cider. This adds a warm, cozy flavor that feels like autumn. For summer, a hint of citrus zest can brighten the bites. It gives them a fresh burst that’s perfect for hot days. For the full recipe, check the details above and make your own tasty energy bites! Store your pumpkin pie energy bites in an airtight container in the refrigerator. This keeps them fresh and tasty. If you plan to eat them soon, you can keep them at room temperature for short durations. Just remember, they may not last as long outside the fridge. These energy bites can last up to one week in the fridge. If you want to keep them longer, freeze them. They can stay fresh for up to three months in the freezer. Just make sure to label the container with the date you froze them. You can enjoy these bites chilled or at room temperature. They make a great snack either way! For a delightful treat, pair them with a cup of tea or coffee. The warm drink complements the tasty flavors of the bites perfectly. If you want to try a fun twist, serve them at a party on a festive plate. You can find the full recipe to make these delicious bites. To make pumpkin pie energy bites, follow these steps: 1. In a large bowl, mix rolled oats, canned pumpkin puree, almond butter, and honey. 2. Add vanilla extract, pumpkin pie spice, and a pinch of salt. 3. Stir until the mixture becomes a sticky dough. 4. Fold in chopped nuts and chocolate chips or raisins. 5. Scoop out small portions and roll them into balls, about 1 inch wide. 6. Place the bites on a plate with space between them. 7. Refrigerate for at least 30 minutes to firm up. Enjoy your tasty and healthy snack! For more details, check the Full Recipe. Yes, you can freeze these energy bites. To do this, place the bites on a baking sheet. Freeze them for about an hour until solid. Then, transfer them to a freezer bag or an airtight container. Label the bag with the date. These bites can last up to three months in the freezer. When you’re ready to eat them, just let them thaw in the fridge. Pumpkin pie energy bites have many health benefits. They are rich in fiber from the oats and pumpkin. Fiber helps with digestion and keeps you full. Almond butter provides healthy fats and protein. Honey or maple syrup adds natural sweetness without refined sugar. Pumpkin is packed with vitamins A and C, which support your immune system. Overall, these bites are a nutritious snack option. Yes, these energy bites are safe and nutritious for kids. They contain wholesome ingredients that provide energy without added sugar. Kids love the sweet taste and chewy texture. You can also let your children help make them. This way, they learn about healthy snacks. Just remember to check for any nut allergies before serving. These pumpkin pie energy bites are easy to make and fun to eat. You mix simple main ingredients like oats, pumpkin, and nut butter. Add some nuts or chocolate chips for a tasty twist. Remember to store them well to enjoy later. Whether for a snack, dessert, or lunchbox treat, these bites pack nutrition in every bite. Get creative with flavors and enjoy the flexible recipes. Healthy eating can be delicious and effortless. Make these energy bites today and see for yourself!](https://dishtreats.com/wp-content/uploads/2025/07/b18c9eee-ac7a-43cf-8a14-33dd9ccff863-768x768.webp)


![To make your chocolate chip banana bread, you need these key ingredients: - 2 ripe bananas, thoroughly mashed - 1/3 cup coconut oil, melted - 1 teaspoon pure vanilla extract - 1/2 cup packed brown sugar - 1/4 cup granulated sugar - 2 large eggs at room temperature - 1 teaspoon baking soda - 1/4 teaspoon fine salt - 1 1/2 cups all-purpose flour - 1/2 cup semi-sweet or dark chocolate chips - 1/4 cup walnuts or pecans, chopped (optional) Each ingredient plays a vital role in crafting a moist and tasty loaf. Ripe bananas add sweetness and moisture. Coconut oil gives a rich flavor and a soft texture. The sugars create that perfect crust while the eggs help bind everything together. You can personalize your chocolate chip banana bread with fun add-ins. Here are some ideas: - Chopped nuts for crunch - Dried fruits like cranberries or raisins - A sprinkle of cinnamon for warmth - Peanut butter or nutella swirls for extra richness Feel free to mix and match! These add-ins can bring new flavors and textures to your bread. Using high-quality ingredients makes a big difference. Choose ripe bananas; they should be spotty and soft. Fresh eggs bring richness and flavor. Use pure vanilla extract for the best taste. For the oils, opt for organic coconut oil if possible. Quality flour helps create the right texture. Remember, great ingredients lead to great results! For the full recipe, check out the [Full Recipe]. Start by preheating your oven to 350°F (175°C). This step is crucial for even baking. Next, grab a 9x5 inch loaf pan. Lightly grease it with cooking spray or butter. You can also use parchment paper to line the pan. This makes removing the banana bread easier. In a large mixing bowl, take 2 ripe bananas and mash them well. You want them smooth with no lumps. Then, add 1/3 cup of melted coconut oil. Mix them together until they blend into a creamy base. This combination gives your bread moisture and flavor. Add 1 teaspoon of pure vanilla extract, 1/2 cup of packed brown sugar, and 1/4 cup of granulated sugar to the banana mix. Stir until it’s smooth. Now, crack in 2 large eggs. Mix well after each egg. Then, sprinkle 1 teaspoon of baking soda and 1/4 teaspoon of fine salt over the mix. Stir gently. Next, sift in 1 1/2 cups of all-purpose flour. Fold it in carefully. Don’t overmix; this keeps your loaf tender. Finally, gently fold in 1/2 cup of semi-sweet or dark chocolate chips. If you like, add 1/4 cup of chopped nuts too. Pour the batter into your prepared loaf pan. Smooth the top with a spatula. Place it in the oven and bake for 55-65 minutes. It’s done when a toothpick comes out clean or with a few crumbs. Let the bread cool in the pan for 10 minutes. Then, carefully move it to a wire rack to cool completely. This cooling step helps set the flavors. For the full recipe, refer to the section above. To get the best texture, use ripe bananas. The riper, the better! They must be soft and spotty. This way, you get a sweet and moist bread. Mash them well to avoid lumps. Mix ingredients gently after adding the flour. Over-mixing can make your bread tough. Aim for a light, fluffy loaf. Keep your banana bread fresh by wrapping it tightly. You can use plastic wrap or foil. Store it at room temperature for up to four days. If you want it to last longer, place it in the fridge for about a week. To keep it even longer, freeze it. Slice it before freezing for easy serving. Just make sure to wrap each slice well. Serve your chocolate chip banana bread warm. It tastes best right out of the oven! Add some butter on top for richness. You can also sprinkle powdered sugar for a sweet touch. For extra fun, top with fresh banana slices or more chocolate chips. This makes it look pretty and taste even better! For the complete recipe, check out the Full Recipe section in this article. {{image_4}} You can enjoy chocolate chip banana bread without gluten. Use a gluten-free flour blend. This blend works well as a one-to-one substitute. Make sure it has xanthan gum. This helps bind the ingredients. The flavor stays rich and delicious. Just follow the same steps as in the Full Recipe. You will love the texture and taste. For a vegan version, swap eggs for flax eggs. To make a flax egg, mix one tablespoon of flaxseed meal with three tablespoons of water. Let it sit for a few minutes to thicken. Use non-dairy milk and coconut oil as well. This keeps the bread moist and soft. You can still add chocolate chips, just choose dairy-free ones. You can add your favorite spices for extra flavor. Cinnamon and nutmeg pair well with bananas. A pinch of each can make a big difference. You can also try almond or coconut extract. These extracts add depth. Experiment to find your favorite combo. Each twist makes the bread unique and fun. To keep your chocolate chip banana bread fresh, store it at room temperature. Wrap it tightly in plastic wrap or foil. This helps keep moisture in. Place it in a cool, dry spot, away from direct sunlight. If you prefer, you can also use an airtight container. This will help maintain its soft texture and rich flavor. Freezing is a great option if you want to save some for later. First, let the banana bread cool completely. Then, wrap it tightly in plastic wrap, followed by aluminum foil. This extra layer prevents freezer burn. You can freeze it for up to three months. When you're ready to enjoy it, simply thaw it in the fridge overnight. Reheating banana bread can bring back its lovely warmth. You can use a toaster oven or a conventional oven. Preheat your oven to 350°F (175°C). Slice the bread and place it on a baking sheet. Heat for about 5-10 minutes. If you want a softer texture, cover it with foil. You can also pop a slice in the microwave for about 10-15 seconds. Enjoy it warm for a cozy treat! Your chocolate chip banana bread is done when a toothpick comes out clean. Insert it in the center. If it has a few crumbs, that is fine too. The bread usually bakes for 55-65 minutes. The top should look golden brown. Yes, you can substitute some ingredients. For example, use olive oil instead of coconut oil. You can also swap brown sugar for maple syrup. Make sure to adjust the amounts as needed for the best results. Chocolate chip banana bread lasts about 3-4 days at room temperature. Store it in an airtight container. For longer storage, keep it in the fridge for a week. You can also freeze it for up to 3 months. You can use applesauce or mashed bananas as egg substitutes. Use 1/4 cup of applesauce or 1/2 banana for each egg. Both options keep the bread moist and flavorful. This chocolate chip banana bread stands out because of its rich flavors. The combination of ripe bananas and chocolate chips creates a sweet treat. Using coconut oil adds a subtle depth to the taste. The option to add nuts gives extra texture. You can find the complete recipe in the Full Recipe section. This blog post covered how to make delicious chocolate chip banana bread. We discussed key ingredients, optional add-ins, and the importance of ingredient quality. I shared step-by-step instructions to guide you through the baking process. We explored tips for the perfect texture, storage methods, and fun variations like gluten-free and vegan options. With these insights, you can easily bake this treat and impress everyone. Enjoy your baking journey!](https://dishtreats.com/wp-content/uploads/2025/06/ff2d306f-7b8f-4bb2-a8a5-5e2882fba681-768x768.webp)