Funfetti Cake Batter Dip Creamy and Colorful Delight

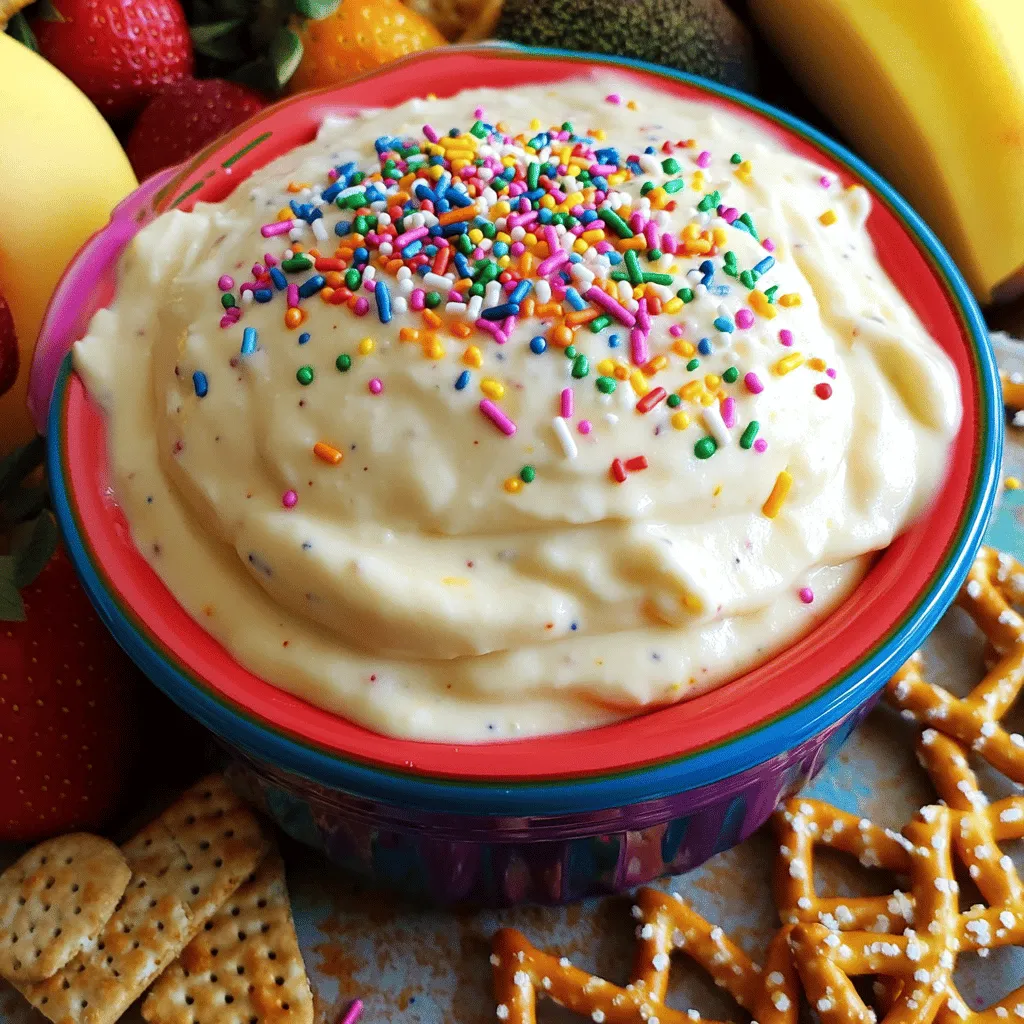
Looking for a joyful treat that brightens up any gathering? Let me introduce you to Funfetti Cake Batter Dip! This creamy and colorful delight is simple to make and perfect for dipping. With just a handful of ingredients like vanilla cake mix and cream cheese, you’ll create a crowd-pleaser in no time. Get ready to impress your friends and family with a fun dessert that’s both delightful and delicious. Let’s dive in!
Ingredients
Primary Ingredients for Funfetti Cake Batter Dip
- 1 cup vanilla cake mix
- 1/2 cup cream cheese, softened
- 1/2 cup sour cream
- 1/4 cup powdered sugar
- 1 teaspoon pure vanilla extract
- 1/4 cup rainbow sprinkles (for the dip and garnish)
- 1 cup mini marshmallows (optional)
The main ingredients for Funfetti Cake Batter Dip create a sweet and creamy treat. Each ingredient serves a vital role. The vanilla cake mix gives the dip its cake-like flavor. Cream cheese adds a rich creaminess. Sour cream keeps it smooth and light. Powdered sugar sweetens the dip without being gritty. Pure vanilla extract enhances the flavor with warmth. Rainbow sprinkles add a fun touch and color. Mini marshmallows can make it even more delightful, but they are optional.
Suggested Dippers
- Fresh fruit slices (e.g., strawberries, apples)
- Pretzels (sweet or regular)
- Graham crackers
You need dippers to enjoy this fun dip. Fresh fruit slices, like strawberries and apples, add a fresh taste. Pretzels bring a salty crunch that contrasts the sweet dip. Graham crackers offer a classic option, perfect for scooping. Each of these dippers adds a new twist to the creamy delight.
Step-by-Step Instructions
Preparation Steps
- Gather these ingredients and tools:
- 1 cup vanilla cake mix
- 1/2 cup cream cheese, softened
- 1/2 cup sour cream
- 1/4 cup powdered sugar
- 1 teaspoon pure vanilla extract
- 1/4 cup rainbow sprinkles (for the dip and garnish)
- 1 cup mini marshmallows (optional)
- A large mixing bowl
- A hand mixer or whisk
- A spatula
- In your large mixing bowl, combine the vanilla cake mix, softened cream cheese, sour cream, and powdered sugar. Mix these together until they are well combined.
Mixing Process
- Use a hand mixer or whisk to blend the mixture. Start at medium speed. Mix until it becomes smooth and creamy. Make sure there are no lumps left.
- Once it is creamy, add the pure vanilla extract. Mix again until the vanilla is fully blended in. This gives the dip a lovely flavor.
Final Touches
- Carefully fold in the rainbow sprinkles and mini marshmallows, if you want. Use a spatula to ensure they are mixed evenly throughout the dip. This adds fun colors and textures.
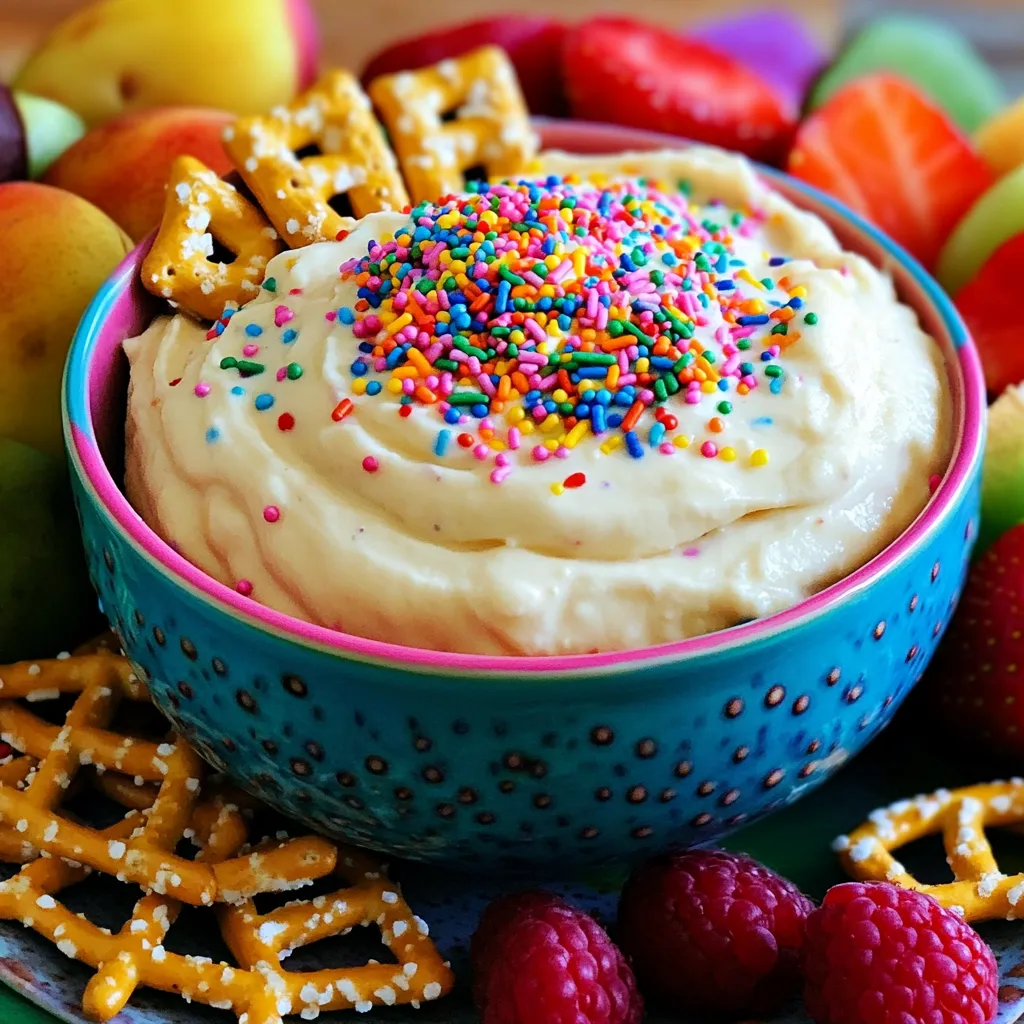
- Transfer the dip to a fun serving bowl. For a festive touch, sprinkle some extra rainbow sprinkles on top. This makes the dip look even more inviting!
- Serve this dip right away. It tastes best when creamy. Pair it with fresh fruit slices, pretzels, or graham crackers for dipping. Enjoy the fun flavors and colorful mix!
Tips & Tricks
Mixing Tips
- Use a hand mixer for best results.
- Avoid over-mixing to keep the dip’s texture nice.
When you mix the dip, start slow. A hand mixer makes it smooth quickly. You want a creamy dip, not a fluffy one. If you mix too much, the dip can get too airy. Just blend until everything is smooth and combined.
Presentation Suggestions
- Choose vibrant serving dishes.
- Arrange dippers attractively around the dip.
A colorful bowl makes the dip pop. Use bright dishes that match the sprinkles. When you set up the dippers, make it fun! Place fresh fruit, pretzels, and graham crackers in a circle around the dip. This adds a festive touch and invites people to dig in.
Serving Temperature
- Best served immediately for optimal creaminess.
- Can be chilled slightly before serving if prepared in advance.
This dip tastes best when fresh and creamy. Serve it right after making it. If you need to prepare it ahead of time, chill it in the fridge for a short while. Just let it sit out for a few minutes before serving to restore some of its creaminess.

Variations
Flavor Enhancements
You can easily change the flavor of your Funfetti Cake Batter Dip. Try using chocolate cake mix instead of vanilla. This gives the dip a rich, sweet taste that pairs well with the sprinkles. Another simple tweak is to add flavored extracts. Almond or lemon extracts can brighten the flavor profile. Just a teaspoon goes a long way!
Fun Mix-Ins
Get creative with fun mix-ins! Instead of mini marshmallows, try different candies. M&Ms, chocolate chips, or even gummy bears can bring new joy to your dip. You can also add crushed cookies or nuts for extra crunch. This will make the dip exciting and full of texture!
Themed Variations
Make your dip fit any occasion by changing the sprinkles. Use holiday-themed sprinkles for Christmas or Halloween. This adds a festive touch that everyone will love. For birthdays, go wild with rainbow colors! A bright mix of sprinkles makes it perfect for any celebration. Each variation keeps the dip fun and interesting!
Storage Info
Short-Term Storage
To keep your Funfetti Cake Batter Dip fresh, store leftovers in an airtight container. Place it in the refrigerator right after serving. For the best flavor, consume the dip within 2-3 days. This way, you won’t miss out on its creamy texture and sweet taste.
Freezing Options
Can the dip be frozen? I do not recommend freezing it. Freezing changes the dip’s texture and makes it less enjoyable. It’s best to savor this dip fresh. This ensures that every bite stays creamy and delightful.
Re-chilling Tips
If you have leftovers, let the dip come to room temperature before serving it again. This helps bring back its original creaminess. After it warms up a bit, mix gently to restore that smooth texture. Enjoying it at the right temperature makes all the difference!
FAQs
What can I use instead of cream cheese?
You can use Greek yogurt or mascarpone cheese. Both options work well and add creaminess. Greek yogurt gives a tangy taste, while mascarpone is richer and sweeter. You might want to adjust the sugar based on your choice.
Can I make this dip ahead of time?
Yes, you can make this dip a day before. Just mix all the ingredients and store it in the fridge. Cover it well with plastic wrap or a lid. Before serving, stir it gently to get the creamy texture back.
Is Funfetti Cake Batter Dip gluten-free?
You can find gluten-free cake mix options at many stores. Make sure to check the label. Serve this dip with fresh fruit or gluten-free dippers like rice crackers. This way, everyone can enjoy it without worries.
This blog post covered how to make Funfetti Cake Batter Dip with simple steps and fun variations. We explored key ingredients like vanilla cake mix and cream cheese, plus tasty dippers like fresh fruit and pretzels. Remember, serve it fresh for the best taste. You can switch flavors or add fun mix-ins to keep it exciting. This dip is perfect for any celebration. Enjoy creating and sharing this fun treat with friends and family!


 for Garlic Butter Lemon Salmon Foil Packs. In this article, you learned how to make Garlic Butter Lemon Salmon Foil Packs. We covered the main ingredients, step-by-step cooking instructions, and helpful tips to ensure success. You can also explore flavor variations and storage options for leftovers. This dish is simple yet delicious, making it perfect for dinner. With these techniques, you can impress friends and family with your cooking. Enjoy your meal and feel proud of your kitchen skills!](https://dishtreats.com/wp-content/uploads/2025/07/636e4153-d701-4cda-a9a1-5094e2b11f0e-768x768.webp)
![- 1 block firm tofu, thoroughly drained and pressed - 1 cup jasmine rice - 2 tablespoons Sriracha sauce The firm tofu acts as the main protein. It absorbs flavors well and provides a hearty bite. Jasmine rice, with its fluffy texture, makes a great base. Sriracha sauce adds the spicy kick, balancing heat and taste. - 1 cup broccoli florets, fresh or frozen - 1 red bell pepper, thinly sliced - ½ cup carrots, julienned or matchstick-cut Broccoli florets add crunch and color. The red bell pepper brings sweetness and a pop of color. Carrots add a nice crunch and a bit of earthiness. Together, they create a vibrant mix that enhances the dish. - 1 tablespoon soy sauce (preferably low-sodium) - 1 tablespoon sesame oil - Fresh cilantro, for garnish Soy sauce brings umami depth. Sesame oil adds a nutty flavor that complements the spice. Fresh cilantro brightens the dish, giving it a fresh finish. This combo of flavors makes each bite exciting. For the full recipe, check out the complete guide. To start, cut the pressed tofu into 1-inch cubes. This size helps the tofu cook evenly. Next, toss the cubes in a bowl with cornstarch. Make sure every piece is coated. This coating is key for a crispy finish when you cook it. Pressing the tofu is vital. It removes excess water, allowing better flavor absorption and texture. Bring vegetable broth to a boil in a medium saucepan. Add the jasmine rice and stir it once. Cover the pan, reduce the heat, and let it simmer for about 15 minutes. This method infuses flavor into the rice. Once the liquid absorbs, fluff the rice with a fork. This step keeps the rice light and airy, which balances the dish. Heat vegetable oil in a large skillet over medium-high heat. Carefully add the cornstarch-coated tofu cubes in a single layer. Fry them for about 8-10 minutes, turning occasionally. You want all sides to turn golden brown and crispy. Once done, transfer the tofu to a plate lined with paper towels. This helps absorb any excess oil. In the same skillet, add the broccoli, red bell pepper, and carrots. Stir-fry the veggies for 4-5 minutes. You want them tender but still bright and colorful. This keeps their nutrients intact. Add the sliced green onions for the last minute. Their fresh taste adds a nice crunch to the mix. In a small bowl, whisk together the Sriracha sauce, soy sauce, sesame oil, and honey (or maple syrup). Mix until well blended. This sauce brings all the flavors together. If you like it spicier, add more Sriracha. For a milder version, reduce the amount. Now, it’s time to put it all together! Divide the fluffy jasmine rice into bowls. Top it with the spicy tofu and vegetable mix. For a polished finish, sprinkle sesame seeds and fresh cilantro on top. This adds flavor and a pop of color to your bowl. For the full recipe, refer back to the main section. Enjoy your Spicy Sriracha Tofu Bowl! To make crispy tofu, you need to press it well. Start by wrapping the block of firm tofu in a clean kitchen towel. Place a heavy object, like a cast iron pan, on top for about 20-30 minutes. This helps remove excess moisture. Next, coat the tofu cubes with cornstarch. Use about 2 tablespoons, ensuring each piece is covered. This coating creates a crunchy texture when cooked. Not everyone enjoys the same heat. If you want less spice, use only 1 tablespoon of Sriracha. You can also mix Sriracha with a bit of honey or ketchup to mellow the heat. For a different flavor, try other sauces. Chili garlic sauce or sweet chili sauce can work well too. Experiment with these options to find what you like best. To save time, prep your ingredients ahead of time. You can chop the vegetables and store them in the fridge for up to three days. Cook the rice and tofu in advance, too. Store them separately in airtight containers. This way, you can quickly assemble your Spicy Sriracha Tofu Bowl when you’re ready to eat. Enjoy the convenience of quick meals without sacrificing taste! For the full recipe, check out the Spicy Sriracha Tofu Bowl. {{image_4}} You can switch the tofu for other protein sources. Tempeh is a great choice. It has a nutty flavor and holds up well in stir-fries. Seitan is another tasty option. It mimics the texture of meat nicely. If you prefer meat, chicken or shrimp work well too. Chicken adds a mild taste, while shrimp brings a sweet, briny flavor. Both cook quickly, making your meal even faster. Feel free to change the vegetables based on the season. In spring, try snap peas or asparagus. In summer, zucchini and bell peppers shine. Winter vegetables like Brussels sprouts and kale add heartiness. You can also use frozen veggies. They save time and are often just as nutritious as fresh ones. Just make sure to thaw and drain excess water before cooking. If you need a gluten-free option, swap soy sauce for tamari. Tamari has a similar flavor but is gluten-free. For the rice, try quinoa or cauliflower rice. Both options are nutritious and add a unique texture to your bowl. Quinoa is protein-rich, while cauliflower rice is low in carbs and calories. These swaps ensure everyone can enjoy this spicy dish! For the complete recipe, check the [Full Recipe]. To keep your spicy Sriracha tofu bowl fresh, store leftovers in an airtight container. Place the bowl in the fridge within two hours of cooking. This helps keep the food safe. Your leftovers can last for up to four days in the fridge. To reheat the tofu without losing its crispness, use an oven or a skillet. If using an oven, preheat it to 350°F (175°C). Place the tofu on a baking sheet for about 10-15 minutes. If using a skillet, heat over medium heat for about 5-7 minutes, turning the tofu occasionally. This keeps it crispy and delicious. You can freeze cooked bowls if you want to save some for later. Place the cooled bowl in a freezer-safe container. It can stay frozen for up to three months. To thaw, move the bowl to the fridge overnight. Reheat it in the oven or a skillet as mentioned above. This way, you can enjoy your spicy Sriracha tofu bowl anytime! For the full recipe, check the earlier sections. To make the Spicy Sriracha Tofu Bowl vegan, swap honey for maple syrup. This simple change keeps the dish sweet and plant-based. Also, check that all products you use are vegan-friendly. For example, ensure your soy sauce is made without animal products. Yes, you can use brown rice. However, remember that brown rice takes longer to cook. It usually needs about 40-50 minutes, while jasmine rice only takes around 15 minutes. Brown rice has a nuttier taste and chewier texture. So, it can change the feel of your bowl. If you don’t have Sriracha, several substitutes work well. You can use chili garlic sauce or sambal oelek for a similar heat. You can also make a homemade version by mixing hot sauce, garlic, and a bit of sugar. This gives you control over the flavor. The spice level of this dish depends on the amount of Sriracha you use. One tablespoon adds mild heat, while two tablespoons ramp up the spice. To adjust heat to your taste, start with less and add more if you like it spicier. Always taste as you go. You can serve this bowl with a side of edamame or a fresh salad. They add nice contrast and extra crunch. For more flavor, drizzle extra Sriracha or sesame oil on top. You can also add lime juice for a zesty touch. Enjoy your meal! For the full recipe, check out the Spicy Sriracha Tofu Bowl details above. You learned how to make a tasty Spicy Sriracha Tofu Bowl. We covered each ingredient and how to prepare them. From cooking the rice to achieving crispy tofu, each step matters. Remember to adjust spices to suit your taste. Feel free to swap in different proteins or veggies to keep it fresh. Store leftovers well to enjoy later. This bowl is not just good; it’s fun to make and share. Enjoy your cooking adventure!](https://dishtreats.com/wp-content/uploads/2025/07/ee3e23f0-fb80-42df-ace0-60219f206871-768x768.webp)
![- 1 lb boneless, skinless chicken breasts - 1 cup wild rice - 1 medium onion - 2 medium carrots - 2 celery stalks - 6 cups low-sodium chicken broth - 1 cup heavy cream or coconut milk - Herbs and Spices You will need chicken breasts for protein. Wild rice brings a nice, nutty flavor. Onion, carrots, and celery add sweetness and crunch. Chicken broth gives depth. Heavy cream or coconut milk makes it rich and creamy. - 1 teaspoon dried thyme - 1 teaspoon dried rosemary - 1 teaspoon smoked paprika These herbs add a lovely aroma. Thyme and rosemary are classic pairings. Smoked paprika gives a warm, smoky touch. - Fresh parsley - Crusty artisan bread Fresh parsley brightens the soup. It looks nice and adds freshness. Pairing with crusty bread makes it even better. You can dip the bread into the soup, which is a treat! For the full recipe, check out the Comforting Chicken and Wild Rice Soup section. - Start by heating 2 tablespoons of olive oil in a large pot over medium heat. - Add 1 medium onion, 2 medium carrots, and 2 celery stalks, all finely chopped. - Sauté these vegetables for about 5 minutes until they soften and the onion turns clear. - Now, add 3 cloves of minced garlic. Stir it in and let it cook for 1 minute. - Next, mix in 1 pound of diced chicken. - Cook it for about 5 to 7 minutes until it is no longer pink. - Once the chicken is ready, add 1 cup of rinsed wild rice and 6 cups of low-sodium chicken broth. - Toss in 1 teaspoon each of dried thyme, dried rosemary, smoked paprika, and a pinch of salt and pepper. - Bring the mix to a boil, then reduce the heat. Cover the pot and let it simmer for 45 to 50 minutes. - After simmering, stir in 1 cup of heavy cream or coconut milk. - Heat it for another 5 minutes. - Taste the soup and adjust the seasoning with salt and pepper as needed. - Ladle the soup into bowls and garnish with fresh parsley before serving. For the full recipe, check out the [Full Recipe]. To boost the taste of your chicken and wild rice soup, use a mix of herbs. Thyme and rosemary work great together. They add a warm, earthy note. You can also try adding a bit of smoked paprika. It gives the soup a rich, smoky flavor that regular paprika cannot match. The soup should be thick, but not too thick. If it’s too watery, let it cook longer. Add more wild rice for a heartier texture. For creaminess, use heavy cream. If you want a lighter option, coconut milk works well. Stir it in at the end for the best results. Meal prep can save you time. Chop your veggies ahead of time and store them in the fridge. You can also cook the chicken in advance. If you have leftovers, they are perfect for future meals. Just reheat and enjoy. This soup tastes even better the next day! For the full recipe, check out the Comforting Chicken and Wild Rice Soup section. {{image_4}} You can make Chicken and Wild Rice Soup fit many diets. For a gluten-free option, use gluten-free broth. Check that the wild rice is pure and free from gluten. This soup is naturally gluten-free, so you have a great base. For dairy-free alternatives, switch heavy cream for coconut milk. This keeps the soup creamy without dairy. You can also try almond milk, but it will change the flavor a bit. Adding more vegetables boosts flavor and nutrition. Spinach adds color and more vitamins. Mushrooms give a nice earthy taste. Try adding these veggies in the last 10 minutes of cooking. If you like heat, add hot sauce. Start with a few drops and taste. This adds a nice kick without overpowering the dish. You can swap chicken for turkey. Ground turkey works well and cooks fast. For a vegetarian option, use tofu or chickpeas. Both add protein and texture. If you want a different soup, try a vegetarian wild rice soup. Use vegetable broth instead of chicken broth. This keeps the flavors bright and fresh. For the full recipe, check the earlier section. Enjoy exploring these variations! Chicken and wild rice soup lasts about 3 to 4 days in the fridge. Store it in airtight containers to keep it fresh. This way, you avoid any odd smells or tastes. Let the soup cool completely before sealing it up. This helps keep the soup's nice texture. To extend the life of your soup, freezing works great. Pour the cooled soup into freezer-safe bags or containers. Leave some space at the top for expansion. It can last up to 3 months in the freezer. When you're ready to enjoy it again, thaw overnight in the fridge. Reheat it on the stove over medium heat. Stir often to warm it evenly. Get creative with your leftovers! Try using the soup as a sauce for pasta. You can also spoon it over baked potatoes for a hearty meal. Pair it with crusty bread for a filling lunch. For a fresh twist, add a side salad or steamed veggies to your meal. These ideas help make the most of your tasty soup. If you want to explore more, check the Full Recipe for different serving ideas. Making Chicken and Wild Rice Soup takes about 1 hour and 10 minutes total. You will need around 15 minutes for prep time. The cooking time is about 50 minutes. This includes simmering the soup until the rice is tender. Yes, you can use a slow cooker for this recipe. First, sauté the veggies and chicken in a pan. Then, add all the ingredients to the slow cooker. Cook on low for 6-7 hours or on high for 3-4 hours. Stir in the cream or coconut milk at the end. This keeps it creamy and fresh. If you need an alternative to wild rice, consider using brown rice or quinoa. Both options are healthy and add great flavor. You can also use white rice, but it cooks faster. Adjust your cooking time if you use a different rice. Yes, Chicken and Wild Rice Soup is quite healthy. It includes lean chicken, veggies, and whole grains. Wild rice is high in fiber and nutrients. The soup is low in sodium if you use low-sodium broth. Plus, it provides a good source of protein and vitamins. Enjoy this dish guilt-free! This blog post covered the key ingredients for Chicken and Wild Rice Soup. It explained how to prepare, cook, and store this dish. I shared tips to boost flavor and texture, along with variations for dietary needs. In conclusion, this soup is versatile and satisfying. You can enjoy it in many ways. With these recipes and tips, you can create a warm and hearty meal that fits your needs. Happy cooking!](https://dishtreats.com/wp-content/uploads/2025/06/ba29d031-2d2c-4923-bda3-eccafd61a64a-768x768.webp)