Fresh Peach Lemonade Refreshing Summer Drink Recipe

Looking for a fun and easy way to cool off this summer? Let’s whip up a refreshing Fresh Peach Lemonade that’s bursting with flavor! With just a few simple ingredients, you can create a drink that celebrates sunny days and ripe peaches. Follow my step-by-step guide, and you’ll impress your friends, family, or even just yourself. Ready to get started? Let’s dive into this delicious recipe!
Ingredients
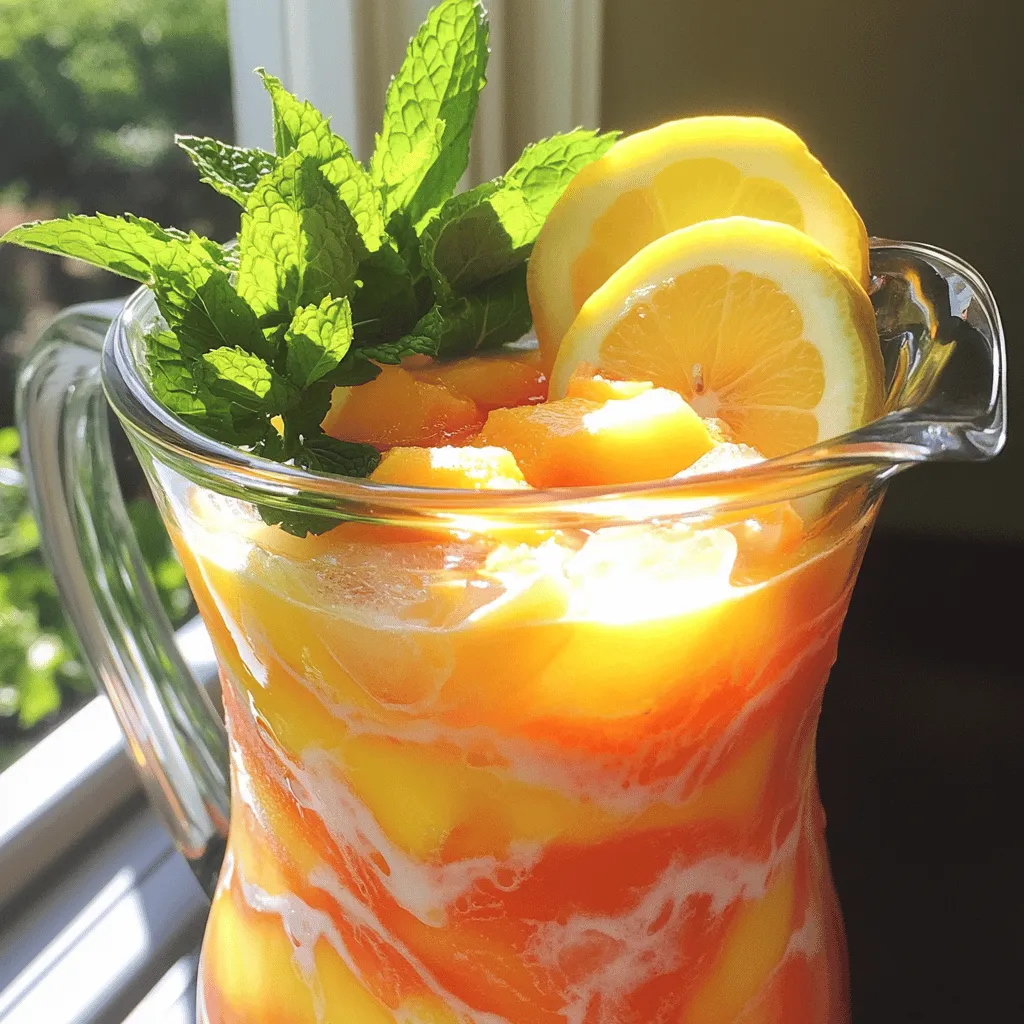
Fresh ingredients make this peach lemonade burst with flavor. Here’s what you need:
- 4 ripe peaches, pitted and diced
- 1 cup freshly squeezed lemon juice
- 1/2 cup honey or agave syrup
- 4 cups cold water
- Optional garnishes: fresh mint leaves, lemon slices, ice cubes
Using ripe peaches ensures a sweet, juicy flavor. I love picking them when they are perfectly soft. Freshly squeezed lemon juice adds the right zest. Honey or agave syrup gives it a touch of sweetness. You can adjust the sweetness based on your taste. Cold water makes it refreshing, especially on hot days.
For garnishes, fresh mint leaves not only look great but also add a nice aroma. Lemon slices add a pop of color and extra flavor. Ice cubes keep your lemonade chilled and enjoyable. Using these fresh ingredients will give you a delicious drink perfect for summer.
Step-by-Step Instructions
Preparing the Peach Puree
First, you need ripe peaches. Take four ripe peaches and dice them into small pieces. Place the diced peaches in your blender. Add one cup of cold water. Blend the mixture on high until it is smooth and creamy. Next, take a fine mesh sieve and strain the peach puree into a large pitcher. This will help you get the juice out and leave the pulp behind. Use a spatula to press down on the puree. This step ensures you extract all the delicious peach juice.
Combining Ingredients
Now, it’s time to add flavor! Pour the freshly strained peach juice into the pitcher. Next, add one cup of freshly squeezed lemon juice. This is about four to six lemons. Then, mix in half a cup of honey or agave syrup. Stir well until the sweetener fully dissolves. Finally, pour in the remaining three cups of cold water. Stir gently to combine everything. Take a sip to check the sweetness. If you want it sweeter, add more honey or agave syrup.
Chilling and Serving
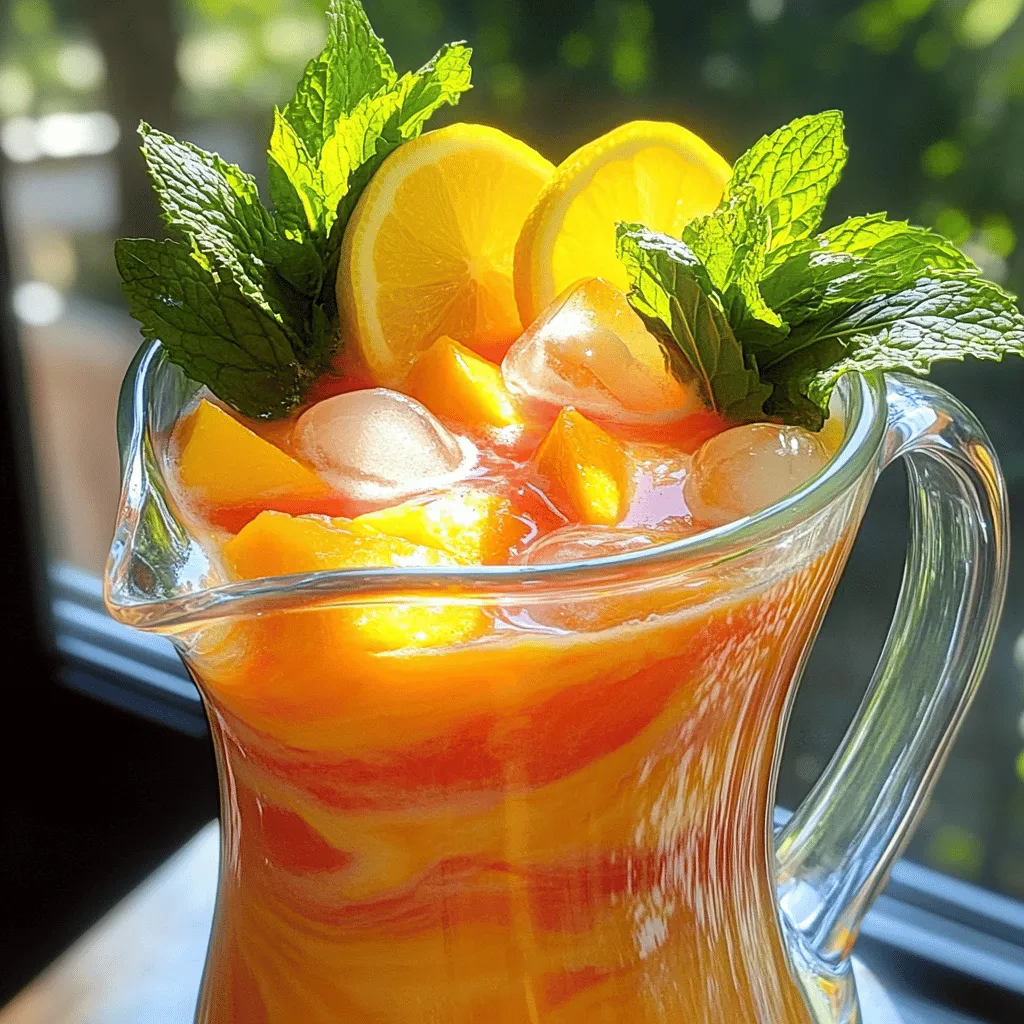
Once everything is mixed, place the pitcher in the refrigerator. Chill for at least thirty minutes. This helps the flavors come together. When you’re ready to serve, fill glasses with ice cubes. Pour the refreshing peach lemonade over the ice. For a pretty touch, garnish each glass with a slice of lemon and a few fresh mint leaves. This will make your drink look even more inviting. Enjoy every sip of this refreshing summer drink!
Tips & Tricks
Achieving the Perfect Sweetness
To make your peach lemonade just right, you can customize the sweetness. Use honey or agave syrup to find your perfect balance. Start with half a cup, then taste the lemonade. If you want it sweeter, add more sweetener. Always taste before chilling to ensure you love the flavor.
Ensuring Freshness
The key to great peach lemonade is ripe, seasonal peaches. Look for peaches that are soft but not mushy. These will give the best flavor. Serve your lemonade right away for the best taste. If you need to store it, keep it in an airtight container in the fridge.
Enhancing Presentation
A beautiful drink is more fun to enjoy. Use colorful garnishes like lemon slices and fresh mint leaves. They add a nice touch. For an extra cool experience, chill your glasses before pouring in the lemonade. This keeps your drink cold and refreshing longer.

Variations
Fruit Combinations
You can mix in other fruits like strawberries or raspberries. These fruits add a new twist to your peach lemonade. I love the bright colors they bring. You can create a mixed berry lemonade twist. Simply blend your choice of berries with the peaches. This mix gives a gorgeous hue and a burst of flavor.
Flavor Add-ins
You can experiment with herbs like basil or rosemary. Adding fresh herbs can enhance the drink’s aroma and taste. Basil provides a sweet, peppery flavor, while rosemary gives a warm touch. You might also try adding ginger or lemon zest for extra zing. Ginger adds a spicy kick, while lemon zest brightens the drink. These small changes make it even more refreshing and fun.
Sweetener Alternatives
If you want a different flavor profile, use maple syrup instead of honey. Maple syrup gives a warm, earthy taste. It pairs well with peaches and lemon. You could also consider using stevia for a sugar-free option. Stevia is a natural sweetener that won’t add calories. It’s a great choice for those watching their sugar intake.
Storage Info
How to Store Leftover Lemonade
Keep leftover lemonade in an airtight pitcher in the refrigerator. This helps maintain its fresh taste. Consume it within 3-4 days for the best flavor. After that, it may lose its bright taste and aroma.
Freezing Options
You can freeze leftover lemonade in ice cube trays for later use. This is a great way to save extra lemonade. You can toss these cubes into drinks or use them in smoothies. They add a refreshing twist to any drink and make slushies easy to create. Just blend the frozen lemonade cubes with some fruit for a quick treat.
FAQs
Can I use frozen peaches for this recipe?
Yes, but ensure they are thawed and drained before blending. Frozen peaches can work well. They are great if fresh ones are not available. Just make sure they are soft enough to blend smoothly.
How can I make this recipe vegan?
Swap honey for agave syrup or another vegan sweetener. Agave syrup is a wonderful option. It provides sweetness without animal products. You can also use maple syrup or coconut sugar if you prefer.
Is it possible to adjust the tartness?
Yes, add more sweetener to balance the tartness of the lemons. If you find it too sour, simply mix in more honey or agave syrup. This way, you can find the perfect taste for your lemonade.
Can I prepare this in advance?
Yes, it’s best to prepare it a few hours ahead for optimal flavor integration. Making it in advance allows the flavors to meld together. This step will make every sip even more enjoyable!
In this blog post, we explored how to make a refreshing peach lemonade. We covered fresh ingredients needed for the best taste. We also provided step-by-step instructions to prepare it perfectly. Tips included how to achieve ideal sweetness and ways to enhance its look. You can try fun variations or store leftovers for later use. Making this tasty drink is easy and rewarding. Enjoy your homemade peach lemonade anytime you crave something sweet and cool!


![- 12 ounces of spaghetti or linguine - 4 cups of vegetable broth - 1 tablespoon of olive oil - 6 cloves of garlic, finely minced - 1 teaspoon of red pepper flakes - Zest of 1 lemon - Juice of 2 fresh lemons - 1 cup of cherry tomatoes, halved - 1 cup of fresh spinach leaves - 1/2 cup of grated Parmesan cheese - Salt and freshly ground black pepper to taste - Fresh parsley, chopped for garnish Gathering the right ingredients is key for One-Pot Lemon Garlic Pasta. Each item plays a role in creating a bright and tasty dish. The spaghetti or linguine serves as the base. The vegetable broth gives it depth and flavor. Olive oil adds richness, while garlic brings a punch. Red pepper flakes add just a hint of heat. Next, the lemon zest and juice bring brightness. Cherry tomatoes offer sweetness and color. Fresh spinach adds a pop of green and nutrition. Parmesan cheese gives a creamy finish. Finally, don’t forget salt and pepper to enhance all the flavors. - Use nutritional yeast instead of Parmesan cheese for a vegan option. - Try gluten-free pasta like brown rice or quinoa pasta. If you want to make this dish vegan, swap out the cheese for nutritional yeast. It adds a similar nutty flavor without dairy. For those who need gluten-free options, plenty of pasta choices exist. You can use brown rice or quinoa pasta for a tasty alternative. This recipe stays flexible while keeping its delicious essence. Enjoy exploring these options as you cook! First, heat one tablespoon of olive oil in a large pot over medium heat. Once the oil is hot, add six cloves of finely minced garlic and one teaspoon of red pepper flakes. Sauté this mix for about one to two minutes. Stir it often to avoid burning the garlic. Burnt garlic can ruin the flavor of your dish. Next, pour in four cups of vegetable broth. Then, add the zest of one lemon and the juice of two fresh lemons. Stir gently to mix everything well. The lemon adds a bright flavor that makes this dish special. Now, bring the mixture to a rolling boil. Carefully add twelve ounces of spaghetti or linguine. Make sure the pasta is fully submerged in the broth. This helps it cook evenly. Reduce the heat to a gentle simmer. Cook the pasta while stirring occasionally for about ten to twelve minutes. You want it to be al dente, which means it should be firm to the bite. Most of the liquid should be absorbed by now. After the pasta is cooked, add one cup of halved cherry tomatoes and one cup of fresh spinach. Cook for an additional two to three minutes. Stir until the spinach wilts and the tomatoes soften slightly. Remove the pot from the heat. Stir in half a cup of grated Parmesan cheese. This will give your pasta a creamy texture. Taste it and season with salt and freshly ground black pepper as needed. Allow the pasta to rest for a couple of minutes in the pot. This helps it thicken slightly before serving. For the full recipe, check out the details provided above. Enjoy your flavorful one-pot lemon garlic pasta! To cook pasta al dente, follow these steps: - Use plenty of water for boiling. - Check the pasta package for cooking times. - Taste a piece a minute before the time is up. To avoid burnt garlic, do this: - Keep the heat at medium. - Stir the garlic often. - As soon as it smells good, move to the next step. If you want a zesty kick, add more lemon juice. - Start with an extra half lemon. - Taste and add more if needed. To balance spices, try adding fresh herbs. - Basil or thyme work well. - Chop them finely and mix in before serving. For best pairings, serve with a crisp salad. - A simple green salad brightens the meal. - Garlic bread makes a great side, too. For a nice presentation, use shallow bowls. - Garnish with parsley and extra cheese. - A sprinkle of red pepper flakes adds color. Check the Full Recipe for more details and tips on making this dish shine! {{image_4}} You can make One-Pot Lemon Garlic Pasta even more filling by adding protein. Grilled chicken is a great choice. Just slice it thin and mix it in before serving. Shrimp is another tasty option. Simply cook the shrimp in the pot for a few minutes until they turn pink. If you want a plant-based option, try chickpeas. They are easy to add and packed with protein. Use a can of chickpeas, rinse them, and stir them in with the pasta. They will soak up the lemon flavor and add a nice texture. Using seasonal vegetables can brighten your dish. Fresh veggies add color and nutrition. In spring, consider asparagus or peas. In summer, zucchini or bell peppers work well. You can also substitute spinach with kale or arugula. These greens offer a different taste and texture. Just chop them and add them in the last few minutes of cooking. You can change the sauce to suit your taste. For a creamy lemon sauce, add a splash of cream after cooking. This gives the pasta a rich flavor. If you prefer a dairy-free option, use coconut milk instead. Another way to deepen the flavor is by adding a splash of white wine. Pour it in before the broth. This adds a nice depth that complements the lemon. Just let it cook down for a minute before adding the rest of the ingredients. These variations will keep your One-Pot Lemon Garlic Pasta exciting and new each time you make it. For the complete recipe, check out [Full Recipe]. You can store One-Pot Lemon Garlic Pasta in the fridge for about three days. To keep it fresh, place it in an airtight container. When reheating, add a splash of water or broth to prevent it from drying out. Heat it gently on the stove or in the microwave, stirring often. This keeps the pasta creamy and tasty. If you want to freeze One-Pot Lemon Garlic Pasta, let it cool completely first. Transfer it to a freezer-safe container. It can last for up to three months in the freezer. When you are ready to eat, move it to the fridge to thaw overnight. Reheat it on the stove with a little broth or water. This helps regain its original texture and flavor. Enjoy your meal without fuss! I recommend using spaghetti or linguine for this dish. These shapes cook well and absorb the lemon-garlic flavors nicely. You can also try fettuccine or thin spaghetti if you like. Choose your favorite type based on what you have at home. Yes! You can use gluten-free pasta like brown rice or chickpea pasta. These options hold up well in the dish and taste great. Be sure to check the cooking time, as gluten-free pasta may vary. If you want less heat, simply reduce the red pepper flakes. You can start with half a teaspoon and add more if you want. You can also replace them with a pinch of black pepper for flavor without the heat. This pasta pairs well with a fresh salad or garlic bread. A simple green salad with lemon vinaigrette adds a nice touch. You can also serve it with grilled vegetables or a light protein like chicken or shrimp. Enjoy your meal! This blog post shared a simple recipe for One-Pot Lemon Garlic Pasta. You learned about the key ingredients, including pasta, broth, and fresh veggies. I offered tips on cooking techniques, flavor enhancements, and ways to add protein. You also found storage tips and answers to common questions. This dish is easy to make and great for any meal. Enjoy experimenting with your favorite ingredients and variations!](https://dishtreats.com/wp-content/uploads/2025/07/777f1442-06da-446c-8bc8-b5c2e5ded698-768x768.webp)


![To make the best pumpkin spice muffins, you need the following key ingredients: - 1 cup pumpkin puree - 1/2 cup brown sugar - 1/2 cup granulated sugar - 1/3 cup vegetable oil - 2 large eggs - 1 teaspoon vanilla extract - 1 1/2 cups all-purpose flour - 1 teaspoon baking soda - 1 teaspoon baking powder - 2 teaspoons pumpkin pie spice - 1/2 teaspoon salt These ingredients create a fluffy, moist muffin that bursts with autumn flavor. The pumpkin puree adds natural sweetness and moisture. Brown sugar gives a rich, caramel taste, while the spices bring warmth and comfort to each bite. You can make your muffins even better with these optional ingredients: - 1/2 cup chopped walnuts or pecans - 1/2 cup chocolate chips Adding nuts gives a nice crunch, while chocolate chips add sweetness. Feel free to mix and match based on your taste. You can even leave them out for a classic muffin. Accurate measurement is key to great baking. Here’s how to measure your ingredients correctly: - Flour: Use a spoon to fill your measuring cup, then level it off with a knife. - Brown Sugar: Pack it firmly into the cup for proper measurement. - Liquid Ingredients: Use a liquid measuring cup and check at eye level for accuracy. Following these tips ensures your muffins turn out perfectly every time. For the full recipe, check out the details above and get ready to bake your delicious pumpkin spice muffins! Start by preheating your oven to 350°F (175°C). This step is key for even baking. Next, prepare a standard muffin tin. You can use paper liners or spray each cup with non-stick spray. This will make it easy to remove the muffins later. In a large bowl, combine the pumpkin puree, brown sugar, granulated sugar, and vegetable oil. Add in the eggs and vanilla extract. Whisk these together until smooth. Make sure there are no lumps. This mix gives your muffins their rich flavor. In another bowl, sift together the all-purpose flour, baking soda, baking powder, pumpkin pie spice, and salt. Sifting helps to mix and aerate the flour. It makes for a lighter muffin. This mix is important for texture. If you want to add some extra texture, gently fold in chopped walnuts or pecans. You can also add chocolate chips for a sweet touch. Be careful not to overmix; just combine until they’re evenly spread in the batter. Now, spoon the muffin batter into the prepared tin. Fill each cup about 3/4 full. This allows room for the muffins to rise. Bake for 18-20 minutes. Check if they’re ready by inserting a toothpick in the center. If it comes out clean, they’re done! Let them cool in the tin for 5 minutes before moving them to a wire rack. This cooling step is essential for the best texture. For the complete recipe, check out the [Full Recipe]. To keep muffins light and fluffy, don’t overmix the batter. When you combine wet and dry ingredients, mix just until you see no dry flour. A few lumps are okay. Overmixing makes muffins tough. Also, ensure your baking powder and baking soda are fresh. Old leavening agents won't help the muffins rise. Store your pumpkin spice muffins in an airtight container. This keeps them soft and moist. You can keep them at room temperature for up to three days. For longer storage, place them in the fridge for a week. If you want to save them for later, freeze them. Wrap each muffin in plastic wrap before placing them in a freezer-safe bag. They can last for up to three months in the freezer. Presentation makes any dish more inviting. For a lovely touch, sprinkle powdered sugar on top of each muffin. Serve them on a pretty platter. You can also add a small bowl of softened butter for easy spreading. This makes your muffins look even more delicious and inviting. {{image_4}} You can make gluten-free pumpkin spice muffins easily. To do this, swap regular flour with gluten-free flour. Look for blends that work well in baking. These blends often include almond flour or coconut flour. Check the package to ensure it has a good flavor. The muffins will still taste great! The texture may vary slightly, but they will remain soft and delicious. If you want vegan muffins, you can make some simple changes. Replace eggs with flax eggs. To make a flax egg, mix 1 tablespoon of ground flaxseed with 2.5 tablespoons of water. Let it sit for about 5 minutes until it thickens. Use plant-based oil instead of vegetable oil. You can also use almond milk or another plant-based milk instead of regular milk. These muffins will be light and fluffy, just like the classic recipe. You can jazz up your pumpkin spice muffins with extra flavors. Try adding maple syrup for a sweet twist. Just reduce the sugar a little to balance it out. You can also add orange zest for a fresh, bright taste. A teaspoon of orange zest will give the muffins a nice citrus kick. Feel free to get creative! You can mix and match these flavors to find your favorite combination. These variations can make your pumpkin spice muffins even more special. Check out the full recipe to get started! To keep your pumpkin spice muffins fresh, store them in an airtight container. Place a paper towel in the container to absorb moisture. This helps prevent sogginess. Store them at room temperature for up to three days. If you want to keep them longer, consider freezing. Freezing is a great way to save your muffins. Start by letting them cool completely. Then, wrap each muffin in plastic wrap. Place the wrapped muffins in a freezer-safe bag. Label the bag with the date. You can freeze them for up to three months. To enjoy your muffins warm, reheat them in the oven. Preheat your oven to 350°F (175°C). Place the muffins on a baking sheet. Heat for 10 to 15 minutes. You can also use a microwave for quick reheating. Just warm them for 15 to 20 seconds. Enjoy your pumpkin spice muffins fresh! Yes, you can use canned pumpkin. It saves time and gives great flavor. Make sure to choose 100% pure pumpkin, not pumpkin pie filling. This keeps the taste just right. Canned pumpkin is often smoother, which helps in mixing. It also has a longer shelf life. So, if you have a can, use it! For eggs, you can use several substitutes. Common options include: - 1/4 cup unsweetened applesauce - 1/4 cup mashed banana - 1 tablespoon ground flaxseed mixed with 2.5 tablespoons water These options keep your muffins moist and fluffy. They also add a hint of flavor. Choose what fits your taste best! Check your muffins after 18 minutes. Insert a toothpick into the center. If it comes out clean or with a few crumbs, they are done. If the toothpick is wet, bake for 1-2 more minutes. Keep an eye on them to avoid overbaking. Perfect muffins should be soft and lightly golden. Absolutely! To make mini muffins, use a mini muffin tin. Fill each cup about halfway. Bake them for 10-12 minutes. Keep checking with a toothpick until they are done. Mini muffins are great for snacks and sharing. They are just as tasty and fun! For the full recipe, check out the details above. In this post, we explored how to make delicious pumpkin spice muffins. I covered the essential and optional ingredients, along with measuring them for great results. The step-by-step instructions guide you through prepping, mixing, and baking. I also shared tips for light muffins and ways to store them well. Finally, I offered tasty variations like gluten-free and vegan options. Now you’re ready to enjoy these warm, flavorful treats any time! Your perfect pumpkin spice muffin awaits.](https://dishtreats.com/wp-content/uploads/2025/06/e45c4b1d-a4d2-42b5-b442-a33a757785ba-768x768.webp)
![- 1 can (15 oz) black beans, thoroughly rinsed and drained - 1 cup sweet corn (use fresh, frozen, or canned) - 1 large red bell pepper, diced into bite-sized pieces - 1 ripe avocado, diced - 1/2 medium red onion, finely chopped for a milder flavor - 1 cup cherry tomatoes, halved for bursts of sweetness - 1/4 cup fresh cilantro, finely chopped for an aromatic touch The foundation of my zesty black bean salad lies in the fresh ingredients. Black beans serve as the protein-packed base. They add a creamy texture and earthy flavor. Sweet corn brings a pop of sweetness, balancing the dish. A red bell pepper adds crunch and color. Diced avocado gives a rich, buttery taste. Finely chopped red onion adds a mild bite, while halved cherry tomatoes provide juicy bursts. Finally, fresh cilantro adds a bright finish, tying all the flavors together. - 2 tablespoons freshly squeezed lime juice - 1 tablespoon high-quality olive oil - 1 teaspoon ground cumin for warmth - 1 teaspoon garlic powder for depth - Salt and freshly cracked black pepper to taste The dressing is key to making the salad come alive. Fresh lime juice adds a zesty kick. Olive oil brings richness and ties the salad together. Ground cumin adds a warm, earthy note. Garlic powder deepens the flavor profile. Finally, salt and black pepper enhance all the tastes, making each bite delightful. - Portion size and garnishes - Optional accompaniments For serving, I like to present the salad in a large, colorful bowl. This makes it inviting and fun. You can also portion it into individual cups for a neat look. Garnish with extra cilantro leaves and lime wedges for a fresh touch. This salad pairs well with grilled chicken or fish. It also makes a great filling for wraps or tacos. Enjoy the zesty flavors and vibrant colors! For the full recipe, check out the details above. To start, grab a big mixing bowl. Add the rinsed black beans, sweet corn, diced red bell pepper, diced avocado, finely chopped red onion, halved cherry tomatoes, and chopped cilantro. Mix them all together well. Make sure each ingredient spreads out. This ensures every bite is full of flavor. Next, take a small bowl. In it, whisk together the freshly squeezed lime juice, olive oil, ground cumin, garlic powder, and a good pinch of salt and black pepper. Keep whisking until the dressing is smooth and well mixed. This mixture will bring out the best in the salad. Now, drizzle the dressing over your salad mixture. Using a large spoon or spatula, gently toss everything together. You want each piece coated with that zesty dressing. After tossing, taste the salad. You can add more lime juice or salt if needed. Let the salad sit for 10-15 minutes at room temperature. This resting time helps all the flavors blend nicely before you serve it. Check out the Full Recipe to see all the details! To make your Zesty Black Bean Salad shine, adjust the seasoning to suit your taste. Start with a little salt and pepper, then taste. If it needs more, add gradually until it’s perfect. You can also squeeze in a splash of extra lime juice. This adds brightness and makes the flavors pop. Using canned ingredients can save you time. Canned black beans and corn are quick and easy. Just rinse and drain them well. If you prefer fresh, that’s great too! Prepping ingredients in advance can also help. Chop your veggies the day before. Store them in the fridge until you’re ready to mix. Serving style can make your salad more appealing. Use a large, colorful bowl to showcase the bright ingredients. You can also serve it in cups for individual portions. Garnish with extra cilantro leaves and lime wedges. This adds a fresh look and invites guests to enjoy your creation. For the full recipe, check the details above! {{image_4}} You can easily swap beans in this salad. Try pinto beans or kidney beans for a different taste. Each bean brings its own flavor and texture. Adding or substituting vegetables can change the salad’s vibe. Consider diced cucumber for crunch or chopped jalapeño for heat. Roasted red peppers can add a smoky note. Use what you like! This salad is vegan and gluten-free. It fits well into many diets. If you want more protein, add grilled chicken or shrimp. Both options pair great with the zesty flavors. You can also use tofu or tempeh for a plant-based protein boost. Both options add texture while keeping it healthy. Want to mix up the dressing? Try a simple vinaigrette with balsamic vinegar instead of lime juice. It adds a sweet tang. You could also use a creamy dressing, like ranch or avocado dressing. This change can make the salad richer and more filling. For a spicy kick, add some hot sauce to your dressing. Experiment to find your favorite combination! For the full recipe and more ideas, check the [Full Recipe]. Store Zesty Black Bean Salad in an airtight container. Glass containers work best, but plastic ones are fine too. Make sure everything is sealed tight. This keeps the flavors fresh. Keep the salad in the fridge for the best taste. To batch prepare, mix all ingredients except avocado. Add avocado just before serving. This keeps it from browning. You can store the salad for up to three days. After that, it may lose its crunch and flavor. You can freeze black bean salad, but I don’t recommend it. Freezing changes the texture of the ingredients. If you decide to freeze it, do so without avocado. To thaw, place the salad in the fridge overnight. This helps it retain some freshness. Yes, you can make this salad ahead of time. It tastes even better after resting. To prep, mix all the salad ingredients in a bowl. Keep the dressing separate until you're ready to serve. This keeps the salad fresh and crunchy. Store the salad in a sealed container in the fridge. It can last up to two days. Just remember to add the dressing just before serving. This salad pairs well with many dishes. Try serving it with grilled chicken or fish for a complete meal. You can also enjoy it with tacos or burritos for a fun twist. It works great as a side dish for barbecues. If you want a lighter meal, serve it with whole-grain pita bread. The flavors blend well with many cuisines. Yes, this salad is very healthy! Black beans are rich in protein and fiber, which help you feel full. They also support heart health and digestion. The fresh veggies add vitamins and minerals. Avocado provides healthy fats that are good for your skin. The lime juice boosts your vitamin C intake. Overall, this salad is a great choice for a nutritious meal. For the full recipe, check out the vibrant Zesty Black Bean Salad! This blog post covered the essentials for making a delicious black bean salad. We explored fresh ingredients, dressings, serving ideas, and tips for great flavor. You can customize it to fit your taste and dietary needs, too. Remember to store your salad properly for freshness. A well-made salad can be a healthy, tasty dish that fits into your meal plans. Enjoy your cooking and delight in each bite of your Zesty Black Bean Salad!](https://dishtreats.com/wp-content/uploads/2025/07/dc2c0f53-4615-45f1-afed-f531318cc377-768x768.webp)
