Fresh Peach Crisp Delightful and Easy to Make Recipe

If you’re craving a sweet, juicy treat, you’ve come to the right place! This Fresh Peach Crisp recipe combines ripe, fresh peaches with a crunchy oat topping, all while being super easy to make. Perfect for summer gatherings or cozy nights at home, it’s a dish that will impress every time. Let’s dive into the simple steps and tips to create this delightful dessert that will have you coming back for seconds!
Ingredients
Fresh Peaches
For this crisp, use 6 ripe peaches. These juicy fruits bring a sweet and tangy flavor. They should be soft but firm. Slice them thinly to help with even cooking. Fresh peaches give the best taste, but you can also use frozen ones if needed.
Dry Ingredients
Gather the following dry ingredients:
- 1 cup rolled oats
- 1/2 cup all-purpose flour (or almond flour for a gluten-free option)
- 1/2 cup packed brown sugar
- 1/4 cup granulated sugar
- 1 teaspoon ground cinnamon
- 1/4 teaspoon ground nutmeg
- 1/4 teaspoon salt
These ingredients create a lovely, crumbly topping for the crisp. The oats add texture, while the sugars provide sweetness. Spices like cinnamon and nutmeg give warm flavors that pair well with peaches. You can adjust the sugar based on your taste.
Optional Serving Suggestions
To make your peach crisp even better, consider these serving ideas:
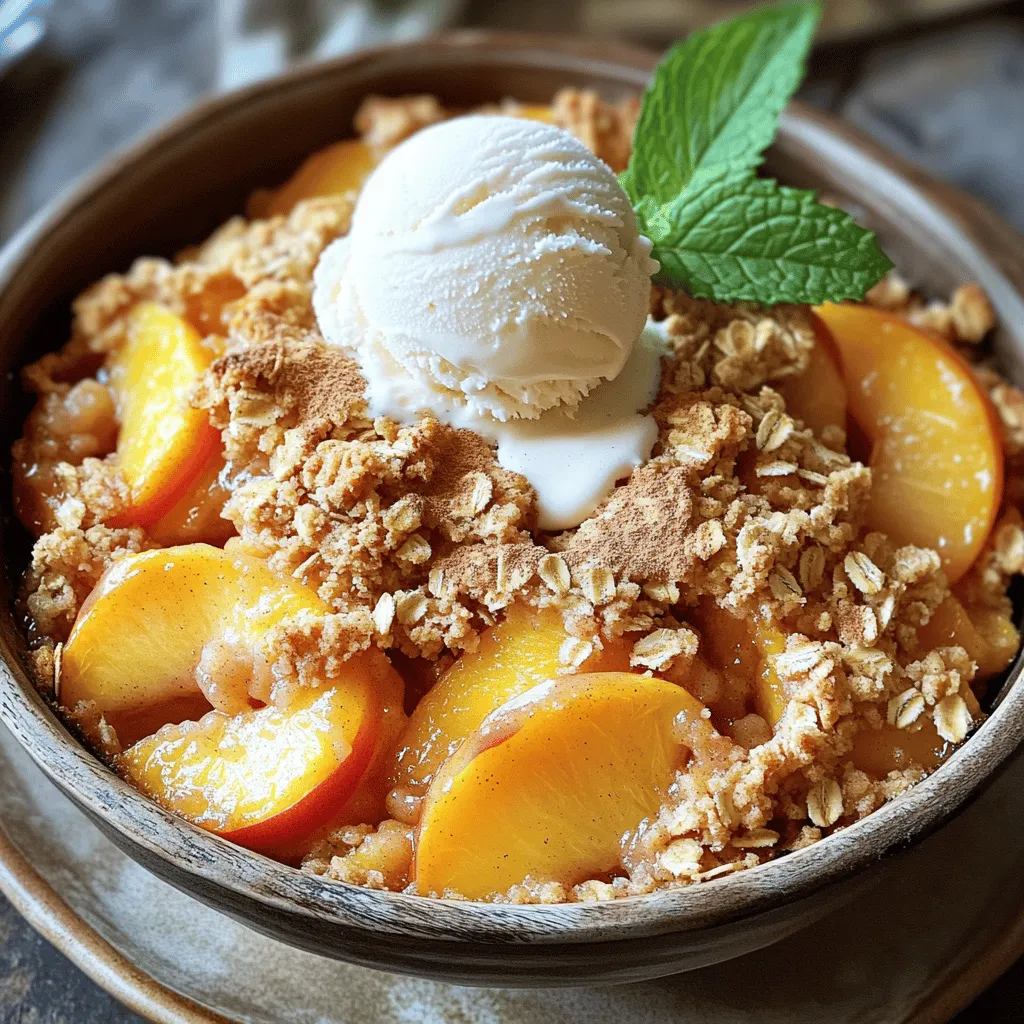
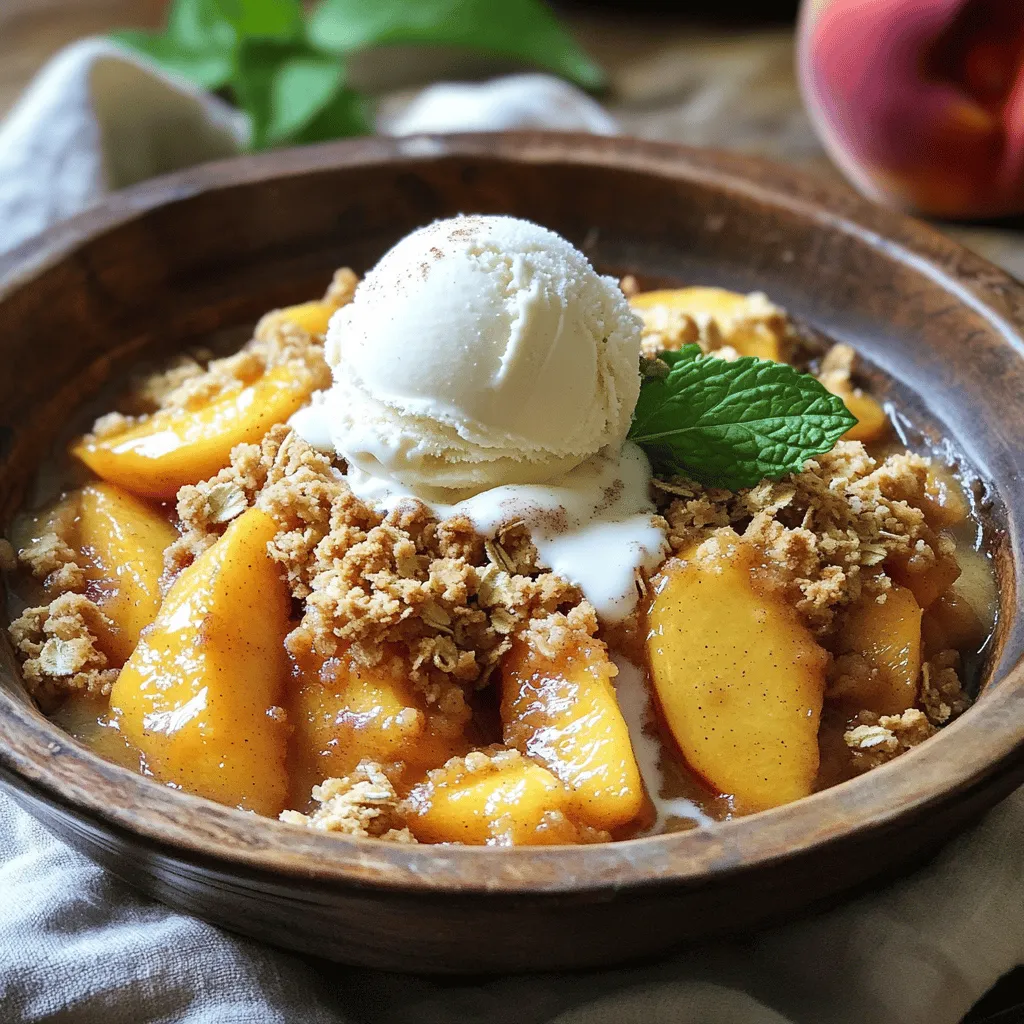
- Top with a scoop of vanilla ice cream
- Add a dollop of fresh whipped cream
These options add creaminess and contrast to the warm fruit. You can also sprinkle some chopped nuts for extra crunch. Enjoy your delicious peach crisp with these simple enhancements!
Step-by-Step Instructions
Prepping the Peaches
Start with fresh, ripe peaches. Wash them well under cool water. Slice the peaches into thin wedges. Remove the pit as you go. In a large bowl, mix the sliced peaches with granulated sugar and vanilla extract. Gently toss the peaches. This step helps to bring out their sweet flavor. Once mixed, pour the peach mixture into a greased 8×8 inch baking dish. Spread the peaches evenly across the bottom.
Making the Oat Topping
In another bowl, combine rolled oats, flour, brown sugar, ground cinnamon, ground nutmeg, and salt. Stir these dry ingredients until they blend well. Then, drizzle melted butter over the oat mix. Mix it gently until it looks like coarse crumbs. This gives your topping a nice texture when baked. Make sure every bit of the dry mix is moistened.
Baking the Crisp
Now it’s time to bake! Evenly distribute the crumbly oat topping over the peaches in the baking dish. Preheat your oven to 350°F (175°C). Bake the crisp for 30-35 minutes. Look for a golden-brown topping and bubbling juices around the edges. This means it’s ready! Once baked, take it out and let it cool for 5-10 minutes. This helps the juices settle and makes serving easier. Serve warm with ice cream or whipped cream for an extra treat. Enjoy this delightful peach crisp recipe!
Tips & Tricks
Achieving the Perfect Texture
To get a great texture for your peach crisp, focus on the oats. Use rolled oats for the topping. They create a chewy, crunchy layer. Make sure to mix the oats with flour and sugar well. This helps them blend nicely. When you drizzle melted butter, stir until it looks crumbly. If it’s too wet, it will bake into a soggy mess. Aim for dry crumbs that will crisp up in the oven.
Enhancing Flavor
To enhance the peach flavor, use ripe, juicy peaches. The fresher, the better! Toss the peaches with granulated sugar and vanilla extract. This simple step boosts the sweetness and aroma. You can also add spices like cinnamon and nutmeg to the topping. These spices add warmth and depth to the dish. A pinch of salt in the topping balances the sweet flavors perfectly. Don’t skip these little details; they make a big difference.
Serving Suggestions for Peach Crisp
When serving your peach crisp, presentation matters. Serve it warm in individual bowls. A scoop of vanilla ice cream or a dollop of fresh whipped cream is a must. The cold cream melts into the warm crisp, creating a sweet delight. You can also garnish with fresh mint for a pop of color. This makes your dish look beautiful and inviting.

Variations
Gluten-Free Options
You can make this peach crisp gluten-free with a simple swap. Use almond flour instead of all-purpose flour. This change keeps the crisp tasty and light. It also adds a nice nutty flavor. Make sure to check that your oats are certified gluten-free. This way, everyone can enjoy this dessert.
Adding Fruits or Nuts
Mixing in other fruits makes your crisp unique. Try berries, like blueberries or raspberries. Cherries also work well with peaches. If you like nuts, consider adding chopped walnuts or pecans. Just sprinkle them on top of the oat mixture before baking. This addition gives a nice crunch and flavor contrast.
Flavor Infusions
You can easily change up the flavors in your crisp. Add a splash of lemon juice for brightness. A little almond extract can also enhance the peach flavor. If you love spices, try adding a pinch of ginger or cardamom. These spices create an exciting twist on the classic recipe. Explore these options to make your peach crisp truly your own!
Storage Info
Storing Leftovers
After enjoying your peach crisp, store leftovers in an airtight container. This keeps the crisp fresh. Place it in the fridge for up to three days. If you want to save it longer, freezing is a great option.
Freezing the Peach Crisp
You can freeze the peach crisp for later use. First, let it cool completely. Then, cover it well with plastic wrap and aluminum foil. It will stay good in the freezer for up to three months. When you are ready to enjoy it, just thaw it in the fridge overnight.
Reheating Instructions
To reheat, preheat your oven to 350°F (175°C). Place the peach crisp in an oven-safe dish. Cover it loosely with foil to prevent it from burning. Heat for about 20 minutes, or until warmed through. If you like, add some fresh ice cream on top when serving. This makes it even more delightful!
FAQs
Can I use frozen peaches for this recipe?
Yes, you can use frozen peaches. Just thaw them first. Drain any extra juice before mixing. This keeps your crisp from becoming too watery.
How do I know when the peach crisp is done?
Your peach crisp is done when the topping is golden brown. You should see bubbles around the edges. A good bake time is 30 to 35 minutes.
What can I substitute for the butter?
If you want to skip butter, try coconut oil or applesauce. Both give a nice texture. Use the same amount as the butter in the recipe. For a dairy-free option, coconut oil works great.
In this blog post, we explored how to make a delicious peach crisp. We covered fresh peach prep, dry ingredients, and tasty serving ideas. You learned step-by-step instructions and tips for the best texture and flavor. We even shared variations for gluten-free options and how to store leftovers. Remember, you can swap ingredients to suit your taste. Enjoy this treat and impress your friends and family with your baking skills. Peach crisp is a simple dessert everyone will love. Happy baking!


![- 4 boneless, skinless chicken thighs - 1 cup teriyaki sauce - 1/2 fresh pineapple, sliced into 1/2-inch rings - 2 tablespoons soy sauce - 1 tablespoon brown sugar - 1 teaspoon freshly grated ginger - 2 cloves garlic, finely minced - 1 tablespoon sesame oil - 1 tablespoon rice vinegar - 2 green onions, finely chopped - Sesame seeds Gathering the right ingredients is key for Grilled Pineapple Teriyaki Chicken. Start with fresh chicken thighs. They stay juicy and tender when grilled. You can use store-bought or homemade teriyaki sauce. I often prefer making my own, as it gives a fresh taste. Next, you want ripe pineapple. Choose one that feels heavy and smells sweet. The sweetness will balance the salty teriyaki sauce. For the marinade, you need a few simple items. Soy sauce adds saltiness, while brown sugar gives a nice caramel note. Ginger and garlic bring warmth and depth. Sesame oil adds a nutty flavor, and rice vinegar gives a bit of tang. Finally, for garnishing, chop green onions for color and freshness. A sprinkle of sesame seeds adds a nice crunch. These ingredients come together to create a vibrant, tasty dish. For the full recipe, check the provided link. First, gather your ingredients for the marinade. In a bowl, mix teriyaki sauce, soy sauce, brown sugar, grated ginger, minced garlic, sesame oil, and rice vinegar. Whisk these together until smooth. Add the chicken thighs and coat them well with the marinade. Cover the bowl with plastic wrap and put it in the fridge. Let the chicken marinate for at least 30 minutes. For more flavor, let it marinate for up to 2 hours. While the chicken marinates, preheat your grill to medium-high heat. If you’re using charcoal, wait for the coals to glow red. This will ensure even grilling and great flavor in your chicken. Now it's time to grill the pineapple. Take your pineapple rings and brush both sides with teriyaki sauce. Once the grill is hot, place the pineapple on it. Grill for about 3-4 minutes on each side. You want to see nice grill marks and a caramelized look. When done, set the grilled pineapple aside on a plate. Next, take the chicken thighs out of the fridge. Let any extra marinade drip off. Place the chicken on the hot grill. Cook for about 5-7 minutes per side. Aim for an internal temperature of 165°F (75°C). In the last few minutes, brush on more marinade for added flavor. When the chicken is cooked, take it off the grill. Let it rest for a few minutes. This helps keep the juices inside. To serve, place a grilled pineapple ring on each plate. Top it with a grilled chicken thigh. For a beautiful touch, sprinkle chopped green onions and sesame seeds on top. Enjoy your meal! For the full recipe, check out [Full Recipe]. For juicy chicken, preheat your grill to medium-high heat. This temperature helps create a nice sear on the chicken. A hot grill also locks in moisture, making the meat tender. If using charcoal, wait until the coals glow red and spread evenly for the best result. The marinade is key to great flavor. I suggest marinating the chicken for at least 30 minutes. This time allows the flavors to soak in. For an even richer taste, let it marinate for up to 2 hours. Just remember, don’t go over 2 hours, or the chicken might turn mushy. When picking a pineapple, look for one that feels heavy for its size. The skin should be golden and slightly soft at the base. A ripe pineapple smells sweet at the bottom. Avoid ones that are too green or have brown spots. A good pineapple adds the perfect touch to your grilled chicken. For more details and to try the dish, check out the Full Recipe. {{image_4}} You can easily swap chicken for other proteins. Try pork tenderloin or shrimp for a tasty twist. Tofu is a great choice for a vegetarian option. Just make sure to press the tofu to remove extra moisture. This helps it absorb the marinade better. No matter what protein you choose, aim for similar cooking times for best results. Want to kick up the flavor? Add red pepper flakes for heat or lime juice for zest. You can also mix in a dash of sesame seeds or a splash of orange juice for sweetness. Experimenting with spices like smoked paprika or five-spice powder can add depth. This way, you can create a unique flavor profile each time. Pair your grilled pineapple teriyaki chicken with steamed rice or a fresh salad. Jasmine rice complements the dish's sweetness well. For salads, consider a mix of greens with a light vinaigrette. You can also serve it with grilled vegetables for added color and nutrition. These options enhance your meal and make it more satisfying. For the full recipe, check out the details above. Store your Grilled Pineapple Teriyaki Chicken in an airtight container. This keeps it fresh and prevents odors from mixing. The chicken and pineapple can last in the fridge for about 3 to 4 days. Always let the chicken cool down before sealing it. This helps avoid condensation inside the container. To freeze your grilled chicken and pineapple, first, let them cool completely. Wrap each piece tightly in plastic wrap. Then place them in a freezer bag or a container. This keeps air out and prevents freezer burn. You can freeze it for up to 3 months. Label the bags with the date for easy tracking. To reheat your chicken, use the oven or stovetop. Preheat your oven to 350°F (175°C). Place the chicken in a baking dish and add a splash of water or broth. Cover it with foil. Heat for about 15-20 minutes until warm. For stovetop, use a skillet over medium heat. Add a bit of oil and warm the chicken gently. Avoid high heat to keep it juicy. You can make teriyaki sauce easily at home. Here’s how: - 1 cup soy sauce - 1/2 cup brown sugar - 1/4 cup rice vinegar - 2 tablespoons sesame oil - 1 teaspoon grated ginger - 2 cloves minced garlic Combine all these ingredients in a saucepan. Heat over medium until the sugar dissolves. Stir it well, and let it simmer for a few minutes. Your homemade teriyaki sauce is ready to use! Yes, you can use chicken breasts. They are leaner but may dry out faster than thighs. To prevent this, marinate them longer. Chicken thighs stay juicy and tender. If you prefer breasts, just keep an eye on cooking time. Many sides pair well with this dish. Here are some ideas: - Steamed jasmine rice - Grilled vegetables - Asian slaw - Quinoa salad These sides will complement the sweet and savory flavors of the chicken. Marinate the chicken for at least 30 minutes. For the best flavor, aim for 2 hours. The longer it sits, the more flavor it absorbs. Just don’t marinate too long, or the texture may change. Yes, you can grill indoors! Use a grill pan on your stovetop. Another option is to use a broiler in your oven. Both methods will give you a nice char and keep the flavor intact. This blog post covered how to make Grilled Pineapple Teriyaki Chicken. We explored key ingredients, marinade tips, and grilling steps. I shared variations and storage info to help you enjoy this dish longer. Always remember to adjust the marinade and experiment with flavors. Whether serving to friends or family, this dish is sure to impress. With these tips, you'll cook with confidence and skill. Enjoy the process and the delicious outcome!](https://dishtreats.com/wp-content/uploads/2025/06/0924d723-9b8a-4a49-9695-7d965ac302d4-768x768.webp)

![- 1 cup plain Greek yogurt - 1/4 cup creamy mayonnaise - 1 tablespoon freshly squeezed lemon juice - 1 teaspoon garlic powder - 1 teaspoon onion powder - 1 teaspoon dried dill weed - 1 teaspoon dried parsley - 1/2 teaspoon sea salt - 1/4 teaspoon freshly ground black pepper - 1/4 teaspoon smoked paprika - Assorted fresh vegetables (carrots, celery, bell peppers, cucumber) To make a delicious Creamy Greek Yogurt Ranch Dip, you need a few simple ingredients. Start with the main trio: Greek yogurt, creamy mayonnaise, and lemon juice. The yogurt gives the dip its rich and tangy base. The mayonnaise adds a smooth, creamy texture, while the lemon juice brightens the flavors. Next, you’ll want to gather your seasonings. Garlic powder and onion powder add a savory punch. Dried dill weed and parsley bring in that classic ranch flavor. Salt, black pepper, and smoked paprika round out the taste, adding depth and a hint of spice. Finally, think about what to dip. Fresh veggies like carrots, celery, bell peppers, and cucumber work perfectly. They add crunch and freshness, creating a balanced snack. For the full recipe, check out the details above. First, grab a medium-sized mixing bowl. In this bowl, add 1 cup of plain Greek yogurt and 1/4 cup of creamy mayonnaise. These two ingredients create a rich base for our dip. Use a whisk or spatula to blend them well until smooth. It should look creamy and inviting. Next, squeeze in 1 tablespoon of freshly squeezed lemon juice. This adds a nice tang to the dip. Now, sprinkle in the seasonings: 1 teaspoon each of garlic powder, onion powder, dried dill weed, and dried parsley. Add 1/2 teaspoon of sea salt, 1/4 teaspoon of freshly ground black pepper, and 1/4 teaspoon of smoked paprika. These flavors will come together beautifully. Now it's time to whisk everything together. Vigorously mix the ingredients until the dip is fully combined. It should be smooth and creamy, with a lovely thickness. Take a taste and adjust the seasonings as needed. If you want more flavor, feel free to add a pinch of salt or a few more herbs. Your taste buds will guide you. Once you're happy with the flavor, it's time to chill the dip. Cover the bowl with plastic wrap or transfer the dip to an airtight container. Place it in the refrigerator for at least 30 minutes. This step allows the flavors to meld and deepen. When you're ready to enjoy, take the dip out of the fridge. Serve it chilled with an assortment of fresh vegetables for dipping, like carrots, celery, bell peppers, and cucumber. This adds a vibrant touch and makes for a fun snack! For the complete recipe, check out the [Full Recipe]. To make your Creamy Greek Yogurt Ranch Dip even tastier, try using fresh herbs. Fresh chives, dill, or parsley can add great flavor. You can also adjust the lemon juice for more tanginess. A little extra juice can brighten the dip. If you want a thicker dip, add more Greek yogurt. It will make the dip creamier. You can also cut back on the mayonnaise for a lighter version. This keeps the flavor while reducing calories. This dip is perfect for parties and gatherings. It pairs well with crackers or pita chips. Serve it with an array of fresh veggies, like carrots or cucumbers. They make great dippers, adding crunch to your snack. For the full recipe, check the earlier sections. {{image_4}} You can easily change the herbs in this dip. Fresh herbs like chives or basil work great. They add a nice twist to the flavor. Dried herbs can also give you different tastes. Think about using oregano or thyme for a unique touch. If you love some heat, add a spicy twist. Incorporate hot sauce or cayenne pepper. This will give your dip a zesty kick. You can also add chopped jalapeños for extra spice. Just be careful with the amount; you want to enjoy the heat, not overpower it! For a vegan version, swap the yogurt and mayonnaise. Use a plant-based yogurt and vegan mayo. Make sure all seasonings are plant-based too. This way, you can enjoy the same creamy dip without any animal products. It's delicious and fits many diets! For the full recipe, check out the link above. To keep your creamy Greek yogurt ranch dip fresh, store it in an airtight container. This helps prevent any odors from other foods in your fridge. You can enjoy the dip for up to one week. Just make sure to seal it tightly. Freezing this dip is not recommended. The texture may change after thawing, making it watery. Only freeze if it is necessary. If you must, use a freezer-safe container. If you freeze the dip, place it in the refrigerator to thaw. This method gives you the best results. Once thawed, stir it well before serving again. This helps bring back the creamy texture. Yes, non-fat can be used for a lighter version. This choice keeps the dip creamy while cutting down on fat. The flavor remains rich and satisfying. The dip lasts up to one week in the refrigerator. Store it in an airtight container to keep it fresh. I find it gets even better after a day. Fresh veggies, crackers, pita chips, or pretzels are great options. Carrots, celery, and bell peppers work well. You can get creative with your dippers! Yes, all ingredients are gluten-free; verify brands to be sure. This makes it a perfect snack for anyone with gluten sensitivities. Yes, it’s recommended to make it a few hours ahead to enhance flavors. The longer it sits, the more the flavors blend. I often prepare it the night before. This blog post shared a tasty Greek yogurt dip recipe. We covered the key ingredients, easy steps, and tips to make it even better. You learned how to customize the dip, try vegan options, and store it correctly. Think of this dip for your next party or snack. It’s healthy, easy to make, and perfect with fresh veggies or chips. Enjoy your tasty dip and feel good about sharing it with friends!](https://dishtreats.com/wp-content/uploads/2025/07/4dca82da-d028-43ac-94fd-c211b04a114a-768x768.webp)