Flavorful Slow Cooker Thai Coconut Curry Chicken Recipe

Looking to spice up your meals? You’ll love this Flavorful Slow Cooker Thai Coconut Curry Chicken recipe! It’s easy, hearty, and packed with amazing flavors. I’ll share simple steps and ingredient tips to make your dish delightful. Whether you’re a beginner or a pro, this recipe is sure to impress! Let’s dive in and create a meal that will warm your heart and home.
Ingredients
Complete list of ingredients
For the best Slow Cooker Thai Coconut Curry Chicken, you’ll need these key items:
- 2 lbs boneless, skinless chicken thighs
- 1 can (14 oz) full-fat coconut milk
- 2 tablespoons red curry paste
- 1 tablespoon freshly grated ginger
- 3 cloves garlic, finely minced
- 1 tablespoon soy sauce (tamari works for gluten-free)
- 1 tablespoon packed brown sugar
- 1 bell pepper (red or yellow), thinly sliced
- 1 cup sugar snap peas, trimmed
- 1 cup broccoli florets
- Fresh basil leaves for garnish
- Juice of 1 ripe lime
- Salt and freshly cracked black pepper, to taste
Alternative ingredients and substitutions
You can swap some ingredients to suit your taste or diet:
- Use chicken breast instead of thighs for a leaner option.
- Coconut cream can replace coconut milk for a richer flavor.
- If you want less spice, use less red curry paste.
- Replace bell pepper with zucchini or carrots for a different crunch.
- For a vegan option, substitute chicken with chickpeas or tofu.
Spice and herb recommendations
Adding spices and herbs can enhance your dish:
- Consider adding a dash of turmeric for color and health benefits.
- A sprinkle of paprika gives a smoky flavor.
- Fresh cilantro or mint can add a fresh touch.
- If you enjoy heat, use Thai chili or crushed red pepper flakes.
- Don’t forget to adjust salt to balance the flavors.
This recipe allows you to play with the ingredients and make it your own. Enjoy experimenting!
Step-by-Step Instructions
Preparing the chicken and sauce
Start with 2 pounds of boneless, skinless chicken thighs. Place them at the bottom of your slow cooker. Pour in 1 can of full-fat coconut milk. This gives a creamy base. Add 2 tablespoons of red curry paste. Stir gently to mix these well. Next, add 1 tablespoon of freshly grated ginger and 3 minced garlic cloves. These ingredients add warmth and depth. Pour in 1 tablespoon of soy sauce and 1 tablespoon of packed brown sugar. Stir until the curry paste blends fully.
Layering vegetables effectively
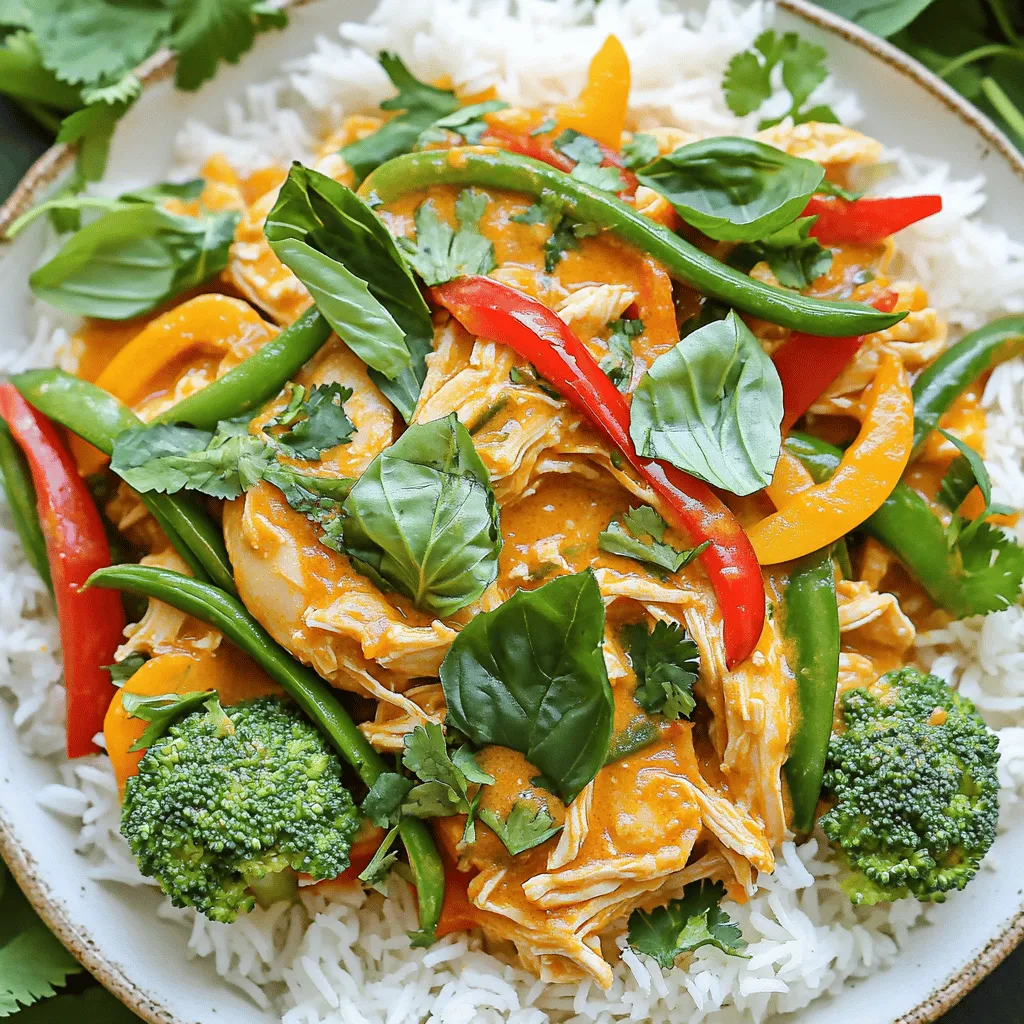
Once your sauce is ready, it’s time for the veggies. Add sliced bell peppers, sugar snap peas, and broccoli florets. Make sure to place these on top of the chicken and sauce. This keeps the colors bright and the veggies crisp. Layering helps the vegetables cook evenly without getting mushy.
Cooking times and methods for optimal results
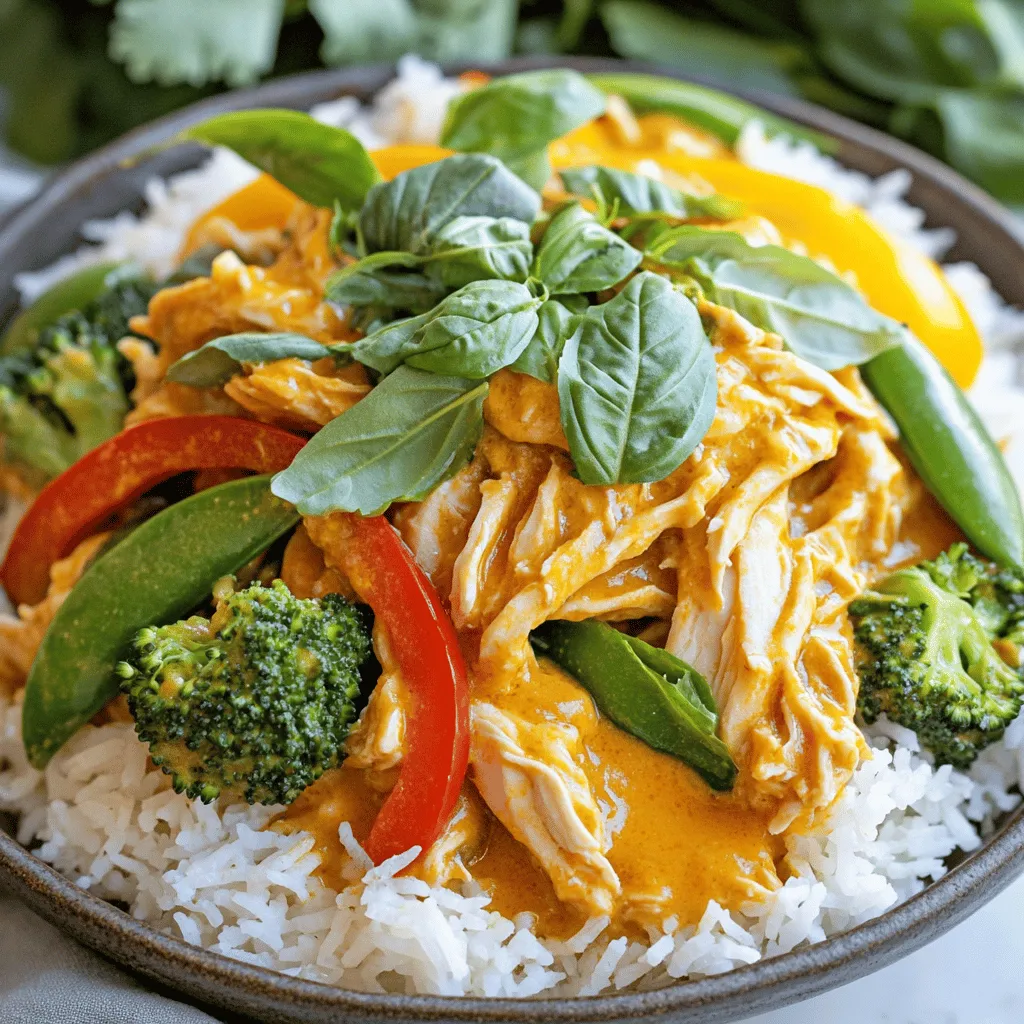
Cover your slow cooker with the lid. Set it to low for 6-7 hours or high for 3-4 hours. This slow cooking allows the chicken to become tender. It should shred easily with a fork when done. After cooking, taste your curry. Adjust with salt, pepper, and juice from 1 ripe lime. This addition brightens all the flavors. For a nice texture, use two forks to shred the chicken in the sauce. Serve your curry over fluffy jasmine rice or rice noodles. Top with fresh basil leaves for a fragrant finish.
Tips & Tricks
Enhancing flavors with additional ingredients
To boost the flavor of your Thai coconut curry, consider adding a few extras. Use fresh vegetables like zucchini or carrots for crunch and color. You can also toss in a tablespoon of fish sauce for a savory depth. Fresh herbs like cilantro or mint can brighten the dish further. If you like heat, add sliced chilies or a pinch of cayenne pepper.
Best practices for using a slow cooker
Using a slow cooker is simple, but a few tips can help. Cut your chicken into smaller pieces for even cooking. Layer your vegetables on top of the meat to keep them crisp. Avoid lifting the lid during cooking, as this releases heat. Always check the liquid level before serving. If it looks too thick, add a splash of coconut milk or water.
Serving suggestions for a complete meal
Serve your curry over fluffy jasmine rice or rice noodles for a hearty meal. Adding a side salad with lime vinaigrette can provide a fresh contrast. For extra flavor, sprinkle chopped peanuts on top for crunch. A slice of lime on the side adds a zesty kick. Enjoy your meal with a chilled drink, like coconut water or iced tea.

Variations
Alternative proteins to use
You can switch out chicken for other proteins. Try using shrimp or fish for a lighter meal. Tofu is a great choice if you want a plant-based option. Each of these proteins adds its own unique flavor and texture. Just remember to adjust cooking times. Shrimp cooks fast, while fish needs a bit more time. Tofu absorbs the sauce well and becomes very tasty.
Vegetarian or vegan substitutions
To make this dish vegetarian or vegan, replace chicken with tofu or tempeh. Use vegetable broth instead of chicken broth. For a creamier sauce, use coconut cream. You can also mix in more veggies like carrots, zucchini, or eggplant. These options make the curry rich without meat. This way, everyone can enjoy a plate of Thai coconut curry.
Adjusting spice levels to taste
You can control the spice level of your curry. If you like it mild, use less red curry paste. For more heat, add extra paste or fresh chili peppers. You can also stir in some chili flakes or sriracha for a kick. Remember to taste as you go. Adjust the heat to fit your palate. Everyone has a different spice tolerance, so make it just right for you!
Storage Info
How to store leftovers
After enjoying your Slow Cooker Thai Coconut Curry Chicken, store any leftovers in an airtight container. This keeps the flavors fresh and prevents spoilage. Make sure to let the curry cool down before sealing it. You can keep it in the fridge for up to four days.
Reheating instructions for best results
To reheat, you can use the microwave or stovetop. If using the microwave, place the curry in a bowl and cover it loosely. Heat it for one to two minutes, stirring halfway through. On the stovetop, warm it in a pot over medium heat. Stir gently until it’s hot. Add a splash of coconut milk if it seems too thick.
Freezing tips for long-term storage
If you want to save your curry for later, freezing is a great option. First, let the curry cool completely. Then, pour it into a freezer-safe container, leaving some space at the top for expansion. Seal it tightly and label it with the date. You can freeze it for up to three months. To thaw, place it in the fridge overnight before reheating. This way, you’ll still enjoy its rich flavors!
FAQs
How long does Slow Cooker Thai Coconut Curry Chicken last in the fridge?
Slow Cooker Thai Coconut Curry Chicken lasts about 3 to 4 days in the fridge. Store it in an airtight container. Make sure it cools before sealing. Always check for any off smells or changes in texture before eating.
Can I make this dish ahead of time?
Yes, you can make this dish ahead of time. Cook it in the slow cooker as directed. Once done, let it cool and store in the fridge. You can also freeze it for up to 3 months. Just thaw it overnight in the fridge before reheating.
What can I serve with Thai Coconut Curry Chicken?
You can serve this dish with fluffy jasmine rice or rice noodles. Both pair well with the rich sauce. For a crunchy side, try a simple cucumber salad. You can also add some crusty bread to soak up the curry. Fresh basil leaves make a great garnish too!
This post provided a complete guide to making Slow Cooker Thai Coconut Curry Chicken. We covered the ingredients, from spices to alternatives, to fit every palate. You learned step-by-step methods for preparation and cooking. I shared tips for flavor and storage to keep your dish fresh. Finally, we explored variations for proteins and spice levels.
With these insights, you can create a delicious meal that fits your needs. Enjoy your cooking and share your delicious results!


![Here’s what you need for a creamy, dreamy mac and cheese: - 1 lb elbow macaroni - 4 cups water - 2 tablespoons unsalted butter, divided - 1 teaspoon garlic powder - 1 teaspoon onion powder - ½ teaspoon smoked paprika - Salt and pepper, to taste - 2 cups sharp cheddar cheese, shredded - 1 cup mozzarella cheese, shredded - ½ cup cream cheese, softened - ½ cup whole milk Gather these ingredients to make your Instant Pot creamy mac and cheese. The elbow macaroni cooks perfectly in the Instant Pot, soaking up all the flavors. The two types of cheese give a rich taste. Cream cheese adds smoothness, while whole milk makes it extra creamy. Each spice, like garlic and paprika, adds a nice touch. Want to make your mac and cheese even better? Try these add-ins: - Cooked bacon for a salty crunch - Steamed broccoli for a healthy twist - Diced tomatoes for freshness - Jalapeños for heat Feel free to mix and match! You can make it just how you like. For the full recipe, check out the detailed cooking steps. Gather all your ingredients. You will need: - 1 lb elbow macaroni - 4 cups water - 2 tablespoons unsalted butter, divided - 1 teaspoon garlic powder - 1 teaspoon onion powder - ½ teaspoon smoked paprika - Salt and pepper, to taste - 2 cups sharp cheddar cheese, shredded - 1 cup mozzarella cheese, shredded - ½ cup cream cheese, softened - ½ cup whole milk Measure everything out before you start. This makes cooking easier and faster. Pour 4 cups of water into your Instant Pot. Add the elbow macaroni, 1 tablespoon of unsalted butter, garlic powder, onion powder, smoked paprika, and a pinch of salt. Stir this mix well to coat the pasta. Now, close the lid and set the valve to sealing. Choose the manual cooking option and set the timer to cook on high pressure for 4 minutes. Once the time is up, do a quick release by moving the valve to venting. Open the lid once the steam has escaped. Add the remaining tablespoon of unsalted butter, shredded cheddar cheese, shredded mozzarella cheese, softened cream cheese, and whole milk. Stir everything together with a spatula until it’s creamy. If it’s too thick, add a little more milk for a smoother texture. Season with salt and pepper to your liking. Stir again to mix in the flavors. For the complete recipe, check out the Full Recipe. Enjoy your creamy mac and cheese! To make your mac and cheese super creamy, use a mix of cheeses. I love combining sharp cheddar and mozzarella. The cheddar gives a bold flavor, while mozzarella adds stretchiness. Cream cheese also helps create a rich texture. If it's too thick, add a splash of whole milk. This will help achieve the creamy consistency you want. Here are some great cheese combos: - Sharp cheddar - Mozzarella - Cream cheese - Gruyere - Fontina Mixing these cheeses gives depth and flavor. Try different amounts to find your favorite mix. You can also add a bit of parmesan for a salty kick. Common mistakes can ruin your dish. First, don't overcook the pasta. Set your timer for 4 minutes. Overcooked pasta becomes mushy. Second, be careful when releasing steam. Always use a kitchen towel for safety. Lastly, remember to season well. Taste your mac and cheese before serving. Add more salt and pepper if needed. For more details, check out the Full Recipe. {{image_4}} You can make your mac and cheese heartier by adding protein. Cooked chicken or crispy bacon works great. Simply chop the cooked chicken or crumble the bacon into pieces. Stir it in after mixing the cheese. This adds flavor and makes it a full meal. For a vegan twist, swap the dairy for plant-based ingredients. Use cashew cream or coconut milk in place of whole milk. Replace the cheese with vegan cheese or nutritional yeast for a cheesy taste. This keeps the dish creamy while making it dairy-free. Add extra flavor by mixing in spices and herbs. A dash of cayenne pepper gives it a kick. Fresh herbs like basil or thyme add brightness. Try Italian seasoning for a different twist. You can also add mustard powder for depth. Experiment to find your favorite mix. For the full recipe, check out [Full Recipe]. To store your creamy mac and cheese, let it cool first. Place it in an airtight container. You can keep it in the fridge for up to three days. Make sure it is sealed tightly to keep it fresh. If you want to enjoy it later, consider freezing it. When you want to reheat mac and cheese, use the microwave or stovetop. If using the microwave, place your serving in a bowl. Add a splash of milk to keep it creamy. Heat it in short bursts, stirring in between. For the stovetop, warm it in a pot over low heat. Stir well and add milk if needed. This helps it regain its creamy texture. To freeze mac and cheese, use an airtight container or freezer bag. Make sure it is cool before you put it in. It can last in the freezer for up to three months. When you are ready to eat it, thaw it overnight in the fridge. Then, reheat using one of the methods above. This way, you can enjoy that yummy flavor again! For the full recipe, check the details above. Yes, you can use gluten-free pasta in this recipe. Just choose your favorite brand. Cook times may vary slightly, so check the package instructions. Gluten-free pasta can be just as creamy and tasty as regular pasta. To spice up your mac and cheese, add cayenne pepper or red pepper flakes. Start with a small amount, like 1/4 teaspoon, and taste as you go. You can also mix in some diced jalapeños for a fresh kick. Adjust it based on your spice level preference. Any Instant Pot model works well for this creamy mac and cheese. I recommend using a model with at least a 6-quart capacity. This size gives enough room for the pasta and water. The Instant Pot Duo or Ultra are popular choices, offering great features for beginners and pros alike. For the full recipe, check the link. This blog has shared everything you need for perfect mac and cheese in your Instant Pot. We covered the needed ingredients, cooking steps, and tips to avoid mistakes. You learned how to make it creamy and flavorful, even with variations. Remember to store leftovers properly for later. Keep experimenting with flavors and ingredients to find what you enjoy. Each recipe can be a new adventure. Enjoy your cooking journey!](https://dishtreats.com/wp-content/uploads/2025/07/aef5e05b-bf60-4c96-8d62-11668510c0c6-768x768.webp)

![- 4 boneless, skinless chicken thighs - 1 cup teriyaki sauce - 1/2 fresh pineapple, sliced into 1/2-inch rings - 2 tablespoons soy sauce - 1 tablespoon brown sugar - 1 teaspoon freshly grated ginger - 2 cloves garlic, finely minced - 1 tablespoon sesame oil - 1 tablespoon rice vinegar - 2 green onions, finely chopped - Sesame seeds Gathering the right ingredients is key for Grilled Pineapple Teriyaki Chicken. Start with fresh chicken thighs. They stay juicy and tender when grilled. You can use store-bought or homemade teriyaki sauce. I often prefer making my own, as it gives a fresh taste. Next, you want ripe pineapple. Choose one that feels heavy and smells sweet. The sweetness will balance the salty teriyaki sauce. For the marinade, you need a few simple items. Soy sauce adds saltiness, while brown sugar gives a nice caramel note. Ginger and garlic bring warmth and depth. Sesame oil adds a nutty flavor, and rice vinegar gives a bit of tang. Finally, for garnishing, chop green onions for color and freshness. A sprinkle of sesame seeds adds a nice crunch. These ingredients come together to create a vibrant, tasty dish. For the full recipe, check the provided link. First, gather your ingredients for the marinade. In a bowl, mix teriyaki sauce, soy sauce, brown sugar, grated ginger, minced garlic, sesame oil, and rice vinegar. Whisk these together until smooth. Add the chicken thighs and coat them well with the marinade. Cover the bowl with plastic wrap and put it in the fridge. Let the chicken marinate for at least 30 minutes. For more flavor, let it marinate for up to 2 hours. While the chicken marinates, preheat your grill to medium-high heat. If you’re using charcoal, wait for the coals to glow red. This will ensure even grilling and great flavor in your chicken. Now it's time to grill the pineapple. Take your pineapple rings and brush both sides with teriyaki sauce. Once the grill is hot, place the pineapple on it. Grill for about 3-4 minutes on each side. You want to see nice grill marks and a caramelized look. When done, set the grilled pineapple aside on a plate. Next, take the chicken thighs out of the fridge. Let any extra marinade drip off. Place the chicken on the hot grill. Cook for about 5-7 minutes per side. Aim for an internal temperature of 165°F (75°C). In the last few minutes, brush on more marinade for added flavor. When the chicken is cooked, take it off the grill. Let it rest for a few minutes. This helps keep the juices inside. To serve, place a grilled pineapple ring on each plate. Top it with a grilled chicken thigh. For a beautiful touch, sprinkle chopped green onions and sesame seeds on top. Enjoy your meal! For the full recipe, check out [Full Recipe]. For juicy chicken, preheat your grill to medium-high heat. This temperature helps create a nice sear on the chicken. A hot grill also locks in moisture, making the meat tender. If using charcoal, wait until the coals glow red and spread evenly for the best result. The marinade is key to great flavor. I suggest marinating the chicken for at least 30 minutes. This time allows the flavors to soak in. For an even richer taste, let it marinate for up to 2 hours. Just remember, don’t go over 2 hours, or the chicken might turn mushy. When picking a pineapple, look for one that feels heavy for its size. The skin should be golden and slightly soft at the base. A ripe pineapple smells sweet at the bottom. Avoid ones that are too green or have brown spots. A good pineapple adds the perfect touch to your grilled chicken. For more details and to try the dish, check out the Full Recipe. {{image_4}} You can easily swap chicken for other proteins. Try pork tenderloin or shrimp for a tasty twist. Tofu is a great choice for a vegetarian option. Just make sure to press the tofu to remove extra moisture. This helps it absorb the marinade better. No matter what protein you choose, aim for similar cooking times for best results. Want to kick up the flavor? Add red pepper flakes for heat or lime juice for zest. You can also mix in a dash of sesame seeds or a splash of orange juice for sweetness. Experimenting with spices like smoked paprika or five-spice powder can add depth. This way, you can create a unique flavor profile each time. Pair your grilled pineapple teriyaki chicken with steamed rice or a fresh salad. Jasmine rice complements the dish's sweetness well. For salads, consider a mix of greens with a light vinaigrette. You can also serve it with grilled vegetables for added color and nutrition. These options enhance your meal and make it more satisfying. For the full recipe, check out the details above. Store your Grilled Pineapple Teriyaki Chicken in an airtight container. This keeps it fresh and prevents odors from mixing. The chicken and pineapple can last in the fridge for about 3 to 4 days. Always let the chicken cool down before sealing it. This helps avoid condensation inside the container. To freeze your grilled chicken and pineapple, first, let them cool completely. Wrap each piece tightly in plastic wrap. Then place them in a freezer bag or a container. This keeps air out and prevents freezer burn. You can freeze it for up to 3 months. Label the bags with the date for easy tracking. To reheat your chicken, use the oven or stovetop. Preheat your oven to 350°F (175°C). Place the chicken in a baking dish and add a splash of water or broth. Cover it with foil. Heat for about 15-20 minutes until warm. For stovetop, use a skillet over medium heat. Add a bit of oil and warm the chicken gently. Avoid high heat to keep it juicy. You can make teriyaki sauce easily at home. Here’s how: - 1 cup soy sauce - 1/2 cup brown sugar - 1/4 cup rice vinegar - 2 tablespoons sesame oil - 1 teaspoon grated ginger - 2 cloves minced garlic Combine all these ingredients in a saucepan. Heat over medium until the sugar dissolves. Stir it well, and let it simmer for a few minutes. Your homemade teriyaki sauce is ready to use! Yes, you can use chicken breasts. They are leaner but may dry out faster than thighs. To prevent this, marinate them longer. Chicken thighs stay juicy and tender. If you prefer breasts, just keep an eye on cooking time. Many sides pair well with this dish. Here are some ideas: - Steamed jasmine rice - Grilled vegetables - Asian slaw - Quinoa salad These sides will complement the sweet and savory flavors of the chicken. Marinate the chicken for at least 30 minutes. For the best flavor, aim for 2 hours. The longer it sits, the more flavor it absorbs. Just don’t marinate too long, or the texture may change. Yes, you can grill indoors! Use a grill pan on your stovetop. Another option is to use a broiler in your oven. Both methods will give you a nice char and keep the flavor intact. This blog post covered how to make Grilled Pineapple Teriyaki Chicken. We explored key ingredients, marinade tips, and grilling steps. I shared variations and storage info to help you enjoy this dish longer. Always remember to adjust the marinade and experiment with flavors. Whether serving to friends or family, this dish is sure to impress. With these tips, you'll cook with confidence and skill. Enjoy the process and the delicious outcome!](https://dishtreats.com/wp-content/uploads/2025/06/0924d723-9b8a-4a49-9695-7d965ac302d4-768x768.webp)