Easy Thai Peanut Noodles Flavorful and Quick Meal

Looking for a quick meal that packs a punch? Try my Easy Thai Peanut Noodles! This dish bursts with rich flavors that everyone will love. With simple ingredients and easy steps, you can whip up a tasty dinner in no time. Whether you’re a beginner or a pro in the kitchen, these noodles will impress. Let’s dive into the ingredients and make this scrumptious meal today!
Ingredients
Essential Ingredients for Easy Thai Peanut Noodles
To make Easy Thai Peanut Noodles, you need key ingredients. Here’s what you will need:
- 8 oz rice noodles
- 1/2 cup creamy peanut butter
- 1/4 cup low-sodium soy sauce
- 2 tablespoons honey or maple syrup
- 1 tablespoon freshly squeezed lime juice
- 1 teaspoon sesame oil
- 1 red bell pepper, thinly sliced
- 1 cup shredded carrots (about 2 medium carrots)
- 1/2 cucumber, julienned
- 4 green onions, chopped (green and white parts separated)
- 1/4 cup crushed peanuts (for garnish)
- Fresh cilantro leaves (for garnish)
- Red pepper flakes (optional)
These ingredients create a rich and tasty dish. The rice noodles give a nice base, while the peanut butter adds creaminess. The soy sauce brings salt and umami to the mix.
Optional Ingredients for Added Flavor
You can make your noodles even better with some optional ingredients. Consider adding:
- Sliced jalapeños for spice
- Chopped bell peppers for crunch
- Fresh mint leaves for freshness
- Chopped cashews for more texture
- Lime wedges for extra zest
These extras can help you tailor the dish to your taste. Feel free to mix and match based on what you like.
Ingredient Substitutions
Don’t worry if you can’t find something. Here are some easy swaps:
- Use almond butter instead of peanut butter.
- Swap rice noodles for whole wheat or soba noodles.
- Honey can be replaced with agave nectar for a vegan option.
- You can use apple cider vinegar in place of lime juice.
These substitutions keep the dish delicious while accommodating your needs. Cooking should feel flexible and fun.
Step-by-Step Instructions
Preparing the Rice Noodles
Start by boiling water in a large pot. Once the water bubbles, add 8 oz of rice noodles. Cook them for 4-6 minutes. Check the package for exact times. When they are done, drain the noodles in a colander. Rinse them with cold water to stop cooking. Set the noodles aside to cool completely.
Making the Homemade Peanut Sauce
Grab a small mixing bowl. In it, combine 1/2 cup of creamy peanut butter, 1/4 cup of low-sodium soy sauce, and 2 tablespoons of honey or maple syrup. Add 1 tablespoon of freshly squeezed lime juice and 1 teaspoon of sesame oil. Whisk these ingredients together until smooth. If your sauce is too thick, add a splash of water, one tablespoon at a time, until it is creamy.
Combining and Tossing Ingredients
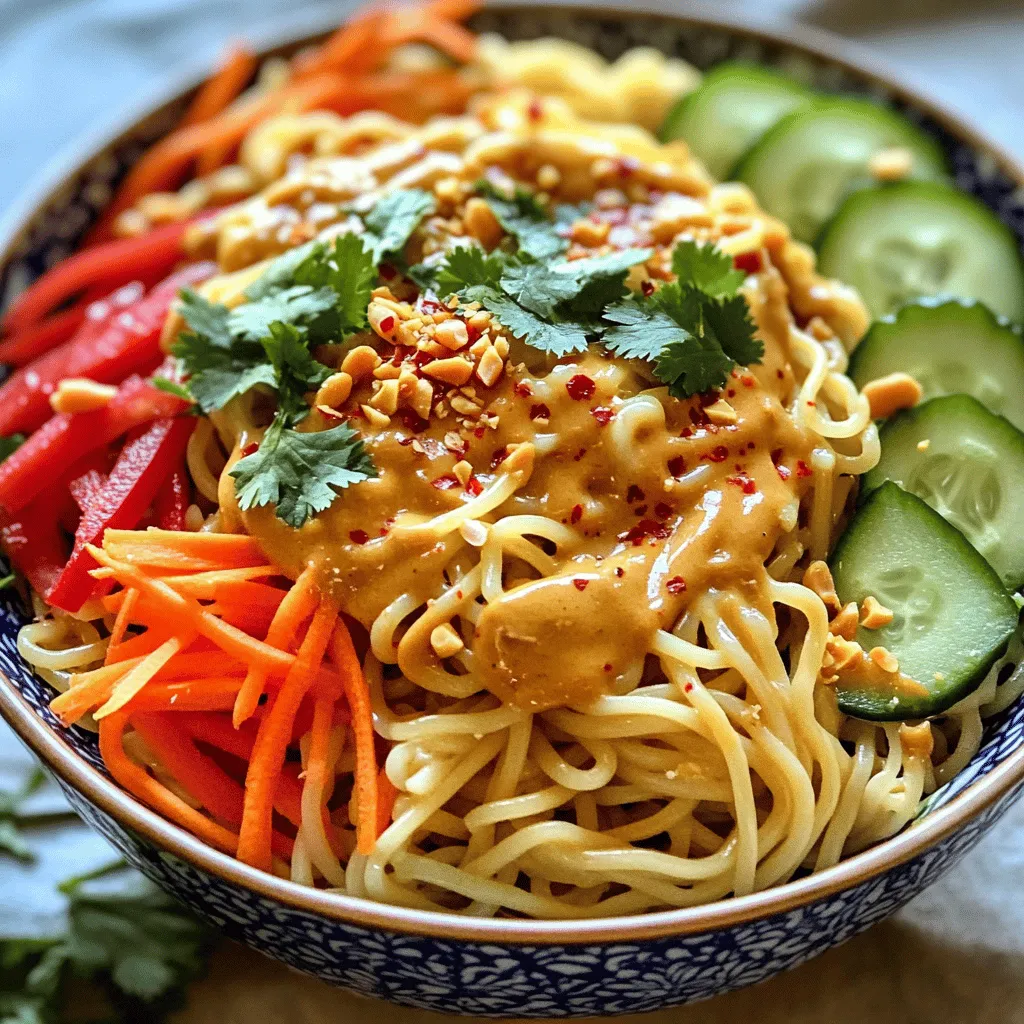
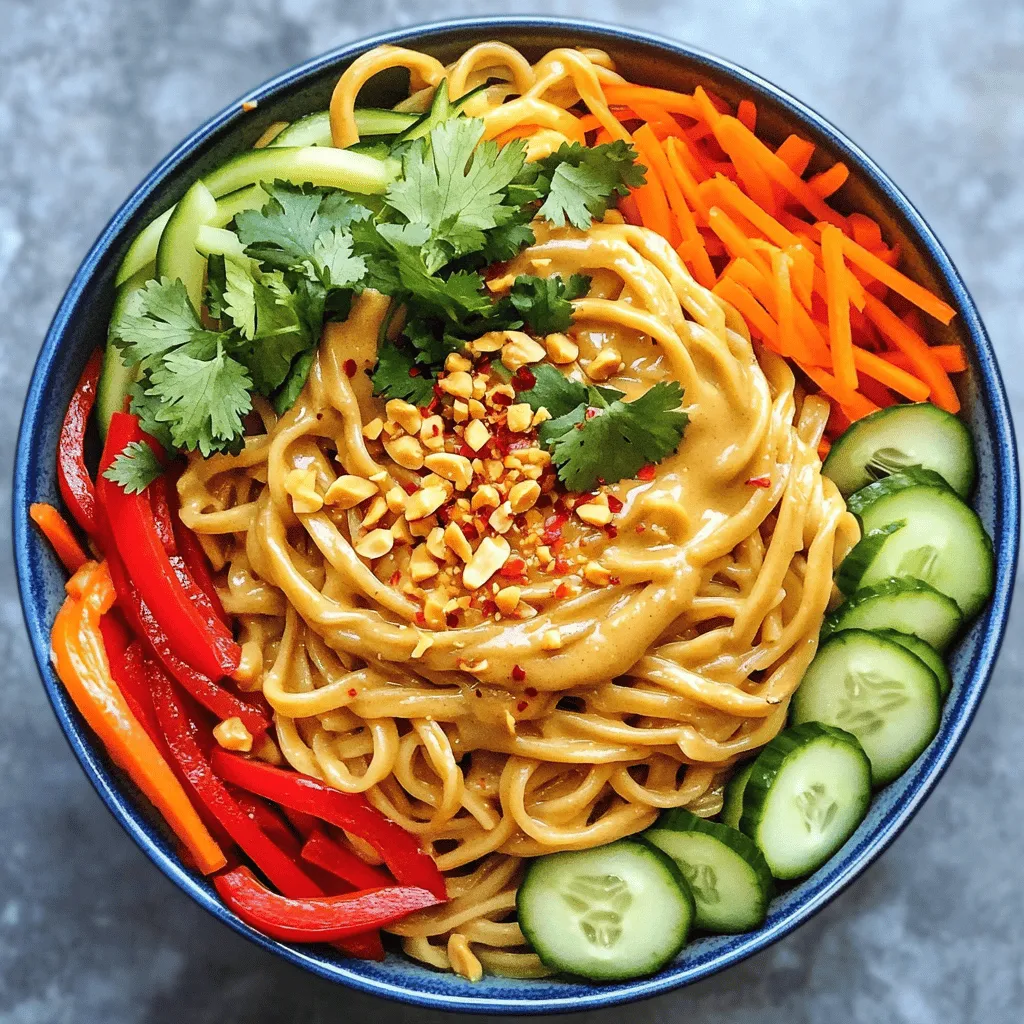
In a large mixing bowl, layer in the cooled rice noodles. Next, add sliced red bell pepper, shredded carrots, and julienned cucumber. Toss in the white parts of 4 chopped green onions for extra flavor. Drizzle the peanut sauce over the noodle mixture. Use two forks or tongs to toss everything together. Make sure all ingredients are well-coated with the sauce. Serve the noodles in bowls and garnish with the green parts of the green onions, crushed peanuts, and fresh cilantro leaves. If you like heat, sprinkle some red pepper flakes on top.
Tips & Tricks
Enhancing Flavor and Texture
To boost flavor, use fresh lime juice. It adds brightness and tang. You can also add minced garlic or ginger for an extra kick. If you like crunch, try adding crushed peanuts right before serving. They give a nice texture. For a more intense flavor, let the noodles sit in the sauce for a few minutes before serving. This lets the noodles soak up the taste.
Presentation Suggestions
To make your dish look great, use colorful bowls. A bright bowl makes the food pop. Arrange the garnishes neatly on top. Place cilantro leaves and green onions in a way that looks inviting. Add lime wedges on the side for a fresh touch. This makes the meal not only tasty but also pretty.
Common Mistakes to Avoid
One mistake is overcooking the noodles. They should be firm, not mushy. Always rinse them in cold water after cooking. This stops the cooking process. Another common error is not mixing the sauce well. Make sure it’s smooth before adding it to the noodles. Lastly, don’t skip the garnishes. They add flavor and make the dish more appealing.

Variations
Protein Additions (e.g., chicken, tofu)
You can add protein to your Easy Thai Peanut Noodles. Options like chicken or tofu work well. For chicken, use cooked, shredded meat. Toss it in with the noodles. If you prefer tofu, try firm or extra-firm types. Cube the tofu and sauté it until golden. Add it to the dish for a nice crunch.
Vegetable Variations
The vegetable choices for this dish are endless. You can use bell peppers, carrots, and cucumbers. Want to change it up? Try adding snap peas or broccoli. You can also use spinach for some greens. Just remember to chop them small so they mix well with the noodles.
Dietary Modifications (vegan, gluten-free)
You can easily make this dish vegan. Just swap honey for maple syrup. To make it gluten-free, use tamari instead of soy sauce. Rice noodles are usually gluten-free, but always check the pack. These simple swaps let everyone enjoy the meal. For the best taste, adjust the sauce after making these changes.
Storage Info
Best Ways to Store Leftovers
To keep your Easy Thai Peanut Noodles fresh, store them in an airtight container. This helps keep the noodles and veggies from getting soggy. If you have extra peanut sauce, store it separately. This keeps the flavors strong and fresh.
How Long Do They Last?
When stored properly in the fridge, these noodles can last for about 3 to 5 days. If you notice any odd smells or changes in texture, it’s best to throw them out. Always trust your senses when it comes to food safety.
Reheating Tips
To reheat, you can use a microwave or a stove. If using the microwave, heat in short bursts, stirring in between. This prevents hot spots and keeps the noodles from getting tough. If using the stove, add a splash of water or extra sauce to keep them moist. This will help bring back their original flavor. Enjoy your meal again!
FAQs
How can I make the sauce spicier?
You can add red pepper flakes for heat. Start with a pinch. Mix it well. Taste the sauce before adding more. You can also use sriracha or chili paste. These options pack a punch too. Adjust to your taste for a spicy kick.
Can I use other types of noodles?
Yes, you can use other noodles. Try fettuccine, udon, or soba. Cook them according to the package. Just remember that cooking times may differ. Feel free to explore different textures and flavors.
What can I substitute for peanut butter?
If you need a swap, use almond or cashew butter. Sunflower seed butter is a great nut-free choice. These alternatives will keep the creamy texture. They also add unique flavors to the dish. You can still enjoy yummy noodles with these swaps.
Easy Thai peanut noodles are simple and fun to make. You start with key ingredients and can add your favorites for more flavor. Follow the steps to cook the noodles and make a tasty peanut sauce. Remember the tips to boost flavor and avoid common mistakes. You can swap in proteins and veggies to fit your diet. Store leftovers correctly to enjoy them later. In the end, these noodles are a versatile meal that fits many tastes. Try them out and make it your own!


![To make tasty roasted veggie grain bowls, gather these items: - 1 cup quinoa, thoroughly rinsed - 2 cups vegetable broth - 1 zucchini, diced into bite-sized pieces - 1 red bell pepper, diced - 1 cup cherry tomatoes, halved - 1 cup broccoli florets, cut into small pieces - 2 tablespoons olive oil - 1 teaspoon garlic powder - 1 teaspoon smoked paprika - Salt and freshly cracked black pepper, to taste - 1 avocado, halved and sliced - ¼ cup tahini - 2 tablespoons freshly squeezed lemon juice - Fresh herbs (such as parsley or cilantro) for garnish Fresh ingredients make a big difference. Choose bright, firm veggies for the best flavor. Here are some tips to ensure freshness: - Look for vibrant colors: Fresh veggies should be bright and appealing. - Check for firmness: Avoid soft or wrinkled produce. - Buy local when possible: Seasonal veggies taste better and last longer. You can swap some ingredients based on your taste or what you have. Here are easy swaps: - Quinoa: Use farro, rice, or barley instead. - Veggies: Try carrots, asparagus, or sweet potatoes. - Tahini: Substitute with yogurt or nut butter for a different sauce. - Herbs: Use basil, dill, or chives for fresh flavor. Explore these options to make your roasted veggie grain bowls unique! For the complete recipe, check the Full Recipe. Start by preheating your oven to 425°F (220°C). This heat is perfect for roasting. While the oven warms, prepare the quinoa. In a medium saucepan, bring 2 cups of vegetable broth to a boil. Once boiling, add 1 cup of rinsed quinoa. Lower the heat, cover, and let it simmer for about 15 minutes. The quinoa will soak up the broth and become fluffy. After cooking, let it rest for 5 minutes. Fluff it with a fork before serving. While the quinoa cooks, prepare your veggies. Grab a large baking sheet and add the diced zucchini, red bell pepper, halved cherry tomatoes, and broccoli florets. Drizzle 2 tablespoons of olive oil over these veggies. Then, sprinkle 1 teaspoon of garlic powder, 1 teaspoon of smoked paprika, salt, and freshly cracked black pepper. Mix everything well to coat the veggies. Place the baking sheet in the oven and roast for 20-25 minutes. Halfway through, stir the veggies to ensure even cooking. They are done when tender and slightly caramelized. For the tahini sauce, combine ¼ cup of tahini and 2 tablespoons of freshly squeezed lemon juice in a small bowl. Whisk them together until smooth. Add a pinch of salt for flavor. If the sauce seems too thick, thin it out with a little water. Adjust it until you reach your desired consistency. You can check the [Full Recipe] for more details. When making roasted veggie grain bowls, avoid overcooking your vegetables. They should be tender but not mushy. Also, don't skip the seasoning. A little salt and pepper make a big difference. Lastly, ensure the quinoa is fluffed well after cooking. This helps the grains mix nicely with the veggies. To boost flavor, try marinating the veggies in olive oil and spices before roasting. You can add herbs like thyme or rosemary for a fresh taste. For texture, consider adding nuts or seeds. Toasted sunflower seeds or crunchy almonds add a nice bite. Roasted veggie grain bowls are great for a filling meal. Pair them with a side salad for more greens. You can also add a protein like grilled chicken or chickpeas for extra nutrition. For a wow factor, drizzle more tahini sauce on top or sprinkle with feta cheese. Check out the Full Recipe for more ideas! {{image_4}} You can switch up the grains in your bowl. Try brown rice, farro, or barley. Each grain brings a different taste and texture. Quinoa is great, but experimenting keeps it fun. You can also use millet for a unique twist. These grains offer more fiber and nutrients. Explore different cooking times for each grain to get them just right. Seasonal veggies make your grain bowl fresh and vibrant. In spring, use asparagus and peas. Summer calls for corn and eggplant. Fall brings sweet potatoes and kale. In winter, think about Brussels sprouts and root vegetables. Each season gives you new flavors and colors. Using fresh, local produce can boost taste and nutrition. Toppings can elevate your bowl. Consider adding nuts or seeds for crunch. Roasted chickpeas add protein and flavor. You might also try feta cheese for a salty kick. Fresh herbs like basil or cilantro can brighten the dish. A squeeze of lime or lemon juice adds freshness. For a spicy touch, drizzle hot sauce or sprinkle red pepper flakes. Each addition brings a new layer of flavor to your meal. Check out the Full Recipe for more ideas! To keep your roasted veggie grain bowls fresh, store them in airtight containers. Make sure to let the bowls cool down before sealing them. This helps prevent moisture buildup, which can make your veggies soggy. You can keep them in the fridge for up to four days. When you’re ready to enjoy your leftovers, reheat them gently. Use the microwave for quick heating. Heat in short bursts, stirring in between, to avoid hot spots. You can also warm them in a pan over low heat. Add a splash of water or broth to keep them moist. Meal prepping is a great way to save time. You can make extra quinoa and roast a variety of veggies. Store them separately in the fridge for easy access. This way, you can mix and match different flavors throughout the week. Just assemble the bowls when you're ready to eat. For a detailed recipe, check the Full Recipe for all the steps! Roasted veggie grain bowls are healthy meals filled with grains and vegetables. They combine cooked grains, like quinoa, with roasted veggies. This mix creates a tasty and colorful dish. You get fiber, vitamins, and minerals in every bite. The flavors blend well, making each bowl satisfying and fun to eat. To make roasted veggie grain bowls, follow these steps: 1. Preheat your oven to 425°F (220°C). 2. Cook 1 cup of quinoa in 2 cups of vegetable broth. Let it simmer until fluffy. 3. Prepare your veggies: dice zucchini, red bell pepper, and halve cherry tomatoes. Add broccoli florets. 4. Toss the veggies with olive oil, garlic powder, smoked paprika, salt, and pepper. 5. Roast the veggies for 20-25 minutes until tender and slightly caramelized. 6. Mix tahini with lemon juice, adding water if needed for the right texture. 7. Assemble the bowls with quinoa, roasted veggies, and avocado slices on top. 8. Drizzle with tahini sauce and add fresh herbs for garnish. You can find the full recipe above for more detailed steps. Yes, you can customize this recipe. Use different grains like brown rice or farro. Change the veggies based on what you like or what is in season. You can also add proteins like chickpeas or grilled chicken. Experiment with different sauces or toppings to make the dish your own. This flexibility makes roasted veggie grain bowls perfect for everyone. This blog covered how to make delicious roasted veggie grain bowls. We discussed key ingredients, focusing on freshness and substitutions. I shared step-by-step instructions for prepping, roasting, and creating a tasty tahini sauce. You learned helpful tips to avoid mistakes and enhance flavor. Variations allowed you to experiment with grains and veggies. Lastly, I provided storage tips to keep leftovers fresh. Roasted veggie grain bowls are flexible and fun. You can mix and match to fit your taste. Enjoy experimenting!](https://dishtreats.com/wp-content/uploads/2025/07/945baa8c-ba42-4ceb-8d11-39d9a326283a-768x768.webp)
![- 1 lb boneless, skinless chicken breast, thinly sliced - 1 large bell pepper (red or yellow), sliced into strips - 1 cup broccoli florets, cut into bite-sized pieces - 1 cup snap peas, trimmed - 1 medium carrot, julienned - 1/4 cup low-sodium soy sauce - 1 tablespoon honey - 1 tablespoon rice vinegar - 2 tablespoons sesame oil, divided - 3 cloves garlic, finely minced - 1 tablespoon fresh ginger, finely minced - Sesame seeds for garnish - 3 green onions, chopped (white and green parts kept separate) Using these ingredients, you can create a dish that bursts with flavor. Each element adds its own unique taste. The chicken breast serves as a great protein base. Bell peppers and broccoli contribute crunch and color. Snap peas and carrots add sweetness and texture. When you use sesame oil, garlic, and ginger, you create a rich aroma. These cooking essentials infuse the dish with depth. Finally, the sesame seeds and green onions provide a delightful finish. They enhance the dish's look and add a touch of brightness. For the full recipe, check the detailed instructions. Heat a large skillet or wok over medium-high heat. Add 1 tablespoon of sesame oil. When the oil shimmers, add the thinly sliced chicken. Season it with salt and pepper. Cook the chicken for 5-7 minutes. Stir it often until golden brown and fully cooked. Once done, remove the chicken from the skillet and set it aside. In the same skillet, add the second tablespoon of sesame oil. Let it heat up. Then, add the minced ginger and garlic. Sauté these for about 30 seconds. This step helps unlock their amazing flavors. Now, add the sliced bell pepper, broccoli florets, snap peas, and julienned carrot to the skillet. Stir-fry the vegetables for 4-5 minutes. You want them tender but still crisp. This keeps the dish colorful and crunchy. Return the cooked chicken to the skillet with the vegetables. In a separate small bowl, mix the soy sauce, honey, and rice vinegar. Whisk these until they blend well. Pour this sauce evenly over the chicken and veggies in the skillet. Stir everything together gently. Bring the mixture to a simmer over medium heat. This helps combine all the flavors and makes the dish more delicious. Next, slowly add the cornstarch slurry to the stir-fry. Stir constantly as you add it. Cook for 1-2 more minutes until the sauce thickens to your liking. This gives the dish a nice glossy finish. Remove the skillet from the heat. Add the chopped green tops of the green onions. Toss everything gently to combine. Serve the stir-fry on plates. Sprinkle sesame seeds on top for extra crunch. Enjoy this delightful meal! For the full recipe, you can refer to the earlier sections. For the best chicken stir-fry, use boneless, skinless chicken breast. Thinly slice it for quick cooking. This cut stays tender and soaks up flavors well. Heat your skillet over medium-high heat. This helps sear the chicken quickly, locking in moisture. Want to spice things up? Try adding a dash of red pepper flakes for heat. You can also mix in a splash of hoisin sauce for extra sweetness. Serve this stir-fry with jasmine rice or noodles. Both options soak up the sauce nicely. To plate your dish, start with a mound of rice in the center. Arrange the chicken and veggies around it. This creates a beautiful, colorful display. For garnish, sprinkle sesame seeds and chopped green onions on top. This adds a nice crunch and fresh flavor. For the full recipe, click here: [Full Recipe]. {{image_4}} You can easily change the protein in this dish. If you don’t like chicken, try these options: - Pork: Thinly sliced pork loin works well. - Beef: Flank steak adds great flavor. - Tofu: Firm tofu is perfect for a vegetarian option. - Shrimp: Quick-cooking shrimp gives a seafood twist. For vegetarian or vegan options, stick with tofu or tempeh. These protein sources soak up flavors well and add a nice texture. If you use tofu, press it to remove excess water for better frying. You can swap vegetables based on what’s in season or what you like best. Here are some great choices: - Zucchini: Adds a nice crunch and color. - Mushrooms: They bring an earthy flavor. - Asparagus: Great for spring dishes. - Cauliflower: A fun way to add some fiber. Mixing different veggies can also create a more colorful dish. Try to use at least three different kinds for variety. Adjust the sauce to match your taste. If you like it sweeter, add more honey. For a spicier kick, toss in some red pepper flakes. You can also switch vinegars. Here are some options: - Apple cider vinegar: It gives a fruity flavor. - Balsamic vinegar: Adds depth and sweetness. - White vinegar: For a sharper taste. Experimenting with these changes makes the dish your own. Don’t be afraid to try new flavors! For the full recipe, check the original instructions. To store leftovers, let the stir-fry cool down first. Place it in an airtight container. This keeps it fresh for up to three days in the fridge. When you're ready to eat, just take out the portion you want. If you want to freeze the stir-fry, use a freezer-safe bag or container. Remove as much air as possible to prevent freezer burn. You can freeze it for up to three months. Remember, some veggies may lose crunch when thawed, so choose your mix carefully. To reheat, the best method is on the stovetop. Add a splash of water or broth to keep it moist. Heat it over medium until hot. If you prefer the microwave, use a microwave-safe dish. Cover it with a damp paper towel to keep steam in. This helps maintain the texture and flavor. You can make this dish your own by adding personal touches. Try using different vegetables like zucchini or bok choy. You can also swap chicken for shrimp or tofu. Add your favorite nuts for a crunchy texture. Experiment with spicy sauces to kick up the heat. Each change can give you a new dish! Yes, frozen vegetables work well in this stir-fry. They save time and are easy to use. However, keep in mind that they may cook faster than fresh ones. You might need to adjust your cooking time. Aim for 3-4 minutes instead of 4-5 minutes for the veggies to stay crisp. Stir-fry goes great with several side dishes. Serve it with steamed jasmine rice for a classic touch. You can also pair it with brown rice for a healthier option. Noodles, like soba or rice noodles, also work well. Add a simple side salad for freshness and extra crunch. Absolutely! This sesame ginger chicken stir-fry is perfect for meal prep. Cook a big batch and divide it into containers. It stores well in the fridge for up to three days. To reheat, use a microwave or skillet. Just be sure to add a splash of water to keep it moist. To make this dish healthier, try a few simple swaps. Use less oil, or replace it with cooking spray. Choose low-sodium soy sauce to cut down on salt. Add more vegetables to increase fiber and nutrients. You can also cut back on honey for fewer calories. This blog post covered how to make a tasty Sesame Ginger Chicken Stir-Fry. We discussed key ingredients like chicken, fresh veggies, and flavorful sauces. I shared step-by-step cooking instructions, along with tips to enhance flavor and presentation. We also explored variations for dietary needs and the best ways to store leftovers. In summary, stir-fry is easy, fun, and flexible. You can customize it to suit your tastes. Enjoy making this dish your own, and share it with friends and family!](https://dishtreats.com/wp-content/uploads/2025/06/887f9040-7330-4bb7-a0e7-766c5efe9124-768x768.webp)


