Easy Greek Lemon Potatoes Flavorful and Simple Dish
![For this dish, you need simple yet vibrant flavors. The essential ingredients are: - 2 lbs baby potatoes, halved - 1/4 cup extra virgin olive oil - 1/4 cup freshly squeezed lemon juice Baby potatoes are perfect because they cook evenly and taste great. Extra virgin olive oil adds rich flavor and helps the potatoes crisp up. Fresh lemon juice gives a bright, zesty kick that makes these potatoes shine. To boost the taste, we use a few key spices. They include: - 3 cloves garlic, finely minced - 2 teaspoons dried oregano - 1 teaspoon sea salt - 1/2 teaspoon freshly ground black pepper Minced garlic brings warmth and depth. Dried oregano adds an earthy note that pairs well with lemon. Sea salt and black pepper enhance all the flavors, making every bite delicious. When serving, a few garnishes can elevate the dish. Here are my favorites: - 1 tablespoon fresh parsley, finely chopped (for garnish) - Lemon wedges (for serving) Fresh parsley adds color and a hint of freshness. Lemon wedges let guests add more zing if they like. These simple touches make your Greek lemon potatoes look and taste even better. For the full recipe, check out the details above! - First, preheat the oven to 400°F (200°C). This helps the potatoes roast evenly. - Next, grab a large mixing bowl. Add the olive oil, lemon juice, minced garlic, oregano, salt, and black pepper. Whisk these together until mixed well. This marinade adds a zesty flavor that makes the potatoes shine. - Now, take your halved baby potatoes and add them to the bowl with the marinade. - Toss the potatoes gently in the mixture. Make sure each piece is coated well. This step is key for flavor. - Carefully transfer the coated potatoes to a large baking dish. Arrange them in a single layer. This helps them cook evenly and get that nice golden color. - Place the baking dish in the oven. Roast the potatoes for 40-45 minutes. Remember to toss them halfway through. This ensures they brown nicely. - Once they are golden and tender, take the dish out of the oven. Let the potatoes cool for a few minutes. Just before serving, sprinkle with chopped parsley. Serve with lemon wedges for a burst of flavor. For the full recipe, check the detailed instructions. To get that golden brown finish, choose small baby potatoes. Their skin crisps nicely, giving a great texture. After roasting for about half the time, toss the potatoes. This helps them brown evenly. Use a spatula to gently turn them. For added zest, consider mixing in lemon zest with your marinade. Lemon zest brightens the dish. You can also add fresh herbs, like thyme or rosemary, for depth. Balance the garlic and lemon by not using too much garlic. The garlic should enhance, not overpower. Serve the potatoes in a colorful bowl to catch the eye. Arrange lemon wedges around the edge. This not only looks nice but adds flavor. You can sprinkle fresh parsley on top for a pop of color. It makes the dish more appealing and fresh. For the complete process, refer to the Full Recipe. {{image_4}} You can add more flavor by using herbs. Fresh herbs bring a bright taste. Dried herbs are easy and still tasty. I love using fresh parsley and thyme. They add freshness and depth. You can also try rosemary for a bold flavor. Mix and match herbs to find your favorite combo. Want to change things up? Try adding different citrus fruits. Oranges or limes give a nice twist. You can also use vegetable broth instead of oil. This makes the dish lighter and adds a new taste. Feel free to experiment with flavors until you find what you love. You don’t have to roast your potatoes. You can cook them on the stovetop too. Just boil them first and then sauté in the lemon mix. This method makes them soft and flavorful. Grilling is another option. It adds a smoky flavor you’ll enjoy. Try grilling them for a fun twist on this classic dish. To store your leftover Greek lemon potatoes, let them cool. Once cooled, place them in an airtight container. Use a glass or plastic container with a tight lid for best results. Store them in the fridge. They will stay fresh for about 3 to 5 days. Label the container with the date to keep track. For reheating, the oven works best. Preheat your oven to 350°F (175°C). Spread the potatoes on a baking sheet in a single layer. Heat for about 10 to 15 minutes until warm. This keeps them crisp. You can also use a microwave, but it may make them soggy. If using the microwave, heat in short bursts. Check often to avoid overcooking. You can freeze Greek lemon potatoes if you want to save some for later. First, let them cool completely. Then, place the potatoes in a freezer-safe bag. Remove as much air as possible before sealing. They can last up to 2 months in the freezer. To thaw, move them to the fridge overnight. Reheat them in the oven as mentioned earlier for the best taste. For Greek lemon potatoes, I recommend using baby potatoes. They are small and tender, which makes them perfect for roasting. Their skin is thin, so you can enjoy the flavor without peeling. You can also use Yukon Gold potatoes for a creamy texture. These potatoes absorb the lemon and garlic well, enhancing the dish's flavor. Yes, you can make this recipe ahead of time. I suggest roasting the potatoes and storing them in an airtight container in the fridge. You can roast them a day in advance. To reheat, simply warm them in the oven at 350°F until heated through. This keeps the potatoes tasty and fresh for your meal. Easy Greek lemon potatoes pair well with many dishes. You can serve them with grilled chicken or lamb for a complete meal. They also go great with a fresh Greek salad, giving you a nice balance of flavors. For a lighter option, pair them with roasted vegetables. The bright lemon taste complements any dish beautifully. If you're looking for more details, you can check out the [Full Recipe] for step-by-step guidance. Greek lemon potatoes are a simple and refreshing dish to make. We explored essential ingredients, step-by-step instructions, and great tips. You can customize flavors with herbs or other citrus fruits. Don't forget how to store leftovers for later enjoyment. These potatoes are not just easy to prepare but also shine at any meal. Experiment and make this recipe your own! Enjoy the bold flavors and satisfying textures. You’ll love sharing this dish with family and friends.](https://dishtreats.com/wp-content/uploads/2025/06/9ec2dfc2-ebd8-4d91-9e7c-548975c099b6.webp)
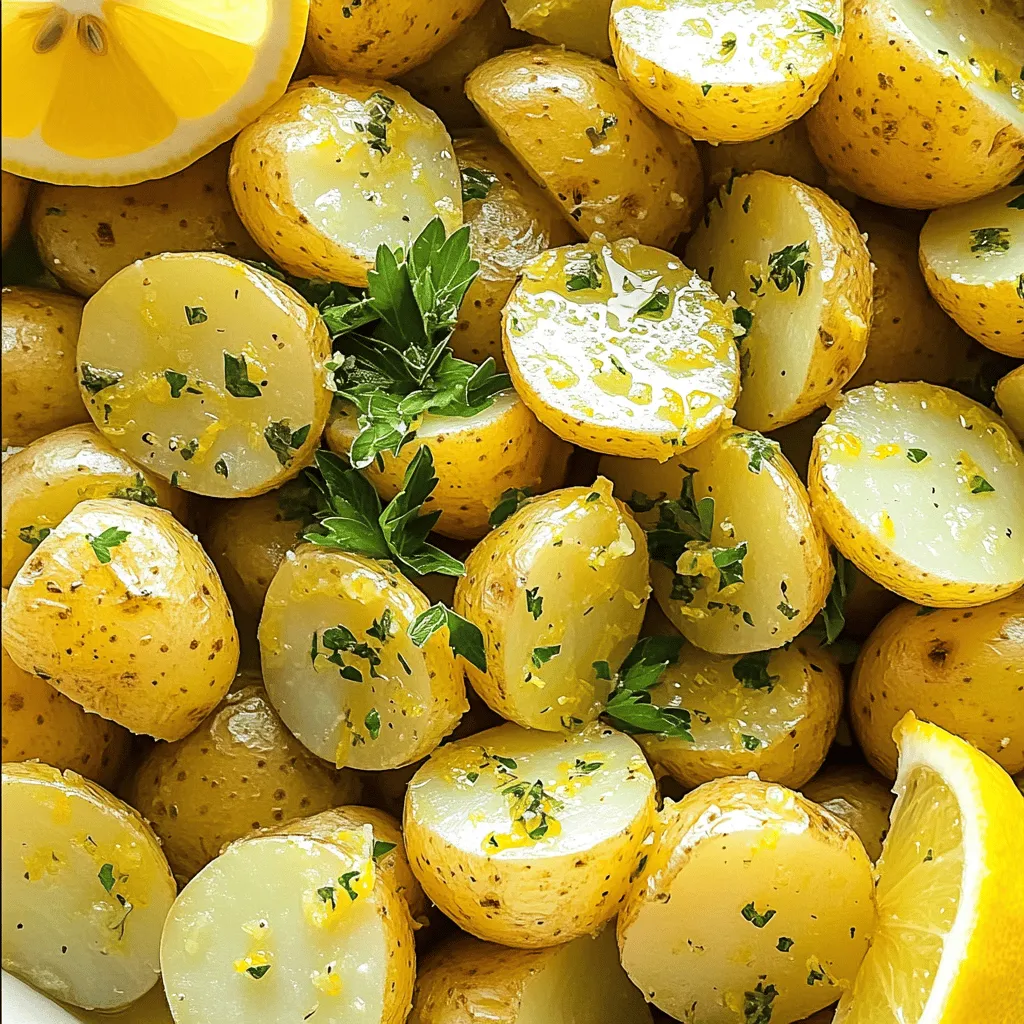
Looking for a simple, tasty dish that will impress at any meal? Easy Greek Lemon Potatoes are your answer! With bright lemon flavors, tender baby potatoes, and a touch of garlic, this dish is both delightful and easy to make. I’ll guide you through the quick steps to achieve that perfect golden finish. Get ready to savor the zest of Greece right in your kitchen!
Ingredients
Essential Ingredients for Easy Greek Lemon Potatoes
For this dish, you need simple yet vibrant flavors. The essential ingredients are:
- 2 lbs baby potatoes, halved
- 1/4 cup extra virgin olive oil
- 1/4 cup freshly squeezed lemon juice
Baby potatoes are perfect because they cook evenly and taste great. Extra virgin olive oil adds rich flavor and helps the potatoes crisp up. Fresh lemon juice gives a bright, zesty kick that makes these potatoes shine.
Spice and Seasoning Ingredients
To boost the taste, we use a few key spices. They include:
- 3 cloves garlic, finely minced
- 2 teaspoons dried oregano
- 1 teaspoon sea salt
- 1/2 teaspoon freshly ground black pepper
Minced garlic brings warmth and depth. Dried oregano adds an earthy note that pairs well with lemon. Sea salt and black pepper enhance all the flavors, making every bite delicious.
Garnishing and Serving Suggestions
When serving, a few garnishes can elevate the dish. Here are my favorites:
- 1 tablespoon fresh parsley, finely chopped (for garnish)
- Lemon wedges (for serving)
Fresh parsley adds color and a hint of freshness. Lemon wedges let guests add more zing if they like. These simple touches make your Greek lemon potatoes look and taste even better.
Step-by-Step Instructions
Prepping the Oven and Ingredients
- First, preheat the oven to 400°F (200°C). This helps the potatoes roast evenly.
- Next, grab a large mixing bowl. Add the olive oil, lemon juice, minced garlic, oregano, salt, and black pepper. Whisk these together until mixed well. This marinade adds a zesty flavor that makes the potatoes shine.
Coating the Potatoes
- Now, take your halved baby potatoes and add them to the bowl with the marinade.
- Toss the potatoes gently in the mixture. Make sure each piece is coated well. This step is key for flavor.
Roasting and Serving
- Carefully transfer the coated potatoes to a large baking dish. Arrange them in a single layer. This helps them cook evenly and get that nice golden color.
- Place the baking dish in the oven. Roast the potatoes for 40-45 minutes. Remember to toss them halfway through. This ensures they brown nicely.
- Once they are golden and tender, take the dish out of the oven. Let the potatoes cool for a few minutes. Just before serving, sprinkle with chopped parsley. Serve with lemon wedges for a burst of flavor.
Tips & Tricks
Perfecting the Texture of Your Potatoes
To get that golden brown finish, choose small baby potatoes. Their skin crisps nicely, giving a great texture. After roasting for about half the time, toss the potatoes. This helps them brown evenly. Use a spatula to gently turn them.
Enhancing Flavors
For added zest, consider mixing in lemon zest with your marinade. Lemon zest brightens the dish. You can also add fresh herbs, like thyme or rosemary, for depth. Balance the garlic and lemon by not using too much garlic. The garlic should enhance, not overpower.
Presentation Techniques
Serve the potatoes in a colorful bowl to catch the eye. Arrange lemon wedges around the edge. This not only looks nice but adds flavor. You can sprinkle fresh parsley on top for a pop of color. It makes the dish more appealing and fresh.

Variations
Adding Herbs
You can add more flavor by using herbs. Fresh herbs bring a bright taste. Dried herbs are easy and still tasty. I love using fresh parsley and thyme. They add freshness and depth. You can also try rosemary for a bold flavor. Mix and match herbs to find your favorite combo.
Flavor Enhancements
Want to change things up? Try adding different citrus fruits. Oranges or limes give a nice twist. You can also use vegetable broth instead of oil. This makes the dish lighter and adds a new taste. Feel free to experiment with flavors until you find what you love.
Cooking Method Alternatives
You don’t have to roast your potatoes. You can cook them on the stovetop too. Just boil them first and then sauté in the lemon mix. This method makes them soft and flavorful. Grilling is another option. It adds a smoky flavor you’ll enjoy. Try grilling them for a fun twist on this classic dish.
Storage Info
How to Store Leftovers
To store your leftover Greek lemon potatoes, let them cool. Once cooled, place them in an airtight container. Use a glass or plastic container with a tight lid for best results. Store them in the fridge. They will stay fresh for about 3 to 5 days. Label the container with the date to keep track.
Reheating Instructions
For reheating, the oven works best. Preheat your oven to 350°F (175°C). Spread the potatoes on a baking sheet in a single layer. Heat for about 10 to 15 minutes until warm. This keeps them crisp. You can also use a microwave, but it may make them soggy. If using the microwave, heat in short bursts. Check often to avoid overcooking.
Freezing Options
You can freeze Greek lemon potatoes if you want to save some for later. First, let them cool completely. Then, place the potatoes in a freezer-safe bag. Remove as much air as possible before sealing. They can last up to 2 months in the freezer. To thaw, move them to the fridge overnight. Reheat them in the oven as mentioned earlier for the best taste.
FAQs
What type of potatoes are best for Greek lemon potatoes?
For Greek lemon potatoes, I recommend using baby potatoes. They are small and tender, which makes them perfect for roasting. Their skin is thin, so you can enjoy the flavor without peeling. You can also use Yukon Gold potatoes for a creamy texture. These potatoes absorb the lemon and garlic well, enhancing the dish’s flavor.
Can I make this recipe ahead of time?
Yes, you can make this recipe ahead of time. I suggest roasting the potatoes and storing them in an airtight container in the fridge. You can roast them a day in advance. To reheat, simply warm them in the oven at 350°F until heated through. This keeps the potatoes tasty and fresh for your meal.
What can I serve with Easy Greek Lemon Potatoes?
Easy Greek lemon potatoes pair well with many dishes. You can serve them with grilled chicken or lamb for a complete meal. They also go great with a fresh Greek salad, giving you a nice balance of flavors. For a lighter option, pair them with roasted vegetables. The bright lemon taste complements any dish beautifully.
Greek lemon potatoes are a simple and refreshing dish to make. We explored essential ingredients, step-by-step instructions, and great tips. You can customize flavors with herbs or other citrus fruits. Don’t forget how to store leftovers for later enjoyment.
These potatoes are not just easy to prepare but also shine at any meal. Experiment and make this recipe your own! Enjoy the bold flavors and satisfying textures. You’ll love sharing this dish with family and friends.
![For this dish, you need simple yet vibrant flavors. The essential ingredients are: - 2 lbs baby potatoes, halved - 1/4 cup extra virgin olive oil - 1/4 cup freshly squeezed lemon juice Baby potatoes are perfect because they cook evenly and taste great. Extra virgin olive oil adds rich flavor and helps the potatoes crisp up. Fresh lemon juice gives a bright, zesty kick that makes these potatoes shine. To boost the taste, we use a few key spices. They include: - 3 cloves garlic, finely minced - 2 teaspoons dried oregano - 1 teaspoon sea salt - 1/2 teaspoon freshly ground black pepper Minced garlic brings warmth and depth. Dried oregano adds an earthy note that pairs well with lemon. Sea salt and black pepper enhance all the flavors, making every bite delicious. When serving, a few garnishes can elevate the dish. Here are my favorites: - 1 tablespoon fresh parsley, finely chopped (for garnish) - Lemon wedges (for serving) Fresh parsley adds color and a hint of freshness. Lemon wedges let guests add more zing if they like. These simple touches make your Greek lemon potatoes look and taste even better. For the full recipe, check out the details above! - First, preheat the oven to 400°F (200°C). This helps the potatoes roast evenly. - Next, grab a large mixing bowl. Add the olive oil, lemon juice, minced garlic, oregano, salt, and black pepper. Whisk these together until mixed well. This marinade adds a zesty flavor that makes the potatoes shine. - Now, take your halved baby potatoes and add them to the bowl with the marinade. - Toss the potatoes gently in the mixture. Make sure each piece is coated well. This step is key for flavor. - Carefully transfer the coated potatoes to a large baking dish. Arrange them in a single layer. This helps them cook evenly and get that nice golden color. - Place the baking dish in the oven. Roast the potatoes for 40-45 minutes. Remember to toss them halfway through. This ensures they brown nicely. - Once they are golden and tender, take the dish out of the oven. Let the potatoes cool for a few minutes. Just before serving, sprinkle with chopped parsley. Serve with lemon wedges for a burst of flavor. For the full recipe, check the detailed instructions. To get that golden brown finish, choose small baby potatoes. Their skin crisps nicely, giving a great texture. After roasting for about half the time, toss the potatoes. This helps them brown evenly. Use a spatula to gently turn them. For added zest, consider mixing in lemon zest with your marinade. Lemon zest brightens the dish. You can also add fresh herbs, like thyme or rosemary, for depth. Balance the garlic and lemon by not using too much garlic. The garlic should enhance, not overpower. Serve the potatoes in a colorful bowl to catch the eye. Arrange lemon wedges around the edge. This not only looks nice but adds flavor. You can sprinkle fresh parsley on top for a pop of color. It makes the dish more appealing and fresh. For the complete process, refer to the Full Recipe. {{image_4}} You can add more flavor by using herbs. Fresh herbs bring a bright taste. Dried herbs are easy and still tasty. I love using fresh parsley and thyme. They add freshness and depth. You can also try rosemary for a bold flavor. Mix and match herbs to find your favorite combo. Want to change things up? Try adding different citrus fruits. Oranges or limes give a nice twist. You can also use vegetable broth instead of oil. This makes the dish lighter and adds a new taste. Feel free to experiment with flavors until you find what you love. You don’t have to roast your potatoes. You can cook them on the stovetop too. Just boil them first and then sauté in the lemon mix. This method makes them soft and flavorful. Grilling is another option. It adds a smoky flavor you’ll enjoy. Try grilling them for a fun twist on this classic dish. To store your leftover Greek lemon potatoes, let them cool. Once cooled, place them in an airtight container. Use a glass or plastic container with a tight lid for best results. Store them in the fridge. They will stay fresh for about 3 to 5 days. Label the container with the date to keep track. For reheating, the oven works best. Preheat your oven to 350°F (175°C). Spread the potatoes on a baking sheet in a single layer. Heat for about 10 to 15 minutes until warm. This keeps them crisp. You can also use a microwave, but it may make them soggy. If using the microwave, heat in short bursts. Check often to avoid overcooking. You can freeze Greek lemon potatoes if you want to save some for later. First, let them cool completely. Then, place the potatoes in a freezer-safe bag. Remove as much air as possible before sealing. They can last up to 2 months in the freezer. To thaw, move them to the fridge overnight. Reheat them in the oven as mentioned earlier for the best taste. For Greek lemon potatoes, I recommend using baby potatoes. They are small and tender, which makes them perfect for roasting. Their skin is thin, so you can enjoy the flavor without peeling. You can also use Yukon Gold potatoes for a creamy texture. These potatoes absorb the lemon and garlic well, enhancing the dish's flavor. Yes, you can make this recipe ahead of time. I suggest roasting the potatoes and storing them in an airtight container in the fridge. You can roast them a day in advance. To reheat, simply warm them in the oven at 350°F until heated through. This keeps the potatoes tasty and fresh for your meal. Easy Greek lemon potatoes pair well with many dishes. You can serve them with grilled chicken or lamb for a complete meal. They also go great with a fresh Greek salad, giving you a nice balance of flavors. For a lighter option, pair them with roasted vegetables. The bright lemon taste complements any dish beautifully. If you're looking for more details, you can check out the [Full Recipe] for step-by-step guidance. Greek lemon potatoes are a simple and refreshing dish to make. We explored essential ingredients, step-by-step instructions, and great tips. You can customize flavors with herbs or other citrus fruits. Don't forget how to store leftovers for later enjoyment. These potatoes are not just easy to prepare but also shine at any meal. Experiment and make this recipe your own! Enjoy the bold flavors and satisfying textures. You’ll love sharing this dish with family and friends.](https://dishtreats.com/wp-content/uploads/2025/06/9ec2dfc2-ebd8-4d91-9e7c-548975c099b6-300x300.webp)


![- 2 cans young green jackfruit - 1 tablespoon olive oil - 1 medium onion, finely chopped - 1 teaspoon smoked paprika - 1 teaspoon ground cumin - 1 teaspoon chili powder - 1/2 teaspoon black pepper - 1/2 teaspoon cayenne pepper (adjust to taste) - 4 sturdy sandwich rolls - Coleslaw (optional, for topping) When making BBQ pulled pork sandwiches, the ingredients are key. Young green jackfruit is the star. It has a texture similar to pulled pork and absorbs flavors well. Use two cans for four servings, and don’t forget to rinse and drain them! For the base flavor, olive oil and onion work wonders. The oil helps to sauté the onion, which adds sweetness and depth. A finely chopped onion is best for even cooking and flavor distribution. Spices bring the dish to life. Smoked paprika adds a lovely smokiness, and ground cumin gives it warmth. Chili powder adds a kick, while black and cayenne pepper let you control the heat. For the sandwich, sturdy rolls hold up best. Choose your favorite type. Optional coleslaw adds crunch and creaminess. It’s a nice touch that balances the rich BBQ flavor. For the full recipe, follow the steps to create your BBQ pulled pork sandwiches that are simple and tasty! To start, you need to shred the jackfruit. Grab two cans of young green jackfruit, and drain them well. Rinse the jackfruit under cool water. With clean hands or two forks, pull apart the jackfruit into thin strands. Aim for a texture that mimics pulled pork. Set the shredded jackfruit aside for later use. Now, let’s sauté the onions and garlic. Heat one tablespoon of olive oil in a large skillet over medium heat. Add one finely chopped medium onion. Stir occasionally until the onion turns soft and translucent, about five minutes. Next, add minced garlic. Use four cloves for a nice kick. Sauté for another minute. You want the garlic fragrant, not browned. It’s time to bring it all together! Add the shredded jackfruit to the skillet. Mix well to coat the jackfruit with the onion and garlic. Now, it’s spice time! Incorporate one teaspoon of smoked paprika, one teaspoon of ground cumin, and one teaspoon of chili powder. Add half a teaspoon of black pepper and half a teaspoon of cayenne pepper. Stir everything together for a minute to let the flavors meld. Next, pour in one cup of BBQ sauce. You can use store-bought or homemade, depending on your preference. Mix until all the jackfruit strands are covered in sauce. Lower the heat and cover the skillet. Let it simmer for 20 to 25 minutes. Stir occasionally, adding a splash of water if it looks dry. Taste and season with salt as needed. Now, while the jackfruit simmers, you can toast the sandwich rolls. Preheat your oven or a skillet. Lightly toast the rolls until golden brown. This step adds a nice crunch. Once the jackfruit is ready, it’s time to assemble your sandwiches. Grab a toasted roll, spoon a good amount of BBQ jackfruit onto the bottom half. If you want, add some coleslaw for extra crunch. Top with the other half of the roll, and enjoy your smoky sweet BBQ pulled jackfruit sandwich! For the full recipe details, check [Full Recipe]. To get the best taste, adjust the spices to fit your likes. Start with the base spices: smoked paprika, ground cumin, and chili powder. These give the jackfruit a deep, rich flavor. If you like it spicy, add more cayenne pepper. Remember, you can always add more spice, but you can’t take it away! Toasting the rolls makes a big difference. Use a skillet or an oven. If using a skillet, heat it over medium heat. Place the rolls cut-side down and toast until golden brown. If you choose the oven, set it to 375°F (190°C). Bake the rolls for about 5-7 minutes. This adds a nice crunch that pairs well with the soft jackfruit. When serving BBQ pulled pork sandwiches, make it fun! Use a wooden board for a rustic look. Place the sandwiches on it and add a small bowl of BBQ sauce for dipping. You can also add extra coleslaw on the side for a pop of color and crunch. This makes your meal look inviting and delicious. For the full recipe, check out the recipe section! {{image_4}} Using a slow cooker makes this dish simple and hands-off. Start by shredding the jackfruit as before. Place it in the slow cooker with olive oil, chopped onion, and minced garlic. Stir in the spices: smoked paprika, ground cumin, chili powder, and black pepper. Pour in your BBQ sauce. Cover and cook on low for 6 to 8 hours. The jackfruit will absorb all the flavors and become tender. You’ll love how easy this method is! Different areas have their own special takes on BBQ pulled pork. In the South, you might try adding vinegar-based sauces for a tangy twist. In Texas, a smoky chipotle sauce can add a kick. Up North, you might find a sweeter sauce with apple cider. Feel free to explore these local flavors. Your sandwiches will reflect your own region's tastes! If you want to switch things up, there are other great options. You can use mushrooms or lentils. Both provide a hearty texture. For a lighter option, consider using shredded zucchini or eggplant. They soak up flavors well too. Just remember to adjust your spices to match. Enjoy the creativity in your kitchen! To keep your leftover sandwiches tasty, store them in an airtight container. Make sure to separate the jackfruit mixture from the rolls. This helps prevent sogginess. Leftover jackfruit can last in the fridge for about three to four days. If you plan to eat them soon, add some extra BBQ sauce to keep them moist. If you want to save the jackfruit mixture for later, freezing works well. First, let the jackfruit cool completely. Then, place it in a freezer-safe container or bag. Make sure to remove any air. This helps avoid freezer burn. The mixture can stay fresh for about three months. Just remember to label the container with the date. When you’re ready to enjoy your pulled pork sandwiches, reheating is key. For the best results, use the stovetop. Place the jackfruit in a skillet over low heat. Add a splash of water or BBQ sauce to keep it moist. Stir until heated through. If you prefer the oven, preheat it to 350°F (175°C). Cover the jackfruit in a baking dish with foil. Heat for about 15 minutes. Enjoy your delicious BBQ pulled pork sandwiches! Yes, you can make BBQ pulled pork sandwiches ahead of time. This dish is perfect for meal prep. I suggest cooking the jackfruit and storing it in the fridge. It stays fresh for about 3 to 5 days. When you're ready to eat, just reheat it on the stove. You can also toast the rolls just before serving. This way, the sandwiches taste fresh and warm. The best BBQ sauce is one that fits your taste. If you like sweet, try a honey BBQ sauce. If you prefer spicy, go for a chipotle sauce. There are many great store-bought options, like Sweet Baby Ray's or Stubb's. You can also make your own. A mix of ketchup, vinegar, and spices creates a great flavor. To make jackfruit taste like pulled pork, focus on flavor. Start by shredding the jackfruit into thin strands. Cook it with onions, garlic, and spices like smoked paprika and cumin. These add depth to the dish. The BBQ sauce is key too. It coats the jackfruit and infuses it with rich flavor. Let it simmer for a while to soak up all those tasty notes. This article covered how to make BBQ pulled jackfruit sandwiches. You learned about the main ingredients, spices, and how to prepare each component. I shared step-by-step instructions to help you shred, sauté, and combine ingredients. You also received tips for perfecting flavor, toasting rolls, and creative presentations. Lastly, we explored variations, storage info, and frequently asked questions. Enjoy cooking this tasty dish that’s both fun and simple to make!](https://dishtreats.com/wp-content/uploads/2025/06/394fc23c-fade-4441-b59c-acd30966e9f2-768x768.webp)


![To make a healthy sweet potato hash, you need these ingredients: - 2 large sweet potatoes, peeled and cut into small cubes - 1 red bell pepper, cut into small cubes - 1 green bell pepper, cut into small cubes - 1 small red onion, finely diced - 3 cloves of garlic, minced - 1 teaspoon smoked paprika - 1 teaspoon ground cumin - ½ teaspoon cayenne pepper (optional, for a spicy kick) - 2 tablespoons olive oil - Sea salt and freshly cracked black pepper, to taste - 4 large eggs (optional, for topping) - Fresh cilantro or parsley, finely chopped (for garnish) These ingredients work well together. Sweet potatoes bring a natural sweetness. Bell peppers add crunch and color. Onions and garlic give a lovely aroma and flavor. Spices like smoked paprika and cumin make this dish really pop. If you want extra protein, you can add eggs on top. Fresh herbs add a nice touch at the end. For the full recipe, you can check the detailed instructions I provided earlier. 1. First, heat 2 tablespoons of olive oil in a large skillet over medium heat. Wait until it shimmers, which means it’s ready. 2. Next, add 2 large sweet potatoes, cut into small cubes. Spread them out in a single layer. Let them cook for about 5 minutes without stirring. This helps them get crispy. 3. After 5 minutes, stir the sweet potatoes. Cook until they are soft and golden, about another 10 minutes. 1. Now, it’s time to add flavor! Stir in 1 small red onion, finely diced. Keep cooking for about 3-4 minutes until the onion is soft and clear. 2. Then, mix in 3 cloves of minced garlic, 1 red bell pepper, and 1 green bell pepper, both cut into small cubes. 3. Add spices: 1 teaspoon smoked paprika, 1 teaspoon ground cumin, and ½ teaspoon cayenne pepper if you want heat. Stir well and let it cook for 5-7 minutes. The peppers should be tender, and the sweet potatoes should be fork-tender. Season with sea salt and black pepper to taste. 1. If you want to add eggs, create 4 small wells in the hash mixture. Crack an egg into each well. 2. Cover the skillet with a lid and cook for about 5 minutes. This cooks the eggs to your liking. For runny yolks, 5 minutes is perfect. This vibrant sweet potato hash is not just easy to make; it’s also packed with flavor. For the full recipe, refer to the earlier sections. To get the best sweet potato hash, focus on the cooking process. Start with small cubes of sweet potato. This helps them cook faster and evenly. Cook them in a hot skillet so they get crispy. I recommend using a cast-iron skillet. It holds heat well and gives a nice sear to your veggies. Spices can really boost the flavor. I love using smoked paprika and cumin. These spices add warmth and depth. If you like heat, add cayenne pepper too. You can adjust the spice levels based on your taste. Start with a small amount and add more if needed. Serving matters! For a pretty look, use shallow bowls. Place the hash in the center, and if you added eggs, make sure they sit on top. This highlights them nicely. A sprinkle of fresh herbs like cilantro or parsley adds color. A slice of creamy avocado on the side makes it even better. For the complete recipe, check out the [Full Recipe]. {{image_4}} Sweet potatoes are packed with nutrients. They are high in vitamins A and C. These vitamins help keep your skin healthy and boost your immune system. One medium sweet potato gives you over 400% of your daily vitamin A needs. This vitamin is great for your eyes and skin. Sweet potatoes also contain fiber. Fiber helps your digestion and keeps you feeling full. By adding sweet potatoes to your breakfast, you get a tasty way to start your day. You include a healthy veggie that fills you with energy. To make this sweet potato hash a balanced meal, add proteins and healthy fats. Protein keeps you strong and satisfied. You can top your hash with eggs for extra protein. Eggs also add a creamy texture. If you want healthy fats, consider adding avocado. This will give your dish a smooth, rich flavor. You can also use nuts or seeds for crunch. Integrating this hash into your diet is easy. It suits different meals, not just breakfast. Serve it for lunch or dinner too. This flexibility makes it a great choice for any day. Enjoy this delicious dish while knowing you are eating well. Check out the Full Recipe for more details! You can change the flavors in your sweet potato hash easily. Adding different vegetables makes it fun. Try adding zucchini or spinach for a fresh twist. Both add great taste and color. You can also use Italian herbs for a different flavor profile. Oregano and basil can enhance your dish. Don't be afraid to mix and match! Adding protein to your hash makes it more filling. You can use chicken or turkey for a hearty meal. Just cook the meat first, then add it to the hash. If you prefer a vegetarian option, tofu or beans work well. Tofu can soak up the flavors of the spices. Beans like black or kidney add fiber and protein. You can serve sweet potato hash in many ways. For breakfast, serve it with eggs on top. The runny yolks add creaminess to each bite. If you're having brunch, add a side salad for balance. You can also create a savory sweet potato bowl. Just layer the hash with your favorite toppings. Think avocado, salsa, or even a dollop of yogurt. Each of these changes keeps your meal exciting! For the full recipe, check out the detailed guide. You can store sweet potato hash in the fridge for up to four days. Make sure to place it in an airtight container. When you’re ready to eat, reheat it on the stove or in the microwave. For the best taste, add a splash of olive oil when reheating. This helps keep the hash moist and tasty. Yes, you can easily make this recipe vegan. Instead of eggs, you can use tofu or chickpea flour. Just scramble the tofu or mix chickpea flour with water to create a batter. You can also replace olive oil with avocado oil or coconut oil. This keeps the flavors rich while making it plant-based. Absolutely! Sweet potato hash is perfect for meal prep. You can cook a big batch and store it in the fridge. Divide it into portions for the week. Just reheat what you need each day. You can also add different proteins or veggies for variety throughout the week. To reheat the hash, use a skillet over medium heat. This helps keep its texture nice. Stir occasionally to ensure even heating. If using a microwave, heat it in short bursts of 30 seconds. Stir in between to avoid hot spots. This way, your hash stays tasty and not mushy. Yes, cheese can add great flavor! Try sharp cheddar or feta for a nice twist. You can sprinkle it on top while the hash is still hot. This lets the cheese melt nicely. If you prefer a creamier texture, consider adding cream cheese or goat cheese. This blog post covered a tasty sweet potato hash recipe from start to finish. We explored essential ingredients, cooking steps, and tips to enhance flavor. You also learned about nutritional benefits and variations to customize your dish. In the end, this recipe is not just easy to make; it’s also a great way to start your day. Try it and enjoy the burst of flavors and textures. You can make it your own with simple adjustments or serve it as is. Your breakfast just got better!](https://dishtreats.com/wp-content/uploads/2025/06/2729619c-b847-4f07-91dc-14d4acdaca85-768x768.webp)