Easy Chicken Enchilada Casserole Simple Family Meal

Looking for a quick and tasty dinner? This Easy Chicken Enchilada Casserole is your answer! With just a few simple ingredients, you can whip up a meal that your whole family will love. In this blog, I’ll guide you through step-by-step instructions, plus tips to make it even better. Whether you’re busy or just looking for a fun twist on dinner, this dish delivers. Let’s get started!
Ingredients
Essential Ingredients List
- 2 cups cooked chicken, shredded
- 1 can (15 oz) black beans, drained and rinsed
- 1 can (10 oz) red enchilada sauce
- 1 cup corn kernels
- 2 cups shredded cheddar cheese
- 1 cup sour cream
- 8 small flour tortillas
Spices and Seasonings
- 1 teaspoon ground cumin
- 1 teaspoon smoked paprika
- 1/2 teaspoon garlic powder
- Salt and pepper to taste
Optional Garnishes
- Fresh cilantro for garnish
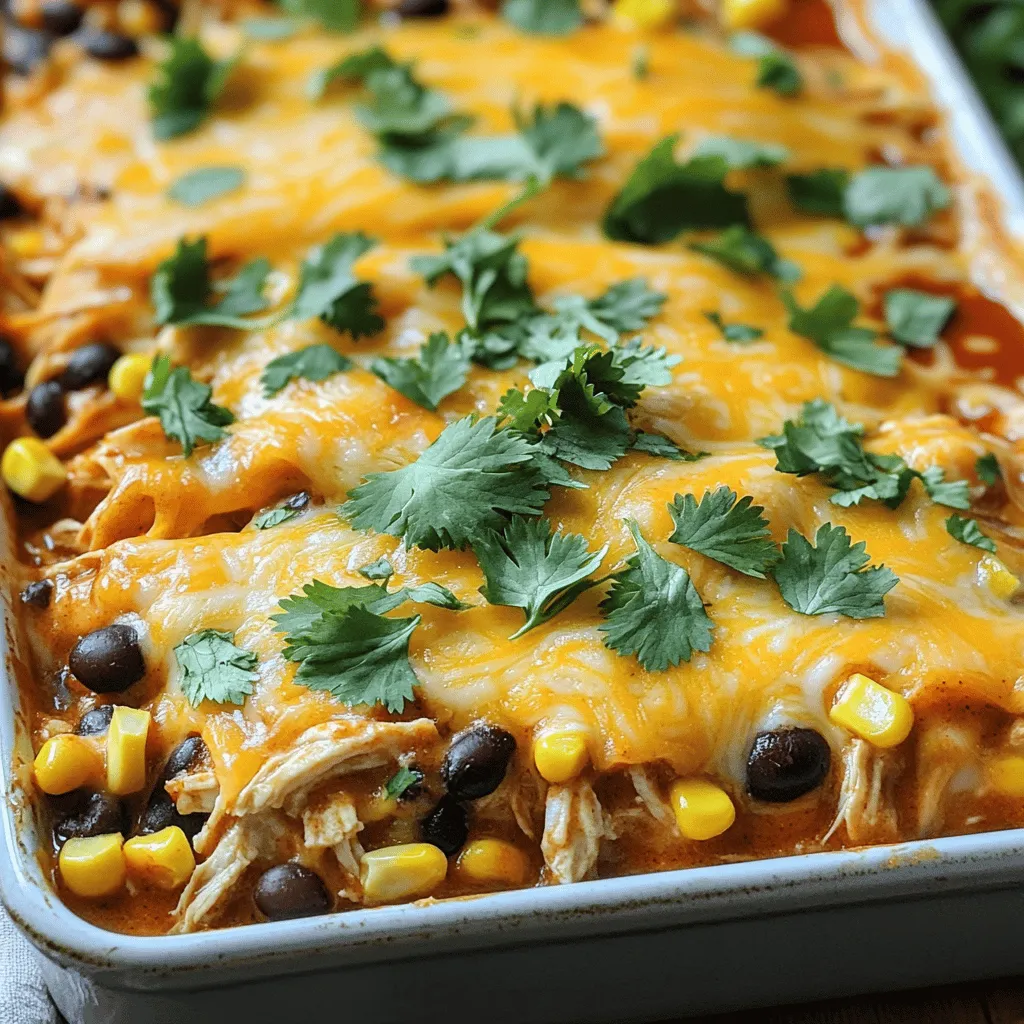
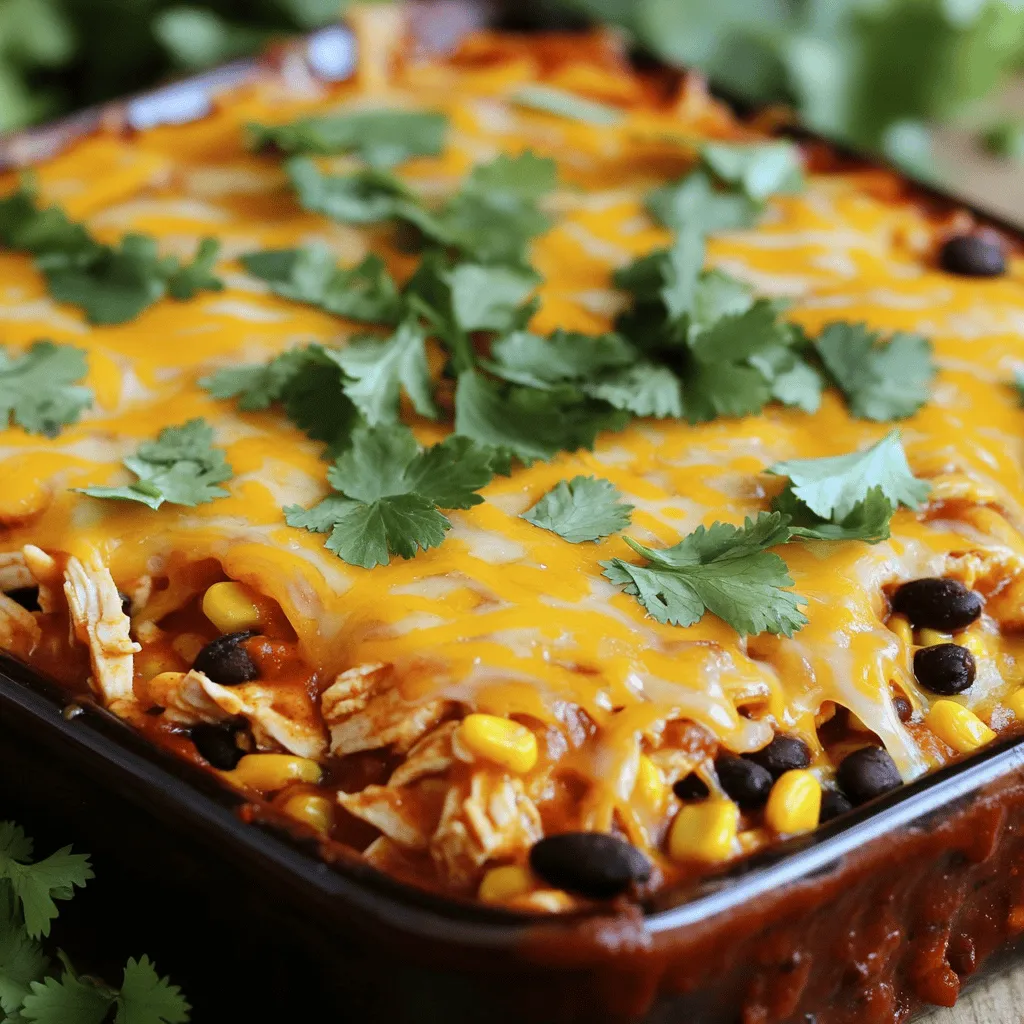
To make Easy Chicken Enchilada Casserole, you need simple ingredients. First, gather your cooked chicken. You can use rotisserie chicken for speed. Next, grab black beans, red enchilada sauce, and corn. These three add great flavor and texture.
Cheddar cheese is key. It melts beautifully and gives that cheesy goodness we all love. Sour cream adds creaminess. The tortillas hold everything together and soak up the flavors.
For spices, cumin and smoked paprika are must-haves. They add warmth and depth to the dish. Garlic powder gives a nice kick. Don’t forget to season with salt and pepper to enhance all these flavors.
For a fresh touch, cilantro makes a great optional garnish. You can add it when serving to brighten the dish.
This recipe is easy and fun.Enjoy creating this tasty meal!
Step-by-Step Instructions
Preparation Steps
- Preheat your oven to 350°F (175°C).
- In a large bowl, mix shredded chicken, black beans, corn, and 1/2 cup of enchilada sauce. This mix is full of flavor and easy to make.
Layering the Casserole
- Spread a thin layer of enchilada sauce on the bottom of a baking dish. This keeps everything moist.
- Cut each flour tortilla in half and arrange them in a single layer on top of the sauce.
- Add half of the chicken mixture on top of the tortillas.
- Spread half of the sour cream over the chicken mixture.
- Sprinkle 1 cup of shredded cheddar cheese over the sour cream.
Baking Instructions
- Repeat the layering with the remaining tortilla halves, chicken mixture, sour cream, and cheese.
- Drizzle the leftover enchilada sauce over the top of the casserole.
- Cover the dish with foil and bake for 25 minutes.
- After 25 minutes, remove the foil and bake for another 10 minutes. The cheese should be bubbly and golden brown.
- Let the casserole cool for 5-10 minutes before slicing into squares. Enjoy this delicious dish!
Tips & Tricks
Cooking Tips
- Ensure chicken is shredded evenly for consistent flavor distribution.
- Covering with foil during the first bake traps moisture.
When your chicken is evenly shredded, every bite tastes great. If you mix in big chunks, some bites might lack flavor. Covering the dish keeps it juicy. After the first bake, remove the foil to crisp the top.
Presentation Tips
- Serve warm, garnished with cilantro and a dollop of sour cream for added appeal.
A warm dish looks inviting. Fresh cilantro adds color. A dollop of sour cream gives a creamy texture. This makes your casserole pop on the table.
Flavor Enhancements
- Experiment with different types of cheese or add green chilies for extra heat.
Switching up the cheese can change the flavor. Try Monterey Jack or pepper jack for a twist. Adding green chilies can give your dish a spicy kick. This keeps your casserole exciting every time you make it.

Variations
Vegetarian Option
You can make this dish meat-free. Just substitute the chicken with cooked lentils or more beans. Lentils add protein and fiber. They also soak up the tasty flavors. You can use black beans, pinto beans, or kidney beans. This makes the casserole just as hearty and delicious.
Gluten-Free Adaptation
If you need a gluten-free dish, you have options. Use corn tortillas instead of flour. You can also find gluten-free tortilla alternatives in stores. Be sure to check the labels to avoid any gluten. This way, everyone at the table can enjoy the meal without worry.
Additions & Substitutions
Feel free to mix things up! Adding diced bell peppers can give a nice crunch. They add color and flavor, too. Olives are another great choice. They bring a salty kick that complements the other ingredients. You can even add corn for extra sweetness. Get creative and make it your own!
Storage Info
Refrigeration
Store leftovers in an airtight container in the refrigerator for up to 3-4 days. This keeps the dish fresh and ready for your next meal. I love to have a tasty lunch option waiting in the fridge.
Freezing Instructions
Freeze individual portions for up to 2 months. This is great for busy days. Just thaw the portions overnight in the fridge before reheating. You will enjoy the same great taste when you’re ready to eat.
Reheating Tips
Reheat in the oven to maintain crispiness. Set it to 350°F (175°C) and cover with foil for best results. If you’re in a hurry, the microwave is a quick alternative. Just remember, it might not be as crispy!
FAQs
Can I make this recipe ahead of time?
Yes, you can assemble the casserole and refrigerate it overnight before baking. This saves time on busy days and helps flavors blend better. Just take it out of the fridge and bake as usual.
What can I serve with Easy Chicken Enchilada Casserole?
Pair with a side salad, guacamole, or tortilla chips. A fresh salad adds crunch and brightness. Guacamole gives a creamy touch, and chips offer a fun crunch. You can also add sour cream for extra richness.
How do I know when the casserole is done?
Look for bubbly cheese and a golden brown top; a toothpick should come out clean if inserted. When it looks nice and brown, it’s ready to eat. Let it cool for a few minutes before serving for the best taste.
This post covers the Easy Chicken Enchilada Casserole from ingredients to storage tips. You’ve learned what you need and how to bake it perfectly. Remember to customize it to suit your tastes, whether it’s an added spice or a vegetarian swap. Enjoy this dish warm, garnished with cilantro for extra flavor. With these steps, your casserole will be a hit. Try it soon and satisfy your cravings!


![To make crispy baked sweet potato fries, you need just a few simple ingredients. Here’s what you’ll need: - 2 large sweet potatoes - 2 tablespoons extra-virgin olive oil - 1 teaspoon cornstarch - 1 teaspoon smoked paprika - 1/2 teaspoon garlic powder - 1/2 teaspoon onion powder - 1/4 teaspoon cayenne pepper (optional) - Salt and freshly ground black pepper - Fresh parsley for garnish These ingredients combine to create a flavorful and fun side dish. Sweet potatoes give a natural sweetness. Olive oil helps with that crispy texture. The cornstarch is the secret for extra crunch. Smoked paprika adds a nice depth of flavor. Garlic and onion powder bring warmth. Cayenne pepper can spice things up if you like it hot. Finally, salt and pepper enhance everything. Using fresh parsley on top not only looks nice but adds a fresh taste. This is the perfect mix for a tasty treat. You can find the full recipe in the recipe section to make it easy for you. 1. Preheat your oven to 425°F (220°C). It’s key for crispiness. 2. Line a large baking sheet with parchment paper. This helps fries not stick. 3. Take 2 large sweet potatoes. Rinse and cut them into even-sized fries. Try to keep them similar in size for even cooking. 4. Place the fries in a mixing bowl. Drizzle 2 tablespoons of olive oil over them. Mix well to coat each fry evenly. 1. Sprinkle 1 teaspoon of cornstarch over the fries. This helps them get that crispy texture. 2. Add spices: 1 teaspoon of smoked paprika, 1/2 teaspoon of garlic powder, 1/2 teaspoon of onion powder, and 1/4 teaspoon of cayenne pepper if you like spice. 3. Season with salt and black pepper to taste. Toss the fries gently to make sure they are all coated well with the seasonings. 1. Arrange the seasoned fries on your baking sheet. Make sure they are in a single layer. This allows air to flow and makes them crispy. 2. Bake in the preheated oven for 25 to 30 minutes. Flip the fries halfway through. This helps them brown evenly. 3. When they turn golden and crispy, they are ready. Let them cool for a few minutes before serving. Enjoy these crispy baked sweet potato fries with your favorite dips! For the full recipe, check out the detailed instructions. To get the best crispy fries, air circulation is key. When you spread the fries out on the baking sheet, make sure they aren't touching. This allows hot air to flow all around them. If your fries aren’t crispy enough, try adding a few extra minutes to the cooking time. Keep an eye on them to avoid burning. You can customize the spice levels based on your taste. If you like more heat, add more cayenne pepper. For a milder flavor, leave it out. You can also swap the spices for other favorites like chili powder or Italian herbs. Mix and match to find your perfect blend. An eye-catching way to serve your fries is in a cone or a basket with parchment paper. This makes them look fun and inviting. Pair your fries with tasty dipping sauces like spicy mayo, creamy ranch, or classic ketchup. It adds more flavor and makes the meal special. Enjoy your crispy baked sweet potato fries from the [Full Recipe]. {{image_4}} You can easily change the taste of your sweet potato fries. For a sweet and spicy option, drizzle them with maple syrup before baking. This will add a nice glaze and a kick of flavor. If you prefer herbs, try adding fresh rosemary or thyme. These herbs bring a savory touch that pairs well with the natural sweetness of the potatoes. Using an air fryer is a fantastic way to make crispy fries. Set your air fryer to 400°F (200°C) and cook them for about 15-20 minutes. Shake the basket halfway through to ensure even cooking. If you enjoy grilling, you can also grill sweet potato fries. Slice them thicker, brush with olive oil, and grill over medium heat for about 5-7 minutes on each side. This gives a nice smoky flavor. Sweet potato fries are great on their own, but you can elevate your meal. Pair them with grilled chicken, fish, or a fresh salad for a balanced dish. They also work well in meal prep. You can make a batch and store them in the fridge. Just reheat them for a quick snack or side dish. For a fun twist, serve them in a cone with a side of your favorite dipping sauce. Try creamy ranch, spicy mayo, or classic ketchup for added flavor. For the full recipe, check out the full recipe link! To keep your crispy baked sweet potato fries fresh, store them in the fridge. Place them in an airtight container. This helps maintain their flavor and texture. They can last for up to three days in the fridge. If you want to keep them longer, freezing is a great option. Place the fries in a freezer-safe bag. Remove as much air as you can before sealing. This prevents freezer burn and keeps them tasty. When you're ready to enjoy your leftovers, reheating is key. For crispy fries, use the oven. Preheat your oven to 400°F (200°C). Spread the fries in a single layer on a baking sheet. Heat for about 10 to 15 minutes, flipping halfway through. This method keeps the fries crispy. You can also use an air fryer. Set it to 380°F (193°C) and heat for about 5 to 7 minutes. Avoid using a microwave, as it can make the fries soggy. In the fridge, your fries can last about three days. In the freezer, they can last up to three months. When you store them correctly, you can enjoy them later without losing flavor or texture. Just remember to check for any signs of freezer burn if they are in the freezer for a while. How can I make sweet potato fries even crispier? To make your sweet potato fries crispier, soak them in cold water. Do this for at least 30 minutes. This helps remove excess starch. After soaking, dry them well with a towel. Also, use cornstarch before baking to create a crisp outer layer. Can I use regular potatoes instead? Yes, you can use regular potatoes. They will taste different but can still be delicious. You might need to adjust the cooking time. Regular potatoes may cook faster than sweet potatoes. What's the nutritional value of sweet potato fries? Sweet potato fries are high in vitamins A and C. They are also a good source of fiber. Compared to regular fries, they have fewer calories and more nutrients. This makes them a healthier choice for a snack or side dish. What is the optimal temperature for baking sweet potato fries? The best temperature for baking sweet potato fries is 425°F (220°C). This high heat helps them cook evenly and get crispy. How long should I bake them for the best results? Bake the fries for 25 to 30 minutes. Be sure to flip them halfway through to get an even golden color. They should look crispy and slightly browned when done. Can I use a different oil? Yes, you can use other oils like avocado oil or canola oil. Each oil has a different flavor, but all will work well for baking. What if I don't have cornstarch? If you don't have cornstarch, you can use potato starch or even flour. Both will help create a crisp texture. Just use the same amount as the cornstarch in the recipe. Making sweet potato fries is simple and fun. You learned the key ingredients and steps to create crispy fries. I shared tips for seasoning and presentation to elevate your meal. You can also explore variations and alternative cooking methods. Storing and reheating properly ensures you can enjoy leftovers without losing quality. Incorporate your favorite flavors and get creative. Remember, these fries are a tasty, healthy option for any meal. Enjoy your cooking adventure!](https://dishtreats.com/wp-content/uploads/2025/07/5c45319a-0858-4d48-b29a-502acd419023-768x768.webp)

