
Are you ready to discover a tasty, easy treat? Crispy Teriyaki Tofu Bites are for you! These bite-sized wonders pack a punch of flavor and crunch. In this post, I’ll walk you through every step to make these delightful snacks. From preparing the tofu to serving ideas, I’ve got you covered. Let’s dive into this simple recipe that will impress your taste buds!
Why I Love This Recipe
- Easy Preparation: This recipe is straightforward, making it perfect for both beginner and experienced cooks.
- Flavorful Marinade: The teriyaki marinade infused with ginger and garlic elevates the taste of the tofu to a whole new level.
- Crispy Texture: The cornstarch coating ensures that the tofu bites turn out perfectly crispy, adding a delightful crunch.
- Versatile Serving: These tofu bites can be served as an appetizer, main dish, or even tossed in a salad for extra protein.
Ingredients
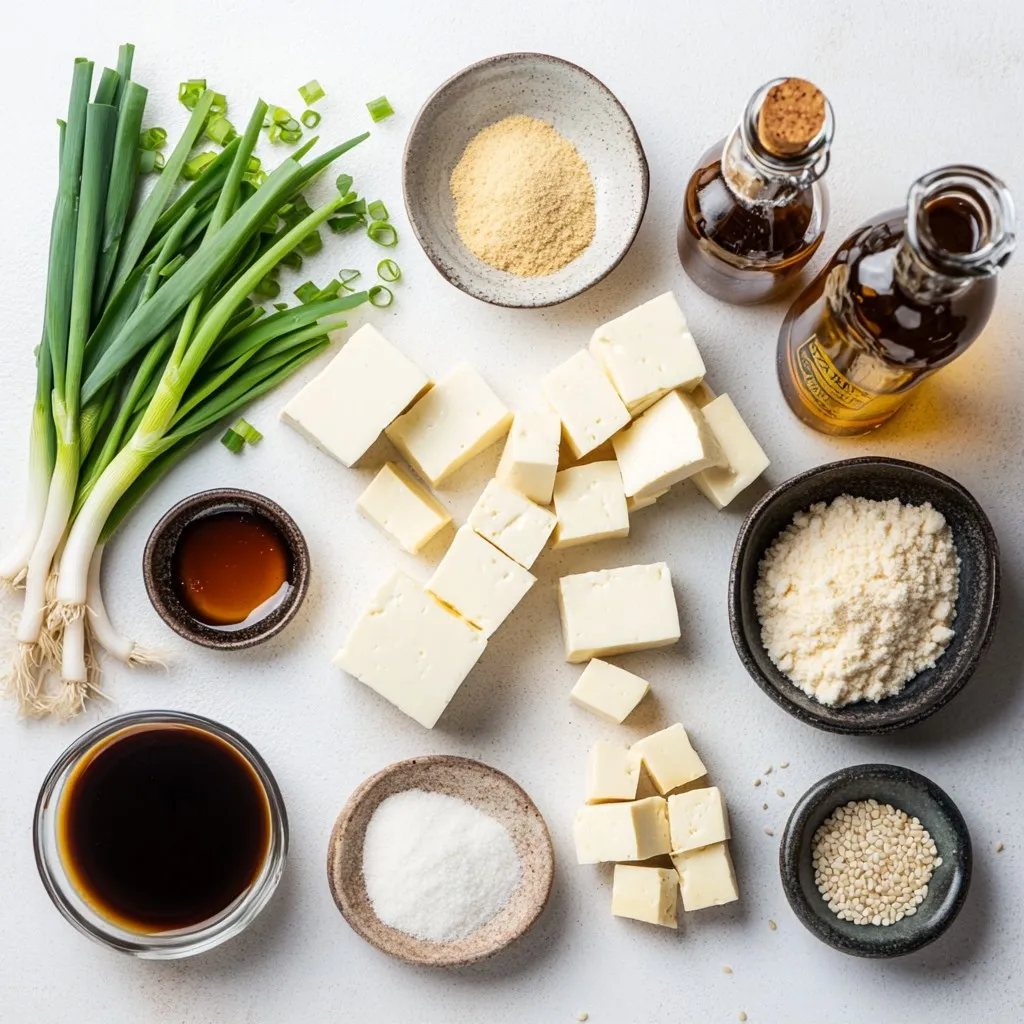
List of Ingredients
– 1 block (14 oz) firm tofu, pressed and cubed
– 1/4 cup soy sauce
– 1/4 cup pure maple syrup
– 1 tablespoon rice vinegar
– 2 teaspoons freshly grated ginger
– 2 cloves garlic, minced
– 1 tablespoon cornstarch
– 1 tablespoon sesame oil
– 1 tablespoon vegetable oil (for frying)
– Sesame seeds (for garnish)
– 2 green onions, sliced (for garnish)
Measurement Tips
When measuring liquid ingredients, use a clear measuring cup. This helps you see the level. For dry ingredients, a set of measuring spoons gives you the best accuracy. Always pack the cornstarch lightly when measuring to avoid clumps.
Ingredient Substitutions
If you need a soy-free option, try tamari. For a different sweetener, honey or agave syrup work well. If you don’t have rice vinegar, apple cider vinegar can be a good swap. You can also use garlic powder instead of fresh garlic if needed.
Step-by-Step Instructions
Preparing the Tofu
Start by pressing the tofu. This helps remove water and makes the tofu firm. Press for about 15-20 minutes. After that, cut the tofu into bite-sized cubes. Aim for even pieces to help them cook well.
Making the Teriyaki Marinade
In a medium bowl, mix together the soy sauce, maple syrup, rice vinegar, grated ginger, and minced garlic. Whisk these ingredients until they blend well. Save a few tablespoons of this marinade for later.
Marinating and Coating the Tofu
Place the tofu cubes in a shallow dish. Pour the teriyaki marinade over the tofu. Make sure each cube is well-coated. Cover the dish and let it marinate for at least 30 minutes. For a stronger flavor, marinate for up to 2 hours. After marinating, sprinkle cornstarch over the tofu. Toss gently to coat each piece evenly. This step is key for a crispy texture.
Frying the Tofu Bites
Heat the vegetable oil in a non-stick skillet over medium-high heat. Add the coated tofu cubes in a single layer. If needed, fry in batches to avoid crowding the pan. Cook for about 5-7 minutes on each side. Look for a golden-brown, crispy finish.
Glazing the Tofu
Once the tofu bites are crispy, pour the reserved teriyaki marinade into the skillet. Let it cook for an additional 2 minutes. This thickens the sauce and coats the tofu in a tasty glaze.
Final Serving Suggestions
Remove the skillet from heat. Let the tofu bites cool for a moment. Transfer them to a serving plate. Garnish with sesame seeds and thin slices of green onion for a fresh touch. Enjoy these crispy teriyaki tofu bites as a snack or part of a meal.
Tips & Tricks
Ensuring Crispy Texture
To get your tofu crispy, start with firm tofu. Press it for 15-20 minutes. This removes excess water. Cut the tofu into uniform cubes. Sprinkle cornstarch on the marinated tofu. Toss it well to coat every piece. This step is vital. Fry the tofu in hot oil. Make sure not to overcrowd the skillet. This keeps the temperature steady and helps the tofu crisp up.
Flavor Enhancements
Use soy sauce and maple syrup for rich flavor. Adding rice vinegar gives it a nice tang. Fresh ginger and garlic add depth. If you like heat, add crushed red pepper flakes. You can also use sesame oil for a nutty aroma. For more sweetness, drizzle honey in the marinade. Always taste the marinade before using it. Adjust it to fit your flavor preference.
Serving Suggestions and Pairings
Serve crispy teriyaki tofu bites on a bed of rice. Jasmine or brown rice works well. Pair them with steamed broccoli or snap peas for color. For a crunch, add chopped nuts or seeds. You can also drizzle extra teriyaki sauce on top. Garnish with sesame seeds and green onions. This adds freshness and flair. Enjoy your tasty bites with friends or family!
Pro Tips
- Pressing Tofu: Ensure to press the tofu thoroughly to remove excess moisture. This will help the tofu absorb the marinade better and achieve a crispier texture when cooked.
- Marination Time: For deeper flavor, consider marinating the tofu for up to 2 hours. The longer it sits in the marinade, the more flavorful it will become.
- Even Coating: When coating the tofu with cornstarch, make sure each piece is evenly dusted. This step is key to achieving that perfect crispy exterior.
- Batch Frying: Fry the tofu in batches to avoid overcrowding the skillet. This allows each piece to cook evenly and develop a nice golden crust.
Variations
Vegan and Gluten-Free Adjustments
You can make this dish vegan and gluten-free easily. Use tamari instead of soy sauce. Tamari is a great option that tastes similar. Always check labels to ensure it is gluten-free. For the maple syrup, it is already vegan, so you are good there. This way, everyone can enjoy these tasty bites!
Alternative Cooking Methods (Baking/Air Frying)
If you want a healthier option, try baking or air frying the tofu. For baking, preheat your oven to 400°F (200°C). Spread the tofu cubes on a baking tray lined with parchment paper. Bake for about 25-30 minutes. Flip them halfway for even crispness. For air frying, set your air fryer to 375°F (190°C) and cook for about 15-20 minutes. Both methods give you crispy bites without much oil!
Flavor Variations (Spicy, Sweet, etc.)
You can change up the flavors to match your taste! To make them spicy, add red pepper flakes or sriracha to the marinade. For a sweet twist, mix in some orange juice or zest. You can also add sesame oil for a nutty taste. These small changes can create a whole new dish from the same base recipe! Enjoy exploring these options!
Storage Info
How to Store Leftovers
To store leftover crispy teriyaki tofu bites, let them cool completely. Place them in an airtight container. Store the container in the fridge for up to three days. Keeping the tofu bites in one layer helps maintain their shape.
Reheating Instructions
To reheat, use a skillet for best results. Heat a small amount of oil over medium heat. Add the tofu bites, cooking for about three to five minutes until they are hot and crispy again. You can also use an oven. Preheat it to 350°F (175°C) and bake them for 10-15 minutes.
Freezing Options
You can freeze the tofu bites if you want to store them longer. Place the cooled tofu in a single layer on a baking sheet. Freeze for about an hour until solid. Then transfer the bites to a freezer-safe bag. They can last for up to three months. To enjoy, thaw them in the fridge before reheating.
FAQs
How do I ensure my tofu is crispy?
To get crispy tofu, start by pressing it well. Remove as much moisture as you can. Use firm tofu for the best results. After pressing, cut the tofu into even cubes. Coat the cubes in cornstarch before frying. This creates a nice, crunchy layer. Fry them in hot oil until golden brown on all sides.
Can I use a different marinade?
Yes, you can use a different marinade. Try using hoisin sauce for a sweet twist. You can mix soy sauce with sriracha for some heat. A peanut sauce also works well for a nutty flavor. Just ensure your marinade has a good balance of sweet and salty.
What do I serve with crispy teriyaki tofu bites?
Serve crispy teriyaki tofu bites with steamed rice. They pair well with stir-fried veggies for a colorful plate. You can also add them to salads for extra protein. Try them in a wrap with fresh greens and sauce.
How long can I store the tofu bites?
You can store crispy tofu bites in the fridge for up to three days. Place them in an airtight container to keep them fresh. Reheat them in the oven for best results. This helps maintain their crispiness. Avoid microwaving, as it can make them soggy.
In this post, I covered the key ingredients and their measurements for delicious teriyaki tofu. You learned step-by-step how to prepare and fry the tofu bites. I shared tips to enhance flavor and achieve that perfect crispy texture. We discussed variations for vegan and gluten-free options as well as storage tips.
Experiment with the ideas I shared. Enjoy your tasty teriyaki tofu bites toda


