Crispy Roasted Sweet Potatoes Perfectly Seasoned Dish
 🥔. In this post, we covered how to make crispy roasted sweet potatoes. You learned about the essential ingredients, kitchen tools, and step-by-step instructions to achieve the perfect texture. We also shared tips for flavor, presentation, and variations to suit your taste. Finally, we discussed storage and reheating methods to keep leftovers fresh. I hope you feel ready to try this recipe. Enjoy making these tasty treats for yourself and others!](https://dishtreats.com/wp-content/uploads/2025/06/e613a315-0dcf-4c0d-9ed5-905015ae798c.webp)
Are you ready to elevate your side dish game? In this post, I’ll show you how to make Crispy Roasted Sweet Potatoes that are perfectly seasoned and bursting with flavor. With just a few simple ingredients and easy steps, you’ll create a dish that’s not only delicious but also visually appealing. Get your oven prepped and let’s dive into the world of crispy perfection!
Ingredients
List of required ingredients
- 4 medium sweet potatoes, peeled and cut into 1-inch cubes
- 3 tablespoons extra-virgin olive oil
- 2 teaspoons smoked paprika
- 1 teaspoon garlic powder
- 1 teaspoon onion powder
- ½ teaspoon cayenne pepper (optional for heat)
- Salt and freshly cracked black pepper to taste
- Fresh parsley for garnish
Recommended kitchen tools
- Baking sheet
- Parchment paper
- Mixing bowl
Nutritional information
Crispy roasted sweet potatoes are not only tasty but also healthy. A serving has around 150 calories. They provide fiber and vitamins A and C. Sweet potatoes are low in fat and high in carbs. Each serving offers a good balance of nutrients. Enjoy this dish while knowing you fuel your body well!
Step-by-Step Instructions
Prepping the sweet potatoes
Start by peeling the sweet potatoes with a sharp peeler. Make sure to remove all the skin. Next, cut them into 1-inch cubes. This size helps them cook evenly. After cutting, place the cubes in a large bowl.
Now, add the olive oil. You want to use three tablespoons for a nice coating. Sprinkle in the smoked paprika, garlic powder, onion powder, and cayenne pepper if you like heat. Don’t forget to salt and pepper to taste! Mix everything well until each cube is coated. This step is crucial for flavor.
Roasting process
Next, preheat your oven to 425°F (220°C). This is the perfect temperature for roasting. While it heats, prepare a baking sheet. Line it with parchment paper for easy cleanup. Once the oven is ready, spread the sweet potato cubes on the sheet in a single layer. Make sure they have space. If they are too close, they won’t crisp up.
Achieving perfect crispiness
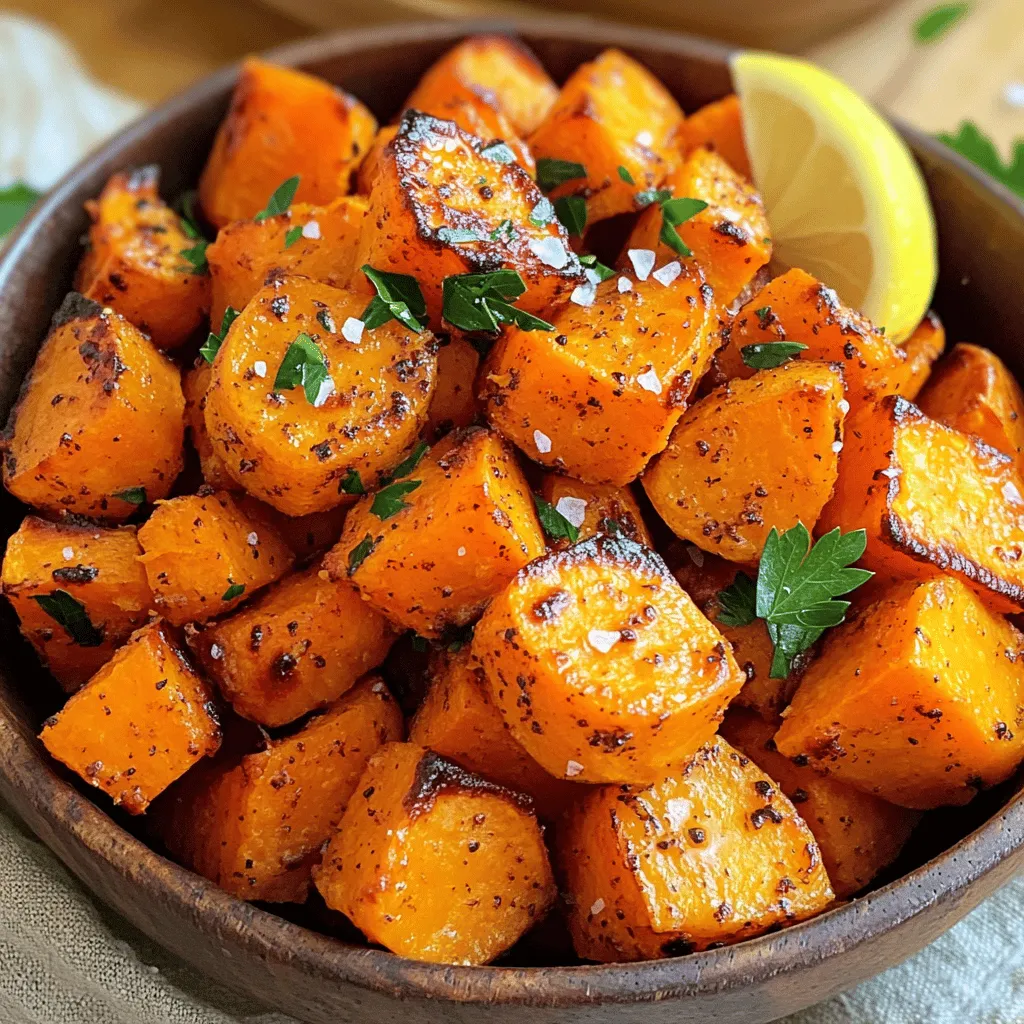
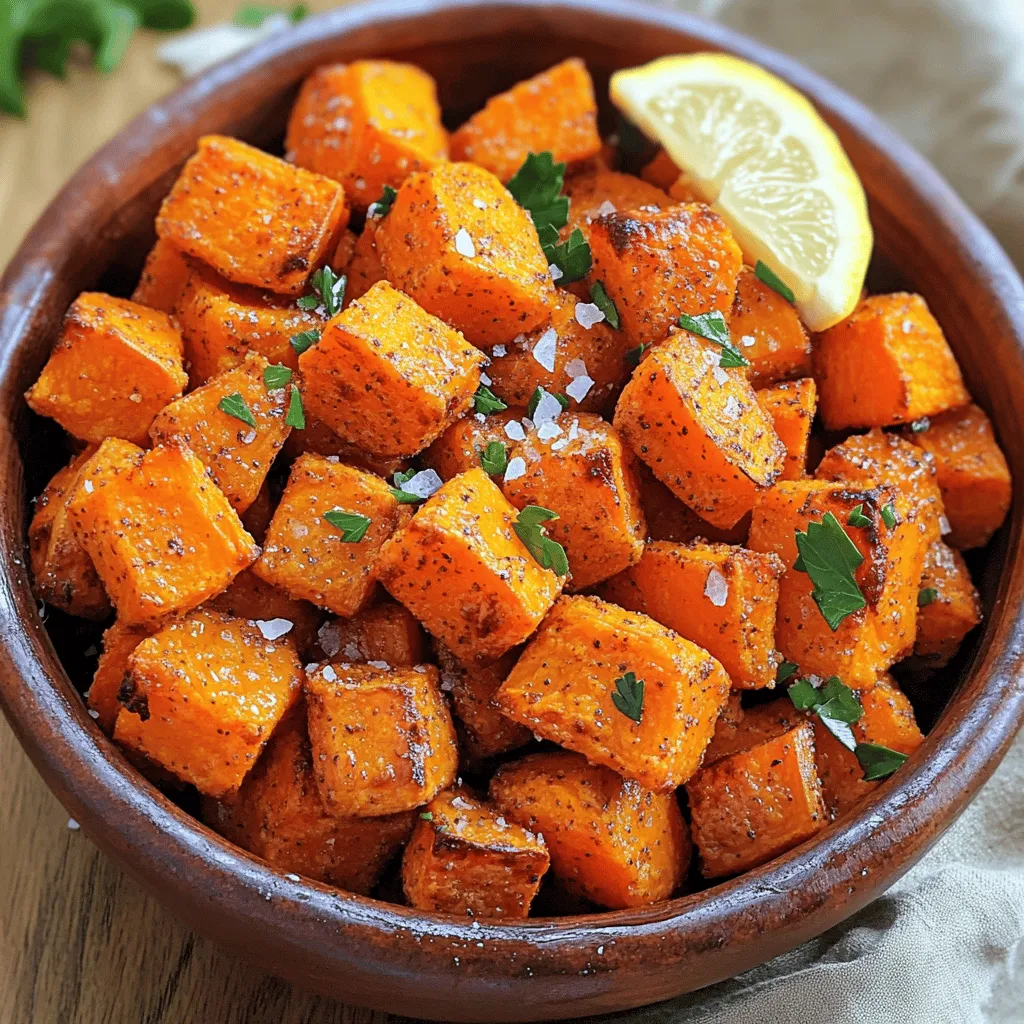
To get that crispy texture, it’s important to flip the sweet potatoes halfway through cooking. This helps them brown evenly on all sides. Roast them for 25 to 30 minutes. They should be golden brown with crispy edges when done. Remove them from the oven and let them cool for a few minutes. This cooling time helps them set. For a fresh touch, sprinkle chopped parsley on top before serving.
Tips & Tricks
Getting the best texture
To achieve the best texture, cut your sweet potatoes into 1-inch cubes. This size helps them cook evenly. Use a sharp knife for clean cuts. It will make the process easier and safer.
For optimal crispiness, ensure the sweet potatoes are dry before seasoning. You can pat them with a towel after washing. Also, do not overcrowd the baking sheet. Give them space to roast and air out. Flip them halfway through to brown all sides.
Adding flavor
For extra flavor, try adding spices like cumin or coriander. You can also use fresh herbs like rosemary or thyme. They add a nice depth and aroma. If you want something sweet, drizzle some maple syrup before roasting.
When it comes to oil, you can use avocado oil instead of olive oil. It has a high smoke point, which helps with crispiness. Coconut oil is another great option for a unique taste.
Presentation tips
To serve your crispy roasted sweet potatoes, use a rustic bowl. This makes the dish look inviting. You can sprinkle a bit of sea salt on top for flavor and crunch.
For added color, garnish with freshly chopped parsley. You can also include a wedge of lemon or lime on the side. This adds a burst of freshness and brightens the dish.

Variations
Sweet variations
You can make your crispy roasted sweet potatoes even sweeter. Try adding maple syrup or a sprinkle of cinnamon. Both add a nice flavor boost. Drizzle some maple syrup on the sweet potatoes before roasting. This gives them a lovely caramelized finish. If you choose cinnamon, mix it in with your other seasonings. It brings warmth and depth to each bite.
Savory variations
If you prefer a savory twist, herbs are your best friends. Rosemary and thyme work wonders. Chop fresh rosemary and mix it in with your olive oil and spices. This adds a fragrant touch. You can also use dried herbs if fresh isn’t available. Thyme gives a subtle earthiness that pairs well with sweet potatoes.
Health-conscious variations
For a healthier option, consider using an air fryer. This method uses less oil while still getting that crispy texture. Just toss your sweet potatoes with seasonings, place them in the air fryer, and cook until golden. You can also make the dish vegan or gluten-free. Use coconut oil instead of olive oil, or skip the oil entirely for a lighter dish. These alternatives keep the flavor while catering to different diets.
Storage Info
Storing leftovers
To keep your crispy roasted sweet potatoes fresh, place them in a container. Use an airtight container for best results. They can stay good in the fridge for up to 3 days. Make sure they cool down before sealing to avoid steam.
Reheating methods
When reheating, your goal is to bring back that crispy texture. The oven works best. Preheat it to 400°F (200°C). Spread the sweet potatoes on a baking sheet and heat for about 10-15 minutes. Flip them halfway through to crisp all sides. The microwave can work too, but it makes them soft. If you use the microwave, heat in short bursts for better control.
Freezing instructions
You can freeze both cooked and uncooked sweet potatoes. For uncooked ones, cut and toss them with oil and spices. Then, spread them on a baking sheet and freeze until solid. Once frozen, place them in a bag. They can stay in the freezer for up to 3 months. For cooked sweet potatoes, let them cool completely, then place them in a container. They will last up to 2 months in the freezer.
FAQs
How long to roast sweet potatoes for optimal crispiness?
Roast sweet potatoes for 25 to 30 minutes. Start by preheating your oven to 425°F (220°C). Cut the sweet potatoes into 1-inch cubes for even cooking. Place them on a baking sheet in a single layer. Flipping them halfway helps them brown well. They should be golden brown with crispy edges. If you want extra crispiness, roast them a bit longer. Just keep an eye on them so they don’t burn.
Can I make crispy roasted sweet potatoes ahead of time?
Yes, you can make crispy roasted sweet potatoes ahead of time. Roast them as usual and let them cool. Store them in an airtight container in the fridge for up to three days. To reheat, use your oven at 400°F (200°C) for about 10 minutes. This will help them regain their crispiness. You can also enjoy them cold in salads.
What to serve with crispy roasted sweet potatoes?
Crispy roasted sweet potatoes pair well with many dishes. Serve them alongside grilled chicken or fish for a balanced meal. They also work great on a salad with greens and nuts. If you want a vegetarian option, try them with black beans or quinoa. They add a nice texture and flavor to any dish. Don’t forget to sprinkle some fresh herbs on top for extra taste.
In this post, we covered how to make crispy roasted sweet potatoes. You learned about the essential ingredients, kitchen tools, and step-by-step instructions to achieve the perfect texture. We also shared tips for flavor, presentation, and variations to suit your taste. Finally, we discussed storage and reheating methods to keep leftovers fresh.
I hope you feel ready to try this recipe. Enjoy making these tasty treats for yourself and others!
 🥔. In this post, we covered how to make crispy roasted sweet potatoes. You learned about the essential ingredients, kitchen tools, and step-by-step instructions to achieve the perfect texture. We also shared tips for flavor, presentation, and variations to suit your taste. Finally, we discussed storage and reheating methods to keep leftovers fresh. I hope you feel ready to try this recipe. Enjoy making these tasty treats for yourself and others!](https://dishtreats.com/wp-content/uploads/2025/06/e613a315-0dcf-4c0d-9ed5-905015ae798c-300x300.webp)


![To make this dish, you will need: - 1 lb Brussels sprouts, trimmed and halved - 3 tablespoons extra virgin olive oil - 1/4 cup pure maple syrup - 1 tablespoon balsamic vinegar - 1 teaspoon garlic powder - Salt and freshly ground black pepper to taste These ingredients come together to create a sweet and savory glaze. The maple syrup adds sweetness, while the balsamic vinegar gives tanginess. The olive oil helps with roasting, making the sprouts tender and tasty. You can add these optional ingredients for extra flavor and texture: - 1/4 cup chopped walnuts - Fresh thyme leaves for garnish Walnuts add a nice crunch, while thyme gives a fresh aroma. Both options enhance the dish without overpowering it. This dish is not just tasty; it’s also good for you. Here’s a quick look at the nutrition per serving: - Calories: About 180 - Protein: 3g - Carbohydrates: 25g - Fat: 8g - Fiber: 4g Brussels sprouts are rich in vitamins C and K. The maple syrup provides natural sugars, making this dish a healthy choice. You get great flavors and health benefits in one meal. For the complete recipe, check the Full Recipe section above! First, we need to preheat the oven to 400°F (200°C). This heat is perfect for roasting. A hot oven ensures crispy edges and tender centers for your Brussels sprouts. Next, gather your ingredients. You will need: - 1 lb Brussels sprouts, trimmed and halved - 3 tablespoons extra virgin olive oil - 1/4 cup pure maple syrup - 1 tablespoon balsamic vinegar - 1 teaspoon garlic powder - Salt and freshly ground black pepper to taste - 1/4 cup chopped walnuts (optional for crunch) - Fresh thyme leaves for garnish (optional for aroma and color) In a large bowl, mix the halved Brussels sprouts with olive oil, maple syrup, balsamic vinegar, garlic powder, salt, and pepper. Toss everything well. Make sure every sprout gets coated in the sweet and savory sauce. This step is key for flavor. Prepare your baking sheet by lining it with parchment paper. This makes cleaning easy and helps prevent sticking. Spread the Brussels sprouts in a single layer on the sheet. Give them space to roast well. Now, place the baking sheet in the hot oven. Roast the sprouts for 25 minutes. Halfway through, stir them to promote even cooking. You want them to get tender and brown. If you add walnuts, toss them on the sheet during the last 5 minutes. This will give them a nice toast and extra crunch. Once done, take the Brussels sprouts out and let them cool for a minute. Transfer them to a serving dish. For a finishing touch, sprinkle fresh thyme leaves on top. This adds a nice pop of color and aroma to your dish. Enjoy this full recipe for a delicious treat! To get that perfect glaze, start with good maple syrup. Use pure maple syrup for the best flavor. Mix it well with olive oil and balsamic vinegar; this combo really shines. Make sure to coat the Brussels sprouts evenly. This helps each piece get that sweet, sticky glaze. Toss them well in the bowl before roasting. Roasting Brussels sprouts needs some care. First, preheat your oven to 400°F (200°C). This hot oven helps them caramelize. Spread the sprouts on a baking sheet in a single layer. If they are crowded, they won't brown well. Stir them halfway through cooking to ensure even roasting. You want them golden brown and tender, about 25 minutes in the oven. When ready to serve, think about how to make them look nice. Place the roasted sprouts on a large platter. You can arrange them in a circle for a pretty look. If you added walnuts, sprinkle them on top for crunch. Fresh thyme leaves also add color and smell great. This makes the dish not just tasty but beautiful too. For the full recipe, check out the details above. {{image_4}} You can switch up the sweetener for a twist. Try honey or agave syrup. These will add their own unique flavors. You can also use coconut sugar for a richer taste. If you like a kick, add some chili flakes for heat. A dash of orange juice can also brighten up the sweetness. This recipe is already vegetarian. To make it vegan, ensure the maple syrup is pure. You can also use almond oil instead of olive oil for a different flavor. For creaminess, add a dollop of vegan sour cream on top before serving. This adds a lovely tang that pairs well with the sweetness. Seasonal swaps can make this dish even better. In spring, add fresh peas for color and sweetness. During fall, toss in some diced apples for a sweet crunch. In winter, try adding roasted chestnuts for a nutty flavor. These changes keep the dish fresh and exciting every time you make it. For the full recipe, you can refer back to the detailed instructions provided. After enjoying your maple glazed Brussels sprouts, store any leftovers in an airtight container. This keeps them fresh and prevents odors. Let them cool first before sealing. Place the container in the fridge. They stay good for about 3 to 5 days. If you want to keep them longer, consider freezing. Reheating your Brussels sprouts can be quick and easy. You can use the oven or stovetop. If you use the oven, preheat it to 350°F (175°C). Spread the sprouts on a baking sheet and heat for about 10-15 minutes. Stir halfway through to ensure even warming. If you prefer the stovetop, heat a pan over medium heat. Add a bit of olive oil and toss the sprouts until warmed through. Freezing Brussels sprouts is a smart way to save them for later. First, blanch them in boiling water for 3 minutes. Then, cool them in ice water. This keeps their bright color and flavor. Drain and dry the sprouts, then place them in a freezer bag. Remove as much air as you can before sealing. They can last up to 6 months in the freezer. When you're ready to use them, just thaw and reheat! Enjoy your deliciously roasted maple glazed Brussels sprouts from [Full Recipe] and savor every bite! Yes, you can prep Brussels sprouts in advance. Trim and halve them a day before. Store them in an airtight container in the fridge. When you're ready, mix them with the other ingredients from the Full Recipe. This helps save time and makes cooking easier. Maple glazed Brussels sprouts pair well with many dishes. Here are some great options: - Roast chicken for a savory touch. - Grilled salmon for a healthy protein. - Quinoa salad for a hearty side. - Mashed potatoes for comfort food lovers. These options balance the sweet and savory flavors of the sprouts. To make this dish vegan, swap out the maple syrup for agave nectar. This keeps the sweetness intact. You can also use vegetable oil instead of olive oil if you prefer. Follow the Full Recipe as is, making those simple swaps. Enjoy the same great taste with a vegan twist! In this blog post, we covered how to make maple glazed Brussels sprouts. We discussed the key ingredients and provided step-by-step instructions. Tips helped you achieve the perfect glaze and roasting method. You also learned about variations, storage, and common questions. Now, you have all the tools to enjoy this dish. Experiment with flavors and enjoy your cooking!](https://dishtreats.com/wp-content/uploads/2025/06/8ccc11bb-56ad-4722-8e0d-cbebb28a9ca5-768x768.webp)

![To make loaded Greek fries, you need fresh and tasty ingredients. Here’s what you need: - 4 large Russet potatoes - 1/4 cup olive oil - 1 teaspoon garlic powder - 1 teaspoon paprika - Salt and pepper to taste - 1 cup crumbled feta cheese - 1 cup cherry tomatoes, halved - 1/2 cup Kalamata olives, pitted and sliced - 1/2 cucumber, diced - 1/4 red onion, finely chopped - Fresh parsley, chopped for garnish - 1/2 cup tzatziki sauce You can get creative with your fries! Here are some tasty toppings to try: - Sliced jalapeños for heat - Chopped bell peppers for crunch - Grilled chicken or lamb for protein - Avocado for creaminess Season your fries to boost flavor! Here are some ideas: - Oregano adds a nice herbal flavor. - Lemon zest gives a fresh, zesty touch. - Red pepper flakes can spice things up. - Dill pairs well with tzatziki and adds brightness. These ingredients and toppings make loaded Greek fries a fun and easy dish. You can mix and match to fit your taste. Enjoy cooking with this Full Recipe! To start, wash four large Russet potatoes. Make sure to scrub them well. Next, cut the potatoes into thin fries, about 1/4 inch thick. This size helps them cook evenly. Place the cut fries in a large bowl. Drizzle 1/4 cup of olive oil over them. Add 1 teaspoon of garlic powder and 1 teaspoon of paprika. Sprinkle salt and pepper to taste. Toss the fries. Make sure every fry gets coated well. Now it's time to bake. Preheat your oven to 425°F (220°C). Spread the seasoned fries on a baking sheet lined with parchment paper. Try to keep them in one layer. This helps them get crispy. Bake for 25 to 30 minutes. Remember to flip them halfway through. Look for a golden brown color when they are done. While the fries bake, prepare the toppings. In a medium bowl, mix 1 cup of halved cherry tomatoes, 1/2 cup of sliced Kalamata olives, 1/2 diced cucumber, and 1/4 cup of finely chopped red onion. Drizzle a bit of olive oil over this mix. Add salt and pepper to taste, then gently combine. When the fries are ready, pull them out of the oven. Immediately sprinkle 1 cup of crumbled feta cheese on top. Next, add your prepared veggie mix. Finally, add a generous dollop of tzatziki sauce on top. For a nice finish, sprinkle chopped fresh parsley for color. Enjoy your Loaded Greek Fries! You can find the full recipe [here]. To make the best fries, start with the right potatoes. I prefer Russet potatoes for their starchiness. Cut your fries thin, around 1/4 inch thick. This helps them cook evenly and get crispy. Soak the cut fries in cold water for at least 30 minutes. This removes extra starch and aids crispiness. After soaking, dry them well with a towel. Coat the fries with olive oil and seasonings. Bake at 425°F (220°C) for 25-30 minutes. Remember to flip them halfway through for an even crunch. Great flavor makes all the difference. I love using garlic powder and paprika for a warm, savory taste. Add salt and pepper to taste. You can also try adding dried oregano or thyme for a Greek touch. Don't be afraid to experiment! Mix your favorite spices into the oil before coating the fries. This will infuse flavor right into the fries. For an extra kick, add some chili powder or cayenne pepper. Presentation matters when serving Loaded Greek Fries. Serve them on a large platter for a fun look. Drizzle extra Tzatziki sauce over the top for a creamy touch. Use fresh parsley to add color and freshness. You can also add slices of lemon for a pop of brightness. For easy serving, provide toothpicks or small forks. This makes it fun for guests to enjoy! For the full recipe, check out the detailed instructions above. {{image_4}} You can make Loaded Greek Fries vegetarian by skipping the meat toppings. The base is already rich with flavor. Use extra toppings like roasted red peppers or artichoke hearts. You can also add a variety of cheeses, like goat cheese or mozzarella, for a creamy twist. These options keep the dish hearty and satisfying. If you want to add protein, consider grilled chicken or shrimp. Both pair well with the Greek flavors. Gyro meat is another great choice. Cook it until it's crispy and flavorful. You can also try chickpeas for a plant-based protein. They add a nice crunch and boost the nutrition. Different regions of Greece offer unique flavors. From the island of Crete, you can add capers and mint for a fresh taste. In the north, try adding smoked paprika for depth. From the Peloponnese, olives and citrus zest can give a bright flavor. Mix and match these ingredients for your own twist on Loaded Greek Fries. For the full recipe, check out the complete guide on Loaded Greek Fries. To keep your loaded Greek fries fresh, let them cool first. Place them in an airtight container. If you have toppings like tomatoes or cucumbers, store them separately. This keeps everything crisp. When you want to enjoy your leftovers, preheat your oven to 375°F (190°C). Spread the fries on a baking sheet. Heat for about 10-15 minutes until hot and crispy. Avoid microwaving them, as this can make them soggy. These loaded Greek fries last about 2-3 days in the fridge. Make sure they are in an airtight container. If you notice any change in smell or texture, it’s best to toss them. Enjoy them fresh for the best taste! I recommend using Russet potatoes for Loaded Greek Fries. They are starchy and fluffy, which gives you that nice, crispy texture when baked. Their skin adds a great crunch, too. Yukon Gold potatoes also work well. They are creamier, which can add a different taste. Yes, you can prepare the fries ahead of time! Cut the potatoes and soak them in water to keep them fresh. This step removes some starch and helps them crisp up better. When you are ready to cook, just dry them off and season them. Bake them fresh for the best taste. Loaded Greek Fries go well with many dishes. They are great alongside grilled meats like chicken or lamb. You can serve them with a fresh Greek salad for a light meal. They also pair nicely with tzatziki, which adds a cool contrast to the warm fries. Enjoy them as a fun snack at gatherings or parties! For a complete experience, check out the Full Recipe to guide you through making these tasty fries. Loaded Greek fries are a fun dish packed with flavors. We explored key ingredients, optional toppings, and tasty seasonings. I shared step-by-step instructions to prepare and bake your fries, then assemble them perfectly. I offered tips for crispy fries and smart presentation ideas. You can even customize your dish with vegetarian options or protein toppings from various Greek regions. Finally, I outlined storage tips to keep leftovers fresh. Enjoy making these fries; they are sure to impress everyone!](https://dishtreats.com/wp-content/uploads/2025/06/9c6541bd-b31d-423a-b196-3f6ab3dd7c20-768x768.webp)