Creamy Tuscan Garlic Salmon Flavorful and Easy Meal

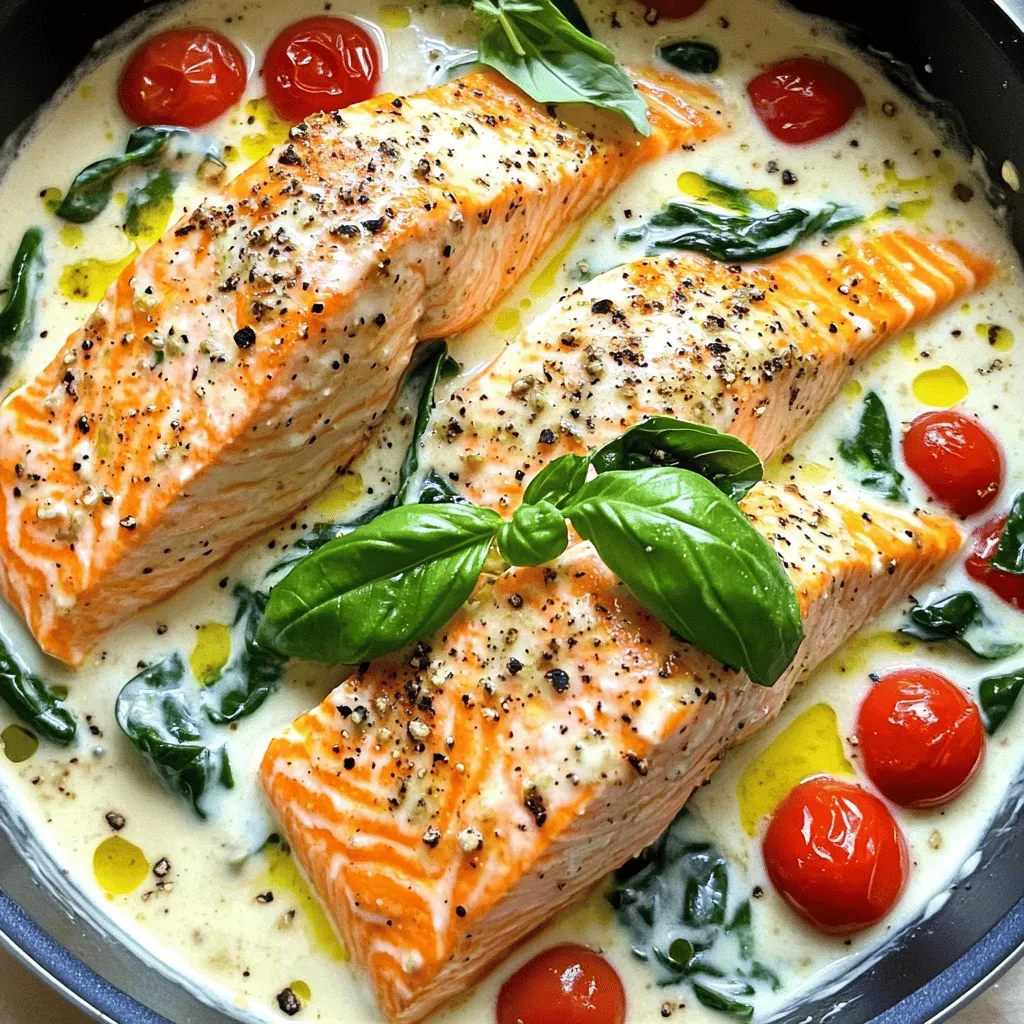
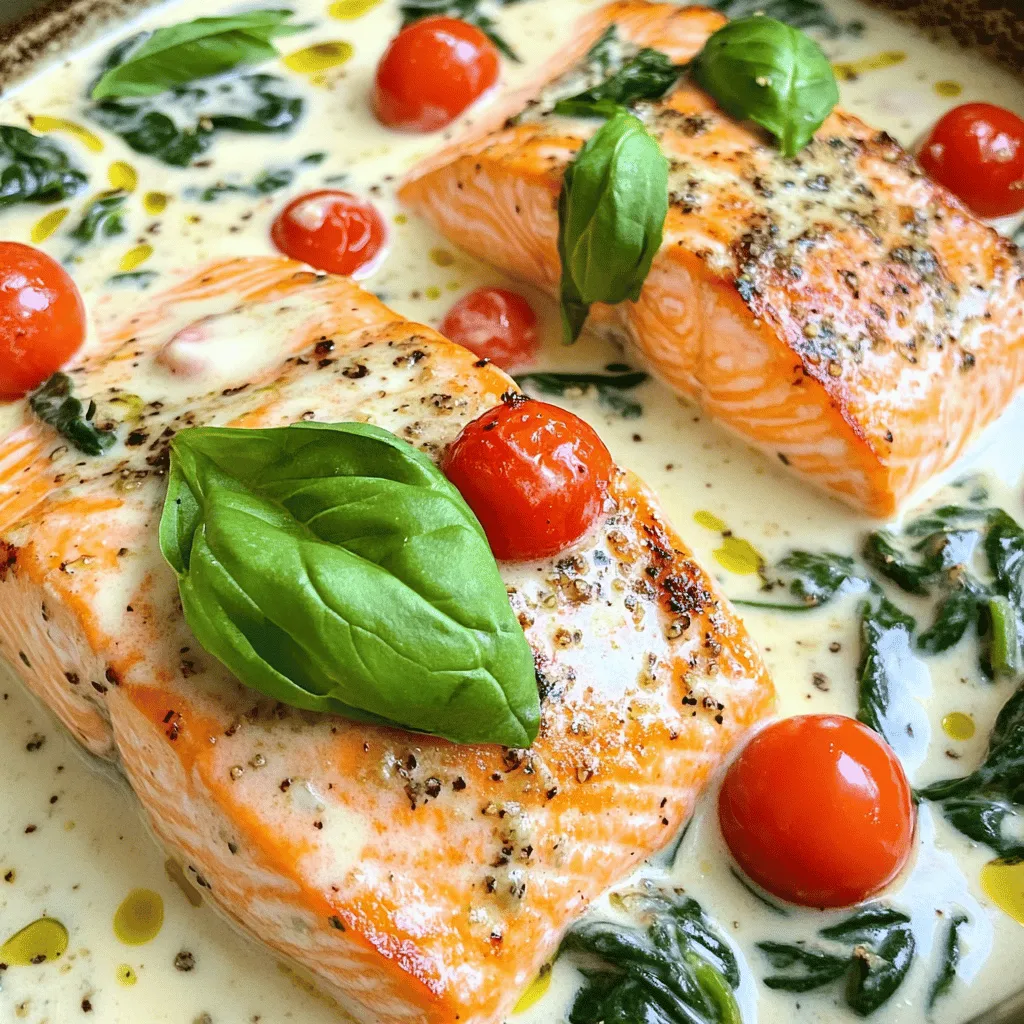
If you crave a meal that’s both rich in flavor and easy to make, then Creamy Tuscan Garlic Salmon is perfect for you. This dish blends tender salmon with a creamy garlic sauce, making it a quick weeknight delight. In this post, I’ll walk you through the simple steps to create this tasty meal, along with tips, tricks, and even some variations to suit your taste. Let’s dive in!
Ingredients
Essential Ingredients for Creamy Tuscan Garlic Salmon
To make Creamy Tuscan Garlic Salmon, gather these key ingredients:
- 4 salmon fillets
- 2 tablespoons olive oil
- 4 cloves garlic, finely minced
- 1 cup cherry tomatoes, halved
- 1 cup fresh baby spinach
- 1 cup heavy cream
- ½ cup freshly grated parmesan cheese
- 1 teaspoon Italian seasoning blend
- Salt and freshly ground black pepper to taste
- Fresh basil leaves for garnish
These ingredients come together to create a rich and tasty dish. The salmon provides protein, while the cream and cheese add delicious creaminess.
Fresh vs. Frozen Salmon: What to Use
I recommend using fresh salmon for the best flavor and texture. Fresh salmon has a lovely taste that shines in this dish. However, frozen salmon works too. If you use frozen salmon, make sure to thaw it properly. Thawing in the fridge overnight keeps it safe and tasty.
Substitute Options for Key Ingredients
Not all ingredients are a must. Here are some substitutes you can try:
- Salmon: Use other fish like trout or chicken if preferred.
- Heavy cream: Swap with half-and-half or a dairy-free cream for a lighter dish.
- Parmesan cheese: Grated mozzarella or nutritional yeast can add flavor too.
- Cherry tomatoes: Use regular tomatoes or sundried tomatoes for a different taste.
- Spinach: Kale or Swiss chard can also work well in this recipe.
These substitutes help you adjust the recipe based on what you have at home. Don’t be afraid to mix it up!
Step-by-Step Instructions
Preparing the Salmon Fillets
Start by heating 2 tablespoons of olive oil in a large, non-stick skillet over medium-high heat. Watch for the oil to shimmer, but avoid smoking it. While the oil heats, season your salmon fillets with salt and black pepper. Once the oil is hot, place the salmon fillets skin-side down in the skillet. Cook them for 4-5 minutes until the edges turn golden brown. Flip the fillets carefully and cook for another 3-4 minutes. The salmon should flake easily with a fork. Once done, transfer the fillets to a plate and cover them loosely to keep warm.
Creating the Creamy Garlic Sauce
Next, reduce the skillet’s heat to medium and add the minced garlic. Sauté the garlic for about 30 seconds until fragrant, but do not let it brown. Add the halved cherry tomatoes and cook for 2-3 minutes. Stir occasionally until the tomatoes soften and release their juices. Now, lower the heat to medium-low. Pour in 1 cup of heavy cream and gradually add ½ cup of freshly grated parmesan cheese along with 1 teaspoon of Italian seasoning. Stir until the cheese melts and combines well. Let the sauce simmer for about 3-4 minutes, stirring often until it thickens and becomes creamy.
Final Touches: Combining Everything Together
Now, fold in 1 cup of fresh baby spinach into the sauce. Allow it to wilt for about 2 minutes, stirring occasionally. This adds color and flavor. Carefully return the cooked salmon fillets to the skillet. Spoon some of the creamy sauce over the salmon. Cook for another 2 minutes until the salmon is heated through and coated with the sauce. For serving, transfer the salmon to plates and drizzle any remaining sauce over the top. Add fresh basil leaves for a nice touch. Enjoy this flavorful and easy meal!
Tips & Tricks
How to Achieve Perfectly Cooked Salmon
To cook salmon perfectly, start with fresh fillets. Look for bright color and a clean smell. Season your fish well with salt and pepper. Heat olive oil in a non-stick skillet until it shimmers. Place the salmon skin-side down and cook for 4-5 minutes. Watch for golden edges. Flip the fillets and cook for 3-4 more minutes. The salmon is done when it flakes easily with a fork.
Enhancing the Creaminess of the Sauce
To make the sauce creamy, use heavy cream. It adds richness and a smooth texture. Gradually mix in freshly grated parmesan cheese. This cheese melts well and boosts flavor. Add Italian seasoning for a fragrant touch. Stir the sauce gently over medium-low heat. Let it simmer to thicken. Fold in fresh spinach last; it adds color and nutrition.
Serving Suggestions and Pairings
You can serve this dish with garlic bread for a crunchy side. It also pairs well over pasta. A light salad with lemon vinaigrette balances the creaminess of the sauce. Fresh basil leaves on top add a pop of color and flavor. Enjoy the meal with a glass of white wine for a perfect touch.

Variations
Healthy Alternatives: Lightened-Up Creamy Salmon
You can make a lighter version of creamy Tuscan garlic salmon. Instead of heavy cream, use Greek yogurt. It adds creaminess without the extra fat. You can also swap the parmesan cheese for nutritional yeast. This gives a cheesy flavor while being plant-based. Use less olive oil for cooking. This keeps the dish tasty but lower in calories.
Adding Extra Veggies for More Flavor
Want more color and nutrients? Toss in extra veggies! Zucchini, bell peppers, or asparagus work well. You can sauté them with the garlic and tomatoes. They add a nice crunch and boost the flavor. You can also try adding mushrooms. They soak up the sauce and add a deep, earthy taste. Fresh herbs like parsley or dill can brighten the dish, too.
Spicy Variations: Incorporating Heat
If you like spice, add some heat to your creamy salmon. You can mix in red pepper flakes while cooking. Start with a pinch and add more if you like it spicy. For a different flavor, try diced jalapeños in the garlic mix. Another great option is to drizzle sriracha on top before serving. It adds a kick and pairs well with the creamy sauce.
Storage Info
Best Practices for Storing Leftovers
Storing leftover creamy Tuscan garlic salmon properly keeps it fresh and tasty. First, let the salmon cool to room temperature. Then, place it in an airtight container. This helps to keep out moisture and air. Store it in the fridge for up to three days. If you want to keep it longer, freezing is a good option.
How to Reheat Creamy Tuscan Garlic Salmon
To reheat, you can use a skillet or the microwave. For the skillet, add a splash of water or cream to keep it moist. Heat on medium-low until warm. If using the microwave, place the salmon on a plate. Cover it with a damp paper towel and heat for 1-2 minutes. Check to ensure it’s heated through but not overcooked.
Freezing Instructions and Tips
Freezing creamy Tuscan garlic salmon is easy. Wrap each piece tightly in plastic wrap. Then, place it in a freezer-safe bag. Be sure to label the bag with the date. This dish can be frozen for up to three months. When ready to eat, thaw in the fridge overnight. Reheat as mentioned earlier for the best taste.
FAQs
Can I use a different type of fish for this recipe?
Yes, you can use other fish. Good choices are tilapia, trout, or cod. Each fish has a unique taste. Adjust the cooking time based on the fish you choose.
How do I know when the salmon is done cooking?
Salmon is done when it flakes easily with a fork. The inside should be a light pink color. Use a food thermometer for best results; it should reach 145°F.
What can I do if the sauce is too thick?
If your sauce is thick, add a splash of chicken broth or milk. Stir well to mix. This will help you get the desired creamy consistency without losing flavor.
Is this recipe suitable for meal prep?
Yes, this recipe is great for meal prep. Store portions in airtight containers. It keeps well in the fridge for up to three days. Reheat in the microwave or on the stove.
Can I make this dish ahead of time?
You can prep the sauce and cook the salmon ahead. Just store the sauce separately. When you’re ready, reheat the sauce and add the salmon to warm it up. This keeps everything fresh and tasty.
This blog post explored how to make creamy Tuscan garlic salmon. We discussed key ingredients, including fresh and frozen salmon. I shared step-by-step instructions for preparing the salmon and the sauce. Tips helped you cook salmon perfectly and serve it nicely. Variations allowed for healthy or spicy options. Lastly, I provided storage info for leftovers and answers to common questions.
Cooking this dish can be fun and rewarding. Enjoy your tasty meals with confidence!


![- 2 cups cooked chicken, shredded - 1 cup black beans, rinsed and drained - 1 cup corn kernels (fresh or frozen) - 2 cups shredded Mexican cheese blend - 1 cup salsa (mild or spicy) - 8 large flour tortillas - 1 teaspoon ground cumin - 1 teaspoon chili powder - 1/2 teaspoon garlic powder - 1/2 teaspoon onion powder - Salt and pepper, to taste - 1/4 cup fresh cilantro, chopped - Sour cream and diced avocado for serving When I prepare this Chicken and Cheese Quesadilla Casserole, I love the bold flavors in every bite. The main ingredients create a hearty meal that feels special. Shredded chicken adds protein, while black beans and corn give it a nice texture. The Mexican cheese blend brings everything together with its melty goodness. I often choose salsa based on my mood. A mild salsa suits those who prefer less heat, while a spicy option adds an exciting kick. The seasonings are key to making this dish flavorful. Ground cumin and chili powder add warmth and depth. Garlic and onion powders give it that savory touch. Don’t forget to season with salt and pepper to elevate the taste. For garnishes, fresh cilantro brightens the dish. I like to add a dollop of sour cream and diced avocado on the side. They balance the flavors and add a creamy texture. This meal is so satisfying, and you can find the full recipe to make it yourself! - Preheat the oven to 350°F (175°C). - In a large bowl, mix the chicken, black beans, corn, cheese, salsa, cumin, chili powder, garlic powder, onion powder, salt, and pepper. Stir well until all ingredients are combined. - Grease a 9x13 inch baking dish with cooking spray or olive oil. - Place one tortilla at the bottom of the dish. Spoon some of the chicken and cheese mixture on top. Add another tortilla and repeat this layering. Finish with a tortilla and sprinkle remaining cheese on top. - Cover the dish with foil. Bake for 20 minutes. - After 20 minutes, remove the foil. Bake again for 10-15 minutes, until the top is golden and bubbling. For the full recipe, check out the detailed ingredients and tips! To boost the taste, pick a salsa that fits your spice level. For a kick, go for spicy salsa. If you prefer mild, a smooth, mild salsa works well. You can also mix salsas for layered flavors. For cheese, try different blends. While a Mexican cheese blend is great, cheddar or pepper jack adds unique taste. Mixing cheeses can create a delightful texture and flavor. Letting your casserole rest is key. This step helps the layers set. Cutting too soon can cause a messy serving. Wait about 5 minutes for the best results. To get a perfectly melted cheese crust, cover with foil while baking. Remove the foil near the end to let the cheese brown. This creates a crunchy top that contrasts the soft filling. Serving on colorful plates makes a big difference. Bright colors enhance the meal's appeal. After cutting the casserole, place each piece on a vibrant dish. For garnishing, fresh cilantro adds a pop of green. Diced avocado gives a creamy touch. A dollop of sour cream on the side adds a lovely finish. Try these tips for a beautiful and tasty presentation! For the full recipe, refer to [Full Recipe]. {{image_4}} You can easily make this dish fit your taste. For a vegetarian twist, try adding more veggies. Bell peppers, zucchini, or spinach work great. They add color and nutrients. You still get a hearty meal without meat. If you want more protein, use ground beef or turkey instead of chicken. Cook the meat first, then mix it into the filling. This change adds a different flavor. It's a fun way to switch things up! Cheese makes this casserole even better. While I love using a Mexican cheese blend, feel free to change it. Cheddar adds a sharp taste. Pepper jack gives a spicy kick. You can even mix different types for a rich flavor. Try combining mozzarella for creaminess and a touch of parmesan for depth. These options create layers of taste. The cheese pulls are so satisfying! You can adapt this recipe to a slow cooker. Just layer the ingredients as you would in the oven. Set it on low for about 4 hours. This method yields a warm, hearty casserole with a different texture. If you own an Instant Pot, you're in luck! Use the sauté function to cook your meat and veggies. Then add the rest of the ingredients. Seal the lid and cook on high pressure for 10 minutes. Quick and easy, this method saves time without losing flavor. For more details, check out the Full Recipe! To keep your Chicken and Cheese Quesadilla Casserole fresh, store it properly. First, let it cool down to room temperature. Then, place the leftovers in an airtight container. This helps lock in moisture and flavor. Use shallow containers for quicker cooling. I recommend glass or sturdy plastic containers. These work well for storage and reheating. You can freeze this casserole before or after baking. For freezing before baking, assemble the casserole in a freezer-safe dish. Cover it tightly with plastic wrap and aluminum foil. When you're ready to bake it, remove the wrap, and bake from frozen. It may take longer to cook. For freezing after baking, let it cool, then slice it into portions. Wrap each slice in plastic wrap and place in a freezer bag. For the best results, consume it within three months. Leftovers can last in the fridge for about 3-4 days. Always check for signs of spoilage before eating. Look for changes in color or texture. If it smells off, it’s best to discard it. When stored properly, frozen portions can stay safe for about three months. Always label the containers with the date for easy tracking. This way, you can enjoy your delicious casserole without worries. You can use low-carb tortillas if you want fewer carbs. Corn tortillas are also a great option. They add a nice flavor and texture to the dish. Yes, you can prep this casserole in advance. Just assemble it and cover it tightly. Store it in the fridge for up to 24 hours. When you are ready to bake, just add extra time if it's cold from the fridge. Look for bubbling cheese and a golden crust on top. You can also insert a knife in the center. If it comes out hot, the casserole is ready to serve. This blog post guides you through making a delicious chicken casserole. We covered the main ingredients, seasonings, and the steps to prepare and bake your dish. I shared tips and tricks for perfect results and ideas for variations based on your taste. Remember, cooking is about creativity. Don't hesitate to make this recipe your own! Enjoy the process, and savor every bite. Happy cooking!](https://dishtreats.com/wp-content/uploads/2025/06/5fb0e458-6070-46a1-b713-1d8a90ab3212-768x768.webp)
![To make a delicious Vegan Lentil Shepherd's Pie, you will need: - 1 cup green or brown lentils, thoroughly rinsed - 3 cups vegetable broth - 1 medium onion, finely diced - 2 cloves garlic, minced - 2 medium carrots, diced into small cubes - 2 celery stalks, finely diced - 1 cup peas (fresh or frozen) - 2 tablespoons tomato paste - 1 tablespoon soy sauce or tamari - 1 teaspoon dried thyme - 1 teaspoon dried rosemary - Salt and freshly cracked pepper to taste - 4 large potatoes, peeled and chopped into chunks - 1/4 cup unsweetened plant-based milk (such as almond or soy) - 2 tablespoons vegan butter or olive oil You can enhance your shepherd's pie with these optional ingredients: - 1 teaspoon smoked paprika for a hint of smokiness - 1 tablespoon nutritional yeast for a cheesy flavor - 1 cup mushrooms, diced, for a hearty texture - A splash of red wine for depth of flavor This recipe serves 4-6 and is a healthy choice. Each serving has: - Approximately 300 calories - 14 grams of protein - 10 grams of fiber - Low in saturated fat - Rich in vitamins A and C from the veggies When you make this Vegan Lentil Shepherd’s Pie, you enjoy a meal that is tasty, filling, and good for you. For the complete cooking details, check out the Full Recipe. To cook the lentils, start by rinsing 1 cup of green or brown lentils. Next, place them in a medium pot with 3 cups of vegetable broth. Bring this mix to a boil, then reduce the heat. Let it simmer for 20-25 minutes. You want the lentils to be tender but not mushy. Drain any leftover liquid and put the lentils aside. In a large skillet, heat a drizzle of olive oil over medium heat. Add 1 diced onion and sauté for about 5 minutes until soft. Then, include 2 minced garlic cloves, 2 diced carrots, and 2 diced celery stalks. Cook this mix for another 5-7 minutes until all the veggies are tender. Now, stir in the cooked lentils, 1 cup of peas, 2 tablespoons of tomato paste, and 1 tablespoon of soy sauce. Add 1 teaspoon of dried thyme, 1 teaspoon of dried rosemary, and some salt and pepper. Let this simmer for about 5 minutes. While the lentil mix simmers, you can prepare the potatoes. Bring a large pot of salted water to a boil. Add 4 large, peeled, and chopped potatoes. Cook them until fork-tender, about 15-20 minutes. Drain the potatoes and return them to the pot. Mash them using a potato masher. Mix in 1/4 cup of plant-based milk and 2 tablespoons of vegan butter. Keep mashing until smooth and creamy. Adjust the seasoning with salt and pepper. Preheat your oven to 375°F (190°C). Grease a baking dish and spoon the lentil mixture into the bottom. Spread the creamy mashed potatoes over the top. Use a fork to create peaks for texture. Bake the pie for 25-30 minutes until the top is golden and crispy. This dish is now ready to enjoy! For the full recipe, check out the detailed instructions above. To make creamy mashed potatoes, start with hot potatoes. Use a potato masher or ricer for the best texture. Gradually add unsweetened plant-based milk and vegan butter for creaminess. Mix until smooth, but avoid over-mixing. A pinch of salt enhances the flavor. Use fresh ingredients for depth. Start by sautéing onions until soft. Add garlic, carrots, and celery for sweetness. Cook them until tender. Incorporate the lentils with herbs like thyme and rosemary. This step brings out the flavors. Don't forget to season with salt and pepper. Let it simmer briefly to blend all the tastes. Serve your Vegan Lentil Shepherd’s Pie hot. Pair it with a crisp green salad for balance. You can also add crusty bread for a hearty touch. For extra flair, sprinkle fresh parsley on top before serving. This adds color and freshness to your meal. Explore different side dishes like roasted vegetables or quinoa for variety. Enjoy your delightful and wholesome dinner! For the full recipe, check the [Full Recipe]. {{image_4}} You can make this lentil shepherd's pie gluten-free. Simply replace soy sauce with coconut aminos. This swap keeps the flavor but avoids gluten. Always check labels to ensure all ingredients are gluten-free. If you're avoiding lentils, try chickpeas or black beans as protein sources. For a nut-free version, skip the plant-based milk and use vegetable broth for mashing. You can also use cauliflower instead of potatoes for a low-carb twist. Incorporate seasonal vegetables to boost flavor and nutrition. Fresh spinach or zucchini works great in the filling. Mushrooms add a nice umami taste, too. Don't be afraid to mix it up based on what's in season. This keeps your dish fresh and exciting. For the full recipe, refer to the beginning of this article. To store your Vegan Lentil Shepherd's Pie, let it cool first. Once cooled, cover it tightly with plastic wrap or foil. You can also use an airtight container. Store it in the fridge for up to four days. This keeps the flavors intact and helps maintain the pie's texture. If you want to save some pie for later, freezing is a great option. Cut the pie into individual portions. Wrap each piece in plastic wrap and then in foil. This prevents freezer burn. Place the wrapped pieces in a freezer bag. You can freeze them for up to three months. When you are ready to enjoy, just thaw it in the fridge overnight. To reheat your shepherd's pie, use the oven for the best results. Preheat your oven to 350°F (175°C). Remove the pie from the fridge or freezer and unwrap it. Place it in a baking dish. Cover the dish with foil to keep it moist. Heat it for about 25-30 minutes if cold. If it’s frozen, it might take up to 45 minutes. Remove the foil for the last 5-10 minutes to crisp the top. Enjoy your delicious meal just like it was fresh! Yes, you can use canned lentils. Just drain and rinse them first. They cook faster. This saves time. For this recipe, use about 1.5 cups of canned lentils. You can serve it with a fresh salad or steamed vegetables. A side of crusty bread also works well. The pie is hearty, so keep sides light. It lasts for 3 to 5 days in the fridge. Store it in an airtight container. Reheat it in the oven or microwave. Yes, you can prepare it a day in advance. Assemble the pie, then cover it and chill. Bake it just before serving for the best taste. Check out the Full Recipe for more details! This blog post covered how to make a tasty vegan lentil shepherd's pie. We explored essential and optional ingredients, plus nutritional info. I provided clear, step-by-step cooking methods. You learned tips for creamy mashed potatoes and flavorful lentils. We noted variations for different diets and the best ways to store leftovers. In closing, I hope you enjoy making this dish! It’s a great meal for everyone.](https://dishtreats.com/wp-content/uploads/2025/06/9ba9e126-74d7-4f69-86a8-52952e7f4e77-768x768.webp)

