Creamy Taco Pasta Skillet Quick and Flavorful Dinner

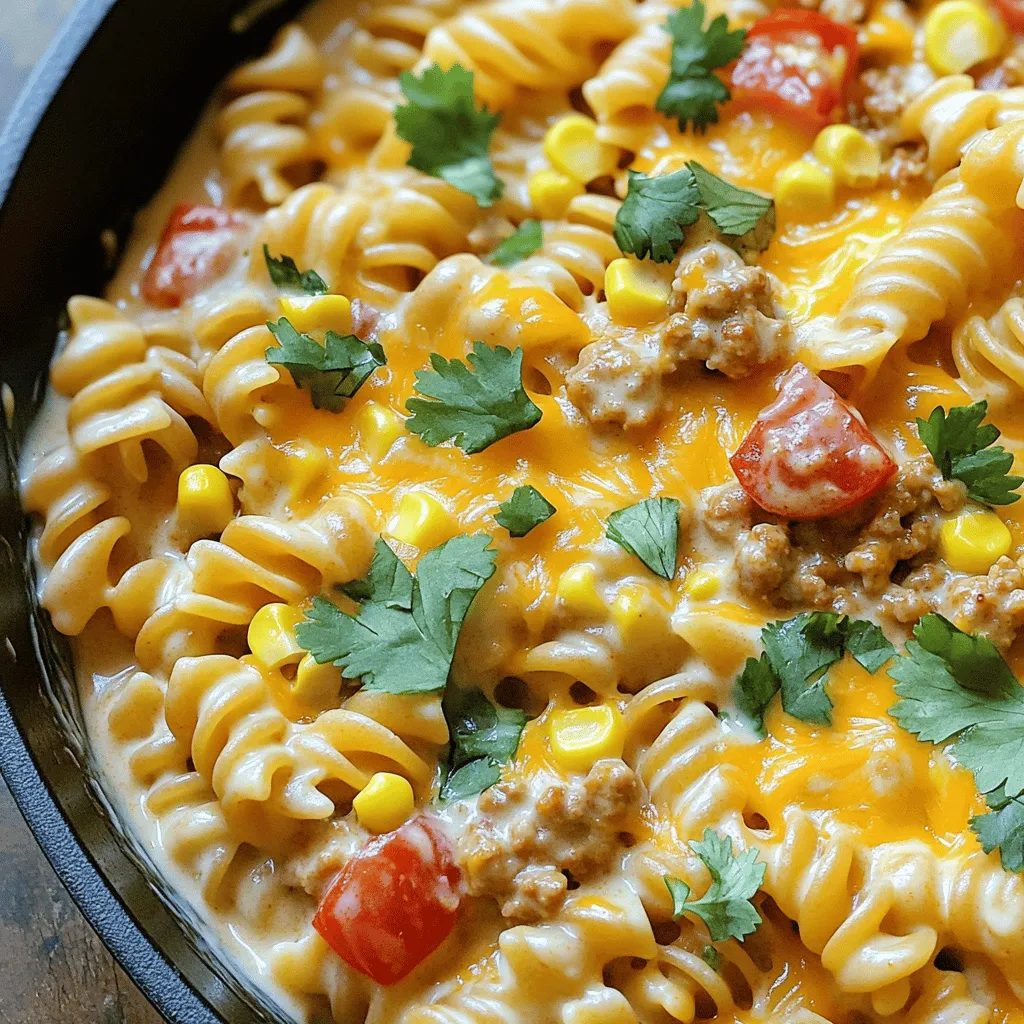
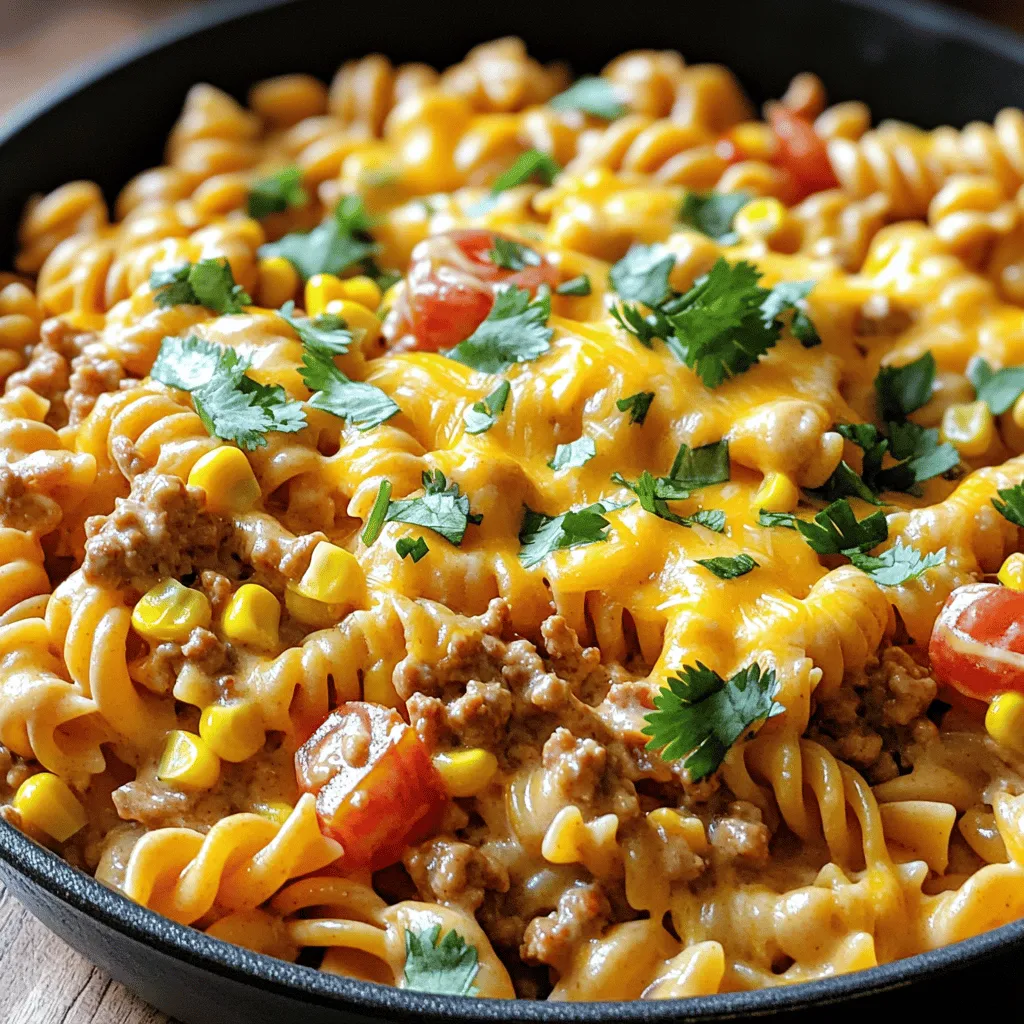
Looking for a quick and flavorful dinner? Try my Creamy Taco Pasta Skillet! It combines tender pasta, savory ground meat, and creamy sauce in one pan. This dish is not only easy to make, but it’s also packed with flavor. In just a few steps, you’ll have a hearty meal that everyone will love. Let’s dive into the ingredients and get cooking!
Ingredients
Main Ingredients for Creamy Taco Pasta Skillet
- 8 oz pasta of your choice (penne or rotini recommended)
- 1 lb ground chicken or turkey
- 1 tablespoon olive oil
- 1 small onion, finely chopped
- 2 cloves garlic, minced
- 1 packet taco seasoning (1 oz)
- 1 can diced tomatoes with green chilies (15 oz), undrained
- 1 cup chicken broth (or water)
- 1 cup heavy cream
- 1 cup corn kernels (fresh, frozen, or canned)
- 1 cup shredded cheese (cheddar or Mexican blend preferred)
- Salt and pepper to taste
- Fresh cilantro, chopped (for garnish)
In this recipe, I focus on simple, fresh ingredients that make a big impact. I love using penne or rotini because they hold the creamy sauce well. Ground chicken or turkey adds a light protein base, making it a healthy choice. The aromatics play a key role; olive oil, onion, and garlic add warmth and flavor to the dish.
The taco seasoning brings that beloved spice mix we all love. I often choose diced tomatoes with green chilies for added zest. The chicken broth enhances the flavor while the heavy cream and shredded cheese create a rich, creamy sauce.
Adding corn gives sweetness and texture, while fresh cilantro brings a vibrant touch. Don’t forget salt and pepper to balance the flavors. These ingredients work together to create a comforting, quick dinner that everyone will enjoy.
Step-by-Step Instructions
Preparing the Skillet Base
First, I heat a tablespoon of olive oil in a large skillet over medium heat. Once the oil is hot, I add a finely chopped onion. I sauté the onion for about 3-4 minutes until it turns soft and fragrant. Next, I add minced garlic and 1 pound of ground chicken or turkey. I cook the meat, using a spatula to break it apart. I stir until the meat is brown and fully cooked, which takes about 5-7 minutes. Then, I mix in a packet of taco seasoning, making sure the meat is well-coated with the spices.
Combining Key Ingredients
After the meat is cooked, I pour in a can of diced tomatoes with green chilies, including all the juices. I also add 1 cup of chicken broth and stir everything together. Next, I bring the mixture to a gentle simmer. Once it bubbles, I stir in 8 ounces of pasta and 1 cup of corn. I ensure that the pasta is fully submerged in the liquid. I cover the skillet with a lid and let it cook for 10-12 minutes. I stir occasionally to keep the pasta from sticking.
Creating the Creaminess
Once the pasta is cooked to my liking, I lower the heat. I pour in 1 cup of heavy cream and add 1 cup of shredded cheese. I stir constantly until the cheese melts and the sauce becomes creamy. I taste the dish and adjust the salt and pepper as needed. Afterward, I remove the skillet from the heat. I let the dish sit for a couple of minutes for the sauce to thicken slightly.
Tips & Tricks
Achieving the Perfect Creamy Texture
To get that creamy texture, choose the right cheese. I recommend using cheddar or a Mexican blend. These cheeses melt well and add rich flavor. Stir the mixture often as it cooks. This helps prevent the pasta from sticking to the pan. Make sure to combine everything well for a smooth sauce.
Cooking Time Adjustments
If you choose a different pasta, adjust the cooking time. Thin pasta cooks faster than thick pasta like penne or rotini. Check the package for the time. You want the pasta to be al dente. This means it should be firm but not hard. To test it, bite into a piece. If it is chewy but not crunchy, it’s perfect.
Enhancing Flavor Profiles
Add more flavor with extra seasonings. Consider using a pinch of chili powder or paprika. These spices can amp up the taste. For a fresh touch, garnish with chopped cilantro. You can also add a squeeze of lime juice for brightness. It makes the dish lively and fun!

Variations
Healthier Substitutions
For a healthier twist, you can switch to whole wheat or gluten-free pasta. Both options keep the taste but add more fiber. Using lean proteins like ground turkey or chicken helps cut fat. If you want plant-based, try lentils or chickpeas. They add protein and flavor without meat.
Flavor Variations
Want more heat? Toss in some sliced jalapeños for a spicy kick. You can also add toppings like avocado or salsa. These add creaminess and freshness, making each bite exciting. Experiment with different cheeses like pepper jack for a fun twist.
Vegetarian Options
To make a meatless version, skip the meat and add veggies. Bell peppers, zucchini, and spinach work great. For protein, use black beans or tofu. This gives you a filling meal that is colorful and tasty. You can enjoy all the creamy flavors without meat.
Storage Info
Storing Leftovers
To store your creamy taco pasta, let it cool first. Place it in an airtight container. You can keep it in the fridge for up to three days. Make sure to label the container with the date. If you want to store it longer, freezing is a good option. Divide the pasta into smaller portions for quick meals later. Use freezer-safe containers or bags to prevent freezer burn. You can freeze it for up to three months.
Reheating Recommendations
When you are ready to eat your leftovers, use a skillet to reheat. Add a splash of water or broth to help it heat evenly. Stir occasionally to avoid burning. You can also use the microwave. Place it in a microwave-safe bowl, cover it with a lid or a damp paper towel. Heat for one to two minutes, stirring halfway through. For day-after servings, you can add fresh toppings like cilantro or cheese to enhance the flavor. This keeps the dish fresh and tasty!
FAQs
How long does Creamy Taco Pasta Skillet last in the fridge?
Creamy Taco Pasta Skillet lasts about 3 to 4 days in the fridge. Store it in a tight container. This keeps the flavors fresh and prevents drying out. When reheating, add a splash of chicken broth for extra creaminess.
Can I use different types of pasta?
Yes, you can use many pasta types. Penne and rotini work best, but feel free to try spaghetti or shells. Just keep an eye on the cooking time, as it may change based on the pasta shape.
What can I serve with Creamy Taco Pasta?
This dish pairs well with a fresh salad or garlic bread. You could also serve lime wedges for zest. Crispy tortilla chips are a fun side, adding crunch to your meal.
Is it possible to make this recipe dairy-free?
You can make this dish dairy-free. Use coconut cream or almond milk instead of heavy cream. For cheese, consider vegan cheese options or nutritional yeast for a cheesy flavor without dairy.
Can I prepare this meal in advance?
Yes, you can prepare this meal in advance. Cook the pasta and meat, then store them separately. When ready, combine and heat them up. This saves you time on busy nights while keeping it fresh.
The Creamy Taco Pasta Skillet is a simple and tasty dish. We covered the key ingredients, from pasta and protein to aromatics and creamy components. I shared step-by-step instructions to make cooking easy. You also learned helpful tips for texture, cooking times, and flavor. Lastly, we looked at variations and storage info for leftovers.
This dish is flexible and fun to make. I hope you feel ready to try it and add your own twist! Enjoy your cooking!


![To create your Chocolate Almond Butter Shake, gather these ingredients: - Perfectly ripe banana - Creamy almond butter - Unsweetened cocoa powder - Honey or maple syrup - Almond milk (or preferred milk variety) - Pure vanilla extract - Flaky sea salt - Ice cubes (optional) Each ingredient plays a key role in making your shake smooth and tasty. The banana gives a natural sweetness and creaminess. Almond butter adds healthy fats and a nutty flavor that blends perfectly with cocoa. Unsweetened cocoa powder provides rich chocolate taste without added sugars. Honey or maple syrup can sweeten your shake just right. Using almond milk keeps the shake light and dairy-free. Pure vanilla extract enhances the overall flavor, while flaky sea salt balances the sweetness. Ice cubes are optional but help create a thicker shake if that’s your preference. For the full recipe, follow the steps provided in the instructions section. Enjoy crafting your delicious shake! - Peel and slice the banana: Start by peeling your ripe banana. Slice it into smaller pieces. This helps it blend easier. - Add ingredients to the blender: Toss the banana slices into the blender. Now add the almond butter, cocoa powder, honey or maple syrup, almond milk, vanilla extract, and a pinch of sea salt. - Incorporate ice cubes if desired: If you want a thicker shake, add the ice cubes. This gives your shake a nice chill. - Blend until smooth: Blend all the ingredients on high speed. Keep blending until everything is smooth and creamy. - Adjust sweetness as needed: Taste your shake. If you want it sweeter, add more honey or maple syrup. Blend again if you add more. - Pour and garnish: Once your shake is perfect, pour it into a tall glass. You can garnish it with cocoa powder or whole almonds for a nice touch. For the full recipe, check the details above. Enjoy! - Choosing the right banana: Use a perfectly ripe banana. It should be yellow with some brown spots. This banana adds the best sweetness and creaminess to your shake. - Perfecting the blend time: Blend for about 30 seconds. This time helps mix all ingredients well. Stop blending once the shake is smooth with no lumps. - Adding optional ingredients for health benefits: You can add a handful of spinach for extra nutrients. Chia seeds or protein powder also boost your shake’s nutrition. - Alternative natural sweeteners: You can swap honey for maple syrup or agave nectar. Each option adds unique flavors. - Tips for reducing sweetness: Use less sweetener to start. You can always add more later. This way, you control the taste better. - Garnishing options: Top your shake with a sprinkle of cocoa powder. Whole almonds or a drizzle of almond butter also look great. - Serve in unique glassware: Try using mason jars or tall glasses. Fun glassware makes your shake more inviting! For the full experience, check out the [Full Recipe]. {{image_4}} You can switch up your nut butter for a new taste. Try peanut butter if you want a classic flavor. Cashew butter gives a creamy touch too. For the milk, almond milk is great, but soy or oat milk works well too. If you want more protein, add some Greek yogurt. Want greens? Throw in a handful of spinach. You won’t taste it, but you'll get extra nutrition. Spices add depth to your shake. A dash of cinnamon or nutmeg makes it warm and cozy. You can also toss in fruits for a twist. Berries or a scoop of avocado adds creaminess and flavor. Each small change can make your shake feel fresh and exciting. Want to make it vegan? Just use maple syrup instead of honey. For gluten-free, this shake is already safe. If you're watching carbs, skip the honey or use a low-carb sweetener. You can enjoy this shake while sticking to your diet plan. For the full recipe, check out the details above. After making your Chocolate Almond Butter Shake, you might have some leftovers. To keep it fresh, pour it into an airtight container. Store the shake in the fridge. It will stay good for about 1 to 2 days. Before drinking, shake or stir it well. This helps mix any separation. If you want to prepare your shake in advance, freezing is a great choice. Pour the shake into ice cube trays or freezer-safe bags. Freeze it for up to a month. When you’re ready to enjoy it, blend the frozen cubes with a little almond milk. This creates a delicious, chilled treat. The shelf life of your shake depends on how you store it. In the fridge, it lasts about 1 to 2 days. If you freeze it, you can keep it for up to a month. Look for signs of spoilage. If the shake smells sour or has a strange color, it’s time to toss it. Always trust your senses. Enjoy your shake at its best! To make a chocolate almond butter shake, gather your ingredients first. You need a ripe banana, creamy almond butter, cocoa powder, honey or maple syrup, almond milk, vanilla extract, and a pinch of sea salt. Start by peeling and slicing the banana. Then, put all ingredients in a blender. Blend until smooth and creamy. Adjust the sweetness if needed. Pour it into a glass and enjoy! Yes, you can substitute almond milk with other types of milk! Options include cow's milk, soy milk, or oat milk. Each type will change the taste slightly. Choose what you like best or what you have on hand. Almond butter offers many health benefits. It contains healthy fats, protein, and fiber. These nutrients can help you feel full and satisfied. Almond butter also has vitamin E, which helps skin health. It may support heart health and provide energy too! Yes, you can make the shake ahead of time. Store it in the fridge for up to 24 hours. If you want to keep it fresh, use an airtight container. Shake it well before drinking to mix everything again. Absolutely! You can use other sweeteners, like agave syrup or stevia. Adjust the amount based on your taste. Each sweetener has a different flavor, so choose one you enjoy! Check out the Full Recipe for more ideas. This blog shared a simple recipe for a delicious chocolate almond butter shake. You learned about the key ingredients, from ripe bananas to creamy almond butter. I also provided tips for the best blending and sweetening options. You can make it your own with various flavors and dietary changes. Remember to store it right for maximum freshness. Enjoy your shake! It’s easy to make, tasty, and can fit any diet. Have fun creating your perfect blend!](https://dishtreats.com/wp-content/uploads/2025/06/abab5c41-bf75-4334-8678-77245c216c9f-768x768.webp)
![To make this dish, you need some key items. Gather the following ingredients: - 3 cups cooked rotini pasta - 2 cups cooked chicken, shredded - 1 cup fresh mushrooms, sliced (white or cremini) - 2 cups heavy cream - 1 cup grated Parmesan cheese - 1 cup shredded mozzarella cheese - 2 cloves garlic, minced - 1 tablespoon olive oil - 1 teaspoon dried Italian herbs (such as oregano, basil, and thyme) - Salt and freshly ground black pepper, to taste - Fresh parsley, chopped (for garnish) These ingredients come together to create a creamy, rich dish that warms the soul. You can add more fun to your Chicken and Mushroom Alfredo Bake. Here are some optional items to consider: - Sun-dried tomatoes for a tangy twist - Spinach or kale for added greens - Cooked bacon for extra flavor - More cheese for a cheesier bake These add-ins make the dish your own and can enhance its taste and texture. Seasonings can elevate the dish. Here are some suggestions: - Fresh thyme or rosemary for bright flavor - Crushed red pepper flakes for heat - Extra Parmesan or mozzarella on top for a golden crust - A drizzle of truffle oil for a gourmet touch These toppings can take your Chicken and Mushroom Alfredo Bake to the next level. For the full recipe, follow the steps closely, and enjoy this creamy delight! Start by preheating your oven to 375°F (190°C). This step is key for even cooking. While the oven warms up, take a 9x13-inch baking dish. Grease it lightly with cooking spray or a bit of olive oil. This will help the pasta bake not stick to the dish. Next, grab a large skillet and heat 1 tablespoon of olive oil over medium heat. Once hot, add 2 cloves of minced garlic. Sauté this for about 1 minute. You want it fragrant but not brown. Now, toss in 1 cup of sliced mushrooms. Cook these for around 5 minutes, stirring often. They should become tender and release their juices. Add salt and black pepper to boost their flavor. In a big mixing bowl, combine 3 cups of cooked rotini pasta and 2 cups of shredded chicken. Next, add the sautéed mushrooms and 2 cups of heavy cream. Sprinkle in half of the 1 cup of grated Parmesan cheese and 1 teaspoon of dried Italian herbs. Mix everything well until it’s all coated in that creamy goodness. Pour the mixture into the greased baking dish. Spread it out evenly. Top it with the rest of the Parmesan and 1 cup of shredded mozzarella cheese for a cheesy finish. Now you are ready for the next steps in your Chicken and Mushroom Alfredo Bake journey! For the full recipe, make sure to check the details provided earlier. To get the best flavor, use fresh mushrooms. They add a rich taste to the dish. I recommend cremini or white mushrooms for this recipe. Make sure you shred the chicken finely. This helps mix it well with the pasta and sauce. For a truly creamy bake, let your pasta cool slightly before mixing it with the sauce. This prevents the cheese from clumping. Use heavy cream for the richest texture. It helps create a smooth, velvety sauce that coats the pasta perfectly. Stir the sauce gently to keep it creamy. If you want to lighten it up a bit, you can mix in some milk, but it may not be as thick. Adding a bit of reserved pasta water can also help if the sauce seems too thick. Baking at 375°F (190°C) is ideal for even cooking. Cover the dish with foil for the first part of baking. This ensures the pasta heats through without drying out. After 25 minutes, remove the foil for the last 15 minutes. This allows the cheese to brown nicely and become bubbly. Always let the dish sit for a few minutes before serving. This helps everything set and makes for easier serving. For the full recipe, check the earlier sections! {{image_4}} You can boost your Chicken and Mushroom Alfredo Bake by adding veggies. Try spinach, broccoli, or bell peppers. These veggies add color and nutrition. You can also use different proteins. Swap chicken for shrimp or cooked sausage for a new twist. Each protein brings its own flavor, making this dish more exciting. If you need gluten-free options, use gluten-free pasta. Many brands offer great choices that taste good. For a low-carb version, replace pasta with zucchini noodles or cauliflower rice. This change keeps the dish light and healthy while still being creamy and satisfying. To change the flavor, add herbs and spices to your bake. Fresh basil or parsley adds a nice touch. You can also try crushed red pepper for heat or smoked paprika for a deeper flavor. Experiment with these options to find your perfect taste. Each adjustment can make your Chicken and Mushroom Alfredo Bake feel new and fun. Check [Full Recipe] for more ideas. After enjoying your Chicken and Mushroom Alfredo Bake, store leftovers properly for the best taste. Let the dish cool down first. Then, transfer it to an airtight container. You can keep it in the fridge for up to three days. Be sure to label the container with the date. To reheat, place the leftovers in a baking dish. Cover it with foil to keep moisture in. Preheat your oven to 350°F (175°C) and bake for about 20 minutes. Stir halfway through to heat evenly. You can also microwave individual portions for a quick meal. Just add a splash of cream or milk to keep it creamy. If you want to freeze your Chicken and Mushroom Alfredo Bake, it’s easy! Use a freezer-safe container or wrap it tightly in plastic wrap and foil. You can freeze it for up to three months. When you’re ready to eat, thaw it in the fridge overnight. Bake it at 350°F (175°C) until heated through, about 30 minutes. Enjoy every creamy bite from the Full Recipe! You can prepare Chicken and Mushroom Alfredo Bake ahead of time by following these steps. First, make the dish up to the point of baking. Once you mix the pasta, chicken, and sauce, place it in your greased baking dish. Cover it tightly with plastic wrap or aluminum foil. Store it in the fridge for up to 24 hours. When ready to bake, preheat your oven to 375°F (190°C). Remove the covering and bake as directed in the Full Recipe. You may need to add a few extra minutes to the baking time. Yes, you can use different cheese in your Chicken and Mushroom Alfredo Bake. If you want a sharper flavor, try using aged cheddar or gouda. For a creamier texture, consider using cream cheese or ricotta. Blend different cheeses for a unique taste. Just ensure that the total amount of cheese stays the same for best results. Your bake will still come out tasty and creamy. You can serve many tasty sides with Chicken and Mushroom Alfredo Bake. Garlic bread is a classic choice and adds a nice crunch. A fresh green salad with a light vinaigrette pairs well too. You can add steamed vegetables like broccoli or green beans for a healthy touch. These sides balance the richness of the bake and round out your meal nicely. This blog post covered how to make a delicious Chicken and Mushroom Alfredo Bake. You learned about the main ingredients, steps to prepare, and tips for the best results. I shared ways to adapt the recipe to your liking and how to store leftovers. With these tools, you can make a creamy dish that satisfies every time. Cooking can be fun and easy when you follow simple steps. Enjoy experimenting and making this recipe your own!](https://dishtreats.com/wp-content/uploads/2025/06/8d8b4d23-05f5-46f0-9917-116c769775c3-768x768.webp)


![To make Rainbow Fruit Skewers, you need a mix of fresh fruits. Here’s the list of what you’ll need: - Fresh strawberries (1 cup) - Juicy orange segments (1 cup) - Sweet pineapple chunks (1 cup) - Crisp green grapes (1 cup) - Plump blueberries (1 cup) - Deep purple grapes or blackberries (1 cup) - Optional: Honey (2 tbsp) for drizzling - Fresh mint leaves for garnish Each fruit brings a burst of color and taste. Fresh strawberries add a sweet tang. Juicy orange segments bring a citrusy pop. Sweet pineapple chunks add tropical flair. Crisp green grapes offer crunch. Plump blueberries add a mild sweetness. Deep purple grapes or blackberries provide a rich finish. Feel free to mix and match. Use your favorite fruits or whatever you have at home. The goal is to create a vibrant, tasty treat. You can also drizzle honey on top for added sweetness. Mint leaves add a nice touch. They make the dish look fancy and smell great. Remember, this is just a guide. You can adjust the amounts to fit your needs. For the full recipe, check out the complete instructions above. Enjoy your colorful creation! To start, wash all your fruits under cool running water. This step keeps them clean and safe to eat. For strawberries, remove the green tops. If they are big, slice them in half. Next, peel the oranges. Cut them into segments and toss out any seeds. Chop the pineapple into bite-sized chunks. Rinse the green grapes and blueberries to remove dirt and make them shine. Grab your wooden skewers. If you plan to grill them, soak the skewers in water for 10 minutes to prevent burning. Now, it’s time to thread the fruits onto the skewers! I like to start with one strawberry, then add one orange segment, a pineapple chunk, and a green grape. After that, toss on a few blueberries and finish with a purple grape or blackberry. This order gives you a bright, colorful look. Aim for a rainbow effect with every skewer! For a little extra sweetness, drizzle honey over the assembled skewers. This step is optional but adds a nice touch. If you want a chill treat, place the skewers in the fridge for about 30 minutes. Chilling helps the flavors pop and makes them extra refreshing. Enjoy these delicious Rainbow Fruit Skewers at your summer gatherings or as a fun snack! For the full recipe, check out [Full Recipe]. Picking ripe fruits is key for tasty skewers. Here are signs to watch for: - Strawberries: Look for bright red color without any green tops. - Oranges: Choose firm, heavy oranges with smooth skin. - Pineapple: Smell the bottom. A sweet aroma means it's ripe. - Green Grapes: Look for a vibrant green color and firm texture. - Blueberries: Pick plump blueberries with a deep blue hue. - Purple Grapes/Blackberries: Choose ones that are dark and slightly soft. Keep your fingers safe while making skewers. Here’s how: - Use wooden skewers that are at least 10 inches long. - Soak them in water for 10 minutes. This helps avoid burning. - Hold the fruit steady with one hand. Use the other to push it onto the skewer. - Start with firm fruits like strawberries. This helps stabilize softer fruits later. - Avoid using too much force. This can break the fruit apart. Make your skewers look as good as they taste. Try these tips: - Arrange skewers in a colorful pattern. Use a mix of all the fruits. - Place them on a bright platter. A white dish makes colors pop. - Garnish the platter with fresh mint leaves. They add a lovely aroma. - For extra flair, drizzle honey on top. It adds shine and sweetness. Explore more ideas in the [Full Recipe]. {{image_4}} You can switch up the fruits based on the season. In spring, use strawberries and blueberries for sweetness. In summer, opt for ripe peaches and cherries. Fall brings apples and pears, adding crunch. Winter is perfect for citrus like tangerines and pomegranates. Each season offers fresh flavors for your skewers. You can create fun themes for parties. For a summer BBQ, use red, white, and blue fruits for a patriotic look. For Halloween, add orange slices and blackberries for a spooky vibe. During the holidays, use red strawberries and green grapes for a festive feel. Matching colors makes your skewers pop! Adding protein can make your skewers more filling. You can thread cubes of cheese like cheddar or mozzarella between the fruits. Greek yogurt is another option—use it as a dip on the side. This adds taste and gives you energy for your summer fun. For the full recipe, check out Rainbow Fruit Skewers! To keep your rainbow fruit skewers fresh, store them in an airtight container. This helps keep moisture in and prevents the fruit from drying out. You can also cover them with plastic wrap if you don’t have a container. In the fridge, these skewers stay fresh for up to three days. After that, the fruit may start to lose its flavor and texture. You can make these skewers a few hours before your event. Just prepare the fruit and assemble the skewers. Store them in the fridge until you are ready to serve. If you want to save time, wash and cut the fruit a day ahead. Keep the pieces in separate containers. This way, you can quickly assemble your skewers when needed. Check out the Full Recipe for more tips on making and storing your rainbow fruit skewers! To scale this recipe, double or triple the ingredients. Use a mix of fruits to please all tastes. Prepare a large platter to display the skewers. Set up a fruit station where guests can make their own skewers. This way, everyone can choose their favorite fruits. You can use frozen fruit, but it may not look as good. Frozen fruit tends to be softer and can lose its shape. If using frozen fruit, let it thaw and drain any excess water. Fresh fruit gives a better texture and taste for skewers. Yes, Rainbow Fruit Skewers are very healthy! Each fruit offers vitamins and minerals. For instance, strawberries provide vitamin C. Oranges are high in fiber. Pineapple contains bromelain, which helps digestion. Grapes and blueberries are full of antioxidants. Enjoy these colorful treats guilt-free! If you want a vegan option, use maple syrup or agave nectar. You can also try yogurt or nut butter for creaminess. For a sugar-free choice, use a sugar-free syrup. These alternatives add sweetness and keep the skewers fun and tasty. To keep fruit fresh, soak apple or banana slices in lemon juice. This helps prevent browning. Store skewers in the fridge until serving. Keep them covered to avoid drying out. Fresh mint leaves also help keep everything looking bright and fresh. For a full recipe, check out the detailed steps in the earlier section! Rainbow fruit skewers combine fresh fruits for a colorful and tasty treat. We walked through selecting ripe fruits, skewering them, and adding sweet touches like honey. You can use fun themes for parties or add proteins for a snack. Keep them chilled and store them well to enjoy later. In the end, these skewers are fun to make and good for you. Enjoy creating your own rainbow of flavors!](https://dishtreats.com/wp-content/uploads/2025/06/1f4123b9-dd53-4d15-af26-e58167d567ef-768x768.webp)