Creamy Taco Pasta Skillet Quick and Easy Meal

Are you ready for a quick and tasty meal that will impress the whole family? This Creamy Taco Pasta Skillet combines the flavors of your favorite taco night with the comfort of pasta. In just 30 minutes, you can whip up a dish loaded with creamy goodness, seasoned meat, and melty cheese. Let’s dive in and get cooking! Your new favorite weeknight meal awaits!
Ingredients
Complete List of Ingredients
- 8 ounces fusilli or rotini pasta
- 1 pound ground turkey or lean ground beef
- 1 tablespoon olive oil
- 1 small onion, diced
- 2 cloves garlic, minced
- 1 packet taco seasoning
- 1 can (15 ounces) diced tomatoes with green chilies
- 1 cup chicken or vegetable broth
- 1 cup heavy cream
- 1 cup shredded cheddar cheese
- 1 cup corn kernels (fresh or frozen)
- Salt and pepper to taste
- Fresh cilantro, chopped (for garnish)
- Sliced jalapeños (optional, for an extra kick)
Gather all these ingredients before you start cooking. This makes the process smooth and easy. The pasta is the base of the dish. You can use fusilli or rotini, which hold the sauce well. Ground turkey or lean beef gives it protein and flavor. Olive oil helps cook the meat and adds richness.
Onions and garlic bring depth to the dish. Taco seasoning gives it that classic taco taste. Diced tomatoes with green chilies add a nice kick. Chicken or vegetable broth keeps the pasta moist and flavorful. Heavy cream makes the sauce rich and creamy.
Shredded cheddar cheese adds a gooey texture. Corn kernels add sweetness and color. Finally, season with salt and pepper. Fresh cilantro brightens the dish. If you like heat, add jalapeños for extra spice.
By prepping these ingredients, you’ll make a delicious creamy taco pasta. This meal is quick, tasty, and perfect for busy nights. Enjoy cooking!
Step-by-Step Instructions
Cooking the Pasta
- Bring a large pot of salted water to a boil.
- Add 8 ounces of fusilli or rotini pasta.
- Cook until al dente, about 8-10 minutes.
- Drain the pasta and set it aside.
Preparing the Meat
- Heat 1 tablespoon of olive oil in a large skillet.
- Add 1 pound of ground turkey or lean ground beef.
- Brown the meat for 5-7 minutes, breaking it apart as it cooks.
- Drain any excess fat from the skillet if needed.
Building the Flavor
- Stir in 1 small diced onion and 2 minced garlic cloves.
- Sauté for about 3 minutes until the onion is tender.
- Mix in 1 packet of taco seasoning, stirring well to combine.
Combining Ingredients
- Pour in 1 can of diced tomatoes with green chilies.
- Add 1 cup of chicken or vegetable broth.
- Mix everything and bring to a gentle simmer for 4-5 minutes.
- Carefully stir in 1 cup of heavy cream, letting it thicken.
Final Steps
- Add the cooked pasta and 1 cup of corn kernels.
- Mix in 1 cup of shredded cheddar cheese until melted.
- Season with salt and pepper to taste, mixing well.
- Garnish with chopped cilantro and sliced jalapeños if desired.
Tips & Tricks
Ensuring Perfect Texture
To cook pasta to al dente, start with a large pot of salted water. Bring it to a boil before adding your fusilli or rotini. Cook according to package directions, usually about 8-10 minutes. Check the pasta a minute or two before the time is up. It should be firm yet tender. Drain the pasta right away to stop cooking.
To avoid a greasy skillet, drain excess fat after browning the meat. Use a leaner meat option like ground turkey. This keeps the dish lighter and lets the flavors shine.
Flavor Boosting Suggestions
For depth, add extra spices. You might try chili powder, cumin, or paprika. These spices enhance the taco flavor. You can also mix in a pinch of cayenne for heat.
Using fresh herbs can elevate your dish. Add cilantro or parsley right before serving. The fresh taste brightens the rich creaminess. You can also sprinkle some lime juice for a zesty kick.
Presentation Ideas
For serving, consider deep bowls over plates. This helps keep the pasta warm and lets the sauce pool at the bottom.
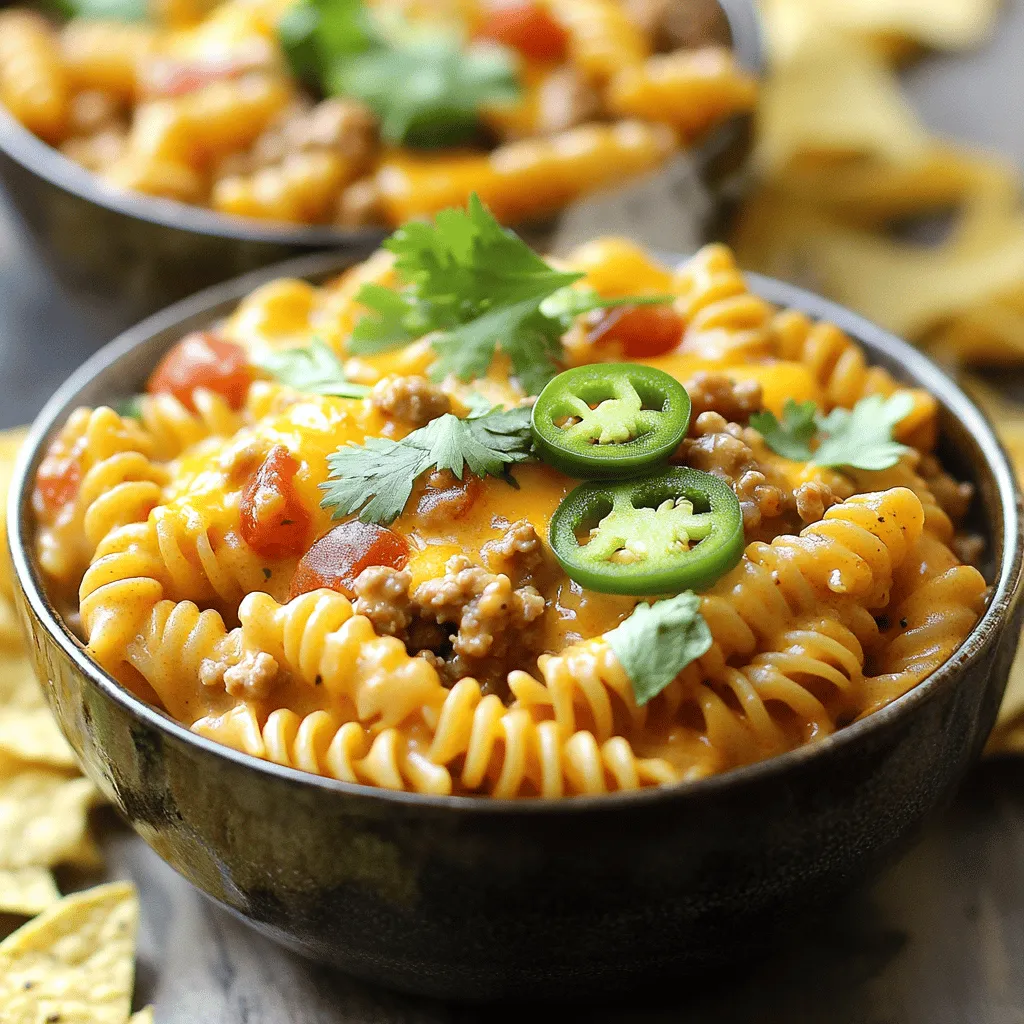
Adding garnishes boosts visual appeal. Top with extra cheddar cheese and a few sprigs of cilantro. You can also add sliced jalapeños for color and spice. Serve with tortilla chips on the side for a delightful crunch.

Variations
Protein Substitutes
You can switch the meat in this dish easily. Ground chicken works well for a leaner choice. If you prefer plants, use lentils or a meat substitute. These options cater to different diets. They keep the dish tasty while meeting your needs.
Sauce Alternatives
Changing the cheese can change the dish’s flavor. Try pepper jack for a spicy kick. You can also use mozzarella for a milder taste. If you need dairy-free, swap heavy cream for coconut milk. It adds creaminess without the dairy.
Pasta Variations
Not a fan of wheat pasta? Use gluten-free pasta. There are many options, like rice or quinoa pasta. You can even try whole grain for more fiber. Different shapes, like penne or bowties, can make this dish fun. Mix it up to keep things interesting!
Storage Info
Best Storage Practices
To store leftovers, let the creamy taco pasta cool first. Once cooled, place it in an airtight container. This keeps it fresh and tasty. Use shallow containers to help it cool faster. I recommend glass or BPA-free plastic containers. They are durable and safe for food storage.
Reheating Instructions
To reheat, use a skillet on low heat. This warms the pasta gently. Stir often to keep it from sticking. You can also use a microwave. Heat it in short bursts, stirring in between. Add a splash of cream if it seems too thick. This helps keep the creaminess intact.
Freezing Tips
Yes, you can freeze creamy taco pasta! Store it in an airtight container. Leave some space at the top for expansion. When you want to eat it, take it out of the freezer. Thaw it overnight in the fridge. Reheat it in a skillet or microwave as mentioned above. Just remember, the texture may change slightly after freezing.
FAQs
Common Questions About Creamy Taco Pasta Skillet
How long does it take to make Creamy Taco Pasta Skillet?
It takes about 30 minutes to make this dish. You spend 15 minutes on prep and 15 minutes cooking.
Can I use different types of meat?
Yes! Ground turkey and lean ground beef work well. You can also use ground chicken or tofu for a meatless option.
Is this recipe suitable for leftovers?
Absolutely! This pasta skillet keeps well in the fridge. Store it in an airtight container for up to three days.
What are the best sides to serve with it?
Tortilla chips make a great side. You can also serve a fresh salad or some steamed veggies for balance.
Can I make this dish in advance?
Yes, you can prep it ahead of time. Just cook and combine the ingredients, then store it in the fridge. Reheat before serving.
This blog post shared a simple recipe for Creamy Taco Pasta Skillet. We covered each ingredient, from pasta to protein. I outlined step-by-step instructions and provided tips for texture and flavor. You can also adapt the recipe with various proteins and sauces. For storage, I included best practices to keep your dish fresh.
Enjoy cooking and savoring this tasty meal! Whether you share it or keep it for yourself, it’s a winner.


![- 2 medium zucchinis, grated - 1 can (15 oz) black beans, drained and rinsed - 1 cup corn kernels (fresh or frozen) - 1 small red onion, finely chopped - 2 cloves garlic, minced - 1 teaspoon ground cumin - 1 teaspoon smoked paprika - 1 cup enchilada sauce (store-bought or homemade) - 8 whole wheat tortillas - 1 cup shredded cheese (cheddar or a vegan alternative) - 2 tablespoons olive oil - Salt and pepper, to taste - Fresh cilantro, chopped, for garnish - Cooking timeline (Prep time: 15 mins, Total time: 40 mins) - Serving Size information (Servings: 4) When I gather ingredients for zucchini and black bean enchiladas, I love how simple it is. Fresh zucchinis are key for flavor and texture. Black beans add protein and fiber. You can use frozen corn or fresh, depending on what you have. A small red onion gives a sweet taste, while garlic adds a nice kick. Spices like cumin and smoked paprika bring warmth and depth to the dish. I like using enchilada sauce from the store to save time, but homemade is always a treat. Whole wheat tortillas provide a hearty base, and shredded cheese ties everything together. Olive oil helps cook the veggies and adds richness. Adding salt and pepper to taste is important. Finally, a sprinkle of fresh cilantro on top makes the dish pop with color and flavor. For the full recipe, check out the details above. - Step 1: Preheat your oven to 375°F (190°C). This helps your enchiladas cook evenly. - Step 2: Heat 2 tablespoons of olive oil in a skillet over medium heat. Add 1 small red onion, finely chopped. Sauté for about 3-4 minutes, until the onion turns soft and clear. - Step 3: Add 2 cloves of minced garlic to the skillet. Cook for 1 minute, stirring often. The garlic should smell strong but not brown. - Step 4: Mix in 2 medium zucchinis, grated, 1 can of black beans (drained and rinsed), and 1 cup of corn. Sprinkle in 1 teaspoon of ground cumin, 1 teaspoon of smoked paprika, salt, and pepper. Cook this mix for 5-7 minutes. The zucchini should be tender and well mixed. - Step 5: Remove the skillet from heat. Stir in half of the 1 cup of enchilada sauce, making sure everything is coated well. - Step 6: Take a whole wheat tortilla and place it flat. Spoon some of the zucchini mixture down the center. Roll it tightly, then place it seam-side down in a baking dish. Repeat this for all tortillas. - Step 7: Once all tortillas are rolled, pour the remaining enchilada sauce evenly over the top. - Step 8: Sprinkle 1 cup of shredded cheese over the enchiladas. Make sure to cover them well. - Step 9: Cover the baking dish with foil. Bake for 20 minutes to let the flavors blend. - Step 10: Remove the foil and bake for another 10 minutes. The cheese should be melted and slightly golden. Feel free to check the Full Recipe for more details and tips! To keep your zucchini filling just right, follow these tips. First, grate your zucchini and then salt it lightly. Let it sit for about ten minutes. This step helps draw out excess moisture. After that, squeeze the zucchini to remove the water. This way, your filling stays firm, not soggy. Next, adjust the seasoning to match your taste. Start with the suggested spices, but feel free to add more cumin or paprika if you want a stronger flavor. A dash of lime juice can also brighten up the dish. When serving these enchiladas, presentation is key. Use a colorful plate to make the dish pop. A sprinkle of fresh cilantro on top adds a nice touch. You can also add a wedge of lime for extra flair. Pair these enchiladas with a simple salad or some fluffy rice. Both options complement the flavors well. Try a side of avocado or a dollop of sour cream to make it even better. Avoid overstuffing the tortillas. If you pack too much filling in, they may tear. Just a good spoonful is enough. Also, let the enchiladas cool for a few minutes after baking. This step helps them set up nicely. If you serve them too hot, the filling may spill out. Trust me, waiting a bit is worth it! If you want the full recipe, remember to check out the [Full Recipe]. {{image_4}} You can change the beans in this dish. Pinto or kidney beans work great too. They add a different taste while keeping it healthy. You can also add other veggies. Bell peppers or spinach can give your enchiladas a new twist. Just chop them up and mix them in with the other filling. If you need gluten-free options, you can use corn tortillas instead of wheat ones. They taste great and work well with the filling. For a dairy-free version, try vegan cheese. It melts nicely and keeps the dish creamy without the dairy. Want more kick? Add spices or hot sauce to the filling. A bit of chili powder or cayenne can spice things up. You can also try different types of enchilada sauce. Green sauce or mole sauce can change the whole flavor profile. Experiment to find what you love best! To keep your zucchini and black bean enchiladas fresh, store them in the fridge. Place them in an airtight container. This will help seal in flavors and moisture. If you have a lot of leftovers, you can freeze them too. Wrap each enchilada tightly in plastic wrap, then place them in a freezer-safe bag. This method prevents freezer burn and keeps them tasty. When it comes to reheating, I recommend using the oven. Preheat it to 350°F (175°C). Place the enchiladas in a baking dish. Cover them with foil to keep the moisture in. Heat for about 20 minutes. This way, they won’t dry out. You can also use a microwave, but they might lose some texture. If you use the microwave, heat in short bursts to check the warmth. In the fridge, these enchiladas last for about 3 to 4 days. Make sure to eat them before then for the best taste. If you freeze them, they can last for up to 3 months. Just remember to label your bags with dates. This helps you keep track of how long they’ve been there. For the best flavor, try to eat frozen enchiladas within that time frame. You can prep the filling in advance. Just cook the zucchini, black beans, and spices as described in the recipe. Allow it to cool, then store it in the fridge for up to two days. When you’re ready to eat, just assemble the enchiladas with the tortillas and sauce. You can also roll the enchiladas and place them in the baking dish. Cover them tightly and refrigerate. Bake them when you're ready to serve. This method saves time and keeps flavors fresh. Yes, you can. To make cheese-free enchiladas, simply skip the cheese or use a plant-based option. You can add extra veggies or a sprinkle of nutritional yeast for a cheesy flavor. Another option is to serve guacamole or a creamy avocado sauce on top after baking. This adds richness and pairs well with the enchiladas. There are several great options! For a low-carb choice, use large lettuce leaves like romaine or kale. You can also use thinly sliced zucchini or eggplant as a gluten-free alternative. If you want something heartier, try using corn tortillas or even large portobello mushrooms. Each option gives a unique flavor and texture to the dish. Yes, you can use frozen zucchini. Just remember to thaw it first and drain any excess water. This helps keep your filling from becoming too watery. Frozen zucchini is convenient and still delivers great taste in the enchiladas. Just follow the same cooking steps as fresh zucchini. It’s an easy way to enjoy this dish anytime. For the full recipe, refer to the earlier section. In this post, we explored how to make tasty zucchini and black bean enchiladas. I shared a simple recipe, with clear steps and helpful tips. You learned about ingredient choices, cooking methods, and ways to store leftovers. Always remember to check the filling, so it stays moist but not soggy. These enchiladas are not just easy to make; they also fit various diets. Enjoy creating your own version and delight in the flavors! Your kitchen adventure starts here.](https://dishtreats.com/wp-content/uploads/2025/07/2cd92dac-f668-457e-8990-b41595643bf1-768x768.webp)


