Creamy Sun Dried Tomato Gnocchi Delightful Recipe

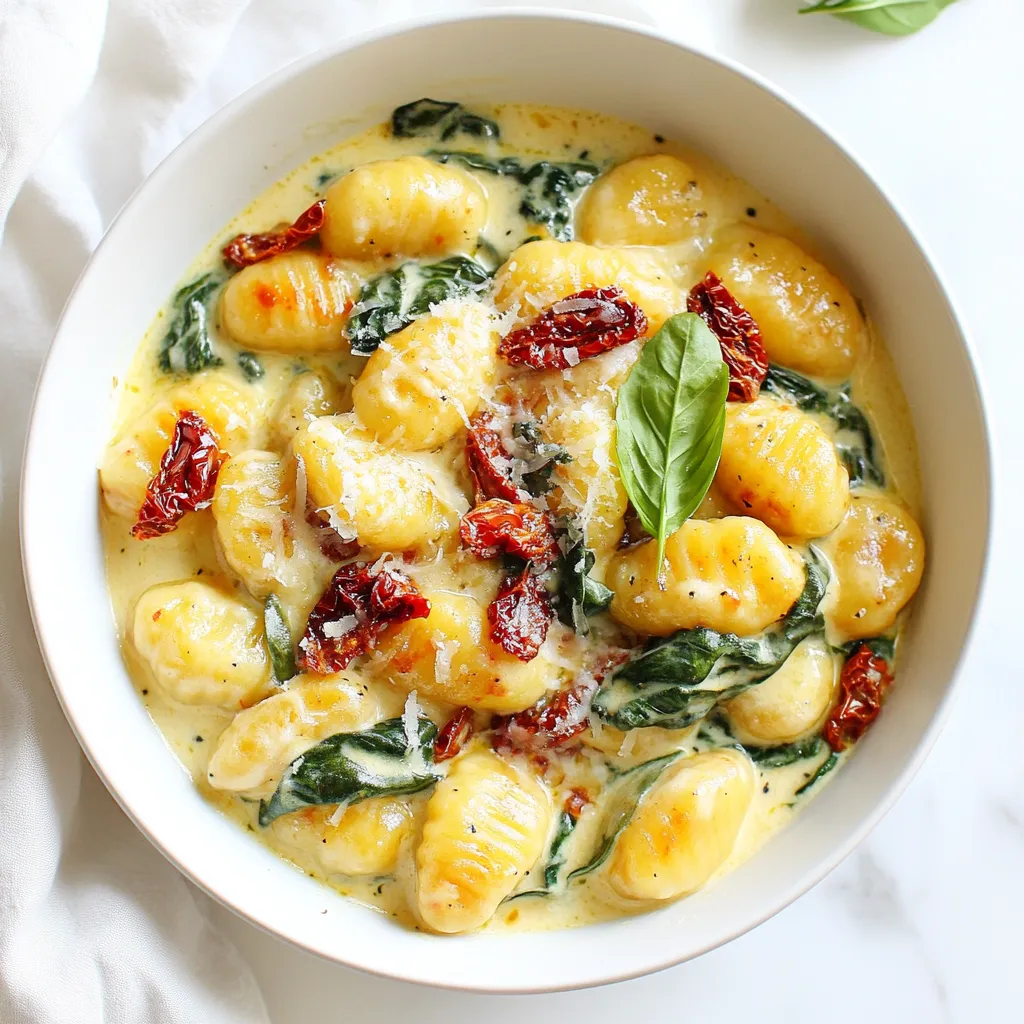
Are you ready to elevate your dinner game with a Creamy Sun Dried Tomato Gnocchi? This dish is rich, flavorful, and incredibly easy to make. Whether you opt for store-bought or homemade gnocchi, the secret lies in high-quality sun-dried tomatoes and the right touch of cream. Join me as I guide you through each step to create this delightful meal. You’ll impress your family and friends in no time!
Why I Love This Recipe
- Comforting and Creamy: This gnocchi dish offers a velvety sauce that wraps around each piece, making it an indulgent comfort food perfect for any occasion.
- Quick and Easy: With minimal prep and cook time, this recipe is perfect for a weeknight dinner, allowing you to enjoy a delicious meal without spending hours in the kitchen.
- Flavorful Ingredients: The combination of sun-dried tomatoes, garlic, and spinach creates a delightful medley of flavors that elevate the dish and tantalize your taste buds.
- Customizable: This recipe allows for easy modifications; you can add protein like chicken or shrimp or swap in your favorite vegetables to suit your preferences.
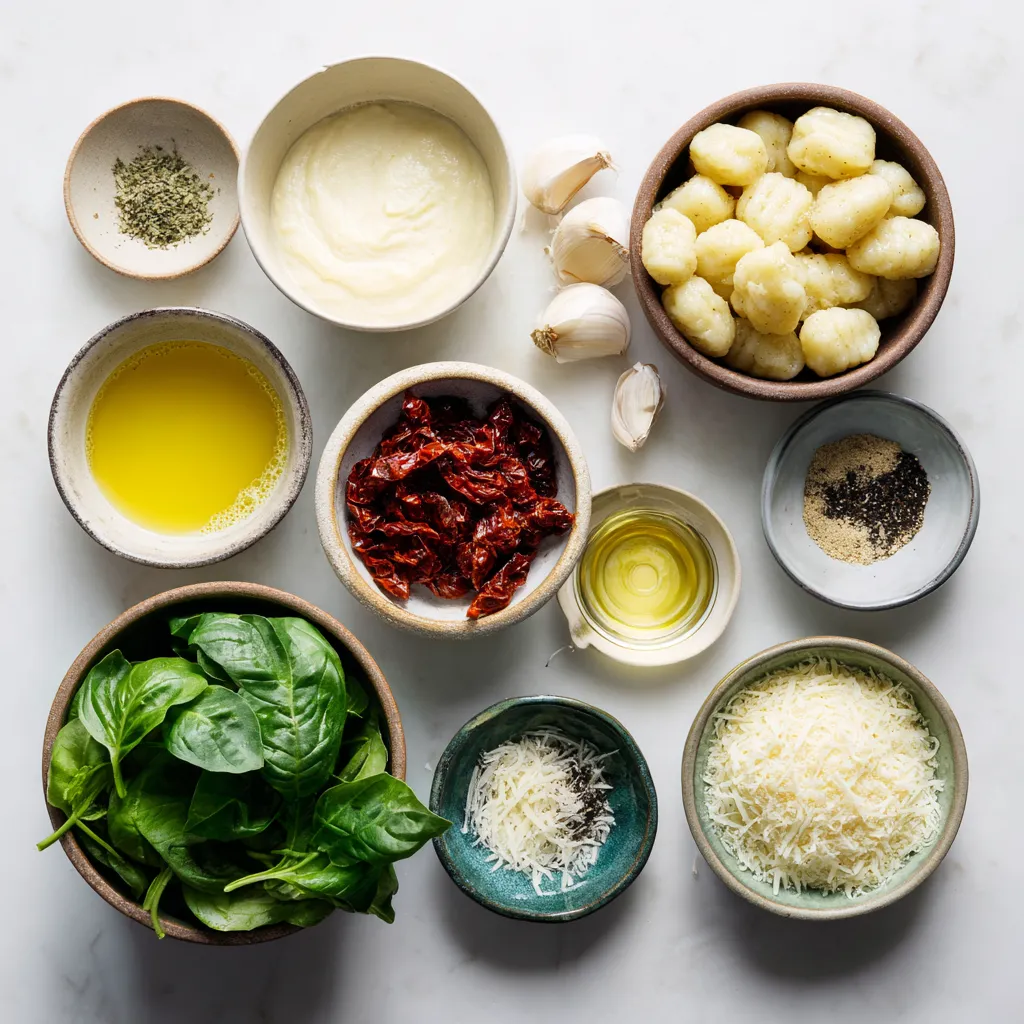
Ingredients
List of Ingredients
- Gnocchi Types: Store-bought vs. Homemade
- You can use 1 pound of gnocchi. Store-bought gnocchi saves time. Homemade gnocchi adds a personal touch. Both options taste great in this dish.
- Importance of Quality Sun-Dried Tomatoes
- Use 1 cup of sun-dried tomatoes, chopped. I suggest using tomatoes packed in oil. They offer rich flavor and moisture. Good quality tomatoes make a big difference.
- Suggested Ingredients: Variations and Substitutes
- For the sauce, include 1 cup of heavy cream. You can swap heavy cream with half-and-half for a lighter option. Add 1 tablespoon of olive oil for sautéing. Use 3 cloves of minced garlic for flavor. I recommend 1 teaspoon of Italian seasoning for that classic taste. Don’t forget salt and pepper to taste. Add 1 cup of fresh spinach for color and nutrition. Finally, use ½ cup of grated Parmesan cheese for creaminess. Fresh basil leaves make a lovely garnish. Enjoy adding your twist to this delightful dish!

Step-by-Step Instructions
Cooking the Gnocchi
How to Determine When Gnocchi is Done
To tell if gnocchi is done, watch for them to float. When they rise to the top, they are ready. This usually takes just a few minutes. Be careful not to overcook them, as they can become mushy.
Tips for Draining Gnocchi Effectively
When the gnocchi finish cooking, use a colander to drain them. Be gentle while draining, so they don’t break apart. You can also toss them lightly with a bit of olive oil to prevent sticking.
Preparing the Sauce
Sauteing Garlic to Avoid Burning
Heat your olive oil in a skillet over medium heat. Once hot, add minced garlic and stir often. Cook it until fragrant, which takes about one minute. Do not let it brown, as burnt garlic can taste bitter.
Infusing Flavor: Importance of Temperature
Keeping the oil at medium heat helps the garlic release its flavor. If the oil is too hot, it can burn the garlic. Always watch the heat to ensure a perfect flavor base for your sauce.
Combining and Finishing the Dish
How to Integrate Spinach Without Overcooking
Add chopped spinach to the skillet after mixing in the cream. Toss gently to coat the spinach without cooking it too long. The spinach will wilt quickly, which helps keep its bright color and nutrients.
Achieving the Perfect Cream Consistency
Pour in heavy cream slowly while stirring. Increase the heat to bring the sauce to a gentle simmer. Let it cook for a few minutes until it thickens. Stir in grated Parmesan cheese until it melts, creating a rich, creamy sauce.
Tips & Tricks
Enhancing Flavor
Adding Extra Herbs or Spices
To boost the flavor, consider adding fresh herbs like parsley or thyme. These herbs bring brightness and depth. You can also add a pinch of red pepper flakes for a little heat. This will create a nice contrast to the creamy sauce.
Balancing Creaminess and Tanginess
A splash of lemon juice or a little balsamic vinegar can add tanginess. This helps balance the rich creaminess. Start with a small amount and taste as you go. You want to enhance the dish without overpowering it.
Serving Suggestions
Best Accompaniments for Creamy Gnocchi
This dish pairs well with a simple side salad. A fresh arugula salad with lemon vinaigrette works nicely. Garlic bread also makes a great side, perfect for soaking up the creamy sauce.
Ideal Wine Pairings
For wine, a crisp white like Pinot Grigio is a great choice. It cuts through the cream and complements the sun-dried tomatoes. If you prefer red, try a light-bodied Pinot Noir. It won’t overwhelm the flavors of the dish.
Pro Tips
- Use Fresh Ingredients: Always opt for fresh spinach and high-quality sun-dried tomatoes for a more vibrant flavor in your creamy gnocchi.
- Customize the Cheese: Feel free to substitute Parmesan with Pecorino Romano or a blend of cheeses for different flavor profiles.
- Adjust the Creaminess: For a lighter version, you can replace some of the heavy cream with vegetable broth or half-and-half.
- Gnocchi Cooking Tip: If making homemade gnocchi, ensure they are not overcooked for the best texture. They should be light and fluffy.

Variations
Different Protein Additions
You can easily change the protein in creamy sun-dried tomato gnocchi. Try adding chicken, shrimp, or tofu for added flavor and texture.
- Chicken: Cook bite-sized pieces in the skillet until they are golden brown. Add them with the sun-dried tomatoes for a hearty meal.
- Shrimp: Use peeled and deveined shrimp. Add them after sautéing the garlic. Cook until they turn pink, then follow with the sun-dried tomatoes.
- Tofu: For a vegetarian option, use firm tofu. Cube it and sauté until golden before adding it to the sauce.
Vegetarian protein options are great for variety. You can use lentils or chickpeas. These add a nice texture and boost protein levels.
Alternative Sauces
If you want to make the dish vegan-friendly, swap heavy cream with coconut milk or cashew cream. Both options will give you a creamy texture with a unique taste.
- Coconut Milk: It adds a subtle sweetness and pairs well with sun-dried tomatoes.
- Cashew Cream: Soak cashews in water, then blend with water until smooth. This creates a rich and creamy base.
You can also try tomato-based variations. Adding crushed tomatoes or tomato sauce can make it lighter. Cook the tomatoes with garlic before adding gnocchi for a fresh twist.
Experimenting with these variations can make your creamy sun-dried tomato gnocchi unique every time!
Storage Info
Storing Leftovers
To keep your creamy sun-dried tomato gnocchi fresh, store it in an airtight container. Place it in the fridge right after it cools down. This helps to avoid bacteria growth.
- Best Practices for Refrigeration: Use a clean spoon to serve out portions. This prevents cross-contamination. Make sure the lid is tightly sealed to keep the moisture in.
- How Long Will It Last?: If stored properly, it will last about 3 to 4 days. After that, the flavors may fade.
Reheating Tips
When it’s time to enjoy your leftovers, reheating is key. You want to keep the gnocchi creamy and tasty.
- Best Methods for Maintaining Texture: Reheat it in a skillet over low heat. Add a splash of cream or water to help it warm evenly. Stir gently to avoid breaking the gnocchi.
- Adjusting Consistency When Reheating: If it gets too thick, add a little more cream or water. This helps bring back the creamy texture. Enjoy every bite!
FAQs
What is Gnocchi Made Of?
Gnocchi is a type of pasta. It is soft and pillowy. Common ingredients in gnocchi include:
- 1 pound gnocchi (store-bought or homemade)
- Potatoes or flour
- Eggs (sometimes)
The main ingredients create a light texture. Some recipes use ricotta cheese, too. This adds richness and flavor.
Can I Use Dried Sun-Dried Tomatoes?
Yes, you can use dried sun-dried tomatoes. They offer a strong flavor. However, they may lack moisture. This can change the dish’s texture. To use them, soak the dried tomatoes in hot water for about 20 minutes. This helps them soften. After soaking, chop them and add to your dish.
How Can I Make Creamy Sun-Dried Tomato Gnocchi Spicier?
To add heat, try these suggestions:
- Add red pepper flakes while cooking the sauce.
- Mix in chopped jalapeños or fresh chili peppers.
- Stir in some hot sauce before serving.
These simple changes will give your dish a spicy kick. Adjust the amount to fit your taste!
This blog post covered the key aspects of making creamy sun-dried tomato gnocchi. We talked about the types of gnocchi, the importance of quality ingredients, and step-by-step cooking tips. Remember, cooking is about flavor and fun. So feel free to play with ingredients and personalize your dish. Store leftovers properly, and reheat them right to keep that great taste. Enjoy every bite and impress your friends with your new skill

Creamy Sun-Dried Tomato Gnocchi
Ingredients
- 1 pound gnocchi (store-bought or homemade)
- 1 cup sun-dried tomatoes, chopped (preferably in oil, drained)
- 1 cup heavy cream
- 1 tablespoon olive oil
- 3 cloves garlic, minced
- 1 teaspoon Italian seasoning
- to taste salt and pepper
- 1 cup fresh spinach, roughly chopped
- 0.5 cup grated Parmesan cheese
- for garnish fresh basil leaves
Instructions
- Cook the Gnocchi: Bring a large pot of salted water to a vigorous boil. Carefully add the gnocchi, cooking according to the package instructions, typically until they float to the surface, indicating they are done. Once cooked, drain the gnocchi in a colander and set aside.
- Prepare the Sauce: In a large skillet, heat the olive oil over medium heat. Once the oil is shimmering, add the minced garlic and sauté for about 1 minute, stirring frequently, until fragrant. Be cautious not to let the garlic brown.
- Add Sun-Dried Tomatoes: Fold in the chopped sun-dried tomatoes and sprinkle in the Italian seasoning. Sauté the mixture for an additional 2-3 minutes, allowing the tomatoes to warm through and infuse the oil with their flavor.
- Create the Creamy Base: Slowly pour in the heavy cream, stirring continuously. Increase the heat slightly and bring the mixture to a gentle simmer. Allow it to cook for 3-4 minutes, which will help the sauce thicken and develop a rich texture.
- Combine Ingredients: Gently add the cooked gnocchi back into the skillet along with the roughly chopped spinach. Toss everything together to ensure the gnocchi are nicely coated in the creamy sauce. Cook for an additional 2-3 minutes, until the spinach wilts and integrates into the dish.
- Finish with Cheese: Stir in the grated Parmesan cheese, allowing it to melt into the sauce, creating a wonderfully creamy consistency. Taste and season with salt and pepper to your preference.
- Serve: Remove the skillet from heat. Plate the creamy gnocchi generously, ensuring each serving is adorned with flavorful sauce. Garnish with fresh basil leaves on top for an aromatic and vibrant finish.


![- 1 lb (450g) chicken breast, thinly sliced - 1 cup fresh Thai basil leaves, packed - 3 cloves garlic, minced - 2 red Thai chili peppers, thinly sliced (adjust based on your spice preference) For this dish, I prefer chicken breast. It cooks quickly and stays juicy. Fresh Thai basil gives this meal its unique flavor. Garlic adds a nice aroma, and Thai chili peppers bring heat. You can control the spice by adding more or less chili. - 2 tablespoons soy sauce - 1 tablespoon oyster sauce (or substitute with mushroom sauce for vegetarian) - 1 tablespoon fish sauce (or an extra tablespoon of soy sauce for vegetarian) - 1 teaspoon sugar (to balance flavors) - 1 tablespoon vegetable oil (for frying) These sauces are key to great taste. Soy sauce offers saltiness, while oyster and fish sauces add depth. Sugar balances the salty flavors, making everything taste better. - 1 bell pepper, sliced (your choice of color for visual appeal) - 1 small onion, sliced into thin wedges - Optional: other vegetables for added nutrition I like using bell pepper and onion for color and crunch. You can add other veggies like carrots or snap peas. They bring more nutrition and flavor, making the dish more vibrant. For the full recipe, refer to the [Full Recipe]. To start, you need to combine the chicken with the sauces. In a medium bowl, add the sliced chicken breast, soy sauce, oyster sauce, fish sauce, and sugar. Mix these ingredients well so the chicken gets all the flavor. Let it marinate for 15 minutes. This short time helps the chicken absorb the tasty sauces. Next, heat the vegetable oil in a large skillet or wok over medium-high heat. You want the oil to shimmer before adding anything. Then, add the minced garlic and sliced Thai chili peppers. Stir-fry them for about 30 seconds until they smell amazing. Be careful not to burn the garlic. Now, add the marinated chicken to the pan. Spread it out evenly for even cooking. Stir-fry for about 5 to 7 minutes. Cook until the chicken is no longer pink and has a nice brown color. After that, toss in the sliced bell pepper and onion. Stir-fry for another 3 to 4 minutes. This will make the vegetables tender but still crisp. Once the chicken and veggies are done, take the skillet off the heat. Gently fold in the fresh Thai basil leaves. They will wilt quickly from the heat and add a lovely aroma. Serve the dish hot, over a bed of fluffy jasmine rice. This rice complements the stir-fry well. Enjoy your Thai Basil Chicken Stir-Fry! For the full recipe, check out the details above. Using fresh ingredients makes a big difference. Fresh Thai basil gives a sweet and fragrant flavor to the dish. Always choose bright green basil leaves. They should smell strong and sweet. The chicken should be fresh, too. This keeps your stir-fry tasty and safe to eat. For the best flavor, cook on high heat. A hot pan helps to sear the chicken. This adds a nice caramel color and enhances the taste. When you add garlic and chili, cook them quickly. This brings out their strong flavors without burning them. You can change the heat level easily. If you want it milder, remove the seeds from the chili peppers. You can also use fewer peppers or substitute with sweet bell peppers. If you like a kick but want it less spicy, try adding sugar. It balances the heat. You can also use a bit of honey for sweetness without heat. Pair your Thai basil chicken stir-fry with jasmine rice. The rice absorbs the sauce well. You can also add a side of steamed veggies for extra nutrition. For garnishes, consider adding lime wedges or crushed peanuts. They add color and crunch. Fresh cilantro or extra basil leaves also make it pop. Enjoy your meal with these simple touches! For the full recipe, check out the details above. {{image_4}} For a vegetarian or vegan version, you can swap chicken for tofu or tempeh. These options give a nice texture. Use mushroom sauce instead of oyster sauce. It brings depth and umami flavor. For the fish sauce, simply add an extra tablespoon of soy sauce. This keeps the taste bold. To maintain flavor, marinate the tofu or tempeh just like chicken. Allow it to soak up the sauces. When cooking, make sure to press out excess moisture. This helps achieve that nice, crispy texture we all love. If you want to try something new, switch the chicken for shrimp or beef. Shrimp cooks quickly, so cut down the cooking time to about 3-4 minutes. Beef takes longer. Slice it thin and cook it for about 6-8 minutes. Remember, cooking times change based on what protein you use. Always make sure your protein is fully cooked before adding in the veggies. Want to shake things up? Add sauces like teriyaki or sriracha for an exciting twist. Teriyaki gives a sweet flavor, while sriracha adds heat. You can even mix both for a sweet and spicy kick. Feel free to experiment with herbs and spices too. Adding cilantro or mint can brighten the dish. Try a sprinkle of lime juice for an extra zest. These tiny changes can create a whole new taste experience. For the full recipe, check the section above. Enjoy cooking! To keep your Thai basil chicken stir-fry fresh, store it in an airtight container. Refrigerate the leftovers within two hours of cooking. If you want to save it longer, freeze the stir-fry. Make sure to cool it completely before freezing. This method helps retain flavor and texture. When you reheat your stir-fry, use a skillet for the best results. Heat it over medium warmth and stir often. This keeps the chicken juicy and prevents it from drying out. For rice, add a splash of water and cover it. This helps the rice steam and become fluffy again. In the fridge, your Thai basil chicken stir-fry lasts up to four days. If frozen, it can last for about three months. Always check for off smells or changes in color. If you see these, it's best to discard it for safety. Thai Basil Chicken Stir-Fry has roots in Thai street food. This dish reflects the vibrant flavors of Thai cuisine. It showcases fresh herbs, bold spices, and simple cooking techniques. Thai basil, known for its unique flavor, is key to this dish. It adds a sweet and slightly spicy note that enhances the chicken. This meal represents the balance of sweet, salty, and spicy tastes typical in Thai dishes. Each bite transports you to bustling markets in Thailand. Yes, you can prepare Thai basil chicken stir-fry in advance. Cook and store it in the fridge for up to three days. To keep it fresh, store it in an airtight container. When you are ready to eat, simply reheat it on the stove. This dish tastes even better the next day as flavors meld. Serve it over freshly cooked jasmine rice for a quick meal. If you cannot find Thai basil, you have options. Sweet basil or holy basil works well as a substitute. Sweet basil offers a milder flavor, while holy basil is spicier. You can also mix in a bit of mint for a fresh twist. While these substitutes change the taste slightly, they still create a tasty dish. Just remember, the flavor will differ from the original recipe. The spice level of Thai Basil Chicken Stir-Fry can vary. It depends on the number of Thai chili peppers you use. Typically, this dish has a mild to medium heat. If you prefer a milder dish, use fewer chilis or remove the seeds. For those who love heat, add extra chilis or a dash of hot sauce. Adjusting spice levels allows everyone to enjoy this flavorful meal. Thai Basil Chicken Stir-Fry is a simple yet flavorful dish. You learned about the key ingredients, like fresh basil and chicken. The step-by-step instructions make cooking easy, even for beginners. We explored tips to enhance flavor and adjust spice levels to suit your taste. You can even try fun variations with different proteins or herbs. Enjoy making it your own, and savor the fresh flavors. Every bite will bring joy to your table.](https://dishtreats.com/wp-content/uploads/2025/06/20a2f9de-1755-4b6a-ade1-393123d10e24-768x768.webp)
![- 4 boneless, skinless chicken breasts - 1 cup finely grated Parmesan cheese - 1 cup panko breadcrumbs - 2 teaspoons garlic powder - 1 teaspoon onion powder - 1 teaspoon dried Italian herbs - Salt and pepper to taste - 2 large eggs - 2 tablespoons olive oil - 1 tablespoon fresh parsley (for garnish) This dish starts with simple, fresh ingredients. The chicken breasts are the star, offering lean protein. The Parmesan cheese gives a rich, savory flavor. I love panko breadcrumbs for their crunch. They make the crust crispy and delightful. For seasoning, I use garlic and onion powders. They add depth to the chicken. Dried Italian herbs bring a nice touch of flavor. Don't forget salt and pepper for balance. The breading mixture includes eggs and olive oil. The eggs help the coating stick well. Olive oil adds richness. Fresh parsley is for garnish. It brightens up the dish and adds color. You can find the full recipe in the article for more details. Each ingredient plays an important role in making this dish a winner. - Preheat your oven to 400°F (200°C). - Line a baking sheet with parchment paper or grease it with olive oil. - Combine 1 cup of finely grated Parmesan cheese, 1 cup of panko breadcrumbs, and the seasonings. You can use 2 teaspoons of garlic powder, 1 teaspoon of onion powder, and 1 teaspoon of dried Italian herbs. Add salt and pepper to taste. Mix everything well in a bowl and set aside. - Take 4 boneless, skinless chicken breasts. Dip each breast into the egg mixture, then coat it in the breadcrumb mix. Make sure to cover it completely. Arrange the coated chicken on the baking sheet, leaving space between each piece. - Drizzle olive oil (2 tablespoons) over the coated chicken for added flavor and crispiness. - Bake the chicken for 25-30 minutes. It is ready when it turns golden and reaches an internal temperature of 165°F (75°C). You can find the full recipe to follow along while you cook. To get that amazing crispiness, you need an even coating. Make sure to press the breadcrumb mixture onto the chicken well. This helps the crust stick. Drizzle a little extra olive oil on top before baking. This oil adds a great crunch and helps the chicken brown nicely. Want to kick up the taste? Try adding different spices to the breadcrumb mix. You can mix in paprika for a smoky flavor or some crushed black pepper for a bit of heat. Fresh herbs like thyme or rosemary can also add a nice touch. Experiment until you find your favorite blend! This dish pairs well with lemon wedges. Squeeze some lemon juice over the chicken for brightness. A fresh salad is also a great side. It balances the meal and adds crunch. Try a simple green salad with a light vinaigrette to round out your plate! For the full recipe, check out the [Full Recipe]. {{image_4}} You can make this dish even more delicious by adding cheese. Try mixing in shredded mozzarella for a cheesy twist. This extra layer of gooey goodness makes every bite special. You can also use different types of cheese. Parmesan pairs well with cheddar, gouda, or even pepper jack. Each choice brings a new flavor to the table. For those who like a kick, add crushed red pepper flakes to the breadcrumb mix. This small change can bring big heat. Adjust the amount to suit your taste. Just a pinch can make your chicken sing with flavor. If you want a low-carb version, swap panko for almond flour. Almond flour gives you a nice crunch without the carbs. This option is great for anyone watching their carbs. It keeps the dish light while still being tasty. For the Full Recipe, you’ll find all the details you need to make this meal shine. Store leftovers in an airtight container in the fridge for up to 3 days. This keeps the chicken fresh and safe to eat. When ready to enjoy, just take it out and reheat. You can freeze the breaded chicken before baking for up to 2 months. This option is great for meal prep. Just coat the chicken and place it in a freezer-safe container. When you are ready to cook, bake it straight from the freezer. Reheat in the oven to maintain crispiness rather than using the microwave. Preheat your oven to 350°F (175°C) and bake for about 10-15 minutes. This way, your chicken will stay crunchy and delicious. Enjoy it as if it was freshly made! Yes, chicken thighs can be used for more flavor and moisture. Chicken thighs are juicier than breasts. They provide a rich taste that pairs well with the crispy coating. You can follow the same steps in the recipe. Just adjust the baking time if needed. Serve with pasta, steamed vegetables, or a simple green salad. Pasta with olive oil and garlic makes a great side. Steamed broccoli or green beans add color and nutrients. A light salad with lemon dressing balances the meal perfectly. These options make dinner fun and flavorful! Reduce ingredient quantities accordingly while maintaining ratios. For example, if you need two servings, simply cut the chicken and other ingredients in half. This keeps the flavors balanced and the dish just as tasty. You can easily scale it up or down based on your needs. This post outlined how to make Baked Parmesan Crusted Chicken, from ingredients to storage tips. We covered key steps, including creating a crispy coating and baking methods. To achieve perfect results, remember to coat evenly and explore flavor options. Enjoy this dish with sides like pasta or salad. With easy adjustments for servings, this recipe fits any table. Try it out and savor every bite!](https://dishtreats.com/wp-content/uploads/2025/07/ab4c9608-7523-42b9-8dc2-3e25f574410b-768x768.webp)


